Sunday, September 29, 2013

Sony's FDR-AX1 Handycam puts 4K recording in the grasp of prosumers (eyes-on)

We assure you, the camera above is not Sony's HDR-AX200.

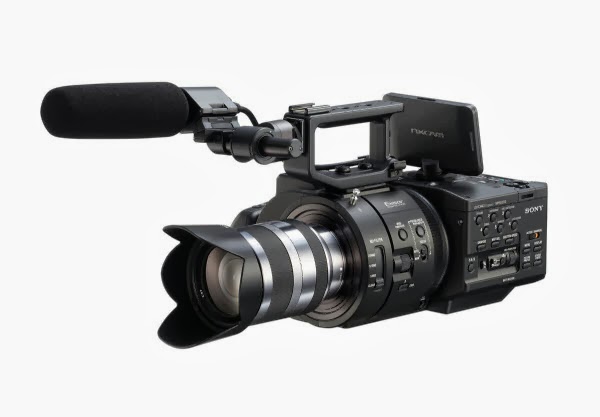
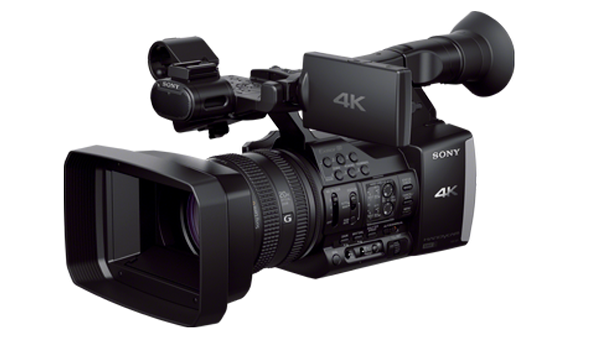
Model Highlights: 4K/60p video Ultra HD, 1/2.3" 8.3MP Exmor R® CMOS image sensor, real-time 4K/60 fps recording, 3 ND filters and 6 paint functions, Sony G Lens with 20x (31.5-630mm) zoom, built-in mic with 2x additional Pro XLR jacks.


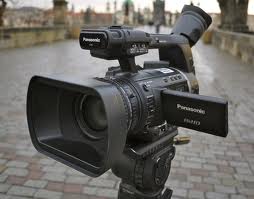
While it shares a similar body, this is the new FDR-AX1 that leaked this morning -- a fixed lens 4K videocamera for prosumers, priced at a cool $4,500. Although JVC beat Sony to the market with its $5,000 kit, Sony's vying to have the upper hand with the tech inside its take, namely by using its XAVC S format. It works by capturing video in MPEG-4 AVC/H.264 Long GOP and audio in linear PCM, which all gets saved in an "MP4 wrapper." To handle the massive amount of data throughput from its 4k/60p stream, the camcorder records to QXD cards (two slots are onboard) which, until now, haven't had much use outside of Nikon's D4. A 64GB card will net you two hours of 4K video, while downscaling to 1080/60p adds an extra hour on top of that.

Video gets captured by a 1/2.3-type Exmor R CMOS sensor and a 20x optical zoom (31.5-630mm) G lens, which comes equipped with a trio of ND filters and Optical SteadyShot. As you'd expect, there are a plethora of manual controls, powered stereo XLR inputs, a 3.2-inch display and a viewfinder on back. It's worth noting that while the AX1 won't be HDMI 2.0 compliant at first, Sony's planning a firmware update down the line to enable it. Until that occurs, it'll only be able to transfer HDMI video over to Sony's existing 4K TVs. We're also told that the camcorder will work with SD cards for shooting in HD.

If you don't care for the flexibility of interchangeable lenses or need something more affordable than the likes of a RED Scarlet, the FDR-AX1 can be yours this October. Sweetening the deal just a little more, Sony will also throw in a 32GB XQD card and a full copy of Vegas Pro 12 to ensure you can get started out of the box. Check out our eyes-on gallery with the prototype seen above in the meantime.

Related topics:

Sony Announces New PXW-Z100 4K Camcorder
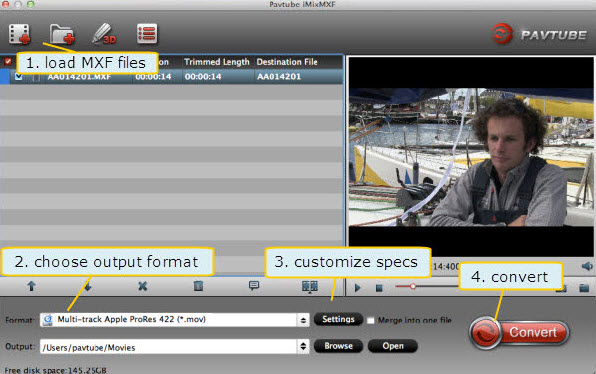
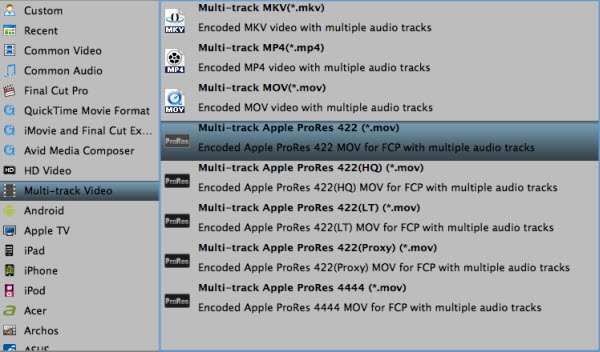
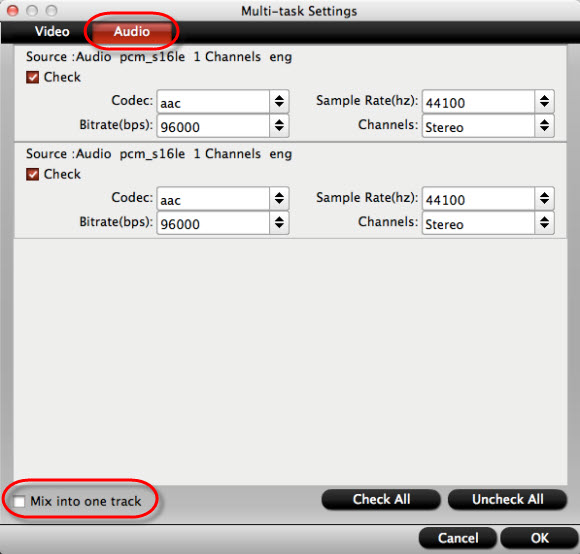
Make Blackmagic Camera 4K footage editable in FCP
Convert 4K Video for editing with Mac in FCP, Avid, iMovie, Premiere, FCE

Saturday, September 28, 2013

Fast Way for importing Sony FS700 50/60p mts footage in Avid Media Composer

In this article, you will learn how to transcode Sony FS700 50/60p MTS to DNxHD MOV for Avid Media Composer editing without any importing problems on Mac.


The file I'm trying to import is AVCHD from my Sony NEX-FS700 at 1080p50 into Avid MC 6.5 via AMA. AVCHD-MTS AMA-plugin is installed but result in an error message. So I'm was asking here to figure out how to get the mts files from FS700 into Avid without any issue?

In fact, Avid can't import Sony FS700 recorded 1080 50/60p AVCHD video, the frame rate is so high and the codec is not friendly to AMC for editing. On Avid official website, Avid only works with standard film and broadcast formats. Although, Avid MC has added some plug-ins, actually background converters for the high-definition video format AVCHD, the importing process are unbelievably slow.

As DNxHD codec is the first choice for editing in Avid Media Composer, so in order to import the Sony FS700 50/60p AVCHD to Avid for editing, the easy workaround is to transcode MTS to Avid MC compatible DNxHD .mov format.

Here, Pavtube HD Video Converter for Mac does a good job in converting Sony FS700 50/60p AVCHD to Avid Media Composer preferred DNxHD format with best video quality. Following we will offer you a tutorial on importing and editing Sony NEX-FS700 50/60p AVCHD to Avid Media Composer on Mac.

1.Download the best Sony mts to Avid Converter, follow the prompts to install the program. Click "Add Video" to load Sony FS700 60p MTS video files or directly drag the files into file list.


2. Click "Format" bar to choose Avid Media Composer -> Avid DNXHD (*.mov), this format is best presetted for Avid Media Composer editing.


Tips:

Pavtube Sony AVCHD Converter for Mac can also convert Sony FS700 60p mts files to FCP, iMovie and FCE, QuickTime, Adobe Premiere Pro, Adobe After Effects, DaVinci Resolve or Apple Aperture 3 compatible video format for editing.

a. For FCP and Aperture 3: Click and choose "Final Cut Pro -> Apple ProRes 422(*.mov)" as the output format. FCP 6 only can support ProRes 422 and ProRes 422(HQ) codec.
b. For iMovie and Final Cut Express: Click and choose "iMovie and Final Cut Express -> Apple InterMediate Codec (AIC) (*.mov)" as the best output codec.
c. For Adobe Premiere Pro and After Effects: Click "Adobe Premiere/Sony Vegas", choose "MPEG-2 (*.mov)" or "MOV(AVC)(*mov)" or "WMV (VC-1)(*.wmv)" as the best video format.
d. For playing Sony AVCHD video on QuickTime: Choose "Common Video -> MOV-QuickTime(*.mov)" as the best video format.
3. "Settings" button in the main interface is very useful for you to customize the Video Codec aspect ratio, bit rate, frame rate,Audio codec, sampling rate, bit rate, channels.

4. After these, you can click "Convert" to start to transcode Sony FS700 50/60p MTS to Avid DNXHD codec for native editing in Avid Media Composer.

Hope this guide: "How to import/edit Sony FS700 50p/60p MTS to Avid Media Composer"can do great help to you. Happy every day!

Read More:

Wednesday, September 25, 2013

Canon MVI Video Converter- Simple way to convert Canon MVI to AVI format

Summary: This article will give you a brief guide to easily convert Canon MVI to AVI format for smooth playback and editing work. 


Hot search: Canon C100 MTS to Sony Movie Studio | Canon EOS 70D MOV to DaVinci Resolve | Canon XF for FCP X | Canon G7 X MP4 to Premiere Pro CC | Canon EOS 5DS MOV to Windows Movie Maker 

Easy question, hoping for an easy answer.Using Canon digital for videos and my clips come up in mvi format which does not work for sending etc. Does anyone know how to convert from mvi to avi format? 

MVI stands for Musical Video Interactive, a DVD based means of packing audio, video and interactive visual content (for example lyrics) onto one disk. Canon PowerShot digital cameras save recorded movie files with a name beginning with "MVI_." 

When try to import those kinds of MVI files from Canon to some video editing software for editing or media player for playback, you will encounter incompatiblity issues. In that case, the simple way to successfully play or edit Canon MVI files is converting MVI to AVI format which is a more popular and supported video format by windows or mac. 

To get better work with MVI file, you can get help with this professional Video Converter and Video Converter for Mac from Pavtube, which can convert MVI to AVI with perfect quality and fast conversion speed. What's more, it is the ideal conversion tool that offers several editing functions like cropping video dimension, trimming file length, adjust playing effects, etc. The converted AVI videos are well supported by mobile phones, different portable devices, media players and editing programs. Following is our workflow. 


Other Download: 
- Pavtube old official address: http://www.pavtube.com/video_converter/ 
- Amazon Download: http://download.cnet.com/Pavtube-Video-Converter/3000-2194_4-75734821.html 
- Cnet Download: http://download.cnet.com/Pavtube-Video-Converter/3000-2194_4-75734821.html 


Part I: Transcode MVI to HD AVI for editing or playback 

1. Run Pavtube Video Converter as the best MVI to AVI Converter. Click "Add Video" or "Add from folder" icon to load MVI material from Canon. 


2. Choose "AVI HD Video (*.avi)" as target format from "HD Video" option. 


3. (Optional) You can click "Settings" button and enter "Profile Settings" panel to adjust video and audio settings if necessary. Users are free to reset codec, bit rate, frame rate, sample rate, and audio channels. 

4. Click the big button "Convert" to start converting MVI to AVI format. 

When all conversions finished, click "Open" to locate the generated files, you may go ahead to create your own masterpiece. 


Part 2: Import converted HD AVI for editing and playing

Launch Windows Movie Maker, Adobe Premiere Pro, and other applications, import your hd .avi files into them and or transfer them to your portable devices or media players for watching. 

Pavtube MVI Converter for Win/Mac other features: 

1. It can rip and convert latest DVD and Blu-ray disc. And it is a great tool to backup discs: "Copy the entire disc" will 1:1 backup the whole movie with original structure, and "Directly Copy" can copy the main movie of the disc without menu and titbits. 

2. You are allowed to edit the video, such as trim, crop, add watermark of text, image and video, attach subtitle, etc. 

This integrated software will give you more than you have to do. 


More related tips: 


This weekend Pavtube offers up to 35% off Blu-ray/DVD Ripper & Video Converter, the best yet easy-to-use tools to convert your BD/DVD/video files into MP4, MOV, MKV, AVI, ProRes, HEVC...onto smartphone, tablet computer, media player, stream server, TV set, game console, VR headset, hard drive, etc. with multiple wanted audio/language/chapter markers! 

Pavtube Upgrade Promotion: Up to 35% Video Converters : http://videostepconvertmap.blogspot.com/2015/08/upgrade-pavtube-add-prorestvh265-mkv.html 

Tuesday, September 24, 2013

Best blu-ray ripper- Editing Blu-ray Discs with Apple Final Cut Pro


Description
: Want to import Blu-ray movies in Final Cut Pro? The following article will show you how to transcode Blu-ray to Apple Prores 422 for FCP editing on Mac.


Blu-ray is getting more and more popular for its large storage and excellent quality so that many people prefer watching Blu-ray movies at home. And what's more, digitizing your blu-ray discs collection is an ideal form of insurance against damage, theft or loss, therefore some folks will have the need to edit blu-rays in nonlinear editing programs such as FCP,  iMovie/FCE, Adobe Premiere, Avid Media Composer etc on Mac before storing or playback.

Now I am testing to import a Blu-ray disk into Final Cut Pro but only find that is the Blu-ray files are not readable by FCP (no matter the version FCP 6/7/X). So in this case, it comes with the question that how can us rip blu-rays and edit blu-ray movies in FCP?

From Apple, we know that FCP most prefers Apple Prores codec for editing. So the quick and easy way to do solve the problem is to convert Blu-rays to FCP compatible prores before importing. After lots of searching in google, finally we got this a powerful blu-ray converting program to help with ingesting blu-ray to FCP on mac. That is Blu-ray Ripper for Mac from Pavtube, which does a good job in decrypting and transcoding blu-rays to Prores so that you can easily get blu-ray discs to work with FCP perfectly.

Get the best Mac Blu-ray to FCP Ripper (30% off now) installed and follow the guide below:


How to transcode Blu-ray to Prores for editing in Final Cut Pro on Mac

Step 1. Load your blu-ray disc.

There is a disc icon on the top left which let you load from disc, folder or ISO/IFO respectively.


Step 2. Choose Output format.

For editing in FCP, the Apple Prores is preferred. Click Format and choose Final Cut Pro>Apple Prores 422 Codec(*.mov).


PS: It has various profiles and formats so that you can rip blu-ray to various formats according to your needs.

Step 3. Set up frame rate, bitrate, or other output settings and add subtitles.

a. Click Settings, you can find file details including codec, size, bitrate and frame rate. You are able to fix them according to your needs. FYI: the higher bitrate you choose, the better video quality it outputs.


b. Sometimes subtitle on Blu-ray discs is not what you want, for example, the original subtitle is in English, you may not read it exactly and you need a Francais subtitles. Now the software allows loading *.srt and *.ass subtitles files. You can download any *.srt and *.ass subtitles files you want then load in the software for output.


If you wanna add external subtitles(like *.srt, *.ass and *.ssa) in video, only click "Edit", choose "Subtitle" > "Enable", you need download a subtitle file, then click "Browse" to load it.
You can get to konw the best and top 5 Subtitle Sites to download subtitles you need here.


Step 4. Now just press the big circular "Start Conversion" button to start converting Blu-ray movies to Prores for Final Cut Pro on Mac.


Tips:

1. Refer to here to learn how to import video files into FCP.

2. Here are some step-by-step guides of how to import Blu-ray to iMoviehow to rip DVD to FCP and convert DVD for FCE.

3. If you wana to convert Blu-ray to FCP with multiple audio and subtitle tracks, please go to Pavtube Bytecopy for Mac.

Click Pavtube Special Offer page to get more discount:

ByteCopy($42) + Blu-ray Video Converter Ultimate($65) = only $80 Save $27
ByteCopy($42) + Video Converter($35) = only $60 Save $17
ByteCopy($42) + MXF MultiMixer($45) = only $70 Save $17
ByteCopy($42) + DVD Creator($35) = only $60 Save $17
ByteCopy($42) + ChewTune($29) = only $54 Save $17

Sunday, September 22, 2013

Does iMovie 9 recognise 1080p MTS video from Panasonic HC-X920?


Summary: How to get iMovie 9 to work with 1080p mts footage from Panasonic HC-X920 perfectly? The is easy workaround to convert Panasonic MTS to AIC Codec for natively using AVCHD file in iMovie.


The 2013 collection is no different, and what better place to start than the new Panasonic consumer flagship, the HC-X920.  With the WiFi-enabled X920, you can enjoy professional grade HD video you can share from anywhere. X920 records video with [AVCHD] AVCHD 3D / Progressive / [iFrame] MP4 format. If you use Panasonic HC-X920 for the 1080p 60fps mts recording and want to edit the 1080p mts files in iMovie 09. You will got problems as below: 

I also purchased X920 for the better clock rate and the newer AVCHD codec. My editing software iMovie 09 doesn't yet support the top recording standard 1080/60p. It is a easy to use camcorder, you won't go wrong with this model. So is it possible make it into reality to edit them in iMovie 09?

X920 is what I expected, have taken it to the beach, snow and have not had any issues, my children love the menu, easy for anybody to operated, no need of the viewfinder, best investment for your money. What's more, HC-X920 also supports the optional 3D lens, will recommend it to friends and family. Any suggestions for the X920 3D mts and iMovie 09 workflow?

I have a MacBook Pro Vs.10.6.8, which came with iMovie '09. I just bought a new X920 HD Camcorder 1080 it puts files in .MTS format. My iMovie does not support the files. It can't even pick them up. Do I need to upgrade to IMovie '11 to be able to edit my HD camcorder files (.MTS)? If so, that's a problem, becuase I got an error that said I can't upgrade because my Mac is too old (which it's only two years old). Or, should I just get another camera? 
iMovie 09 won't import the 1080p AVCHD (2D/3D) Videos. So, how to deal with Panasonic HC-X920 1080p AVCHD in iMovie 9? Well, as we know, iMovie native format is AIC .mov, so the best method to import 2D/3D AVCHD from Panasonic HC-920 to iMovie 9 smoothly is to convert the Panasonic AVCHD to AIC for editing along with some help from a 3rd-party Mac Pansonic AVCHD Converter. 

Fortunately, Pavtube MTS to iMovie Converter for Mac can exactly do favor for you. With it, you can convert Panasonic HC-X920 AVCHD to iMovie compatible AIC codec MOV format. There will be no problem to import AVCHD footage into iMovie 9 keeping audio and video synchronization on Mac.

With the Mac program, you can transcode AVCHD MTS/M2TS/M2T/TS files at 1080i, 1080p, and 720p to proper format for:

  • Editing on FCP, iMovie, FCE, Avid, Premiere, iPhoto and more;
  • Playing on portable devices(iPad, iPhone, iPod, Nexus 4, Nexus 7, Galaxy S4, S3, Tab 3, Tab 2, HTC One and so on);
  • Burning on Mac OS X
     
  • Uploading to YouTube, Vimeo, Facebook and more uses. 

What's more, the MTS/M2TS Converter for Mac supports adding .srt, .ass, .ssa subtitle to your videos or movies.  Aslo, it has added 3D profiles in Format menu. (Side-by-Side, Top-Bottom, or Anaglyph 3D in MKV/MP4/MOV/WMV/AVI)

In summary, it works very well in converting Panasonic HC-X920 1080p MTS files to AIC for editing in iMovie 9. You can download a free trail version: Pavtube MTS/M2TS Converter for Mac and follow the guide below:

Step 1. Add .mts files to the Mac MTS to iMovie Converter.

Launch the Mac MTS/M2TS to iMovie Converter. Click "Add Video" or "Add from folder" button to load your source .mts or .m2ts files from Panaonic HC-X920.


Tip: If you want lossless merge multiple MTS, M2TS files, pleas check the "Merge into one file" box.

Step 2. Choose iMovie native foramt as output.

To convert X920 MTS files to iMovie native foramt, please click "Format > iMovie and Final Cut Express", choose "Apple Intermediate Codec(AIC) .mov" as the best output format.


Tip: If you wanna edit the video/audio parameters, you need to go to "Settings" window.

Step 3. Start MTS to iMovie native foramt conversion.

Click the "Convert" button under the preview window, and the best Mac MTS to iMovie Converter will start converting Panasonic HC-X920 MTS clips to iMovie friendly AIC mov format on Mac OS X.

When the conversion is done, you will be directed to open the folder where you saved the converted files, and then you can import output video files to iMovie to edit.

Tips: 
1. If you want to import Panasonic MTS footage in FCP, only need to change step 2, choose "Format > Final Cut Pro > Apple ProRes 422 (*.mov)" as output format, or you can also refer to the guide.

2. If you want to edit Panasonic HC-X920 MTS footage in Avid Media Composer, only need to change step 2, choose "Format > Avid Media Composer > Avid DNxHD (*.mov)" as output format, or you can also refer to the guide

3. If you want to share Panasonic HC-X920 60p AVCHD video on Youtube, you can refer to this guide.

Editor's Recommendations

Tuesday, September 17, 2013

Why Premiere Pro and After Effects doesn't like Sony EX3 XDCAM files

Got Problems importing Sony PMW-EX3 xdcam mp4 footage into Premiere Pro/After Effects for further editing? Look no further, follow the easy workaround to achieve your goal smoothly.


Question:

I recently purchased two PMW-EX3 cameras for use here at my work, and I thought that I had them up and running perfectly but recently ran into a problem importing footage. When I shoot anything over around 13:40:00 long, PP CS4 will not import the entire length of the clip, only the first 13:40:00 (give or take a minute or two). When I play back the clips on the camera or in Sony's clip browser software I can play the entire duration of the clip. When I'm in PP using the Media Browser window to get to my footage, it even shows me the correct duration of the clip in the Duration column, but when I copy it over into my project bin, only that first 13 and a half minutes makes it. And a similar problem importing the files from EX3 into After Effects. AE only imports the first MP4 file of your clip and not the rest.

I've searched lots of other forums, and while I've seen various issues with importing XD EX footage into PPro and AE, I haven't seen this best solution yet

Sony PMW-EX3 can shoot XDCAM EX MP4 recording with true 1920x1080 resolution on dual SxS cards. As the XDCAM mp4 footage still cannot fully supported by some video editors like Adobe Premiere Pro and After Effects on Mac. So if you are using Premiere and AE for editing just like the above user, the best workaround for us is to convert Sony PMW-EX3 mp4 to Adobe Premiere Pro/After Effects most compatible MPEG-2 format, and it will make the editing work much smooth and easier. 

At first, you need to find a third party program to do EX3 files to MPEG-2 transcoding. As far as I konow, the best hd video converting program is Pavtube HD Video Converter for Mac, a powerful XDCAM Converter for Premiere/AE, which is use-to-use, capable of converting XDCAM video to various formats for editing with Premiere Pro, Avid Media Composer, Final Cut Pro, iMovie or FCE on Mac, and supports batch renaming painlessly. Download it here and get to konw the detailed steps as below.

Guide on transcoding Sony EX3 XDCAM to MPEG-2 for Premiere Pro and After Effects editing on Mac

Step 1: Install and run the best Sony XDCAM Converter for Mac. Click the “Add Video” or "Add from folder" button to import .mp4 files from the Sony EX3 camcorder. Join mp4 clips via checking the “Merge into one” box.


Step 2: Hit the Format box and select Adobe Premiere/Sony Vegas --> MPEG-2(*.mpg) as output format for editing EX3 XDCAM video in Premiere Pro and After Effects natively.


Step 3: Click the “Settings” icon to do some audio, video parameter settings like video bitrate, frame rate, audio sample rate, audio channel, etc. (Optional)

Step 4: Click the "Convert" button under the preview window, the Mac XDCAM Converter will start the conversion from EX3 to Adobe Premiere Pro/Adobe After Effects immediately.

After the conversion, you will be able to get the output files via clicking on “Open” button effortlessly. Afterwards, you can import Sony EX3 MP4 footages to Premiere Pro CS and After Effects for further editing easily.

XDCAM Related:

Sunday, September 15, 2013

Get FCP X work with Panasonic AG-HPX300 preserving multi-tracks

Summary: Anyone figured out how to import Panasonic AG-HPX300 MXF footage to FCP X? FCP X support P2 mxf files or not? The easy workaround aims to tell you how to get HPX300 MXF P2 mxf recognised by FCP X with preserving multi audio tracks.


I have some files recorded with a Panasonic AG-HPX300. They are MXF recordings in AVC-Intra and DVCPRO HD codec. How can import them to FCPX 10.4? The key point is I don't want to loss any of the audio channels that I recorded with two microphones. Is that any work flow for this?

Panasonic AG-HPX300 recording files in MXF format. Although FCP X says they have native support for MXF files, in fact, is doesn't support P2 MXF files well from AG-HPX300. And many users will fail to import Panasonic AG-HPX300 P2 MXF footage in FCP X directly as above.
 
To 
my knowledge, the simplest way to solve the incompatibility problem is just to convert Panasonic AG-HPX300 P2 MXF file to FCP X compatible format like Prores. mov. And in order to accomplish the goal without losing any tracks during conversion, come and meet this multi-audio track MXF Converter for Mac which can easily convert Panasonic AG-HPX300 MXF to Prores will all audio tracks preserved. And follow the step-to-step guide as below.

1. Connect your AG-HPX300 P2 camera to Mac and keep it on; get this multi-track MXF to FCP Converter installed. Now follow the top left two icons to load individual mxf or in batch. 


Tips:

Please make sure you have the entire MXF file structure as it saved on your camcorder’s P2 card. See MXF file structure on Panasonic’s P2 card as below. Pavtube iMixMXF is able to recognize audio tracks from ‘AUDIO’ folder automatically, which ensures the generated Prores .MOV files have both image and sound correctly.


2. Click "Format" and choose Multi-track Video>Multi-track Apple ProRes 422(*.mov) as the most compatible codec for FCP X editing.


3. Click "Settings" to free select needed video/audio tracks.

Check the tracks you need and left others unchecked, thus you can get Multi-track MOV with your needed audio streams. Note there’s a mix into one track icon on the bottom, it will combine all your checked audio tracks into single one.


With this Pavtube iMixMXF program, you can also add some personal subtitles in it like this which makes the play backing much easier:


4. Click the red "Convert" to easily convert Panasonic AG-HPX300 multiple video/audio track MXF to ProRes for FCP X. 

Just let it go and wait for a while to get this fresh hot multiple audio track ProRes MOV for FCP  X editing on Mac. 

P.S.

Pavtube also have a Mac MXF to FCP converter program for users that do not need to deal with multi-track video/audio files; only $29 is needed atm. Refer to here to quick look this MXF Converter for Mac.

Read more:
Import Panasonic AJ-HPX3100 P2 MXF into iMovie
Edit Panasonic AG-HVX200 P2 MXF in Avid MC
Premiere Pro and Panasonic P2 MXF Workflow 

Wednesday, September 11, 2013

Easy way to edit Sony F55/F5 XAVC files in Sony Vegas, After Effects, Pinnacle,Cyberlink, Windows Movie Maker


Summary: Do you've got or have you ever heard about Sony PMW-F55/PMW-F5 CineAlta 4K digital cinema camera? Now just follow the article to convert Sony F55/F5 XAVC on Windows for editing in Sony Vegas, After Effects, Pinnacle,Cyberlink, Windows Movie Maker, etc.


After the successful sale of PMW-F55 and PMW-F5 all over the world, Sony keeps on developing more new models so as to gain more market share and to solidify its position in the already-full HD cameras market. XAVC is a video format introduced by Sony on October 30, 2012 and records by F55 & F5 camcorder. It supports resolution (4096 * 2160 and 3840 * 2160) at up to 60 fps. To record videos, XAVC is among the most advanced formats.

With every new camera, come many new questions about workflow. The term "workflow" can be fairly broad, but today I am looking at the helpful tips for importing Sony F55/F5 XAVC footage into various non-linear editing systems (NLEs) on Windows plantform like Sony Vegas, After Effects, Pinnacle,Cyberlink, Windows Movie Maker, etc.

If you're working with XAVC on Windows, you will find the Sony F55/F5 XAVC files are not supported well by Windows PC.  In order to import Sony XAVC footage into Sony Vegas, After Effects, Pinnacle,Cyberlink, and windows Movie Maker for smoothly editing, we can render to the third-party software to help convert XAVC to AVI/MOV/WMV/MPG–Windows native format. This is the best way to assist XAVC users with Sony F55/F5 XAVC Windows editing workflow.

To achieve our goal, the quickest and easiest way is to use the easy-to-use yet professional software called Pavtube HD Video Converter (currently on sale with 20% off), with which, we can effortlessly and flawlessly transcode Sony F55/F5 XAVC footage to AVI/MOV/WMV/MPG for Sony Vegas, After Effects, Pinnacle,Cyberlink, and windows Movie Maker editing. It is safe to install and easy to use. And you can enjoy the powerful edit function, like trim, crop, watermark for text, image and video, 3D effect, subtitles and so on. Now free download and follow below step to convert Sony XAVC files on Windows for editing in Sony Vegas, After Effects, Pinnacle,Cyberlink, Windows Movie Maker.

Step 1. Load Sony F55/F5 XAVC files.

You can choose "add video" directly or "load files" to add the whole folder.


Step 2. Select output format for video editing software.

Click "Format" menu and choose "Adobe Premiere/Sony Vegas -> MPEG-2 HD Video (*.mpg)",or select WMV/MOV/MPEG-2, you can also choose "HD Video -> AVI HD Video (*.avi)". Finally, click the file icon beside output bar, and choose a destination folder for saving output files.


Step 3. Edit loaded Sony XAVC files.

Click "Edit" button and you are allowed to trim, crop, add text/image/video watermark or some effect to your output video for making it perfect. Here the function of adding subtitles to output files will contribute to make your own videos. You can use free software Subtitle Edit to edit your subtitle content then add it to output videos.


Tips: Click "Settings" on the interface and you can adjust the parameters including size, bitrate, frame rate, etc. to get a high quality of output files. And keep the settings the same as original video recordings will provide you the least loss of video quality.

Step 4. Start conversion.

Click the "Convert" button to start transcoding Sony F55/F5 XAVC footage for editing in Sony Vegas, After Effects, Pinnacle,Cyberlink, and windows Movie Maker. When it completed, click the "Open" button to get the generated videos for your editing software.

More features about this Sony Ultimate XAVC Video Converter:

1. Rip and convert Blu-ray and DVD including 1:1 backup Blu-ray/DVD movies to PC hard device for future needs.

2. Directly Copy feature will save 100% intact .M2TS main movie from original BD disc.

Now you can easily import and edit Sony F55/F5 XAVC Footage to Sony Vegas, After Effects, Pinnacle,Cyberlink, and windows Movie Maker. Just have a try! If you are a Mac user, you can go to the 20% off Pavtube HD Video Converter for Mac.

XAVC related articles:

Tuesday, September 10, 2013

Panasonic HPX250: Rewrapping MXF to Quicktime MOV on Mac

Description: It mainly introduces how to play Panasonic AG-HPX250 P2 MXF files with QuickTime player. If you are facing the problem to play P2 MXF on Mac smoothly, this article will show you a way out. 

I'm on the verge of purchasing a HPX250 camcorder in the coming days. I'll use AVC-Intra for production work, but I can't see the raw P2 mxf footage from the camera when loading into QuickTime Player on Mac. My problem is going to be getting the HPX250 MXF files translated to a format which QT will support. What is the best workflow?


From above, you can see the MXF file from Panasonic AG-HPX250 is not a friendly format for QuickTime player on Mac. In fact, without advanced tools, it was impossible to for QuickTime to distinguish Panasonic AG-HPX250 incompatible MXF footage.

To watch
Panasonic AG-HPX250 P2 MXF video on Apple QuickTime on Mac, you need to rewrap the MXF files to QuickTime compatible MOV video firstly. Here Pavtube MXF Converter for Mac is know as the best and fast MXF rewrapping tool that can help you convert any P2 MXF file to QuickTime video on Mac with super fast speed and excellent quality.  

Becides, it is capable of converting MXF files to a variety of other formats like Apple ProRes, Avid DNxHD, Apple InterMediate Codec, DVCPRO, MOV, MPG, M4V etc. You can also choose to convert to some built-in mobile devices and editing software, such as iPhone 5, iPad 4/Mini, Final Cut Pro, iMovie, FCE, Avid Media Composer, Adobe Premiere Pro, etc. Let’s go to try efficient workflow with an easy-to-use interface.

At first, download and install the MXF to MOV Converter, and then follow the guide for how to rewrap Panasonic HPX250 MXF to QuickTime MOV for playback on Mac.

1. Load MXF files

There are two ways for you to load MXF files: Load MXF video or Load the whole MXF folder .


2. Select MOV for QuickTime player

Click "Format" menu to find "QuickTime Movie Format", and then choose the format you want.


Tips: You can click "Settings" on the interface, some video and audio parameters for output can be changed like bitrate, frame rate, channels, etc. Definitely keep default settings is able to bring you a wonderful video if you are not good at settings.

3. Convert Panasonic HPX250 MXF to QuickTime MOV

Click "Convert" button to start P2 MXF to QuickTime Conversion. It will not take much for conversion. Once completed, click the "Open" button to locate the output MOV files for QuickTime player to playback smoothly on Mac.

Tips: If you want to convert to MOV file with all multiple audio tracks preservation, Pavtube iMixMXF can help you to get it done. With it you are allowed to preserve all or any audio tracks for output MOV and mix the multiple audio tracks into one if you need. 

Read More:

Monday, September 9, 2013

Trouble with importing .mov files from Canon 6D into FCP X

In this article, you will know how to import Canon EOS 6D H.264 mov recordings to FCP X on Mac OS X, and edit with best Prores 422 codec.

Canon EOS 6D is the world's smallest and lightest full-frame DSLR. If you're in the market for a full-frame DSLR for ultimate technical quality and super-fast autofocus for action, but don't want to pay extra for (or carry the weight of) the 5D Mark III, the 6D is about 95% of the 5D Mark III for a lot less money. The EOS 6D is built around a new Canon CMOS sensor, which offers a pixel count of 20.2MP. In concert with the DIGIC 5+ processor it offers a standard ISO range of 100-25600, expandable down to 50 and up to 102,400.


The MOV files Canon 6D outputs in encoded by H.264 high-def streams, which is different from QuickTime mov or others. Many traditional nonlinear editing programs on mac do not support H.264 codec directly, such as FCP, iMovie, Adobe premiere and so on. To load Canon 6D H.264 MOV to FCP X, you need to convert them into FCP  preferred video format firstly.

Now come and meet this Canon MOV Converter for Mac. I downloaded the Trial Version of Pavtube and converted some clips taken with Canon 6D .mov. After that, I have successfully import the converted clips to Final Cut X.

This Canon MOV to FCP Converter is not only able to convert organized videos files, but also able to deal with various videos and audios in batch. No need to install third party plug-in, no need to fix the settings manually; just import, choose FCP preset, and click Convert. It's just as simple as that. The software does a good job in editing H.264 .mov files directly in FCP and also easily convert Canon 6D MOV video to iMovie/FCE etc. You can also remux, Trim, cut, split, mix videos, overlays, also add 3D effect to Canon 6D H.264 footages. Now mac 10.8.3 is supported, feel free to have a try!

How to Convert Canon 6d HD MOV to iMovie/FCE with AIC MOV

Step 1. Connect your Canon 6D camera to Mac with USB cable or use card reader to transfer the MOV files to Apple hard drive disk.

Step 2. Add Canon 6D 1080p H.264 MOV videos to Mac Canon Video Converter.

Download, and run this iMedia Converter for Mac, and click the "Add Files"button to load individuals mov videos; or you can click "Add from folder"to load the entire folder.


Step 3. Choose FCP X ompatible format.

Click the "Format "option, you can choose Final Cut Pro>Apple Prores 422 Codec(*.mov). 

convert-format-to-prores-422

Step 4. Now click the big red Convert botton and wait for a while to get the fresh hot converted video. Click Browse to locate them directly. Ok now the transcoded files now are ready for editing Canon 6D MOV in Final Cut Pro X.

Editor's Recommendations

Wednesday, September 4, 2013

Convert Canon MXF to Final Cut Pro X keeping multi audio channels

Description: Here we will offers you an easy and step-by-step workflow to convert and mix Canon multi audio channels MXF to Apple ProRes for FCP X editing.


Question: "Hi, I filmed using Canon xf305 camera using 2 clip mics and want to edit in Final Cut Pro X. I’ve tried several programs but always loss some of the audio channels. Pls I need to edit both the original two channels in FCP X. How can I solve this?"

Answer: I also ran into this problem when editing my friend’s wedding video. From Apple official website I know that apple prores codec is best for FCP editing on Mac. So before importing Canon MXF clips to FCP 6/7/X, I tried to convert Canon MXF to Final Cut Pro X compatible format ProRes 422 .mov.

Did a lot search and tried some editing applications but not very satisfied for the transcode speed, quality or audio tracks saving.  Recently found a program on mac named iMixMXF from Pavtube and it work well in converting Canon multi audio channels MXF to Final Cut Pro X till now. It is the best Mac multi-track MXF Converter and MXF Mixer.

Follow this step-by-step guide; you can easily accomplish the task within a few clicks.

Step 1. Get this Mac multi-track MXF Converter installed, click "Add video" to load individual mxf videos; or click "Add from folder" to load the entire folder. It will recognize all the audio channels.


Step 2. Click "Format" and choose Multi-track Video>Multi-track Apple ProRes 422(*.mov)


Step 3. Click "Settings" to customize your video size, bitrate, frame rate and other specs; and check video channels that you want to convert.

Follow the bottom left icon to let the selected audio tracks "mix into one channel"; or that it will keep all the audio tracks apart.


For non-multi-track converting, it's also supported to add .srt/.ass soft subtitles as you like; click Edit and switch to "Subtitles" tab, and click Browse to locate your prepared subtitles.

Step 4. Click "Convert" to start converting multi-audio channels Canon MXF to multi-track Apple ProRes for FCP X.

Tips: In Pavtube converted video, we can see both the audio tracks saved separately as original, and we will also find the timecode is kept for FCP X.


Pavtube iMixMXF
($45) is a powerful MXF Converter for Mac program will all audio tracks preserved in MKV, MP4, MOV for playing and Apple ProRes for FCP editing.

If you prefer to work with single audio channel and do not need to multi-track integration feature, you are suggested to try Pavtube MXF Converter for Mac (only $29).

Editor's Recommendations

Tuesday, September 3, 2013

Best method to change video format from mts to swf

Have the need to convert MTS to SWF? Now get the most efficient software- Pavtube iMedia Converter for Mac to accomplish this task with lightening speed and exceptional output quality.

Now I have stored a lot of MTS videos in hand from some HD Camcorders. What I would like to do is to share my happy moment with more and more people over the Internet. So how to get these mts shootings more compatible for uploading?
As we konw, to play, upload and share the mts videos over and over again is somehow very trouble. You may find many videos with SWF format on the websites like YouTube. SWF is an Adobe flash file format used for multimedia, and it has become the dominant for displaying "animated" vector graphics on the Web. So, as an alternative, you can try to change video from mts to swf so that you can easily sharing your mts files on the web.

As for the problem of how to convert mts to swf, there are quite a few ways to do it. But the easiest and quickest way is to use Pavtube MTS to SWF Converter for Windows and MTS to SWF Converter for Mac which owns powerful converting functions and flexible editing functions.

With this software, you can deal with the mts format including converting mts to other popular video format like mts to mov, mts to wmv, swf to vob, swf to mp4, in which way, you are enabled to convert MTS to SWF with no limitation.

As for the flexible editing functions, like cutting off the unnecessary part, adding watermarks including text, image and video, adding 3D effect, and so on. And attaching subtitles to output video can be achieved here. You can add subtitles to your favorite movies which have no subtitles or add subtitles of native language to the foreign movies in order to fully enjoy the movies. Such a great job!

The following is the detailed information on how to convert MTS to SWF on Mac with the help of Pavtube MTS to SWF Converter for Mac, the windows workflow is as the same. At first, please download the program here and install it on your Mac.

Step 1: Import MTS footage.

Run the Pavtube HD Video Converter for Mac, click "Add video" to load mts recording videos to the program, or also support to drag and drop mts files to the program.


Step 2: Choose SWF format.

Go to choose the proper format what you need. Click "Format" to choose "Flash Video > SWF-SWF Format (*.swf)" or other popular format you want.


Step 3. Attach subtitles to a video/movie.

Find "Edit" icon and then click it, you will find video editor. There you can Trim, Crop, Add watermark and Effect. Above all, Subtitle can be added here.
Step 4. Customize the output format

Click "Settings" to customize the video and audio settings. For video settings, you can adjust Encoder, Frame Rate, Resolution, Aspect Ratio and Video Bitrate. For audio settings, you can adjust Encoder, Sample Rate, Channels and Audio Bitrate to meet your needs.


Step 5. Start MTS videos to SWF Mac Conversion.

Click "Convert" button to start conversion. The conversion from mts to swf which will be done in amazing fast speed, which costs you a few minutes thanks to its advanced feature and easy-to-use interface.

After conversion, go to find the converted .swf files with subtitles by clicking "Open" button. In this way, you will change video format from mts to swf with ease and successfully solve the mts video sharing problems.

Other useful guides for you:

Sunday, September 1, 2013

Convert .mts files from Sony NEX-7 to work with iMovie on Mac

Summary: Follow this article you will know how to convert and import Sony NEX-7 AVCHD MTS to iMovie compatible format with the best MTS to iMovie Converter on Mac.


In the middle ground between DSLRs and point-and-shoot lies a vast plain filled with all manner of tweener cameras, in all variants of shape, size, price, and quality. Until now, no one has nailed the whole package, but so far the smartest middle ground — smaller body and price, but without losing too much quality or manual control — has been Sony's NEX line.

The NEX-5N and NEX-C3 are excellent cameras, with big sensors in small bodies, but the NEX-7 is the flagship member of the line. The $1,349 shooter has a DSLR-sized, 24.3-megapixel APS-C sensor, a built-in electronic viewfinder, a tilting LCD, 1080p video recording, and a solid set of manual controls. It's built to run with the big dogs, and priced like it too — can it keep up? And could you actually buy the NEX-7 instead of a DSLR?

For many experienced Mac users, what they are concerned most is how does the Sony NEX-7 mts files work with Mac. As for NEX-7, you will get all kinds of options when shooting video: it can record in 1080p and 1080i at 60 frames per second, or 1080p at 24fps. You can shoot in AVCHD or MP4, though MP4 video is an odd 1440 x 1080 resolution. You can also shoot video in a variety of different manual modes, meaning you can change shutter speed, aperture, and the like both before and during video recording.


But AVCHD format is not well supported by iMovie, Final Cut and other software on Mac, you may encounter many problems when you try to import and edit them in FCE, iMovie and FCP. If you want to import and edit Sony NEX-7 MTS in iMovie, you need to convert Sony MTS to iMovie best supported video format, like Apple InterMediate Codec(AIC) MOV format, you can follow the steps below and learn how to convert Sony NEX-7 MTS videos to AIC codec for iMovie editing smoothly.

1. Free Download Pavtube MTS/M2TS Converter for Mac. This software can convert Sony AVCHD MTS video to iMovie compatible formats or other common formats.


2. Install and run this MTS to iMovie Converter. Click "Add Video" to load the .mts files from Sony NEX-7 to the Mac Converter.


3. Click format column to choose the output format for iMovie. Click and choose "iMovie and Final Cut Express -> Apple InterMediate Codec (AIC) (*.mov)", it's the best format for iMovie - to import Sony NEX-7 MTS to iMovie.


4. You can click "settings" button to adjust output parameters, such as resolution and bitrate. 

Tips: To get 1080p full hd video qualtiy, you can click to set video resolution to1920×1080.


5. Click convert button to start.

The Mac MTS to AIC Converter will convert Sony MTS footage for iMovie quickly. It can also help you to convert Sony Alpha NEX-7 mts for importing into FCP. After conversion, you can successfully work with Sony NEX-7 MTS video in iMovie as you want.

Learn More: