Sony RX10 III is an excellent digital camera, it is able to shoot UHD 4K video up to 30 fps, and super slow-motion full HD video up to 960 fps. UHD 4K videos are recorded in XAVC S MP4 format, and 1080p videos can be recorded in AVCHD MTS format.
I have not been successful in having iMovie recognize my RX10 when connected with its USB cable. It doesn't know that the camera is attached, even though the computer knows, and thus will not import videos. I've tried all of the USB settings in the camera.
Can someone give me specific instructions for importing videos via iMovie?
As mentioned above, Sony RX10 III recorded video in 4k XAVC S MP4 format and 1080p in AVCHD MTS format, while XAVC S MP4 format is the favored format for most of its users, for it brings better quality and convenient for broadcasting. The only problem usually occurred during the editing process.
iMovie (7, 9, 11) can't ingest videos from Sony DSC-RX10 III directly mainly because you have recorded video with the the high frame rate 'HFR' videos modes that capture footage at up to 960 fps. iMovie can’t recognize such high frame rate. The easiest workaround is to convert Sony DSC-RX10 4k XAVC S MP4 format and AVCHD MTS format to iMovie native supported Apple InterMediate Codec (AIC) (*.mov) in a low frame rate without quality loss, which is the most compatible format for iMovie and make the editing work much smooth and easier.
Pavtube HD Video Converter for Mac (review) is now providing the most reliable and professional 4K solutions to all format issues with from RX10 III including 4K XAVC/XAVC S, AVCHD format. (4K MP4, 4K MTS, 4K MXF also can be handle smoothly).
With this professional 4K video converter, you an import RX10 III 4K footage into iMovie with the preset native-format Apple InterMediate Codec, compress the resolution of RX10 III 4K footage from 4096*2160P to 1920*1080P so that you can drag & drop the video clips into iMovie easier.
The trail-before-purchase is supported, just feel free to try it:


If you are a Windows user, and in need of edit the RX10 III 4K footage in Windows Movie Maker, Sony Vegas, Adobe After Effects, etc. Please turn to Pavtube HD Video Converter
How to Convert RX10 III XAVC S/ AVCHD to AIC for iMovie
Download the Pavtube HD Video Converter and install it on your Mac(compatible with Mac OS X 10.11 El Capitan, 10.10 Yosemite, 10.9 Mavericks, 10.8 Mountain Lion, 10.7 Lion, 10.6 Snow Leopard, 10.5 Leopard and lower versions).
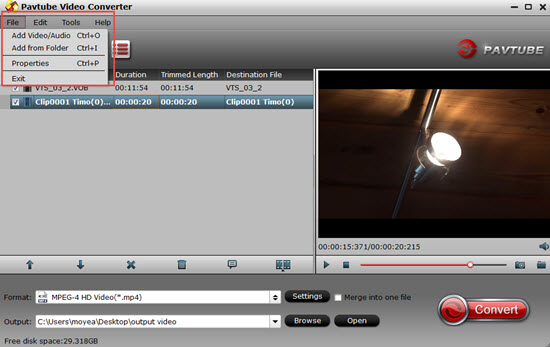
Step 1. Add RX10 III XAVC S/ AVCHD files
Connect RX10 III with your Mac via a USB, click "Add Video" button to load RX10 III XAVC S/ AVCHD files to the program. You can also directly drag the video files into the program directly.
Tip: if we got some single MTS clips from Sony DSC-RX10 III, the iMovie even won’t recognize the files without the intact folder structure.
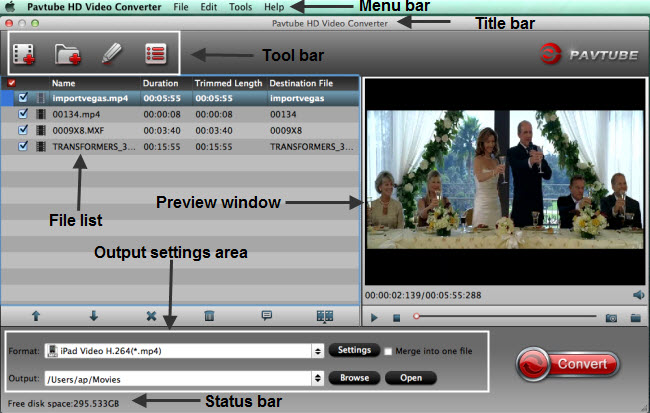
Step 2. Select output format
From "Format" drop-down option, choose iMovie best video editing codec from "iMovie and Final Cut Ex..." > "Apple Intermediate Codec (AIC)(*.mov) to output.

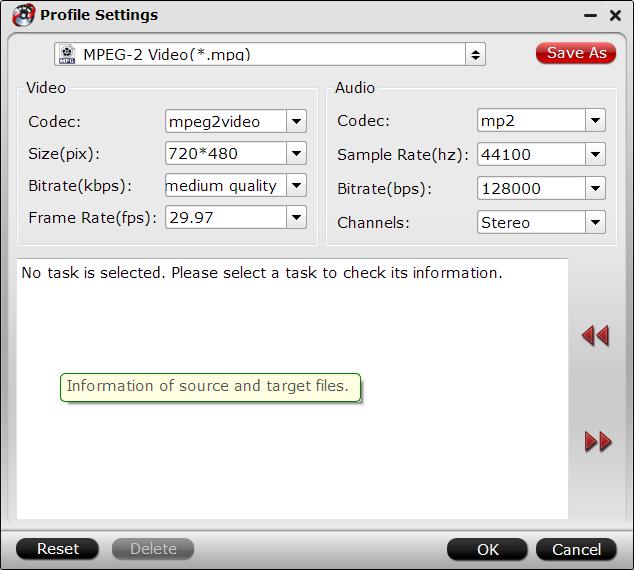
Step 3. Compress RX10 III 4K video to 1080P
Open "Profile Settings" window, click "Size(pix)" to select 1920*1080 as the final resolution for output video. You can also adjust video and audio settings, including codec, aspect ratio, bit rate, frame rate, sample rate, and audio channel.

Step 4. Start the conversion
Finally, simply hig the big Convert button to start converting RX10 III XAVC S/ AVCHD files to Apple InterMediate Codec for iMovie.
Within several minutes, you can find the converted file on your computer by clicking the "Open" button. And then you can import the converted files to iMovie for editing smoothly.
Not the end: Supported iMovie exported files converting, too.
Able to editing in iMovie is just the beginning of your task, isn't it? After editing the files, you'll have lots of choice with the iMovie expported files, like upload to the website sharing with your followers, stream to the your big screen TV for watching, backup into your cellphones or your Home Media Sever...
The available options and possibilities with the iMovie exported files are too numerous and extensive to cover here. If the exported files are incompatible for your purpose, just drag and drop it to the converter again and choose your target format. It's really wonderful that will drive you crazy, isn't it?
If you happen to have some recorded files by Canon XF series camera/camcorder, and encounter the importing or editing issue with iMovie or other NLEs, there is a big discount for you!

iMixMXF/MultiMixer + Video Converter
iMixMXF/MultiMixer Key Features:
-Import/preserve/mix multi-track MXF in MKV/MP4/MOV formats.
-Output multi-track Apple Prores MOV for further editing in Final Cut Pro (X).
-Support DVCPRO/HDV/Avid DNxHD/AIC output
-Convert MXF to any other formats for editing, playing, or broadcasting.
-Merge/split/trim/crop MXF footages.
Video Converter Key Features:
-Convert from and to any common SD/HD video and audio format.
-Support Apple ProRes/DVCPRO/HDV/Avid DNxHD/AIC encoding.
-Output formats for Mac editing software, e.g. FCP, iMovie, FCE, Avid, Adobe...
-Output formats for different playback devices.


Read More:
I have not been successful in having iMovie recognize my RX10 when connected with its USB cable. It doesn't know that the camera is attached, even though the computer knows, and thus will not import videos. I've tried all of the USB settings in the camera.
Can someone give me specific instructions for importing videos via iMovie?
As mentioned above, Sony RX10 III recorded video in 4k XAVC S MP4 format and 1080p in AVCHD MTS format, while XAVC S MP4 format is the favored format for most of its users, for it brings better quality and convenient for broadcasting. The only problem usually occurred during the editing process.
iMovie (7, 9, 11) can't ingest videos from Sony DSC-RX10 III directly mainly because you have recorded video with the the high frame rate 'HFR' videos modes that capture footage at up to 960 fps. iMovie can’t recognize such high frame rate. The easiest workaround is to convert Sony DSC-RX10 4k XAVC S MP4 format and AVCHD MTS format to iMovie native supported Apple InterMediate Codec (AIC) (*.mov) in a low frame rate without quality loss, which is the most compatible format for iMovie and make the editing work much smooth and easier.
Pavtube HD Video Converter for Mac (review) is now providing the most reliable and professional 4K solutions to all format issues with from RX10 III including 4K XAVC/XAVC S, AVCHD format. (4K MP4, 4K MTS, 4K MXF also can be handle smoothly).
With this professional 4K video converter, you an import RX10 III 4K footage into iMovie with the preset native-format Apple InterMediate Codec, compress the resolution of RX10 III 4K footage from 4096*2160P to 1920*1080P so that you can drag & drop the video clips into iMovie easier.
The trail-before-purchase is supported, just feel free to try it:
If you are a Windows user, and in need of edit the RX10 III 4K footage in Windows Movie Maker, Sony Vegas, Adobe After Effects, etc. Please turn to Pavtube HD Video Converter
How to Convert RX10 III XAVC S/ AVCHD to AIC for iMovie
Download the Pavtube HD Video Converter and install it on your Mac(compatible with Mac OS X 10.11 El Capitan, 10.10 Yosemite, 10.9 Mavericks, 10.8 Mountain Lion, 10.7 Lion, 10.6 Snow Leopard, 10.5 Leopard and lower versions).
Step 1. Add RX10 III XAVC S/ AVCHD files
Connect RX10 III with your Mac via a USB, click "Add Video" button to load RX10 III XAVC S/ AVCHD files to the program. You can also directly drag the video files into the program directly.
Tip: if we got some single MTS clips from Sony DSC-RX10 III, the iMovie even won’t recognize the files without the intact folder structure.
Step 2. Select output format
From "Format" drop-down option, choose iMovie best video editing codec from "iMovie and Final Cut Ex..." > "Apple Intermediate Codec (AIC)(*.mov) to output.
Step 3. Compress RX10 III 4K video to 1080P
Open "Profile Settings" window, click "Size(pix)" to select 1920*1080 as the final resolution for output video. You can also adjust video and audio settings, including codec, aspect ratio, bit rate, frame rate, sample rate, and audio channel.
Step 4. Start the conversion
Finally, simply hig the big Convert button to start converting RX10 III XAVC S/ AVCHD files to Apple InterMediate Codec for iMovie.
Within several minutes, you can find the converted file on your computer by clicking the "Open" button. And then you can import the converted files to iMovie for editing smoothly.
Not the end: Supported iMovie exported files converting, too.
Able to editing in iMovie is just the beginning of your task, isn't it? After editing the files, you'll have lots of choice with the iMovie expported files, like upload to the website sharing with your followers, stream to the your big screen TV for watching, backup into your cellphones or your Home Media Sever...
The available options and possibilities with the iMovie exported files are too numerous and extensive to cover here. If the exported files are incompatible for your purpose, just drag and drop it to the converter again and choose your target format. It's really wonderful that will drive you crazy, isn't it?
If you happen to have some recorded files by Canon XF series camera/camcorder, and encounter the importing or editing issue with iMovie or other NLEs, there is a big discount for you!
iMixMXF/MultiMixer + Video Converter
iMixMXF/MultiMixer Key Features:
-Import/preserve/mix multi-track MXF in MKV/MP4/MOV formats.
-Output multi-track Apple Prores MOV for further editing in Final Cut Pro (X).
-Support DVCPRO/HDV/Avid DNxHD/AIC output
-Convert MXF to any other formats for editing, playing, or broadcasting.
-Merge/split/trim/crop MXF footages.
Video Converter Key Features:
-Convert from and to any common SD/HD video and audio format.
-Support Apple ProRes/DVCPRO/HDV/Avid DNxHD/AIC encoding.
-Output formats for Mac editing software, e.g. FCP, iMovie, FCE, Avid, Adobe...
-Output formats for different playback devices.
Read More: