Showing posts with label MTS. Show all posts

Wednesday, August 14, 2013

Canon XA20 MTS/MP4 importing workflow in Sony Vegas, Avid, Premiere, Pinnacle, Cyberlink and Windows Movie Maker

Summary: To edit Canon XA20 mts/mp4 files smoothly on your editing software including Sony Vegas, Avid, Premiere, Pinnacle, Cyberlink, Windows Movie Maker, you need to transcode mts/mp4 to AVI/MOV/WMV/MPEG-2 for Windows editing software at first. And this article will show you how.

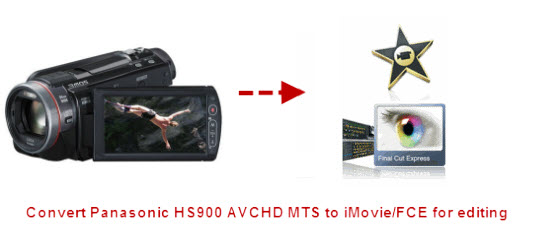
Canon XA20 is one of the new announced Ultra-Compact Professional Camcorder which cover the needs of the professional that need compact cameras with pro feature sets.

First off, Canon heard the cries for 1080/60p from the masses and it looks like they're finding ways to please the end-users. With 1080/60p & 1080/24p in both AVCHD (28mbps) & MP4 (35mbps) codecs, everyone is covered. Plus, the 20x Optical HD Video Zoom Lens with 8-Blade Circular Aperture mounted to the 2.91 Megapixel HD CMOS Image Sensor will help make anyone's day brighter. Second, Canon has added WiFi to the cameras to enable file transfers on the go, making them perfect tools for ENG & EFP applications.


Since AVCHD/MP4 is quite complicated codec and format, currently there are not much software being able to support the AVCHD and mp4 video. Actually, you can't directly import Canon XA20 mts/mp4 footage into Windows editing software like Sony Vegas, Avid, Premiere, Pinnacle, Cyberlink, Windows Movie Maker, etc. That's why so many users asking if there are any easy solutions that can help them edit XA20 mts/mp4 files on Windows Editors.

To make Canon XA20 mp4/mts video workable with  Sony Vegas, Avid, Premiere, Pinnacle, Cyberlink and Windows Movie Maker , you only need to convert XA20 MTS/MP4 video files to AVI/WMV/MPEG-2, the most suitable video format for editing on Windows PC.

Now go to find Pavtube HD Video Converter for Windows.Lots of users are impressed by this converter since it is powerful enough to convert camcorder videos to multiple video formats for iOS/Android/Windows Tablets & Phones and HD Media Players as well as video editing software including Adobe Premiere, Sony Vegas, Avid Media Composer, and more. And you can enjoy the powerful edit function, like trim, crop, watermark for text, image and video, 3D effect, subtitles and so on.

The following guide will show you how to transcode/convert Canon XA20 MTS/MP4 files to AVI/MOV/WMV/MPEG-2 for Sony Vegas, Avid, Premiere, Pinnacle, Cyberlink, Windows Movie Maker.

Download it and follow below steps.

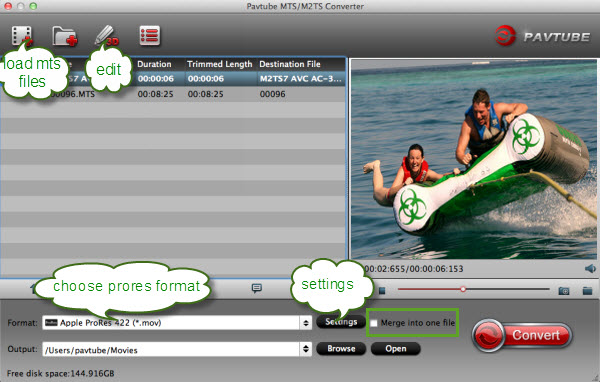
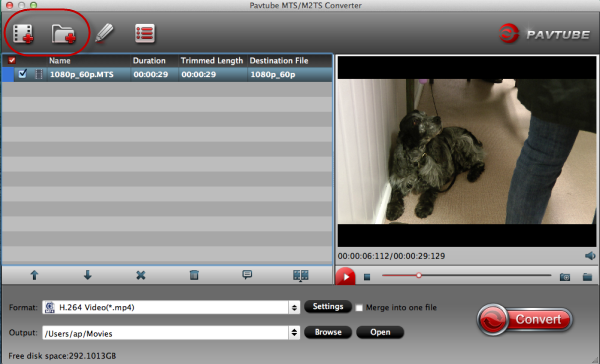
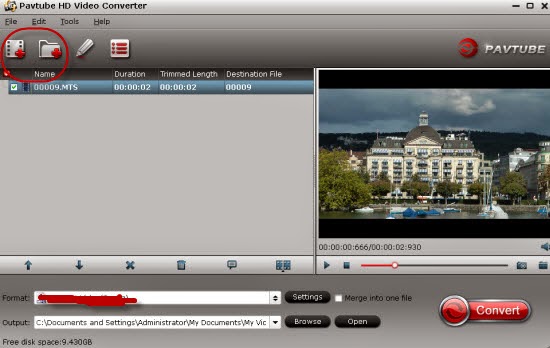
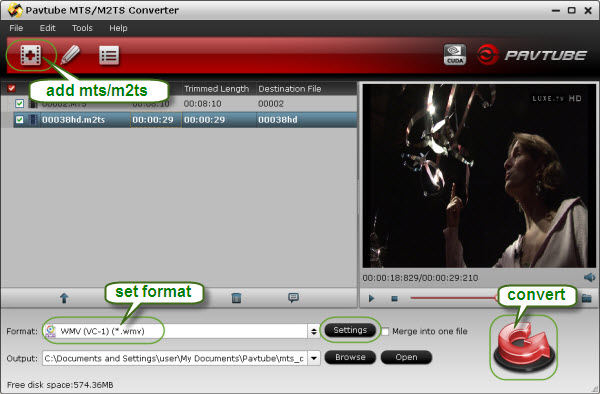
Step 1. Load Canon XA20 MTS/MP4 files.

You can choose "add video" directly or "load files" to add the whole folder.


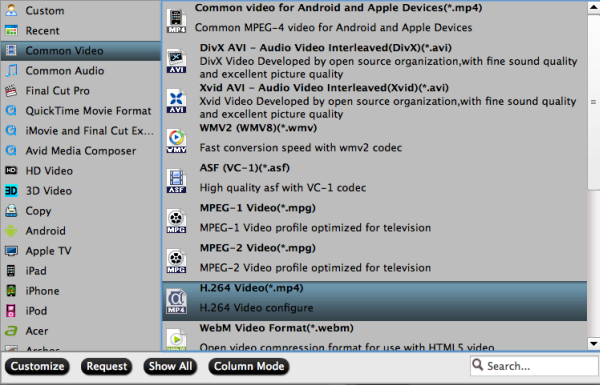
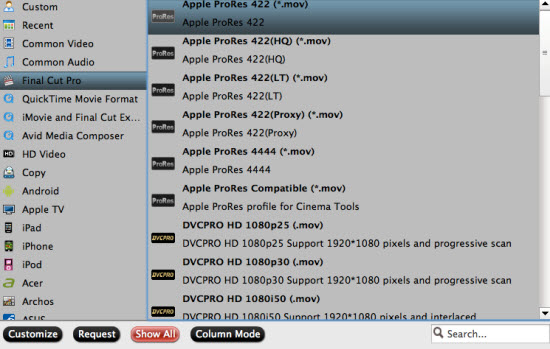
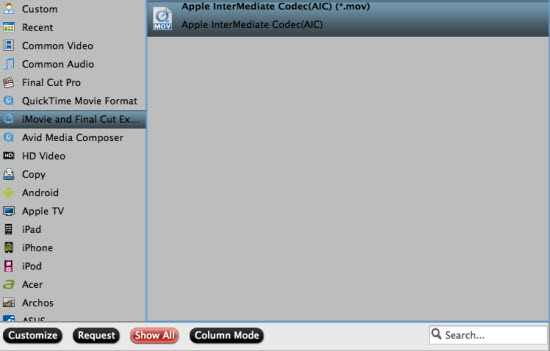
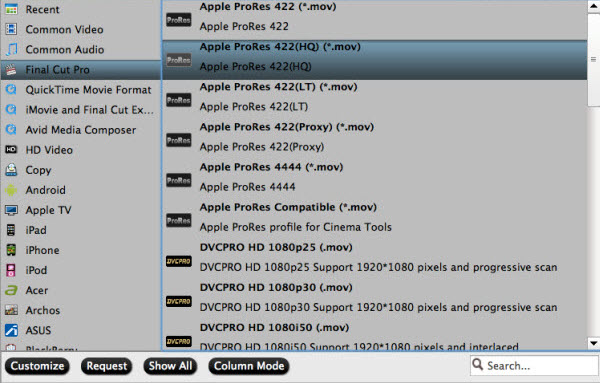
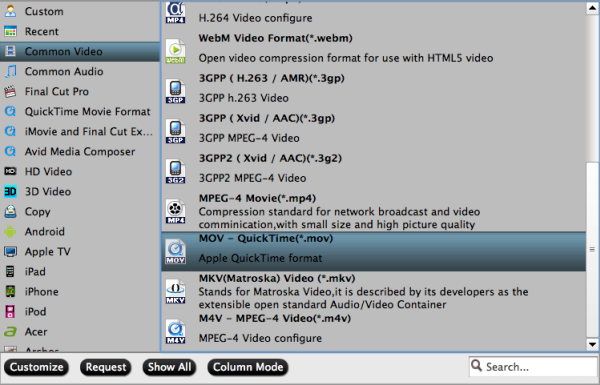
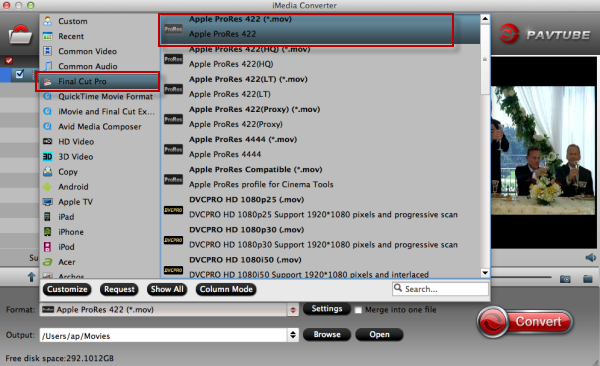
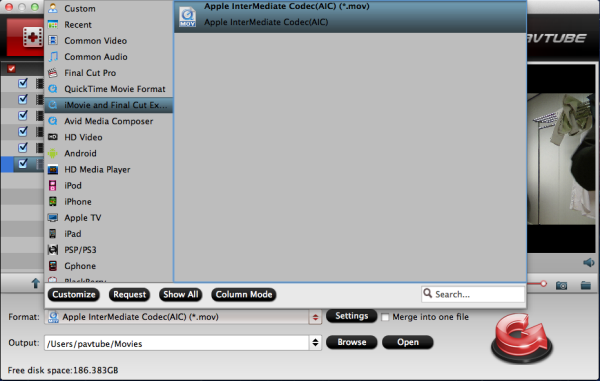
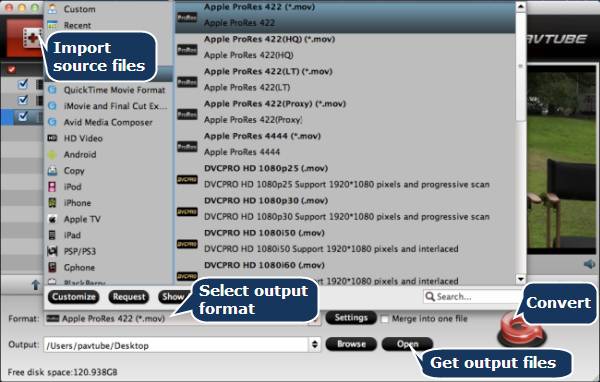
Step 2. Select output format for video editing software.

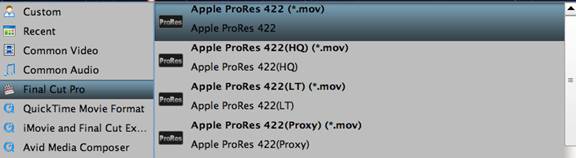
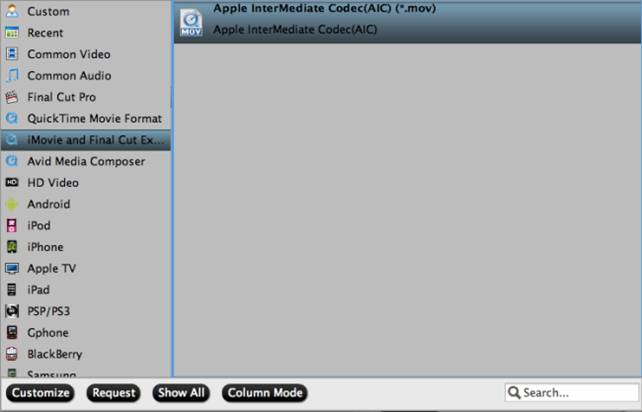
Click "Format" menu you will find various video formats listed by different devices. Just choose a compatible video format for your editing software. Choosing the editing software option directly will help you to take less time to find a more preferable video format.


Step 3. Edit loaded Canon XA20 MTS/MP4 video files.

Click "Edit" button and you are allowed to trim, crop, add text/image/video watermark or some effect to your output video for making it perfect. Here the function of adding subtitles to output files will contribute to make your own videos. You can use free software Subtitle Edit to edit your subtitle content then add it to output videos.


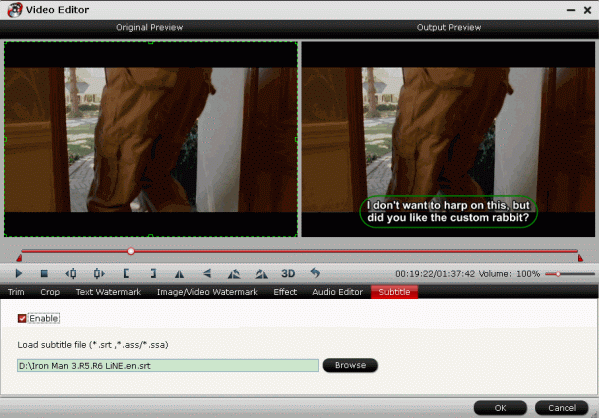
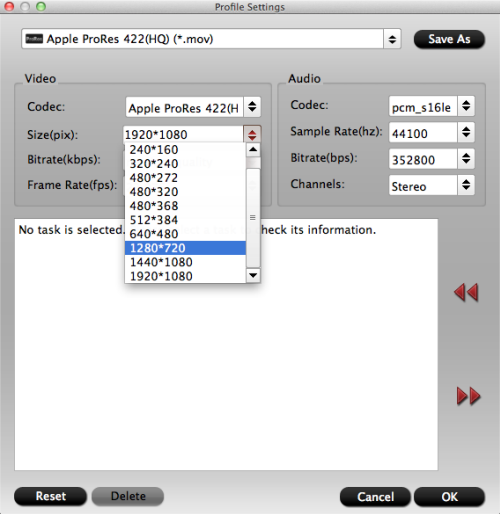
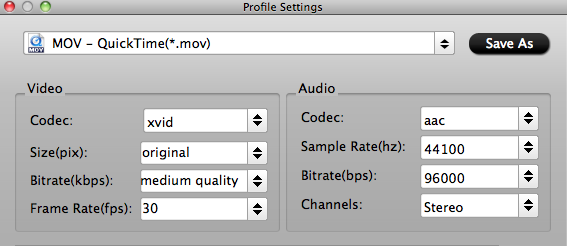
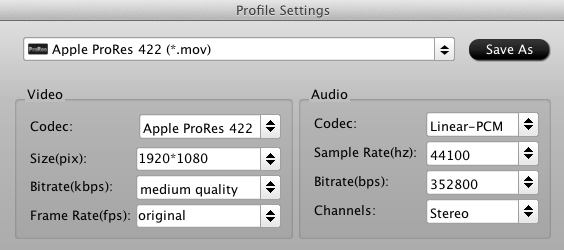
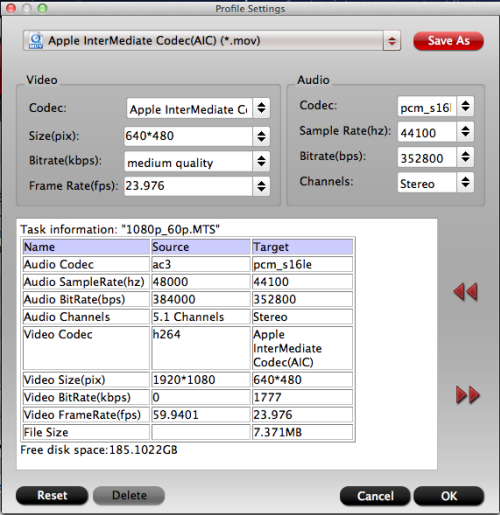
Tips: Click "Settings" on the interface and you can adjust the parameters including size, bitrate, frame rate, etc. to get a high quality of output files. And keep the settings the same as original video recordings will provide you the least loss of video quality.

Step 4. Start conversion.

Click the "Convert" button to start conversion. When it completed, click the "Open" button to get the generated videos for your editing software.

More features about it:

1. Rip and convert Blu-ray and DVD including 1:1 backup Blu-ray/DVD movies to PC hard device for future needs.

2. Directly Copy feature will save 100% intact .M2TS main movie from original BD disc.

It is an integration of Blu-ray Ripper, DVD Ripper and Video Converter and it will meet almost all your requirements about converting videos. Good news for you that Pavtube 2013 Summer Holiday Sale Round 2 is coming and 20% discount is provided to Video Converter Ultimate and iMedia Converter for Mac during sale time. Catch the chance to try it now.

Now get ready for importing and editing Canon XA20 MTS/MP4 videos in Sony Vegas, Avid, Premiere, Pinnacle, Cyberlink and Windows Movie Maker. Enjoy your editing workflow!

Read More:

Tuesday, August 13, 2013

Sony RX100 Mark II (M2) Hands-on -Sony's best point-and-shoot camera to date


Last year, Sony's RX100 changed the way many of us think about point-and-shoots. The camera's one-inch sensor enabled brilliant image quality and stellar low-light performance, netting DSLR-like results in a device you can slip in your pocket. It really did change the game when it comes to everyday photography, and I instantly fell in love. What remained to be seen, however, was how Sony would build on the RX100's success by releasing an even more capable model this year. In an unexpected move, the company opted not to retire 2012's blockbuster, and kept pricing exactly where it's always been, at $650. The RX100 Mark II, meanwhile, was marketed as a modest step up -- an even more well-rounded package, for 100 bucks more.


When my Mark II sample arrived, I did what any jaded New Yorker would after a half-dozen years of shooting sample photos in Manhattan: I booked a flight to somewhere else. United's last-minute weekend specials made Chicago the best bet, and off I went for a weekend of perfect weather, approachable restaurants and sidewalks that weren't so crowded that I had to walk in the street. It's like New York -- if you take away a million tourists and pepper in smiling Midwesterners and affordable adult beverages.

Key Features:

  • 1"-type Exmor-R BSI-CMOS sensor (13.2 x 8.8mm, 3:2 aspect ratio) 
  • 20.2 million effective pixels 
  • 28-100mm (equiv), f/1.8-4.9 Carl Zeiss Vario-Sonnar T* lens 
  • Steady-Shot image stabilization 
  • ISO 160-12,800 (Down to ISO 100 and to 25,600 expanded) 
  • NFC-mediated Wi-Fi allowing file transfer and control from smartphones 
  • Rear control dial and customizable front control ring 
  • 10fps continuous shooting in 'Speed Priority' mode 
  • Tiltable 3" 1.2M-dot 'WhiteMagic' LCD screen 
  • 13 Picture Effects (27 with variations) 
  • Memory Recall feature can store up to three groups of custom settings 
  • 1080p60 video, (AVCHD) with MP4 option (50p in PAL regions) 
  • Built-in stereo microphones 
  • 330-shot battery life (CIPA)  
The final notable physical adjustment is the new Multi Interface Shoe. It looks like a typical hot shoe that you'd find on any ol' DSLR, but this version adds a multi-pin connector for interfacing with accessories like an OLED EVF or a microphone rig -- neither of which I needed to try out on a brief vacation. Some photographers clearly prefer shooting with an EVF, but the tilting LCD suited me just fine, even with the bright summer sun hitting the camera from above.


The pictures, as expected, look great. The camera did a fine job of exposing, and colors and white balance were spot on. Everything I loved about the previous RX100 is present here, too, so you can absolutely expect a top-shelf experience through and through. The one notable setback is the price. It'll run you $750, which admittedly is a bit more than we'd like to pay for a point-and-shoot, regardless of its performance. But when you start looking at this strictly as an ILC replacement, that sky-high price tag begins to make a bit more sense. Cheap it's not, but if you want the absolute best, consider this your only option.

Monday, August 12, 2013

Convert NXCAM to H.264- Transfer Sony NXCAM AVCHD video for playback and sharing

AVCHD from Sony NXCAM is not really a friendly format for playing/sharing and usually we go from Sony NXCAM to H.264 converting and this article will provide the detailed info.


For the past few days, I've been evaluating a prototype of Sony's first NXCAM camera family member. This first NXCAM model has a striking resemblance to a Sony Z5, which is an HDV tape-based camcorder with optional chip recording. Announced on November 18th, Sony's new NXCAM family brand offers class-leading, professional performance for AVCHD technology.

Sony NXCAM records stunning quality 1920 x 1080 images at 24Mbps (50i or 25p), and operational flexibility is maximised by AVCHD recording onto affordable and readily available consumer memory cards. Now I have a client who is a NXCAM user, he passed to me a bunch of .mts files came from his NXCAM with no camera info. He want to get some suggestion for playing and sharing NXCAM AVCHD video on Mac.

Then I recommend him to look for a converter that can convert NXCAM MTS files to H.264, thus, after enjoying the video on Mac, he can also transfer the H.264 files to media players or video devices for playback or sharing. He tries some converter from the web, but only received an error message while converting NXCam video to h.264. Didn't get to write it down because the app crashed. And then want me to give him some hope.

In that case, I will share my easy solution here. Since H.264 is fully supported by most media players and video uploading website, first you need to transcode NXCAM AVCHD MTS to H.264 with the top NXCAM AVCHD Converter for Mac from Pavtube.

For background, the app from Pavtube worked the first time we tried it but not this time. It works perfectly in converting NXCAM AVCHD video to H.264 codec. Not only is it extremely easy to use but it's also often faster than any other Compressor. What's more, it can convert NXCAM mts videos to other common target readable format in which you want the video to be played. Then it has quickly become my absolute favorite way of converting my Sony NXCAM footage. Well, below is a step-by-step guide for you.

Guide to convert Sony NXCAM AVCHD videos to H.264 for playback and sharing

1. Install and run the best Mac NXCAM to H.264 Converter. Transfer Sony NXCam video to hard drive, and then click "Add video" or "Add from folder" to add the avchd files you need into the program.


2. Click Format column and choose the output format, you can choose "H.264 Video (*.mp4) from "Common Video" for output. This is the perfect format for playing on Tablets/Smartphones and sharing on website.


3: Click settings button to adjust the output video’s parameters, such as bitrate, resolution, etc.

4. You can edit the Sony NXCam videos in this program before converting to other formats on Mac OS. Trim, crop, add watermark or adjust effect as you want.

5. Start converting Sony NXCAM AVCHD video to H.264 MP4 for Mac.

In this way, you can use Sony NXCAM recorded MTS footages to playback or sharing. Please take a try now, hope it will do a great favor for you.

Read More:

Wednesday, July 31, 2013

Flawlessly Convert Sony HX200V 60p MTS files for using in FCP, iMovie, QuickTime Player


Sony Cyber-shot DSC-HX200V is a fast-shooting megazoom with excellent photo and video quality for its class, and plenty of shooting options to make casual and advanced shooters happy. Recently, I take some pictures with it of birds, try to capture flight and movement and want to select individual frames. I'm satisfied with the full HD Movie Shooting capability (1920×1080/60p) and Optical SteadyShot Active Mode.

However, My HX200V camera gave me videos as AVCHD file which I have not acknowledged with. I tried with both FCP, iMovie and quicktime, but none of them could recognize it. Is there any step-by-step work flow for this? Which software can convert video taken with my Sony HX200V Cybershot camera for working with my mac? PS: the footages are on 1080 60p. 

In this case, I googled to search the solutions. I find this 60p MTS and M2TS video format is not friendly for use on Mac, Mac platform best supported format is .mov format. So I tried to seek for the best avchd converter for mac to do convertering. Now I get this MTS/M2TS Converter for Mac from Pavtube.

I have successfully convert Sony HX200V 60p AVCHD to best codec for editing on Mac. This software is top MTS converter for Mac that can transcode AVCHD files to Apple InterMediate Codec (AIC), Apple ProRes 422 codec, QuickTime codec, etc. These output formats are specially presetted, so the conversion quality is guaranteed, I can get lossless video conversion with this tool. 

Here I will share the easy steps that you can follow to transcode Sony Cyber-shot DSC-HX200V 60p AVCHD MTS to MOV for using in FCP, iMovie and QuickTime Player. 

1. Install and run the best Sony 60p MTS Converter for Mac, it's an professional AVCHD to FCP/iMovie/QuickTime Converter which can convert Sony DSC-HX200V 60p AVCHD files to different formats on Mac (including OS X Mavericks 10.9).  
Click "Add Video" to load the 60p .mts files from Sony HX200V Camcorder to the Mac Converter. 


2. Click "format" bar to choose output format:

Choose "Final Cut Pro -> Apple ProRes 422 (*.mov)" as the best output codec for importing 60p MTS files to Final Cut Pro (X) editing.


Choose "iMovie and Final Cut Express > Apple Intermediate Codec(AIC) (*.mov)" as the best video format for editing 60p AVCHD files to iMovie. 


Choose "Common video -> MOV-QuickTime (*.mov)" to play Sony 60p AVCHD mts with QuickTime Player.


Step 4. You can click “settings” to customize the output parameters, adjust the resolution, bitrate as you want. 

Tips:

If you would like to add Anaglyphic 3D effect or Subtitle for your footage, click "Edit" icon to start video editing with your 3D files, such as adding Anaglyphic 3D effect(Red-Blue, Red-Green) as well as adding watermark, trim your videos and so on.

You can also click "Subtitles" option, add srt, ass, ssa suntitle you want.

Step 5. Click convert button to start converting Sony HX200V 60p AVCHD MTS to Prores/AIC/QuickTime mov for FCP, iMovie editing and QuickTime Playere playback.

After the Mac MTS to MOV conversion, you can import the converted footages to FCP, iMovie  and QuickTime Player for editing and playing smoothly on Mac.

Monday, July 29, 2013

Down-convert Panasonic GH2 MTS footage from 1080p to 720p for editing in FCP/Premiere

Summary: In this article, you can learn the best way to convert Panasoni GH2 AVCHD MTS to a file that FCP/Premiere can recognize on Mac(Mavericks 10.8 included) with downsizing 1080p HD video to 720p.


Panasonic Lumix DMC-GH2 

Panasonic Lumix DMC-GH2 updates the highly acclaimed if rather pricey GH1 Micro Four Thirds system camera. As such the GH2's styling is closer to that of a baby DSLR than its sibling's, the GF2 compact camera form. While stylistically similar, its size is roughly a third of the size of Olympus' Four Thirds E-5 DSLR, and closer in fact to that of a bridge camera. Except unlike a bridge camera, the Panasonic's added appeal is the ability to swap the lens in use. Therefore it's fair to say that for those who like the feel of a DSLR but not the attendant bulk, the GH2 is potentially a very attractive proposition. It's in effect a DSLR 'lite'. 

Easiest way to convert GH2 1080p .mts to 720p?

I'm a Director, DP-Editor/Gaffer. I do commercials and corporate work. I got my Panasonic GH2 and I shot all the .mts footage myself about Teaching Practices in Public Schools in Maryland. I like One-touch HD video recording and manual controls. And now I need to down-convert GH2 MTS footage from 1080p to 720p for storage and editing in FCP&Premiere. Is there any easy way (free or nominal fee)? 

Why we need to downsize the HD video?

By google search, you can see many folks are asking about how to downsize 1080p to 720p. It is my impression that if I edit with actual 720p files, it will be less strain on the system both in editing and rendering as well has hard drive space. In fact, it really does. After reducing the big video size, we will edit more smoothly, save space and make 1080p video playable on protable device like iPad.

An easy to use 1080p to 720p Converter

As in the above case, you have the need to find a professional MTS Converter for FCP/Premiere to downsize 1080p HD video to 720p. Pavtube MTS Converter for Mac is exactly the one ease of use. I have used it on my project, it is helpful in down-converting Panasonic GH2 1080p full HD video to 720p video quickly and transoding GH2 MTS file to FCP/Premiere editable Prores codec, then I can wok well with GH2 mts file in FCP and Premiere. Overall first impression is excellent. Below I will share the step-to-step guide to you.

Simple way to downconvert GH2 1080p to 720p for editing in FCP/Premiere

Step 1. Download Pavtube MTS Converter for Mac. This professional Panasonic MTS Converter can help you convert 1080p AVCHD MTS files to rich formats for use on Mac(Mavericks 10.9 included). 

Step 2. Install and launch this 1080p to 720p MTS Converter. Import 1080p MTS footage from GH2 to it. 

Step 3. Click "Format" bar to choose format for output, you can choose Final Cut Pro > Apple ProRes 422 HQ (*.mov) for editing in FCP and Premiere Pro.


Step 4. You can click “settings” to customize the output parameters, adjust the resolution, bitrate as you want. To down-convert 1080p to 720p, you just need set Size(pix) to 1280*720. That is the exact 720P.


Step 5. Click convert button to start converting Panasonic GH2 1080p AVCHD MTS to Prores for FCP and Premiere editing with 1280*720 definition.

As long as the conversion is done, you will get the 720p mov video files in full screen from its destination folder, and then you can import the files with 720p resolution to FCP/Premiere editing
 smoothly on Mac (including Mavericks 10.9).

Read More:

Monday, July 15, 2013

Smoothly playing AVCHD MTS files on Mac without slow motion problem

Follow the guide you can easily convert AVCHD mts files to QuickTime MOV for smoothly play AVCHD videos on Mac with A/V syncing. You won't get any issues when adding your AVCHD MTS files to Mac 
for playback.


Q: MTS playing in slow motion but sound is normal speed

Hi,
A friend took some mts video for me and gave me the SD card - I'm able to see it in several programs but it's always playing in slow motion though the sound is normal. How can I get it to play normal speed? Or covert it to normal speed? Thanks!


A: If you videos are from cameras or camcorders, it must be syncing well. So the problem may lies in the media player you choose. So at first check your computer specs, and make sure that it runs fast for work with the media player on your mac.

Then for playing mts files on mac, what is the best Mac MTS/M2TS player? You can try mplayer osx extended, or VLC to play it back. Quicktime cannot handle transport streams very well.
VLC media player is said to support AVCHD footage on Mac, and you can choose to play the files. However, there is also slow motion problem when playing .mts .m2ts files with VLC. The audio plays in normal speed, while the video time is double as what it should be. In other words, the sound is OK but the image lags behind. This might happen to computers with low configuration - CPU, video card. 

Many users do not have a powerful enough Apple computer with Intel Core i7, good graphic processors, and they may expect Apple QuickTime Player to natively support AVCHD videos, just like the WMP in Windows 7. So for smoothly playing AVCHD on Mac, they may need to convert AVCHD to QuickTime MOV on Mac.

It’s hard to find an excellent AVCHD Converter. Now, Pavtube HD Video Converter for Mac will help you convert AVCHD files to MOV for QuickTime with keeping the best quality of the original video to the output file. It's also a good software which can convert AVCHD videos to any common formats. The windows version is Pavtube HD Video Converetr for Windows.

You can follow the tips below to convert AVCHD video to QuickTime MOV format.

1. Download Pavtube MTS to QuickTime Converter, install and run, and then import the AVCHD files you want to convert.


2. Click Format bar and choose best output format for output. Click and choose common video -> MOV-QuickTime (*.mov). You can also choose other formats for output as you want.


3. You can click “settings” to adjust the output parameters, such as resolution and bitrate.


4. Edit function is very easy to use, you can trim, crop, add watermark or adjust effect before converting AVCHD videos to QuickTime MOV on Mac.

5. Click convert button to start converting AVCHD to QuickTime MOV file on Mac.

After conversion, you can use converted .mov files as you want. Now smoothly playing AVCHD file on Mac is without any problem.

Further Reading:

Thursday, July 11, 2013

Tricks for importing Canon Legria HF M306 AVCHD MTS files to FCP X


Summary: If you are facing the issue when importing and editing Canon Legria HF M306 AVCHD footage in Final Cut Pro X, here recommend you the best Mac Canon MTS to ProRes Converter to achieve your goal smoothly.

Canon Legria HF R306 camera, as an update of entry-level Legria camcorder range at CES 2012, is a Full HD compact camcorder, featured with a 1/4.85in CMOS sensor, 32x optical zoom, 51x intelligent zoom, a 3in colour touchscreen monitor and a whopping 8GB of internal storage space. That specification is already pretty good for a camcorder of this price, but Canon has gone even further by adding Wi-Fi connectivity, which means you can transfer recorded videos to your PC without a USB cable and stream videos to DLNA-enabled TVs and games consoles. All of this is recorded straight to memory card so you can quickly and easily share your movies with friends and family.

I have just got a Canon Legria HF M306 camera and I have taken it on my trip. After recording some footage HF M306, I wanna share this with others. To get better effect, just now I'm trying to get the AVCHD recording from it into Final Cut Pro X, but without much success, that is, I can get the Canon to show up on my desktop, but can't seem to get FCP X on my Mountain Lion to capture the video from the M306 camera using the USB Cable. 

AVCHD is highly compressed and not ideal for editing with Final Cut Pro X you can't natively import Canon HF R306 mts in FCP X. In order to smoothly edit Canon HF R306 AVCHD files in Final Cut Pro X without crashing problem and avoid rendering, you'd better transcode the Canon AVCHD to FCP native format, say, Apple ProRes Codec with some help from a third-party software. 

Required Software:

Pavtube's AVCHD MTS/M2TS Mac - a top Canon AVCHD Converter for Mac users.

The Mac Canon MTS to FCP Converter is an easy to use yet professional AVCHD Converter on Mac OS X which can not only transcode Canon Legria HF R306 AVCHD files to Apple ProRes codec videos for Mac editing, but also provide simple video editing functions for you. Besides, the program can also convert HD videos from HD camcorders or DVs (like JVC, Panasonic, Sony and Cannon) for editing in Final Cut Pro, Final Cut Pro X, Final Cut Express, iMovie, Avid, Adobe Premiere etc.

The following passage guides you how to convert Canon Legria HF R306 AVCHD footages to Apple ProRes 422 encoded MOV file for FCP X. If you have the same problem about editing Canon HF R306 MTS videos in Final Cut Pro X, check out the brief guide below.

Step 1. Import Canon HF R306 AVCHD videos to the top MTS to FCP Converter for Mac.


Step 2. Click the format bar, and move mouse cursor to "Final Cut Pro > Apple ProRes 422 (*.mov)" as output format.


Step 3. Click "Convert" button to start transcoding Canon Legria HF R306 AVCHD files to Apple ProRes Codec for Final Cut Pro X under Mac OS.

Some more helpful features of the app:

1. Settings- click to set video resolution(1920×1080/1440×1080/1280×720/720×480), bitrate(from 1Mbps to 20Mbps), frame rate (24p/30p)

2. Editor (next to "Add" icon)- click to set deinterlace, denoise, mute, volume up, trim, crop, etc.

After a shot conversion, you will be able to load/transfer Canon Legria HF R306 AVCHD videos into Final Cut Pro X editing without rendering.

Tips: Before you try to do the conversion, if you are also a FCP X user, please make sure that you have installed the Apple ProRes Codec manually since the FCP X asks users to install it by themselves.


Editor's Recommendations

Wednesday, July 10, 2013

Panasonic GH3 and G5 firmware update brings low light AF, silent shooting

If you've been spooking subjects or failing to focus on them with your Panasonic Lumix GH3 or G5, you might feel like you got a brand new camera today thanks to a firmware update. Its new features include low-light (-3EV) autofocus and a "silent mode" setting that'll turn off the electronic shutter, all sounds and the flash emission in one go, leaving subjects like deer or golfers undisturbed. You'll also get an exposure compensation shutoff reset option, better AF performance with certain lenses and a WiFi fix for Mac computers. You can grab it at the source, proving it's not only hackers that bring free goodies to pricey cameras.


Version 1.2 for the GH3 adds the 'Low light AF' previously seen on the G6 that works down to -3 EV, a 'silent mode' that turns off operational sounds and flash firing, and an 'Exposure Compensation Reset' function'. Meanwhile version 1.1 for the G5 only corrects wording of the Motion Picture menu on cameras sold in PAL broadcast regions (including Europe and Australasia), and therefore isn't required by US owners. Click below for full details and to download the firmware.

Click here to download the latest firmware for the Panasonic Lumix DMC-GH3 (Ver 1.2)

Click here to download the latest firmware for the Panasonic Lumix DMC-G5 (Ver 1.1)


Related gudie:

Monday, June 24, 2013

Convert AVCHD MTS/M2TS/TS to Avid, Premiere, Sony Vegas, Pinnacle Studio, Movie Maker and Cyberlink

Facing the problem importing MTS/M2TS/TS files in Avid, Premiere, Sony Vegas, Pinnacle Studio, Movie Maker and Cyberlink, you can fix the issues via transcoding AVCHD to Windows Editor compatible format.

  • AVCHD? What is it? Where is the format from?


AVCHD-
Advanced Video Coding High Definition is the new high definition video format for HD camcorder recording and playback (often with the file extension of mts, m2ts or mt2, ts). which is usually recording by professional digital Sony, Panasonic, Canon and more camcorders and cameras.
 

  •  AVCHD Importing on Win? Is that so easy?

If you have a HD camera or camcorder device, you have great chance to deal with AVCHD .mts/.m2ts/.ts Video. After you shot many enough videos, then you definitely want to edit these AVCHD file. However, it is not so easy to import/edit AVCHD MTS recordings on Win, as AVCHD is a highly compressed format just fit for viewing but not for editing, it can’t suported well by  many editing software like  Avid Media Composer , Adobe Premiere, Sony VegasPinnacle Studio, Windows Movie Maker and CyberLink PowerDirector.

Users' AVCHD MTS/M2TS/TS clips to MOV conversion need: 

Case 1: Hello, I have a Sony HDR-CX150 Camcorder which records H.264 MTS files. I need a tool which is able to convert MTS files into a file format I can use/manipulate on Adobe Premiere to make family movies on my PC computer? Thanks.

Case 2: I'm new to Avid. I am using Avid media composer 5.0. Can anyone help me with importing .mts files? I am using Panasonic HDC-TM700 to shoot the mts in AVCHD folder. When I import the MTS files into the project bin, it will take hours to import a 600MB file. Sometime it will just give me an error message to say that shot of storage. What should I do to speed the importing process?

Case 3: Hello,I'm running windows 7 and using Pinnacle Studio 15 for editing. The camera I shoot with is the Panasonic LX5. What format would you recommend I transcode to for Pinnacle Studio editing?

Case 4: Yesterday I got my new My Canon Vixia HF S200. I have tried shooting in AVCHD format. And I would like to transcode these mts files into something that Windows Movie Maker can manipulate. Is there anyone recommend one way to make the importing and editing more efficiently or suggest the best and fast workaround? I appreciated any help.

  • Convert AVCHD MTS recordings? What software to choose?

To edit or import AVCHD/MTS/M2TS/TS files in Avid, Premiere, Sony Vegas, Pinnacle Studio, Windows Movie Maker and Cyberlink smoothly, you will need to convert AVCHD MTS/M2TS/TS videos to best compatible format for Windows PC. By the way, “the AVCHD video software is not always as willing as AVCHD camcorder hardware”, so that decent AVCHD Converter software is necessary to be prepared at hand.

Pavtube MTS/M2TS Converter  is mainly used to effortlessly encode/re-encode AVCHD MTS/M2TS/TS video files from  Sony (3D), Panasonic (3D) and few Canon Cameras to for smoothly importing andediting in various Windows non-linear editing systems (NLE), including Avid, Premiere, Sony Vegas, Pinnacle Studio, Windows Movie Maker and Cyberlink. If youre using a Mac, please turn to its equivalent Mac version– iMedia Converter Mac, which can help you solve the AVCHD and Mac incompatibility.


  • Edit AVCHD Recordings on Windows PC? How to make it?

Step 1: Free download the best AVCHD to Windows PC Converter and run it to add the AVCHD MTS/M2TS/TS footages.


Step 2: Hit the Format box and select “HD Video” option on the dropdown menu and you can choose “AVI/WMV/MPEG-2” as output format for editing with Premiere, Sony Vegas, Pinnacle Studio, Windows Movie Maker, Cyberlink.


Besides, you can choose “Avid DNxHD 720p (*.mov)“ or "Avid DNxHD 1080p (*.mov) " for Avid MC editing.

Step 3: Adjust video and audio parameters, including the Bitrate of Video and Audio, the Codec of Video and Audio, Video Size, Sample Rate, Frame Rate, Audio Channels, etc., by clicking the “Settings” button on the main interface for getting the best quality.

Step 4: Click the “Convert” button on the main interface to start transcoding AVCHD footages to AVI/WMV/MPEG-2/MOV for editing inAvid, Premiere, Sony Vegas, Pinnacle Studio, Windows Movie Maker, Cyberlink.

When the conversion is completed, click “Open” in the main interface and get the converted files for importing and further editing.

Now transferring and editing AVCHD/MTS/M2TS/TS video files in Avid, Premiere, Sony Vegas, Pinnacle Studio, Windows Movie Maker, Cyberlink is smooth and without any problem.

Read More:

Saturday, June 22, 2013

Best solution to edit Panasonic HS900 recorded 1080/60p AVCHD videos in iMovie/FCE

Summary: If you would like to edit Panasonic HDC-HS900 1080/60p MTS on Mac with iMovie and FCE, just follow the steps below to convert Panasonic HS900 1080/60p MTS to iMovie/FCE best codec AIC.

Panasonic HDC-HS900 features Advanced 3MOS System, 1080/60p or 1080/50p Recording (Full-HD 1,920 x 1,080, 60/50 Progressive Recording), NEW HYBRID O.I.S. (Optical Image Stabilizer), large 3.5-inch LCD with Touch Operation, and a 220GB HDD and DXC/SDHC/SD Memory Card Hybrid Recording. 3D image recording is possible with the optional VW-CLT1 3D Conversion Lens. The Panasonic HS900 weighs approx 395g, with dimensions of 67 x 72 x 146mm. Compatible with SDHC, SDXC memory cards. The HD video camera stores videos in .mts format with MPEG-4 AVC/H.264 compression.

One on friends had recorded some videos using Panasonic HDC-HS900 as part of his research. He would like to import the HS900 camcorder videos to iMovie/FCE on Mac for editing. However, the resulting HD videos are in AVCHD .mts files which is highly compressed and could not be imported to iMovie/FCE. With the 1080/60p recording mode, the videos play great on the HS900 camcorder, however, Mac is not compatible with this format, not even iMovie or Final Cut Exprees.

While looking for a solution to edit HS900 recorded 1080/60p AVCHD videos in iMovie/FCE, Mac Panasonic AVCHD Converter is recommended as the partner to Panasonic HS900 for iMovie/FCE editing. As Apple InterMediate Codec is the most compatible video format for iMovie, this superior Panasonic 60p/50p MTS to iMovie/FCE Converter will help you to convert Panasonic HDC-HS900 1080/60p AVCHD to AIC and make HS900 HD camcorder video footage editable on iMovie and FCE.

Below is a simple instruction for you to import and edit Panasonic HDC-HS900 60p/50p MTS to iMovie/FCE on iMac/MacBook Pro with Mac OS X like Mountain Lion, Lion, Snow Leopard.

Step 1. Import HDC-HS900 AVCHD MTS/M2TS files to Panasonic AVCHD to AIC Converter for Mac.

Click the add button to import the AVCHD resource files to the Pavtube AVCHD MTS/M2TS converter for Mac. Then the files will be listed on the file list tab, you can choose to check the properties of the video or preview it.


Step 2. Choose suitable output format forthe HDC-HS900 AVCHD to AIC conversion.

Click the format bar, and there will bemany output formats on the format list. You are recommended to choose iMovie and Final Cut Express > Apple Intermediate Codec (AIC) (*.mov).


Step 3. Convert HDC-HS900 AVCHD MTS/M2TS video footages to iMovie/FCE.

Click the "Convert" button and start transcode HDC-HS900 AVCHD MTS/M2TS footage to AIC for iMovie/FCE will begin at once.

When the conversion finished, you candirectly import the output AIC MOV files to iMovie and Final Cut Express for editing andmake your movies. The importing needn’t any rendering because the AIC MOV isone of the compatible video formats in iMovie/FCE on Mac OS X Lion.

Read More:

Sony Cyber-shot RX100 sequel leaks in Japanese with WiFi and tilting display

We were more than a little smitten with Sony's original RX100, a high-end Cybershot point-and-shoot housing a notable 1-inch 20.2-megapxiel CMOS sensor alongside a f/1.8 Carl Zeiss lens. It looks like there were enough customers that thought the same, because SonyAlphaRumors has gleaned several images from the manual for a sequel device.

The site has more to share, but it's checking its translations first. In the meantime, these initial images already point to some notable hardware additions. Alongside a screen that can tilt up and down (plus a light sensor to adjust brightness automatically), the mark two RX100 will apparently catch up with Sony's NEX series, adding built-in WiFi too. There's also the addition of a hot shoe for mics and other peripherals, but fear not: there's still the built-in flash to the left of it. Naming, pricing and availability are still unknowns, but according to the site's mole, the camera will get formally announced later this month on June 27.

See related video tips for Sony: 

Thursday, June 20, 2013

Deinterlace/Import Sony DSC-WX30 1080i mts to Avid, Premiere, Sony Vegas, Pinnacle and Windows Movie Maker

Sony has announced the WX30, a 5x zoom camera with 16.2MP backlit CMOS sensor.
Overview:
Professional quality in your pocket

So compact and easy to use, the Cyber-shot™ WX30 digital camera offers extraordinary imaging possibilities. Step up to high-performance imaging with detail-packed stills, 3D and smooth Full HD video. Picture Effect lets you achieve impressive creative results with ease.

Features:

  • Better looking pictures made easy 
    Not sure how to pick the perfect camera settings to suit a particular scene? Don’t worry, help is at hand. Superior Auto Mode adjusts exposure and other camera settings for optimum results in a wide range of shooting situations.
  •  Magical moviesLeft your camcorder behind? One touch is all that’s needed to shoot brilliantly crisp, detailed HD 1080i video clips. Picture quality is wonderfully clear and smooth, while efficient AVCHD video compression keeps files smaller for storing and sharing.
  • Add a new dimension with 3DDiscover an incredible world of 3D imaging. Shoot 3D stills at the touch of a button. Capture wide 3D images to enjoy on your 3D TV with Sweep Panorama. Sweep Multi Angle creates amazing 3D-like views you can explore by tilting the camera screen.
  • Sensational images, even in low light 

    Many cameras struggle to produce crisp, clear images in low light. The revolutionary Exmor R™ CMOS sensor boosts sensitivity while reducing image noise for brilliant, detail-packed pictures. 

Tips: Sony DSC-WX30 1080i AVCHD workflow on Windows PC editing program

Sony WX30 offers 1080i recordings in AVCHD and MP4 format, so if you wanna import WX30 AVCHD file to PC in video editing programs like Avid, Premiere, Sony Vegas, Pinnacle or Windows Movie Maker for editing, you may find most video editing programs does not recognize the WX30 AVCHD video footage, and that's why we need to convert Sony MTS to editable formats before editing.

Soteware Requirement:

Pavtube HD Video Converter for Mac - a powerful Sony AVCHD MTS Converter can help you easily transcode Sony WX30 1080i AVCHD to best codec for Windows platform. (Downlaod the Windows version here: )

This is the main interface of the AVCHD to AVI/WMV/MOV Converter:


You can choose rich output formats for editing on Windows.

For example, it the Format box, you can select WMV (for Adobe Premiere, Sony Vegas, Windows Movie Maker), MOV (for Avid Media Composer), AVI (for Pinnacle Studio), etc.

After encoding Sony WX30 1080i MTS to Windows PC compatible format, Sony WX30 1080i AVCHD footage can be imported to Avid, Premiere, Sony Vegas, Pinnacle or Windows Movie Maker instantly and also the 1080i is deinterlaced.

Another program Pavtube Video Converter can do the same job, it can also deal with you blu-ray, DVD and HD Videos. just have a try!

Read More:

Monday, June 17, 2013

Best method to import Sony HDR-SR12 MTS to Final Cut Pro on Mac

To get Final Cut Pro working perfectly with SR12 AVCHD .mts files, a best way is to convert Sony SR12 MTS to ProRes MOV, something ensuring best results when using .mts files in FCP. Read on to learn details.
 

Sony HDR-SR12

As the leader in the high-definition camcorder category, Sony is further expanding the industry with the introduction of a new HD camcorder model. Sony HDR-SR12 hard drive camcorder is based on AVCHD technology and feature full 1920 x 1080 high-definition recording for outstanding clarity and detail. It delivers the highest HD resolution available without sacrificing recording times. And features a new high-profile encoding system to optimize encoding efficiency. And, because HDR SR12 is based on the industry-standard MPEG-4 AVC/H.264 video codec, it enters the market compatible with many third-party editing suites, however not including Final Cut Pro. 
 

I became a Mac user just a few days ago, when I bought a MacBook Pro. Now I'm trying out the trial of Final Cut Pro X 10.0.0.1 with my Sony HDR-SR12. I have problems getting my MTS-files to/imported to Final Cut Pro X. I've read the help over and over again, searched on Google and youtube, and in this forum. Nothing seems to help me. This is what I tried (and of course all sorts of it):  

- Start FCPX
- Connect my Sony HDR-SR12 with USB
- Turn the camcorder on and choose USB CONNECT
- Press the "Import media from a connected device" icon in FCPX
- "NO NAME" is showing up, with a circle... waiting...
- After a minute, "NO NAME" disappears

Any ideas? Thanks, 


Like almost all Sony HDR camcorder users, you may be confused on how to edit Sony HDR-SR12 video with Final Cut Pro on Mac OS X as above. Final Cut Pro isn't compatible with Sony HDR-SR12 AVCHD video, so before solving this problem, you have to convert Sony HDR-SR12 AVCHD to FCP acceptable file format like MOV video format encoded with ProRes or H.264 codec on Mac OS X for natively importing SR12 mts files to FCP.

Sony MTS to FCP Converter is a top assisting app for AVCHD to Mac processing. It re-wraps the Sony AVCHD .mts/.m2ts media into a .mov format so that FCP can read the mts files. Because no actual encoding takes place, the conversion takes in a few seconds. For users that wanna skip rendering process in FCP, it is also possible to export Apple ProRes encoded .mov.

The easy way to import and edit Sony SR12 AVCHD in Final Cut Pro 

Step 1: Download Pavtube AVCHD to Final Cut Pro Converter and import your Sony SR12 AVCHD file. This software will solve your AVCHD to Final Cut Pro importing problems.


Step 2: You will need to choose the output format for FCP. You are recommended to choose Final Cut Pro -> Apple ProRes 422 (*.mov), it’s great for editing in FCP. There are more formats for output, you can pick as you need.


Step 3: Click “Settings” button to adjust the output video’s parameters, such as bitrate, resolution, etc. for example, you can choose the resolution as 1920*1080 or 1280*720, that’s 1080p or 720p resolution, great for editing.


Step 4: Start converting Sony SR12 AVCHD to Final Cut Pro with Prores Codec.

After converting, you can load Sony SR12 AVCHD video to Final Cut Pro for editing as you want, now you can have a try.

Read Related Articles:

Thursday, June 6, 2013

Make Sony HDR-PJ780 1080 50/60p AVCHD Editable in iMovie and FCE

Summary: To import 50/60p AVCHD mts video clips from Sony PJ780 to iMovie/FCE, you just need to get a top Sony MTS Converter to help you to convert AVCHD to most compatible video format (AIC MOV) with Mac iMovie and FCE


Sony PJ780 Reviews: 

Balanced Optical SteadyShot paired with current video technology at the height of the time could be the Sony HDR-PJ780 quickly becomes the darling ambitious videographers.Sony would have unlocked a second time, the full manual control and the image characteristics of the camera.Conversely, those who anyway only in automatic mode at the PJ780 films should have a lot of fun.One can in many cases save a tripod and maybe there are here and there even a suitable use for the built-in projector.

Pros:
  • Image Stabilizer 
  • Wide Angle 

Cons:
  • Image characteristics can not be changed 
  • Few image control options 
  • Small (touch) screen 

Sony HDR-PJ780 can films full HD 1080 video recording at 50/60, 25 and 24 fps in AVCHD format, also supports 720p MPEG-2 format. It is an excellent camera for us to record vivid videos, especially the AVCHD format can deliver stunning picture quality, unfortunately, iMovie/FCE doesn't support 50/60p from your camera Sony PJ780.

As we know, iMovie and FCE favorable video format is Apple Intermediate Code(AIC). The best and quick solution is to transcode Sony PJ780 50/60p AVCHD to AIC with iMovie/FCE best supported codec and format AIC .mov. Then you can handle your Sony PJ780 AVCHD in iMovie/FCE effortlessly.

Here we recommend you to choose a top MTS to AIC Converter for mac to transfer Sony PJ780 MTS recordings for iMovie 9 or FCE 4 editing. With this Mac AVCHD Converter, you not only can easily transcode Sony PJ780 1080 50/60p AVCHD clips to MOV files with AIC codec for your iMovie/FCE with the preset profiles, but also can combine several clips into one for easy importing/editing into iMovie and FCE.

As for how to convert Sony PJ780 50/60p AVCHD to iMovie or Final Cut Express, you can follow the bellow steps.

Step 1: Load MTS files.

Connect Sony HDR-PJ780  to your Mac via USB 2.0, or insert your SD Card to Mac. You can browse the .mts files from AVCHD > BDMV > STREAM. And then insall and luanch the best Mac Sony MTS to AIC Converter. Click the “File” or the related label to add the .mts files from your Camcorder.


Tips: If you want to merge multiple 1080 50/60p MTS clips into one, please tick “Merge into one file” box to merge the files into one single file.

Step 2: Choose output format.

Click on the “Format” and move you pointer to “iMovie and Final Cut Express” on the dropdown menu, choose it for natively editing Sony MTS files in iMovie and FCE.


Step 3: Set the best video profile for FCE/iMovie editing Sony HDR- PJ780 MTS files.

Click the “Settings” icon and you will be led to the “Profile Settings”, on which page you can customize the codec, bit rate, frame rate, sample rate and audio channel according to your needs and optimize the output file quality.


Tricks:

1. 30 fps, and video size as 1920*1080 are recommended parameters to keep the best quality for editing MTS footages in Final Cut Express or iMovie.

2. If you want to have a smaller file size but keep the good quality, you can change the video size to 1440*1080.

Step 4: Convert Sony PJ780 50/60pMTS to AIC MOV. 

Click the “Convert” button, it will start the fast transcoding Sony HDR- PJ780 50/60p MTS to ProRes for FCE/iMovie on Mac. You can get the estimated time and video size in the “Conversion” interface.

After Sony MTS to AIC conversion, you will be able to get the output files for FCE/iMovie by clicking on “Open” button. Now you can import and edit Sony HDR-PJ780 1080 50/60p MTS in FCE or iMovie easily and effortlessly.

Free Download Sony MTS Converter for Mac

Read More:

Thursday, May 30, 2013

How to get/load Panasonic Lumix GH3 MTS to Final Cut Pro X

Summary: Read on the article to find the easy solution how to import and edit Panasonic Lumix GH3 AVCHD MTS in FCP X with no issues. 

Panasonic is trying to promote its brand new Lumix GH3 as "the first DSLM". That's "digital single lens mirrorless" for the uninitiated, thought it sounds - obviously and intentionally, no doubt - a lot like "DSLR" to us. Hardly a surprise then that it looks, feels and functions a lot like one too. GH3 features a 17.02MP Micro 4/3 Digital Live MOS sensor and a 4-CPU Venus Engine, which enable the GH3 to capture high resolution JPEG and RAW stills as well as intricately detailed HD video.


GH3 can record AVCHD video format.We like shooting and playing HD MTS videos at 60p, but we can't get an enjoyment on editing these 60p MTS footgaes in FCP X. To smoothly import Panasonic GH3 MTS to FCP X for further editing, you'd better transcode unsupported MTS or all AVCHD files to videos with a compatible Prores .mov format for FCP X before ingesting, thus you can directly bring GH3 AVCHD files to FCP without any plugin.

1. Free Download Pavtube MTS Converter for Mac. This software can convert Panasonic GH3 AVCHD MTS video to FCP friendly formats or other common formats.


2. Install and run this MTS to FCP Converter.

3. click format bar to choose output format for use in FCP X. click and choose Final Cut Pro -> Apple ProRes 422 (*.mov). it's the best format for FCP - to import Panasonic GH3 MTS to FCP X.


4. You can click "settings" button to adjust output parameters, such as resolution and bitrate.
5. Click convert button to start.

The Panasonic GH3 Mac MTS Converter will convert Panasonic MTS for iMovie quickly. After conversion, you can edit Panasonic GH3 MTS video in iMovie as you want.

You can also follow GH3 MTS to ProRes for Final Cut Pro conversion guide and learn how to import video files to FCP (X).


Read More: