Showing posts with label iMovie. Show all posts

Thursday, July 25, 2013

iMovie no audio problem? Find the easy solution to fix it here

Summary: If you have the common "iMovie no sound problem" issue, just read this article, you will find the best solution here.


Q1: Want to edit in imovie and there is no audio! Can't get it to play full screen. Won't open. Wont show clip in viewer either. I have tried restarting imovie. havee restarted Macbook pro)
 

Q2: Completed my first movie in iMovie '11 and I'm having an audio problem. Searched and found many audio problems in iMovie-- too bad because it's a pretty easy program to work with!

Q3: I'm making a movie on my Mac Mini and I am struggling with this audio bug using iMovie 11.  I'm seeing this issue that I cannot solve. Any clues here? Thanks in advance. 


As above, "iMovie no sound" is a common problem asked by many mac users. What's the problem? This may lie in the unsupported codec and format of the video files that imports into iMovie. 

From Apple forum we know that many common vidoe codes and formats are not a suitable and native for iMovie, so you are suggested to transocde all kinds of videos to AIC (Apple Intermediate Codec), the favorite editing codec of iMovie in advance. This may be te easy solution!

Pavtube HD Video Converter for Mac can fix this iMovie no sound, which supports converting videos for using in iMovie with no limition. You can do it on All major Mac OS X operating systems, like Mountain Lion, Lion, Snow Leopard and the lastest Mac OS X Mavericks. 

Steps: Convert and import videos to iMovie without losing sound issue 

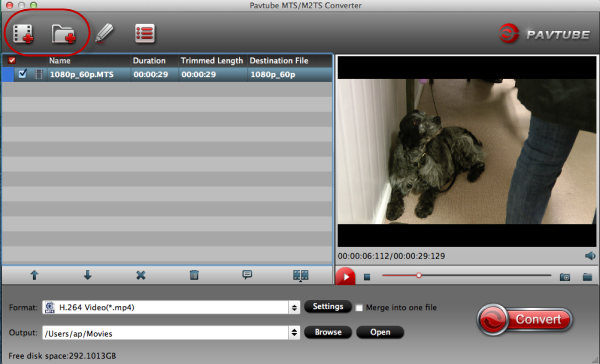
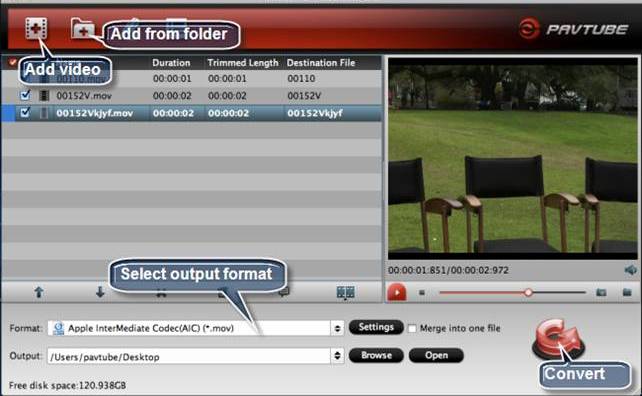
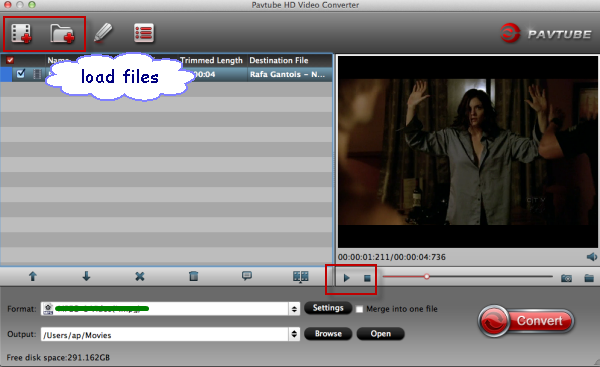
Step 1: Run Pavtube HD Video Converter for Mac and video clips to it

You can click either "Add Video" button or "Add from folder" button to load source files.

If you want to combine the loaded video clips into one file, simply tick off the checkbox before "Merge into one file".


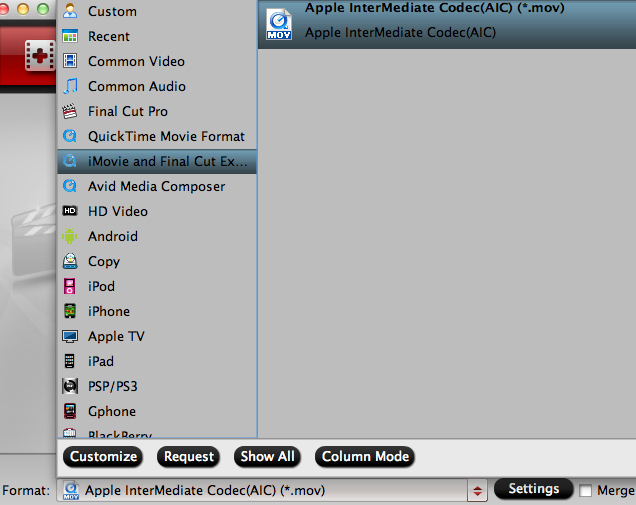
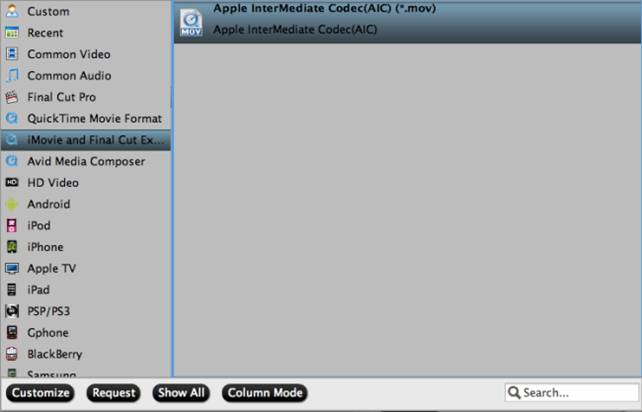
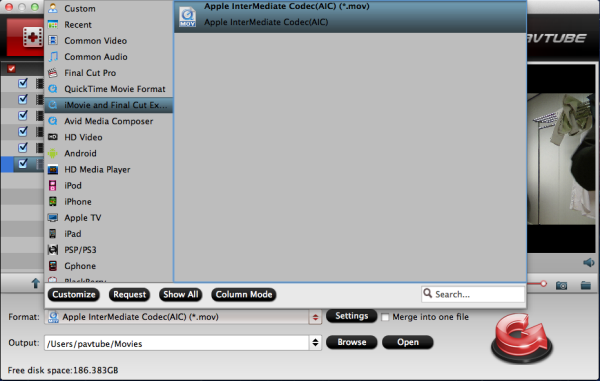
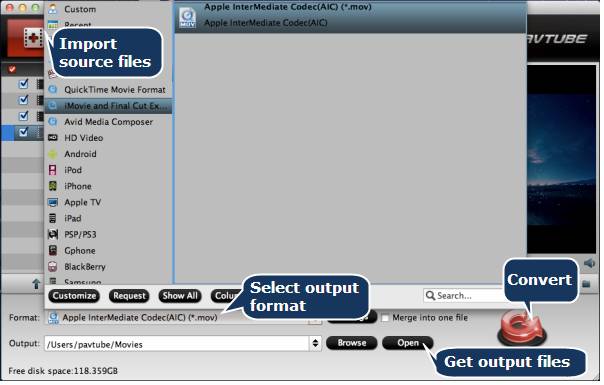
Step 2: Select "Apple InterMediate Codec (AIC) (*.mov)" as target format

In order to convert video to AIC for use in iMovie, simply hit "Format" menu and follow "iMovie and Final Cut Express" > "Apple InterMediate Codec (AIC) (*.mov)".
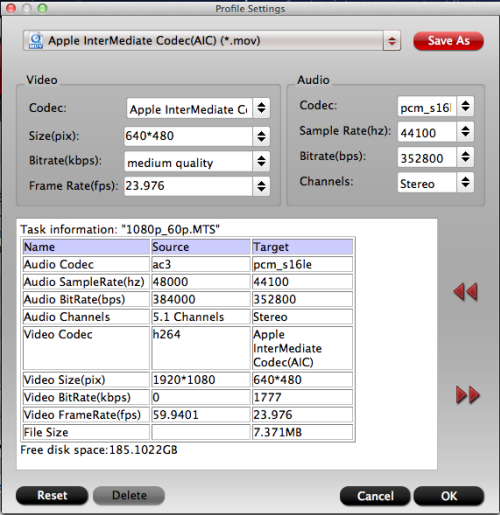
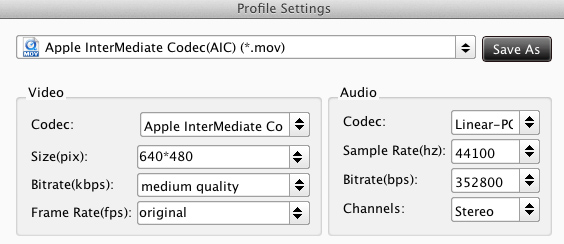
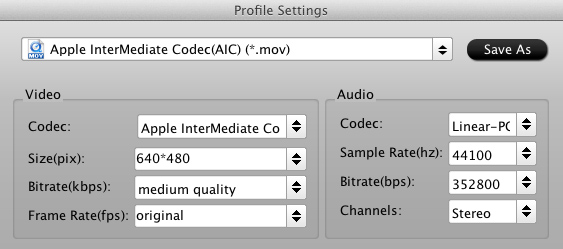

Settings:


Step 3: Start all kinds of videos to AIC Conversion

Click the big button "Convert" to start all kinds of videos to AIC Conversion.

As soon as the conversion is completed, you are able to click "Open" button to get the generated AIC MOV files for use in iMovie.

Step 4: Import converted videos to iMovie.

Launch iMovie, and then choose "File > Import > Movies" to import the converted videos to iMovie for further editing.  The audio of the video file will ok in iMovie and you will not have any "iMovie no sound" problem.

Now you you can edit you video projects in iMovie without any hassle. Find more iMovie Solutions here.

Tuesday, July 16, 2013

MXF to AIC MOV Converter-Edit Canon C300 MXF in iMovie 11 and FCE 4

Summary: By transcoding MXF to AIC MOV format, you can smoothly import/edit Canon C300 MXF files into iMovie 11 and Final Cut Express 4 without problmes. 


Bringing Canon’s expertise and decades of experience designing sensors, lenses, image processing and design to the world of motion picture capture, the EOS C300 camera has been designed to meet the demanding needs of cinema industry professionals, providing a modular, portable and eminently adaptable system of cameras, lenses and accessories built for moviemaking in the 21st century.


A variety of physical and electronic C300 elements are borrowed liberally from Canon’s XF series camcorders, chief among them being the recording codec, known as Canon XF. It is a 50Mbps 4:2:2 MPEG2 codec utilizing the widely supported .MXF wrapper, writing 1080p30 and 720p60 video to Compact Flash at a choice of either 50Mbps or 35Mbps.

You may have used Canon C300 camcorders to record many high-definition footages which are in MXF video format, this video format is good for record videos, but it’s not compatible with many editing software, such as iMovie 11 and FCE 4 on Mac.

You may have the need to import C300 MXF footage to iMovie 11 and FCE 4 for editing. So what to do? The best way is to convert MXF to iMovie/FCE supported video format, like Apple InterMediate Codec (AIC) .MOV format. Now you can follow the step-by-step guide to convert C300 recorded mxf files to AIC MOV for iMovie 11/FCE easily.

1. Free Download Pavtube MXF Converter for Mac. The program is an excellent easy-to-use and intuitive Mac tool for camcorder users. It is good at batch converting MXF recordings shot by Panasonic P2 camcorders, Sony XDCAM camcorders, Canon XF series cameras to ProRes/AIC MOV formats compatible with your Mac Video editing software like iMovie, Final Cut Pro (X), Final Cut Express. 


2. Install and launch this Mac MXF to AIC  Converter, import Canon C300 MXF footages to the software.


Step 2. Click the "Format" option, select "iMovie and Final Cut Express > Apple InterMediate Codec(AIC)(*mov)" for editing Canon C300 MXF in iMovie/FCE.


Some more helpful features of the batch MXF to MOV Converter for Mac:

1. Adjust video and audio parameters. (Optional)

Click "Settings" button to customize the output video and audio settings by yourself. But if you are not good at it, you'd better use the default parameters, they will ensure you a good balance between file size and image quality basically. You can change the resolution, bitrate, frame rate as you need.

2. Editor (next to "Add" icon)- click to set deinterlace, denoise, mute, volume up, trim, crop, etc.


Step 3. When above steps finished, you can click "Convert" button to start converting Canon C300 MXF to AIC MOV for iMovie 11/FCE 4 with a super fast speed. With the excellent C300 MXF to MOV Converter, you can deal Canon C300 MXF footage on Mac with best video and audio quality as you want.

Related article:


Tuesday, July 2, 2013

XDCAM MXF to MOV- Edit Sony PDW-510 XDCAM MXF in iMovie 8/9/11 with High Quality

Summary:In this post, you can learn the best way and tools for importing and editing Sony PDW-510 XDCAM MXF in iMovie 8/9/11.

Sony PDW-510 is one of Sony XDCAM series, the high-end professional camcorders which can capture excellent image quality. It has been designed with special consideration for heavy-duty field acquisition, using DVCAM compression recording to 25Mbps at MXF format.

But when you want to edit the videos they record, you may find the high quality MXF files are not recognized by most editing software like iMovie (including the version 8',9',11'), as iMovie 8/9/11 cannot support the original MXF footages from  PDW-510. It is a common sense that the most compatible format for iMovie 8/9/11 is Apple Intermediate Codec(AIC)(*.mov).

So the first problem you have to solve is to transcode Sony 
PDW-510 MXF to AIC the most compatible codec which is specially designed for editing in iMovie 8/9/11. Here we recommend you to choose a top MXF to AIC Converter for mac to transfer these recordings for iMovie 8/9/11 editing.

Steps for Convert Sony  PDW-510 XDCAM MXF clips to AIC for editing in iMovie 8/9/11.

Step 1: Install the top Sony XDCAM MXF Converter for Mac on your Mac OS X, and run it to import your Sony   PDW-510 XDCAM MXF footages to it.


Tip: If you want to combine the files together, please tick the box "Merge into one" on the main interface.

Step 2: Click the Format box and select best output format on the dropdown list. You are advised to choose Apple Intermediate Codec(AIC)(*.mov) as the export.


Step 3: Click the “Settings” icon on the main interface and you’d better set the video size as 1920*1080, video frame rate as 30fps(or 25fps PAL) for importing Sony PDW-510 MXF to iMovie 8/9/11 with the best quality.


Step 4: Click the Arrow button on main interface to start converting Sony PDW-510 XDCAM MXF clips to AIC video immediately.

After the Sony  MXF to AIC converter finished transcoding, you can run the iMovie 8/9/11 to import the converted files and edit them in it without any rendering or incompatibility problem.

Editor's Recommendations

Saturday, June 22, 2013

Best solution to edit Panasonic HS900 recorded 1080/60p AVCHD videos in iMovie/FCE

Summary: If you would like to edit Panasonic HDC-HS900 1080/60p MTS on Mac with iMovie and FCE, just follow the steps below to convert Panasonic HS900 1080/60p MTS to iMovie/FCE best codec AIC.

Panasonic HDC-HS900 features Advanced 3MOS System, 1080/60p or 1080/50p Recording (Full-HD 1,920 x 1,080, 60/50 Progressive Recording), NEW HYBRID O.I.S. (Optical Image Stabilizer), large 3.5-inch LCD with Touch Operation, and a 220GB HDD and DXC/SDHC/SD Memory Card Hybrid Recording. 3D image recording is possible with the optional VW-CLT1 3D Conversion Lens. The Panasonic HS900 weighs approx 395g, with dimensions of 67 x 72 x 146mm. Compatible with SDHC, SDXC memory cards. The HD video camera stores videos in .mts format with MPEG-4 AVC/H.264 compression.

One on friends had recorded some videos using Panasonic HDC-HS900 as part of his research. He would like to import the HS900 camcorder videos to iMovie/FCE on Mac for editing. However, the resulting HD videos are in AVCHD .mts files which is highly compressed and could not be imported to iMovie/FCE. With the 1080/60p recording mode, the videos play great on the HS900 camcorder, however, Mac is not compatible with this format, not even iMovie or Final Cut Exprees.

While looking for a solution to edit HS900 recorded 1080/60p AVCHD videos in iMovie/FCE, Mac Panasonic AVCHD Converter is recommended as the partner to Panasonic HS900 for iMovie/FCE editing. As Apple InterMediate Codec is the most compatible video format for iMovie, this superior Panasonic 60p/50p MTS to iMovie/FCE Converter will help you to convert Panasonic HDC-HS900 1080/60p AVCHD to AIC and make HS900 HD camcorder video footage editable on iMovie and FCE.

Below is a simple instruction for you to import and edit Panasonic HDC-HS900 60p/50p MTS to iMovie/FCE on iMac/MacBook Pro with Mac OS X like Mountain Lion, Lion, Snow Leopard.

Step 1. Import HDC-HS900 AVCHD MTS/M2TS files to Panasonic AVCHD to AIC Converter for Mac.

Click the add button to import the AVCHD resource files to the Pavtube AVCHD MTS/M2TS converter for Mac. Then the files will be listed on the file list tab, you can choose to check the properties of the video or preview it.


Step 2. Choose suitable output format forthe HDC-HS900 AVCHD to AIC conversion.

Click the format bar, and there will bemany output formats on the format list. You are recommended to choose iMovie and Final Cut Express > Apple Intermediate Codec (AIC) (*.mov).


Step 3. Convert HDC-HS900 AVCHD MTS/M2TS video footages to iMovie/FCE.

Click the "Convert" button and start transcode HDC-HS900 AVCHD MTS/M2TS footage to AIC for iMovie/FCE will begin at once.

When the conversion finished, you candirectly import the output AIC MOV files to iMovie and Final Cut Express for editing andmake your movies. The importing needn’t any rendering because the AIC MOV isone of the compatible video formats in iMovie/FCE on Mac OS X Lion.

Read More:

Thursday, June 6, 2013

Make Sony HDR-PJ780 1080 50/60p AVCHD Editable in iMovie and FCE

Summary: To import 50/60p AVCHD mts video clips from Sony PJ780 to iMovie/FCE, you just need to get a top Sony MTS Converter to help you to convert AVCHD to most compatible video format (AIC MOV) with Mac iMovie and FCE


Sony PJ780 Reviews: 

Balanced Optical SteadyShot paired with current video technology at the height of the time could be the Sony HDR-PJ780 quickly becomes the darling ambitious videographers.Sony would have unlocked a second time, the full manual control and the image characteristics of the camera.Conversely, those who anyway only in automatic mode at the PJ780 films should have a lot of fun.One can in many cases save a tripod and maybe there are here and there even a suitable use for the built-in projector.

Pros:
  • Image Stabilizer 
  • Wide Angle 

Cons:
  • Image characteristics can not be changed 
  • Few image control options 
  • Small (touch) screen 

Sony HDR-PJ780 can films full HD 1080 video recording at 50/60, 25 and 24 fps in AVCHD format, also supports 720p MPEG-2 format. It is an excellent camera for us to record vivid videos, especially the AVCHD format can deliver stunning picture quality, unfortunately, iMovie/FCE doesn't support 50/60p from your camera Sony PJ780.

As we know, iMovie and FCE favorable video format is Apple Intermediate Code(AIC). The best and quick solution is to transcode Sony PJ780 50/60p AVCHD to AIC with iMovie/FCE best supported codec and format AIC .mov. Then you can handle your Sony PJ780 AVCHD in iMovie/FCE effortlessly.

Here we recommend you to choose a top MTS to AIC Converter for mac to transfer Sony PJ780 MTS recordings for iMovie 9 or FCE 4 editing. With this Mac AVCHD Converter, you not only can easily transcode Sony PJ780 1080 50/60p AVCHD clips to MOV files with AIC codec for your iMovie/FCE with the preset profiles, but also can combine several clips into one for easy importing/editing into iMovie and FCE.

As for how to convert Sony PJ780 50/60p AVCHD to iMovie or Final Cut Express, you can follow the bellow steps.

Step 1: Load MTS files.

Connect Sony HDR-PJ780  to your Mac via USB 2.0, or insert your SD Card to Mac. You can browse the .mts files from AVCHD > BDMV > STREAM. And then insall and luanch the best Mac Sony MTS to AIC Converter. Click the “File” or the related label to add the .mts files from your Camcorder.


Tips: If you want to merge multiple 1080 50/60p MTS clips into one, please tick “Merge into one file” box to merge the files into one single file.

Step 2: Choose output format.

Click on the “Format” and move you pointer to “iMovie and Final Cut Express” on the dropdown menu, choose it for natively editing Sony MTS files in iMovie and FCE.


Step 3: Set the best video profile for FCE/iMovie editing Sony HDR- PJ780 MTS files.

Click the “Settings” icon and you will be led to the “Profile Settings”, on which page you can customize the codec, bit rate, frame rate, sample rate and audio channel according to your needs and optimize the output file quality.


Tricks:

1. 30 fps, and video size as 1920*1080 are recommended parameters to keep the best quality for editing MTS footages in Final Cut Express or iMovie.

2. If you want to have a smaller file size but keep the good quality, you can change the video size to 1440*1080.

Step 4: Convert Sony PJ780 50/60pMTS to AIC MOV. 

Click the “Convert” button, it will start the fast transcoding Sony HDR- PJ780 50/60p MTS to ProRes for FCE/iMovie on Mac. You can get the estimated time and video size in the “Conversion” interface.

After Sony MTS to AIC conversion, you will be able to get the output files for FCE/iMovie by clicking on “Open” button. Now you can import and edit Sony HDR-PJ780 1080 50/60p MTS in FCE or iMovie easily and effortlessly.

Free Download Sony MTS Converter for Mac

Read More:

Sunday, April 28, 2013

XAVC to iMovie-Edit Sony PMW-F55/F5 XAVC files in iMovie on Mac

With the introduction of the new PMW-F5 and PMW-F55 4K cameras, Sony has started the roll-out of its new, more efficient, mid-range codec: XAVC. This has been designed for 4K, and will offer both intra frame and Long GoP options. It will also allow higher frame rate recording at 1080p.

The cameras will support four codecs: XAVC, for high frame rates and 4K, MPEG-2 at 50Mbps, MPEG4 SStP (Sony’s SR Master codec) and Raw 4K “by the switch of a button, depending on what job you want to do,” adds Olivier Bovis, Sony’s head of AV Media. XAVC is an extension of H.264, using the highest Level 5.2 of the standard, so it is very solid in terms of multi-generational support, he explains.


XAVC Converter for Mac, a powerful Sony XAVC to iMovie Converter software which is able to convert XAVC files to AIC, is not only a Sony PMW-F55/F5 XAVC to iMovie Converter, but also a various video format converter supports transcoding Sony XAVC to FCP Prores. With it, you can easily convert your footages in different formats to iMovie preferred formats smoothly. It also provides try-before-purchase service, click here to download a free trial version.

(Tip: Click Sony XAVC Converter to access a windows version if you are running Windows PC.)

How to convert Sony F55/F5 XAVC media to AIC for iMovie

Step 1. Install and launch the Pavtube Sony XAVC to AIC Converter for Mac, click "add videos" to load individual videos, or click "add from folder" to load the whole folder.


Step 2. Click "Format" preset and choose "iMovie and Final Cut Express-> Apple InterMediate Codec (AIC) (*.mov)" as best video format for editing Sony XAVC in iMovie as well as good video quality.


If you just want to convert this video for normal use and want it to be smaller in size, then Apple ProRess 422 (*.mov) is suggested.

You can also click "Settings" which is marked as step 3 to fix the frame rate, bitrate and video quality to your needs. (Refer to the page)

Step 3. now click "Convert" and let it go. The XAVC to AIC Converter for Mac supports batch conversion, so if you have lots of xavc videos to convert, check 'Shut down computer after conversion', and you can go away without keeping an eye on it.

Tips: When the conversion is finished, you can import the converted XAVC file to iMovie.

Related articles:

Thursday, April 25, 2013

Transcode/Import Nikon D4 MOV videos to iMovie for smoothly editing


Facing problems importing Nikon D4 MOV files into iMovie 11/09/08? Here you will find the fluid workflow for editing Nikon MOV footage with iMovie. 

Apple Intermediate Codec (AIC) would be the finest codec for iMovie editing, which truly can be a mov format. As we know, Nikon D4 record movies in MOV format, but these mov footage constantly in HD (1080p, 720p or 1080i ). And include diverse codec. These mov films can not be supported properly by iMovie. If you desire to edit Nikon D4 MOV recordings in iMovie, so as to get the top video good quality, you happen to be recommended to transcode MOV to AIC.AIC can be a video codec made to become an intermediate format in an HDV workflow.


There is a quick workaround for you to get iMovie ingest Nikon MOV files without any problems. By converting Nikon H.264 .mov to AIC encoded .mov files, the possible best quality will be retained in post-production workflow and you can then edit the resulting media files just as you would edit in QuickTime Movie format without rendering. The following guide tells you how to convert Nikon D4 MOV footage to AIC codec for use in your iMovie sequence.

Nikon h.264 MOV Converter is the best choice to help you transcode H.264 MOV to iMovie preferable AIC format fast. As a professional converter, Pavtube iMedia Converter for Mac is a recommendable Nikon H.264 MOV converter for iMovie to help you which is an all-in-one converter for dealing with your Blu-ray, DVD and Videos on Mac.

First free Download and install Pavtube iMedia Converter for Mac. This converter can help you transcode Nikon H.264 MOV video to iMovie, Final Cut Pro, FCE, etc.

1. Run this Nikon h.264 MOV to iMovie editor, import D4 h.264 MOV videos you want to transcode.

2. Click format bar to choose the format for output. For editing Nikon D4 H.264 MOV in iMovie on Mac, you can choose iMovie and Final Cut Express -> Apple InterMediate Codec (AIC)(*.mov), it's best for iMovie editing. If you want to customize it, you can click settings to use the parameters you want. And you can find the video editor button on the Column, it will help you on frame-by-frame trimming if you need.


3. Click "Converter" to start optimizing your D4 h.264 MOV to iMovie friendly format.

After a shot waiting, you can click "open" button to find the output files and import your D4 H.264 MOV into iMovie without optimizing process.

This Nikon h.264 MOV to iMovie converter can help you convert almost all the H.264 MOV videos from Nikon cameras. For instance, you can convert Nikon D3100 to iMovie, convert Nikon D7000 to iMoive, convert Nikon D300S/D90/D3200/D5100 to iMovie, etc. If you like, it will also help you convert Nikon H.264 Mov to FCP, AVID, Premiere format for editing. It's a compressive Nikon h.264 Video Converter.

Read More:

Tuesday, April 16, 2013

Frustration with iMovie and Canon G1X MOV transcoding


Canon PowerShot G1 X surprises the users with its ability to shoot spectacular 1080p full HD video with stereo sound that you can later watch on your HDTV or put to your computer to share with family and friends. In addition to be capable of shooting full HD 1080p video at 24 frames per second, the PowerShot G1 X digital camera can also shoot 720p HD video at 30 frames per second. The Full HD video, together with the professional level of images, makes the PowerShot G1 X the best choice for Canon lovers. The broght and compact camera seems the perfect one except the problem when you want to import Canon PowerShot G1 X 1080p MOV to iMovie on Mac for editing.


The reason that you can't edit G1X MOV videos in iMovie is canon G1X recorded videos are in MOV format, this format is not compatible well with iMovie and other editing software, iMovie best supported video format is Apple InterMediate Codec (AIC) MOV format, so if you want to edit G1X MOV video in iMovie smoothly, you’d better convert G1X MOV to AIC MOV for iMovie, you can follow the steps below to transcode G1X to iMovie AIC format, then you won't have any editing problems in iMovie.

1. Download Pavtube HD Video Converter for Mac, this Mac H.264 to AIC Codec Converter can help you convert G1X MOV to AIC codec for iMovie, more output formats are also supported, such as MKV/AVI/MP4/Apple ProRes, etc.

2. Run the professional Mac Canon MOV to iMovie Converter, import G1X MOV footages to this best AIC Converter for iMovie.

3. Click and choose the best output format, for editing G1X MOV in iMovie, you click and choose iMovie and Final Cut Express -> Apple InterMediate Codec(AIC) (*.mov), it's the best format for iMovie and Final Cut Express.


4. You can click settings button to customize output parameters as you want, such as codec, resolution, etc. it's good to keep the parameters as original.


5. Edit function is available to use in this G1X MOV iMovie Converter; you can trim, crop, add watermark or adjust effect to the Canon Powershot G1X MOV video.

6. Click "Convert" button to start, H.264 to AIC Converter will help you convert videos in a short time, and then you can import Canon G1X video to iMovie freely.

Pavtube HD Video Converter for Mac is an all-in-one bluray ripper for Mac, Mac DVD Ripper, and Video Converter for Mac. can convert 1080p cameras/camcorders footages to editable HD video formats for non-linear editing software like iMovie, Final Cut Express, Final Cut Pro, Final Cut Studio, Avid, Adobe Premiere etc. The HD footage can be compressed to SD video clips for storage when you wanna save storage space. The Mac iMedia Converter is also able to extract audios from Blu-ray discs, DVDs and videos for media players with high quality and fast conversion speed.

Read More:

Monday, April 15, 2013

Best solution to ingesting Sony NEX-F3 AVCHD files to iMovie on Mac


Sony's Alpha NEX-F3 is Sony's entry-level mirrorless interchangeable lens camera, it's the replacement to the NEX-C3, with the most significant change being a new 3-inch LCD that can flip upward 180 degrees and face your subject. Have you ever tried to edit the 1080/60p AVCHD videos, shot by Sony Alpha NEX-F3 Digital Camera, in iMovie? If so, you may have found that when you try to ingest 1080p Sony MTS to iMovie, you will get many AVCHD importing problems there and the reason is that 1080p AVCHD format can not be recognized by iMovie.

If you want to edit Sony NEX-F3 AVCHD in iMovie, you need to convert Sony NEX-F3 AVCHD MTS/M2TS to iMovie best supported video format, iMovie best supported video format is Apple InterMediate Codec(AIC) MOV format, you can follow the steps below then you can edit Sony NEX-F3 MTS/M2TS video in iMovie smoothly.

1. Download Pavtube MTS/M2TS Converter for Mac.This software can convert Sony NEX-F3 AVCHD video to iMovie or other common formats.


2. Install and run this Sony NEX-F3 AVCHD to AIC Converter.

3. Click format column to choose the output format for iMovie. Click and choose iMovie and Final Cut Express -> Apple InterMediate Codec (AIC) (*.mov), it's the best format for editing Sony NEX-F3 in iMovie.


4. You can click settings button to adjust output parameters, such as resolution and bitrate.

5. Click convert button to start.

The Sony NEX-F3 AVCHD Converter will convert MTS/M2TS for iMovie quickly. After conversion, you can edit Sony NEX-F3 AVCHD video in iMovie as you want.

With this Sony AVCHD to MOV Converter, you can also edit Sony NEX-F3 video in FCP

Read More:

Wednesday, April 10, 2013

Transcode/Edit Sony Alpha A57/A65/A77 AVCHD video to mov for Final Cut Pro on Mac

In this tutorial you are going to learn how to convert AVCHD Video from Sony Alpha A57/A65/A77 to FCP compatible formats for editing.
 
Nowdays, more and more cameras can record full HD 1080 60p AVCHD files. If you'eve recorded your ideas or memory into HD videos with Sony A57/A65/A77, you may also want to edit those AVCHD mts files in Adobe Premiere. But you may encounter some problems when you want to import Sony A57/A65 footages to FCP for editing, like import it slowly, and couldn't edit videos smoothly.

The reason you can't edit Sony AVCHD MTS files in FCP smoothly is that AVCHD MTS/M2TS files are not well supported by FCP on Mac due to the unfriendly codec, you can't edit the videos smoothly in Final Cut Pro. The best solution is to convert Sony A57/A65/A77 AVCHD MTS/M2TS to FCP best supported Apple RroRes codec.
Now I will start with the step-by-step guide on how to convert Sony A57/A65/A77 AVCHD 1080/60p MTS/M2TS to ProRes 422 and then import the converted videos for editing in Final Cut Pro.

Step1: Download Pavtube HD Video Converter for Mac and import your Sony A57/A65/A77 AVCHD file.


Step2: Click format column and choose the output format. You are recommended to choose Final Cut Pro -> Apple ProRes 422 (*.mov)

Tips: If you want the files to be in smaller size, you can follow Final Cut Pro > Apple ProRes 422(LT) (*mov)/Apple ProRes 422(*mov) option. If your files size is at SD levels, you are advised to choose Final Cut Pro>Apple ProRes 422(Proxy)(*mov).

Step3: Click settings button to adjust the output video's parameters, such as bitrate, resolution, etc.


Step4: Start converting Sony A57/A65/A77 1080/60p MTS/M2TS videos to Apple ProRes for Final Cut Pro 6/7/X

After the Sony A57/A65/A77 AVCHD to FCP conversion, import the converted MOV files to Final Cut Pro, then you can edit Sony A57/A65/A77 videos in FCP smoothly.

You can also convert Sony A57/A65/A77 AVCHD to best editing codec for iMovie/Premiere Pro on Mac. Just enjoy your HD videos from Sony A57/A65/A77 in your FCP now! Good luck to you!

Editor's Recommendations

Monday, April 8, 2013

Fast Convert/import Canon XF100 1080p MXF to AIC MOV for iMovie


Canon XF100 makes use of Canon's XF codec-a file-based MPEG-2 compression with MXF file wrapper. It can record content with 1080/60i/30p/24p or 720/60p/30p/24p at a constant bitrate of 50Mbps for high color resolution of HDV. You can capture many interesting videos with Canon XF100.

Everything goes perfect until you try to edit Canon XF100 .mxf file in iMovie. Fail in import the MXF file into iMovie, though you can see the disk on the desktop and can play the files in the Canon plug-in after connecting the XF100 to Mac. Why does it happen? The answer is MXF file format incompatibility with iMovie (even iMovie'11).

To import XF100 MXF files into iMovie for editing, the best way is converting MXF to iMovie recongnized video formats like AIC .mov. Mac Canon MXF Converter is your best choice to convert MXF to iMovie on Mac.

With Mac XF100 MXF to AIC MOV Converter, you can keep the highest video quality for editing. In addition, you can also convert MXF to Prores for FCP, DNxHD MOV for Avid,AVC MOV for Premiere Pro or other popular video formats like WMV, AVI, MKV, FLV, 3GP, MPG, etc on Mac and edit videos like cropping videos, adding watermark, trimming videos, merging videos.

Step 1. After downloading, install and run this best Canon MXF to iMovie Converter for Mac, just copy the MXF files from the CF cards right to your hard drive, import the files to the software.


Step 2. Click "Format" bar to choose the output format.

Click format bar to choose the output format, for editing Canon MXF files on iMovie, you can choose iMovie-> Apple InterMediate Codec (AIC) (*.mov).


Step 3. You can click Settings button to adjust the output parameters such as resolution and bitrate, you can also keep it as original.


Step 4. Click convert button to start converting Canon XF100 MXF to AIC for iMovie.

Pavtube MXF to iMovie converter can convert Canon MXF footages quickly, after conversion, you can use converted files in iMovie smoothly, just have a try.