Showing posts with label panasonic. Show all posts

Thursday, August 8, 2013

Easy Solution to import Panasonic HVX200 MXF to iMovie 8,9,11 on Mac OS X Mavericks

Summary: If you cannot use iMovie 8, iMovie 9, iMovie 11 on Mac OS X Mavericks to edit Panasonic HVX200 MXF file, do not be upset, below article will show you the solution about how to transcode Panasonic HVX200 P2 MXF to iMovie compatible format.


Panasonic AG-HVX200 answers the demands of the professional HDTV photographer with a compact and feature packed acquisition tool. This versatile prosumer High Definition camcorder packs an array of features into a handheld design. For recording video, the HVX200 includes a Mini DV tape mechanism along with two P2 (Professional Plug-in) card slots. The P2 cards allow for true variable frame rates and recording options that Mini DV tape can't offer. These include DVCPRO HD 1080/24p and 720/60p, along with normal interlaced video.

My work with the prototype camera I used over a period of six weeks started with what I know, which is 720p/24p. The P2 card of AG-HVX200 is capable of storing large amounts of video and audio data in MXF-format files. I prefer iMovie for editing with AG-HVX200, but I failed to open the MXF files with iMovie many times. (iMovie 11, Mac Mavericks). I am looking for the easy-to-use and reasonably priced converter to make my MXF files from AG-HVX200 to be readable in iMovie. I have more than 200 MXF files, I need to batch process them. Can anyone help regarding this conversion?

As far as I know, in order to edit Panasonic AG-HVX200 MXF files in iMovie 8,9,11 flawlessly, the best best method is to convert Panasonic MXF to Apple InterMediate Codec (AIC) which is a best editing codec for iMovie 8,9,11.

At first, you need 3rd-party tool- Pavtube MXF Converter for Mac

It is a professional MXF to iMovie Converter which can not only convert Panasonic AG-HVX200 recorded MXF files to AIC for iMovie 8,9,11 editing on Mac OS X Mavericks, but also provide simple video editing functions for you. This Mac MXF Converter is especially designed for converting Panasonic P2 MXF, Sony XDCAM MXF, Canon XF MXF files for editing in Final Cut Pro, Final Cut Pro X, Final Cut Express, iMovie, Avid, Adobe Premiere etc. Below is how.

Guide - Encode Panasonic AG-HVX200 MXF to AIC for iMovie 8, 9, 11 editing on Mavericks

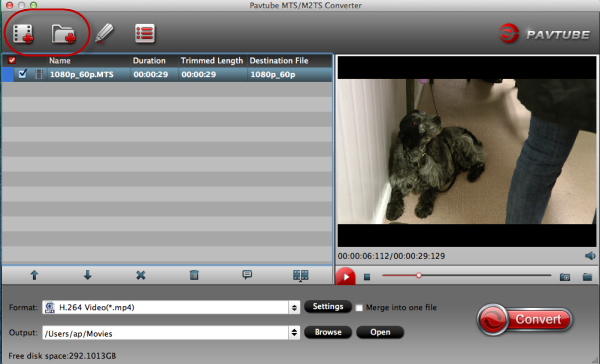
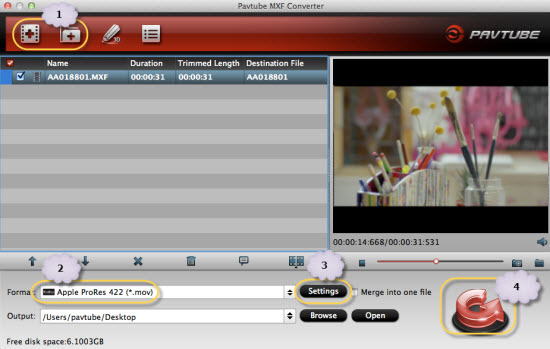
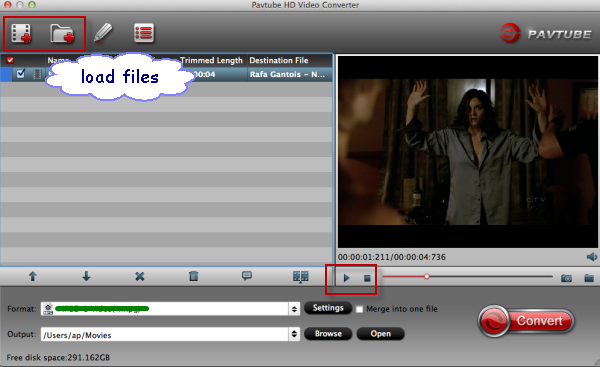
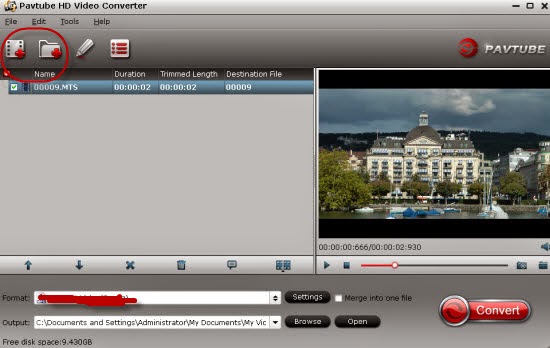
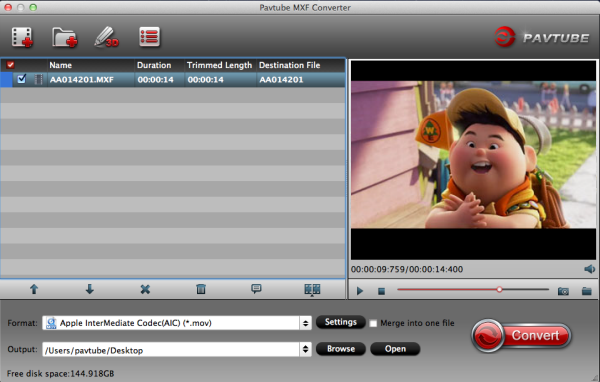
Step 1. Import MXF files from Panasonic AG-HVX200 to the top MXF to iMovie Converter for Mac.


(Note: Before conversion, you need to transfer MXF files from your Panasonic AG-HVX200 to Mac Hard Drive, then click the "add" button to browse to import MXF videos. This MXF Converter for Mac support batch conversion)

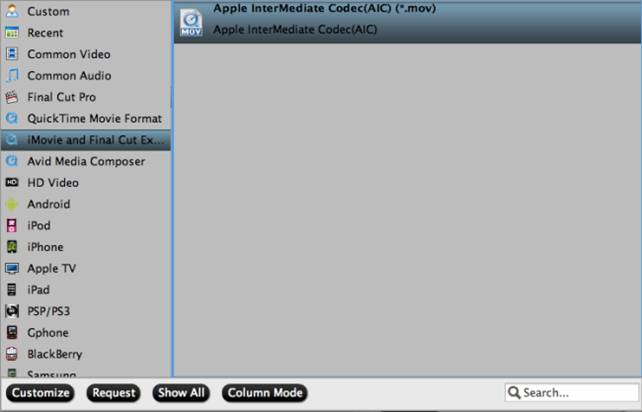
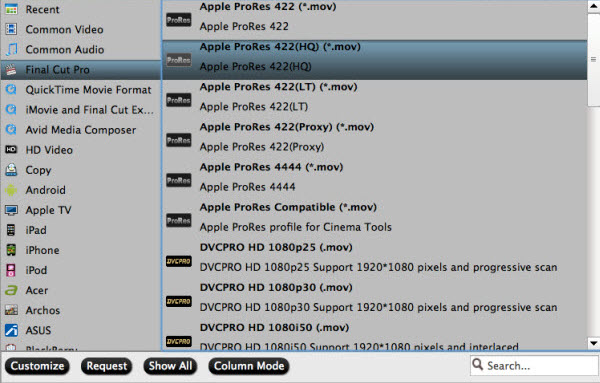
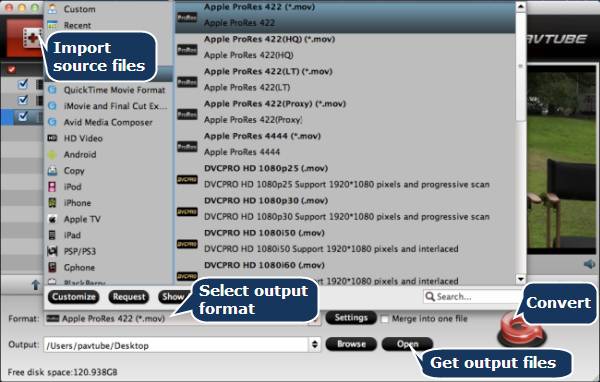
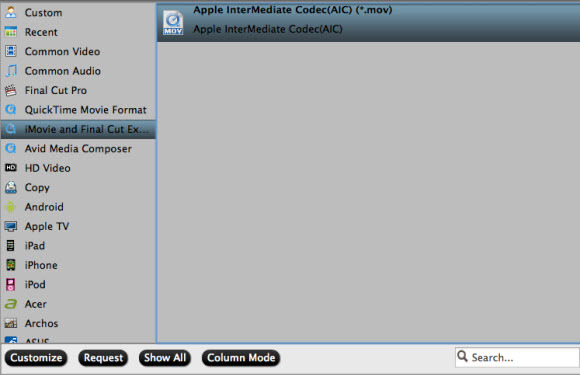
Step 2. Click the Format bar, and move mouse cursor to "iMovie and Final Cut Express -> Apple InterMediate Codec (AIC) (*.mov)", it's the best format for editing in iMovie 8,9,11.


Step 3. Click "Convert" button to start transcoding Panasonic AG-HVX200 MXF files to AIC Codec for iMovie 8,9,11 under Mac OS X 10.9 Mavericks.

Some more helpful features of the app:

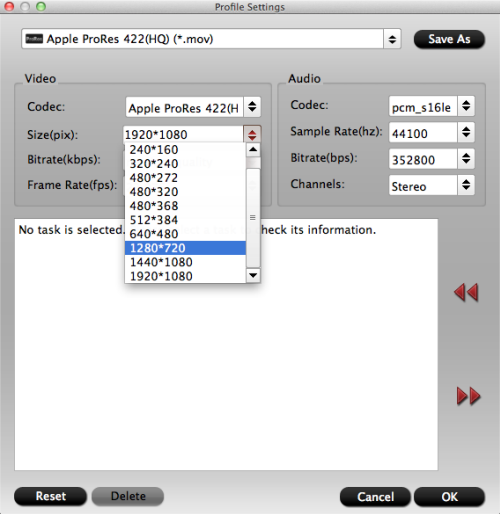
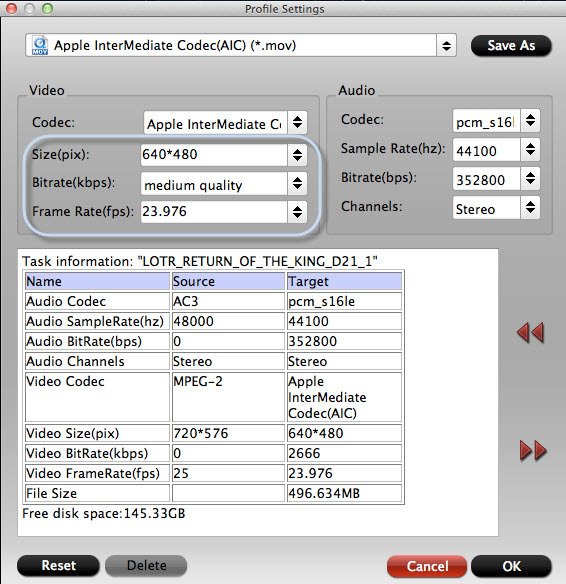
1. Settings- click to set video resolution(1920×1080/1440×1080/1280×720/720×480), bitrate(from 1Mbps to 20Mbps), frame rate (24p/30p)


2. Editor (next to "Add" icon)- click to set deinterlace, denoise, mute, volume up, trim, crop, etc.

So there you have it. Pretty simple. After the workflow, you can go to the output folder to find the converted video files. Now you are free to start importing/editing Panasonic AG-HVX200 MXF files in iMovie 8,9,11 under Maveircks without problems.

Read More:

Monday, July 29, 2013

Down-convert Panasonic GH2 MTS footage from 1080p to 720p for editing in FCP/Premiere

Summary: In this article, you can learn the best way to convert Panasoni GH2 AVCHD MTS to a file that FCP/Premiere can recognize on Mac(Mavericks 10.8 included) with downsizing 1080p HD video to 720p.


Panasonic Lumix DMC-GH2 

Panasonic Lumix DMC-GH2 updates the highly acclaimed if rather pricey GH1 Micro Four Thirds system camera. As such the GH2's styling is closer to that of a baby DSLR than its sibling's, the GF2 compact camera form. While stylistically similar, its size is roughly a third of the size of Olympus' Four Thirds E-5 DSLR, and closer in fact to that of a bridge camera. Except unlike a bridge camera, the Panasonic's added appeal is the ability to swap the lens in use. Therefore it's fair to say that for those who like the feel of a DSLR but not the attendant bulk, the GH2 is potentially a very attractive proposition. It's in effect a DSLR 'lite'. 

Easiest way to convert GH2 1080p .mts to 720p?

I'm a Director, DP-Editor/Gaffer. I do commercials and corporate work. I got my Panasonic GH2 and I shot all the .mts footage myself about Teaching Practices in Public Schools in Maryland. I like One-touch HD video recording and manual controls. And now I need to down-convert GH2 MTS footage from 1080p to 720p for storage and editing in FCP&Premiere. Is there any easy way (free or nominal fee)? 

Why we need to downsize the HD video?

By google search, you can see many folks are asking about how to downsize 1080p to 720p. It is my impression that if I edit with actual 720p files, it will be less strain on the system both in editing and rendering as well has hard drive space. In fact, it really does. After reducing the big video size, we will edit more smoothly, save space and make 1080p video playable on protable device like iPad.

An easy to use 1080p to 720p Converter

As in the above case, you have the need to find a professional MTS Converter for FCP/Premiere to downsize 1080p HD video to 720p. Pavtube MTS Converter for Mac is exactly the one ease of use. I have used it on my project, it is helpful in down-converting Panasonic GH2 1080p full HD video to 720p video quickly and transoding GH2 MTS file to FCP/Premiere editable Prores codec, then I can wok well with GH2 mts file in FCP and Premiere. Overall first impression is excellent. Below I will share the step-to-step guide to you.

Simple way to downconvert GH2 1080p to 720p for editing in FCP/Premiere

Step 1. Download Pavtube MTS Converter for Mac. This professional Panasonic MTS Converter can help you convert 1080p AVCHD MTS files to rich formats for use on Mac(Mavericks 10.9 included). 

Step 2. Install and launch this 1080p to 720p MTS Converter. Import 1080p MTS footage from GH2 to it. 

Step 3. Click "Format" bar to choose format for output, you can choose Final Cut Pro > Apple ProRes 422 HQ (*.mov) for editing in FCP and Premiere Pro.


Step 4. You can click “settings” to customize the output parameters, adjust the resolution, bitrate as you want. To down-convert 1080p to 720p, you just need set Size(pix) to 1280*720. That is the exact 720P.


Step 5. Click convert button to start converting Panasonic GH2 1080p AVCHD MTS to Prores for FCP and Premiere editing with 1280*720 definition.

As long as the conversion is done, you will get the 720p mov video files in full screen from its destination folder, and then you can import the files with 720p resolution to FCP/Premiere editing
 smoothly on Mac (including Mavericks 10.9).

Read More:

Wednesday, July 10, 2013

Panasonic GH3 and G5 firmware update brings low light AF, silent shooting

If you've been spooking subjects or failing to focus on them with your Panasonic Lumix GH3 or G5, you might feel like you got a brand new camera today thanks to a firmware update. Its new features include low-light (-3EV) autofocus and a "silent mode" setting that'll turn off the electronic shutter, all sounds and the flash emission in one go, leaving subjects like deer or golfers undisturbed. You'll also get an exposure compensation shutoff reset option, better AF performance with certain lenses and a WiFi fix for Mac computers. You can grab it at the source, proving it's not only hackers that bring free goodies to pricey cameras.


Version 1.2 for the GH3 adds the 'Low light AF' previously seen on the G6 that works down to -3 EV, a 'silent mode' that turns off operational sounds and flash firing, and an 'Exposure Compensation Reset' function'. Meanwhile version 1.1 for the G5 only corrects wording of the Motion Picture menu on cameras sold in PAL broadcast regions (including Europe and Australasia), and therefore isn't required by US owners. Click below for full details and to download the firmware.

Click here to download the latest firmware for the Panasonic Lumix DMC-GH3 (Ver 1.2)

Click here to download the latest firmware for the Panasonic Lumix DMC-G5 (Ver 1.1)


Related gudie:

Saturday, June 22, 2013

Best solution to edit Panasonic HS900 recorded 1080/60p AVCHD videos in iMovie/FCE

Summary: If you would like to edit Panasonic HDC-HS900 1080/60p MTS on Mac with iMovie and FCE, just follow the steps below to convert Panasonic HS900 1080/60p MTS to iMovie/FCE best codec AIC.

Panasonic HDC-HS900 features Advanced 3MOS System, 1080/60p or 1080/50p Recording (Full-HD 1,920 x 1,080, 60/50 Progressive Recording), NEW HYBRID O.I.S. (Optical Image Stabilizer), large 3.5-inch LCD with Touch Operation, and a 220GB HDD and DXC/SDHC/SD Memory Card Hybrid Recording. 3D image recording is possible with the optional VW-CLT1 3D Conversion Lens. The Panasonic HS900 weighs approx 395g, with dimensions of 67 x 72 x 146mm. Compatible with SDHC, SDXC memory cards. The HD video camera stores videos in .mts format with MPEG-4 AVC/H.264 compression.

One on friends had recorded some videos using Panasonic HDC-HS900 as part of his research. He would like to import the HS900 camcorder videos to iMovie/FCE on Mac for editing. However, the resulting HD videos are in AVCHD .mts files which is highly compressed and could not be imported to iMovie/FCE. With the 1080/60p recording mode, the videos play great on the HS900 camcorder, however, Mac is not compatible with this format, not even iMovie or Final Cut Exprees.

While looking for a solution to edit HS900 recorded 1080/60p AVCHD videos in iMovie/FCE, Mac Panasonic AVCHD Converter is recommended as the partner to Panasonic HS900 for iMovie/FCE editing. As Apple InterMediate Codec is the most compatible video format for iMovie, this superior Panasonic 60p/50p MTS to iMovie/FCE Converter will help you to convert Panasonic HDC-HS900 1080/60p AVCHD to AIC and make HS900 HD camcorder video footage editable on iMovie and FCE.

Below is a simple instruction for you to import and edit Panasonic HDC-HS900 60p/50p MTS to iMovie/FCE on iMac/MacBook Pro with Mac OS X like Mountain Lion, Lion, Snow Leopard.

Step 1. Import HDC-HS900 AVCHD MTS/M2TS files to Panasonic AVCHD to AIC Converter for Mac.

Click the add button to import the AVCHD resource files to the Pavtube AVCHD MTS/M2TS converter for Mac. Then the files will be listed on the file list tab, you can choose to check the properties of the video or preview it.


Step 2. Choose suitable output format forthe HDC-HS900 AVCHD to AIC conversion.

Click the format bar, and there will bemany output formats on the format list. You are recommended to choose iMovie and Final Cut Express > Apple Intermediate Codec (AIC) (*.mov).


Step 3. Convert HDC-HS900 AVCHD MTS/M2TS video footages to iMovie/FCE.

Click the "Convert" button and start transcode HDC-HS900 AVCHD MTS/M2TS footage to AIC for iMovie/FCE will begin at once.

When the conversion finished, you candirectly import the output AIC MOV files to iMovie and Final Cut Express for editing andmake your movies. The importing needn’t any rendering because the AIC MOV isone of the compatible video formats in iMovie/FCE on Mac OS X Lion.

Read More:

Wednesday, June 5, 2013

Losslessly transcode Panasonic AJ-HPX3100 P2 MXF to Final Cut Pro for editing

Summary: To make it easier for editing Panasonic AJ-HPX3100 P2 AVC-Intra MXF videos on FCP 6/7/X, you need to convert P2 MXF to ProRes codec for FCP with a professional P2 MXF converter Mac.

Panasonic AJ-HPX3100 is a high-end professional camera which offers high image quality and performance for high-end video production. This camera's native effective resolution is 1920 x 1080 and features 3x 2/3" 2.2MP CCD sensors for high quality imagery. Recording is possible in AVC-Intra 100, AVC-Intra 50, and DVCPRO HD; 4:2:2 full raster sampling is supported in the AC-Intra 100 format.

After make some footage on the Panasonic AJ-HPX3700, you may want to edit the P2 MXF files in Final Cut Pro. However, you may face the problem that FCP 6/7/X does not recognize the P2 AVC-Intra MXF .mxf videos. This is due to the unfriendly codec.

To smoothly import AJ-HPX3700 P2 footage into Final Cut Pro, you can need a professional P2 MXF Converter for Mac, which is a great Mac Panasonic MXF Converter to help me make the P2 MXF to FCP compatible ProRes transcoding. It offers the optimal preset profiles for Apple ProRes including ProRes 422, ProRes 422 (HQ), ProRes 422 (LT), ProRes 422 (Proxy) and ProRes 4444 for you to choose. And there is no need to worry about the quality loss. Now please follow the steps to transcoding AJ-HPX3700 P2 MXF to Final Cut Pro (FCP 6/7 and FCP X) with Apple Prores codec.

How to convert P2 Card MXF footage from Panasonic AJ-HPX3100 to ProRes 422 HQ

Step 1. Connect your AVC-Intra MXF Camcorder to iMac with USB 2.0 cable or use card reader to transfer the P2 AVC-Intra .mxf files to Apple hard drive disk.


Step 2. Add Panasonic AJ-HPX3100 P2 AVC-Intra MXF videos to this top Mac Panasonic MXF Converter.

Run Pavtube MXF Converter for Mac, and click the "Add Files" button to load the P2.mxf videos.
 

Step 3. Choose MOV with Apple ProRes 422 codec for Final Cut Pro 6/7/X.

Click the "Profile" option, and move mouse cursor to Final Cut Pro > Apple ProRes 422 HQ (*.mov) as output format. To get 1080 videos, we need to click the "Settings" button and choose 1920*1080 as output video resolution.
best format for editing xavc in fcp x 4K XAVC workflow with FCP 7  Convert F55 4K XAVC to ProRes 422 HQ

Step 4. Specify output file path. Click on "Browse" and browse to where you'd like to save target Apple ProRes 422 HQ video.

Step 5. Convert Panasonic AJ-HPX3100 P2 MXF to ProRes 422 HQ MOV for Final Cut Pro 6/7/X.

Click the "Convert" button and the Mac MXF Video converter would start converting Panasonic AJ-HPX3100 AVC-Intra MXF videos to Apple ProRes 422 MOV immediately.

Step 6. Press "Open" to locate result video. Launch FCP 6/7/X, and go to "File > Import > Files…" to import converted P2 footage to FCP project.


The software also converts P2 MXF and Canon MXF video to compatible formats for FCE/iMovie, Avid, Adobe Premiere Pro, After Effects, etc. You can convert Panasonic P2 MXF to AIC .MOV for FCE and iMovie, or transcode Panasonic AVC-Intra MXF to H.264 MOV, DV, AVI, M4V, MPG for Avid, Adobe Premiere Pro, and After Effects.

MXF files bite up storage. If you have lots of MXF video stored on Mac HDD and are now ending up with plenty of long files with only a few short gems, it is recommended that you use Bytecopy for Mac to import MXF and trim long video clips in Apple ProRes as well as common video formats (MOV, AVI, MP4, M4V, etc).

Read More:

Thursday, May 30, 2013

How to get/load Panasonic Lumix GH3 MTS to Final Cut Pro X

Summary: Read on the article to find the easy solution how to import and edit Panasonic Lumix GH3 AVCHD MTS in FCP X with no issues. 

Panasonic is trying to promote its brand new Lumix GH3 as "the first DSLM". That's "digital single lens mirrorless" for the uninitiated, thought it sounds - obviously and intentionally, no doubt - a lot like "DSLR" to us. Hardly a surprise then that it looks, feels and functions a lot like one too. GH3 features a 17.02MP Micro 4/3 Digital Live MOS sensor and a 4-CPU Venus Engine, which enable the GH3 to capture high resolution JPEG and RAW stills as well as intricately detailed HD video.


GH3 can record AVCHD video format.We like shooting and playing HD MTS videos at 60p, but we can't get an enjoyment on editing these 60p MTS footgaes in FCP X. To smoothly import Panasonic GH3 MTS to FCP X for further editing, you'd better transcode unsupported MTS or all AVCHD files to videos with a compatible Prores .mov format for FCP X before ingesting, thus you can directly bring GH3 AVCHD files to FCP without any plugin.

1. Free Download Pavtube MTS Converter for Mac. This software can convert Panasonic GH3 AVCHD MTS video to FCP friendly formats or other common formats.


2. Install and run this MTS to FCP Converter.

3. click format bar to choose output format for use in FCP X. click and choose Final Cut Pro -> Apple ProRes 422 (*.mov). it's the best format for FCP - to import Panasonic GH3 MTS to FCP X.


4. You can click "settings" button to adjust output parameters, such as resolution and bitrate.
5. Click convert button to start.

The Panasonic GH3 Mac MTS Converter will convert Panasonic MTS for iMovie quickly. After conversion, you can edit Panasonic GH3 MTS video in iMovie as you want.

You can also follow GH3 MTS to ProRes for Final Cut Pro conversion guide and learn how to import video files to FCP (X).


Read More:

Tuesday, May 14, 2013

How to convert Panasonic P2 HD MXF to ProRes for Final Cut Pro

Pavtube iMedia Converter for Mac is an easy-to-use and intuitive Mac MXF to ProRes Converter tool which can help you transcode recorded P2 HD MXF clips to ProRes 422, ProRes 422 HQ or 4444 for smoothly editing with Final Cut Pro 6/7/X.
 
Recently many camcorder producers have released their high-end products to attract video editors with high tech in their camcorders. You'd know that professional camcorders series usually use MXF container format to record videos instead of AVCHD format, which is often used in family expenses camcorders.

MXF is a special HD video format which has been put to use in many high-end camcorders such as Cannon XF series and Panasonic P2 HD series (including AG-HPX170, AG-HVX200, AG-HPX300, AG-HPX370, AG-HPX500, AJ-HPX2100, AJ-HPX2700, AJ-HPX3000, and AJ-HPX3700, etc.). Files are saved onto the P2 memory card in MXF format allowing direct data transfer to broadcasting and production system.

However, those files in MXF format have proved to be not so well-suited when they are about to be edited in Final Cut Pro.

The footage came from a Panasonic DVCPRO HD P2 camera. I have converted many files from this same camera with no problem but for some reason now it has no audio. I cannot find that screen you have referenced below. Is there a way someone can help walk me through this? 

To edit Panasonic P2 video footage with Final Cut Pro, you have to convert P2 MXF to FCP natively supported video format like MOV with Apple ProRes Codec. Here we recommend you the best  P2 MXF Converter for Mac which can help you to transcode Panasonic P2 MXF to Apple ProRes .mov format for FCP on Mac OS X quickly and easily.  Here comes the detailed guide. 

Notes:
  1. Please ensure that the computer you are using to do P2 MXF conversion has Final Cut Pro installed, otherwise, the converted files will have audio only without image.
  2. If you are using FCP X, please make sure you have installed ProApps QuickTime Codecs, or you may get files with sound only without video. The FCP X does not install the ProApps QuickTime Codecs automatically, so you need download and install the codec manually.
While importing MXF clips to Pavtube MXF to ProRes converter for conversion, please make sure you have the entire MXF file structure as it saved on your camcorder’s P2 card. If you only have some loose .MXF clips, your files will have image only without audio. See MXF file structure on Panasonic’s P2 card as below.


The above screenshot clearly shows .MXF clips are all saved in ‘VIDEO’ folder, while audio files are all stored in ‘AUDIO’ folder. When you importing .MXF clips from the correct file structure, Pavtube MXF to FCP Converter is able to recognize audio tracks from ‘AUDIO’ folder automatically, which ensures the generated ProRes 422 MOV files have both image and sound correctly.

Step 1: Click “Add Video” button to import P2 .mxf files


Step 2: Choose “Apple ProRes 422 (*.mov)” as output (Pavtube iMedia Converter for Mac has a preset option to choose a format specific to the Final Cut Pro)

convert-avchd-prores-422-hq-mov


Step 3: Click “Convert” button to convert P2 MXF on Mac

As soon as the conversion is finished, click “Open” button to get the generated Apple ProRes 422 MOV files to FCP (X) for extending editing.

Read Related Articles:

Tuesday, April 23, 2013

Import Panasonic DVCPRO P2 MXF files to Sony Vegas Pro 11 without Raylight Ultra by DVFilm

The best workaround for ingesting and importingPanasonic DVCPRO P2 MXF files to Sony Vegas Pro 11 for smoothly editing without any audio and video problem.

Panasonic Camcorders such as AG-HVX200, AG-HPX300, etc are normally save as MXF files are usually known as P2 MXF file for short; however, the P2 MXF file is not naturally supported by some video editing software like Sony Vegas Pro 11, Windows Movie Maker, etc. When importing the P2 MXF files to these programs for editing, you probably will meet some troubles. Here we'd like to offer you some tips of how to import P2 MXF file to Sony Vegas Pro 11 for editing without any trouble.

Q:"I have a Panasonic DVCPRO P2 camcorder that records .MXF video format, now I would like to import these projects to Sony Vegas Pro 11 for editing. What I want is to edit MXF files smoothly without codec problems, what video codec should I use? Can you recommend some software which can help me import and convert MXF to Sony Vegas Pro 11 smoothly?"

Considering that there will be probably many other P2 camcorder users would encounter the similar trouble when importing the P2 MXF footage to Sony Vegas Pro 11 for editing, so we solve the trouble for you here.

One of the solutions is to purchase the Raylight Ultra plugin. With this, you can either edit your P2 footage directly in the Sony Vegas Pro 11 timeline or you can convert the P2 MXF files to AVI format with the software that Raylight comes with. While, for some users, they may feel that the Raylight Ultra is a bit expensive. Well, here we offer you the other option- to transcode P2 MXF to MOV/WMV for Sony Vegas Pro 11 with a 3rd party software.

Here we recommendIn order to edit your Panasonic DVCPRO P2 MXF in Sony Vegas Pro 11 smoothly, you should transcode MXF format to WMV format, which is best supported by Vegas Pro.

Pavtube Video Converter Ultimate is the best choice, I have used this tools for some time, and I also rewrap Canon MXF files to Premiere, this software can deal nearly all kinds of MXF videos, it can convert Panasonic DVCPRO P2 MXF files for Sony Vegas Pro 11 easily, that is to convert MXF video to WMV/MPG format, and then you can edit Panasonic DVCPRO P2 MXF files smoothly in Sony Vegas Pro 11. Just take a look at the brief guide below.

1. Download Pavtube Ultimate Converter, follow the prompts to install the program. Click "Add" to load Panasonic DVCPRO P2 MXF video files or directly drag the files into file list.


2. Click "Format" bar to determine output format. For smoothly editing in Vegas, you are recommended to choose Adobe Premiere/Sony Vegas -> WMV (VC-1) (*.wmv), this format is best for Sony Vegas Pro 11 editing.


3. If you would like to customize the video and audio parameters, you can click "settings", adjust the parameters as you want, like Video Codec, aspect ratio, bit rate, frame rate, Audio codec, sampling rate, bit rate, channels.

4. Click "Convert" to start to convert Panasonic DVCPRO P2 to Sony Vegas Pro 11.

With this Panasonic MXF to Sony Vegas Pro 11 converter, it becomes easy for you to convert P2 MXF video to Vegas Pro smoothly for editing.

Read More: