Monday, August 19, 2013

Best Way to convert Canon HF G30 AVCHD footage to Premiere Pro CS6 and After Effects CS6

Summary: With following this guide, you can smoothly import and edit Canon HF G30 50p/60p AVCHD footage in Premiere Pro CS6 and After Effects CS6 by transcoding Canon 50p/60p .mts to Premiere/AE CS6 most compatible MPEG-2 video.


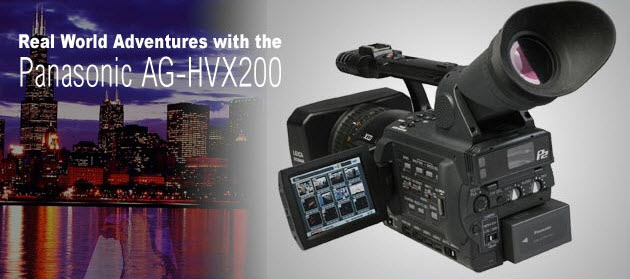
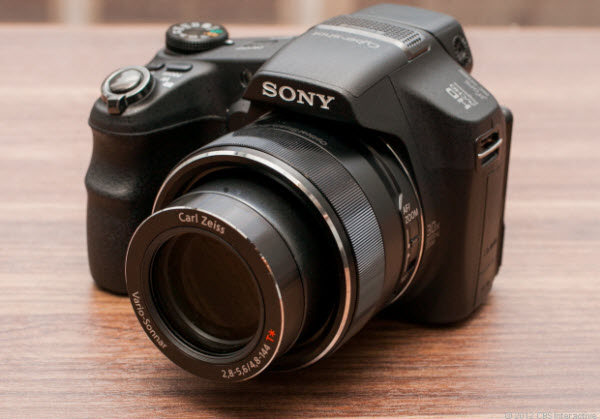
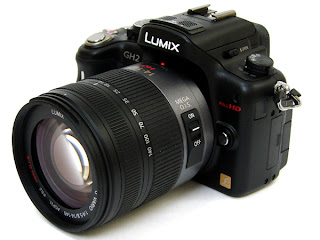
The new Legria HF G30 (also known as the Vixia HF G30 in the US) from Canon has the same imaging system, but without the XLRs and is aimed at enthusiast videographers, such as hobbyists or film students. Their HD video system has been completely redesigned – from the lens through to the image sensor and processor – to improve imaging performance. There are various advanced shooting features and connectivity options to suit different types of applications, from news and documentaries to weddings.

This camera is awesome, I've had it almost a month now and was able to put it through it's paces on a Disney cruise to Alaska. It was amazing with great control in manual mode with auto exposure and worry free shooting in auto mode where all my settings were taken care of.

But now I have a question. I'm working on a documentary project using a Canon HF G30; I had problems working with AVCHD Progressive files genereted by HF G30 and I was very worried because both Premiere Pro CS6 and After Effects CS6 didn't support the 1080 50p/60p .mts files. To make this kind of file compatbile, I tried to convert the Canon HF30 AVCHD footage with various programs but the results was no more an HD progressive file.

Then I tried this amazing program, Pavtube MTS/M2TS Converter for Mac , and I'm very happy of the converted files: no loss of quality, the same high resolution, same colors and defitition.It works fast and with an incredible quality; I tried to compare the original files with the converted one and I could not find differences, I even analysed the two files with professional instrumens and compared the flow on a professional monitor, this program it's simply great! Now I have successfully converted Canon HF G30 50p/60p MTS footage to editable formats not only for  Premiere Pro CS6 and After Effects CS6 editing, the converted files work perfectly with these pofessional editing programs!!! Just follow the step-by-step guide I shared below to get the work done smoothly.

Convert Canon HF G30 50p/60p
.mts to Premiere Pro CS 6 and After Effects CS6 editable format

Step 1: Copy Canon HF G30 50p/60p .mts media on to the Storage Drive in a folder.

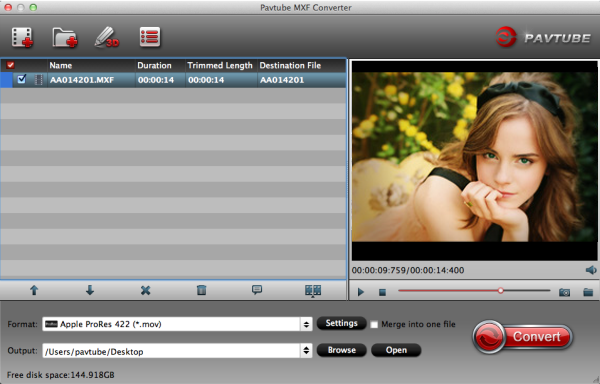
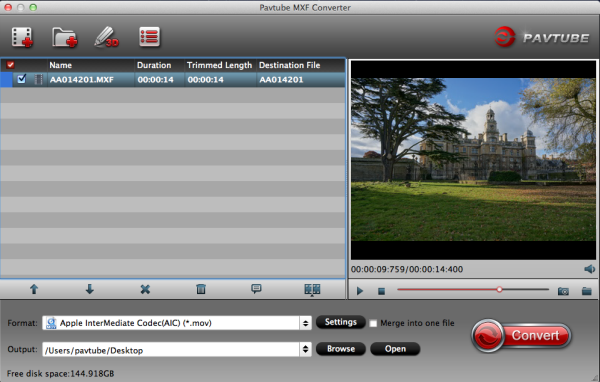
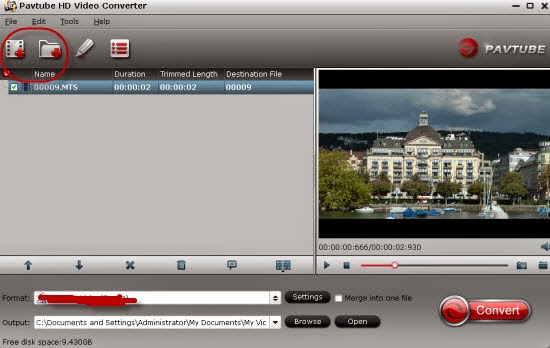
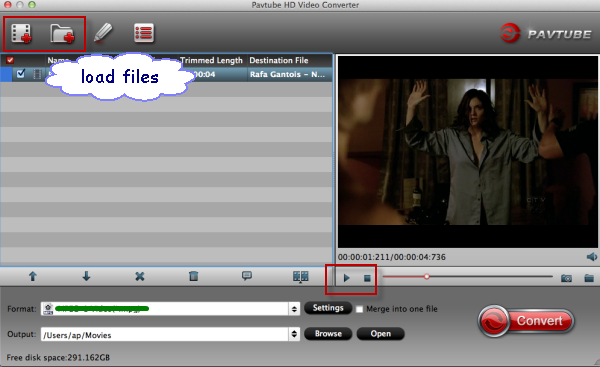
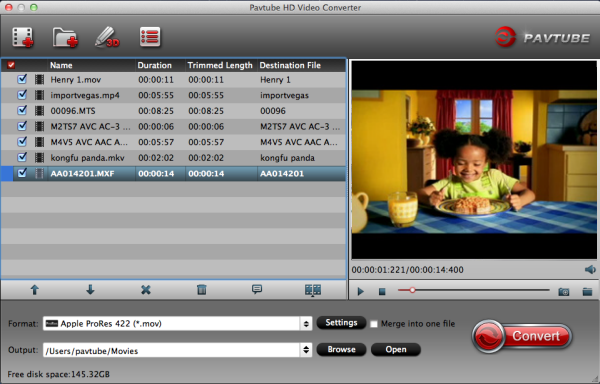
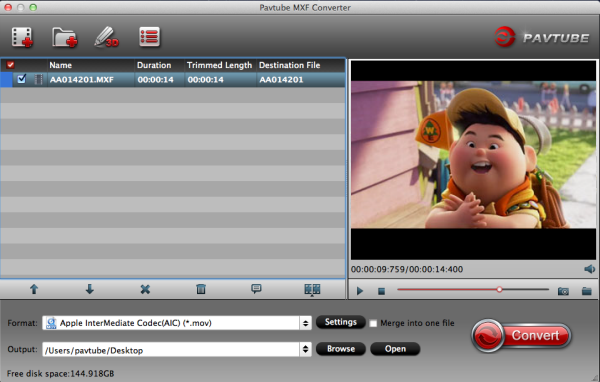
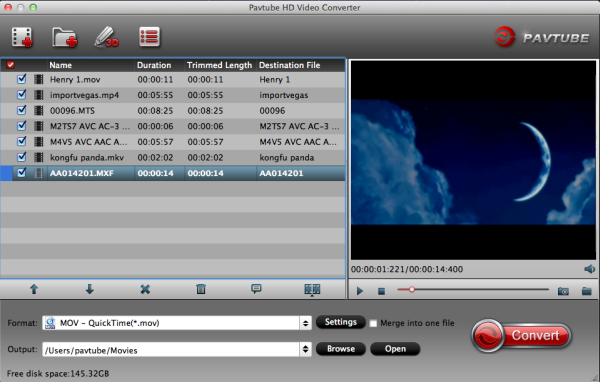
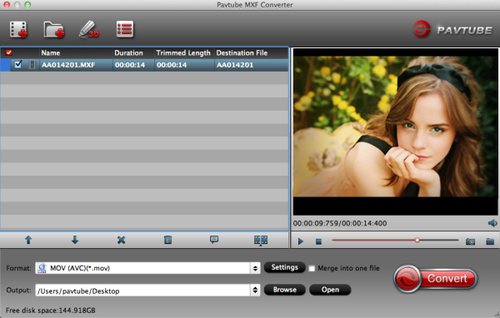
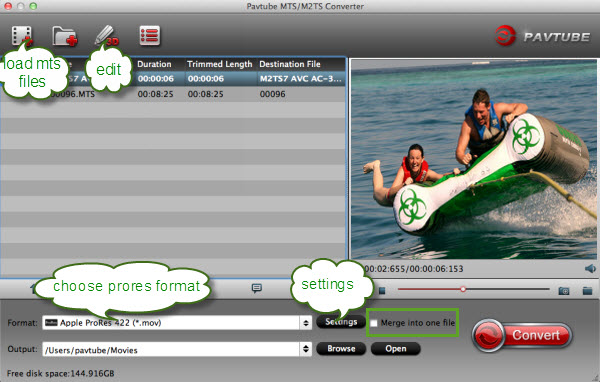
Step 2: Launch the best Canon AVCHD Converter for Mac. Click the "Add" button for adding to import the 50p/60p mts files from Canon HF G30 to the best Mac G30 MTS/M2TS Converter.


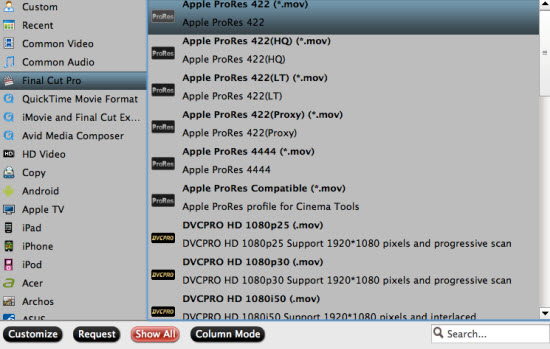
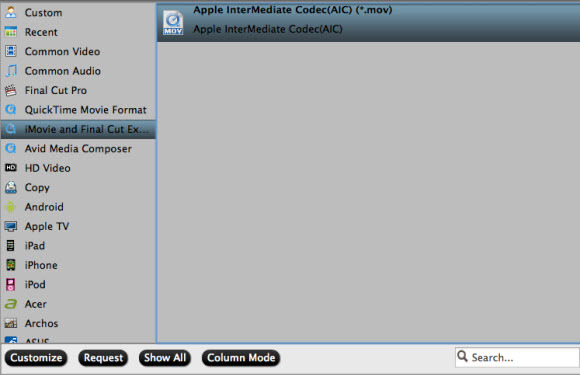
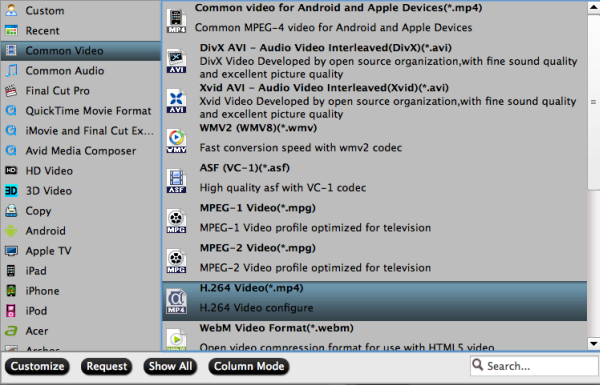
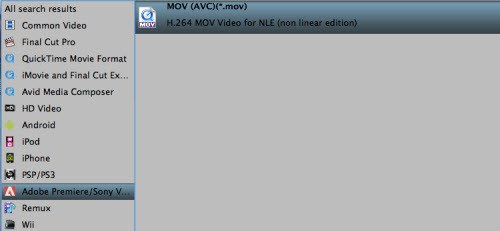
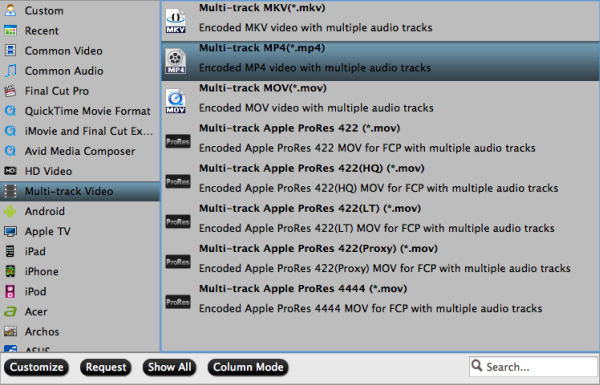
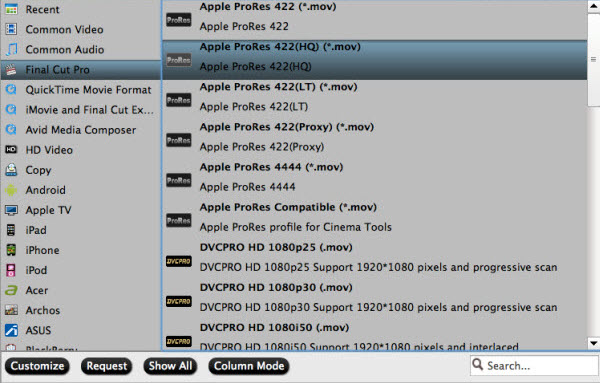
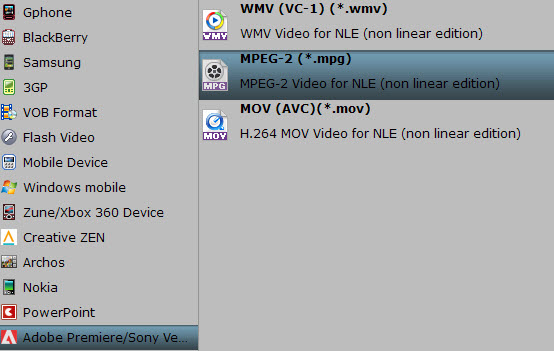
Step 3: Click on the dropdown menu of "Format", and then move your pointer to Adobe Premiere/Sony Vegas> MPEG-2 (*.mpg) which is the perfect video format for you to transfer MTS to Adobe Premiere Pro CS6 and After Effects CS6.


Then you can set the output folder by clicking "Browse" icon as you prefer.

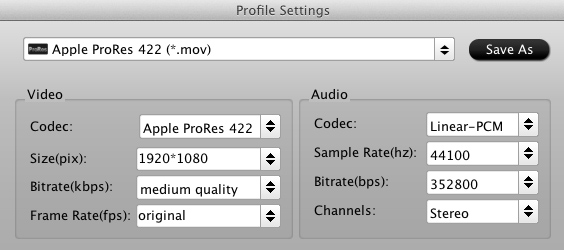
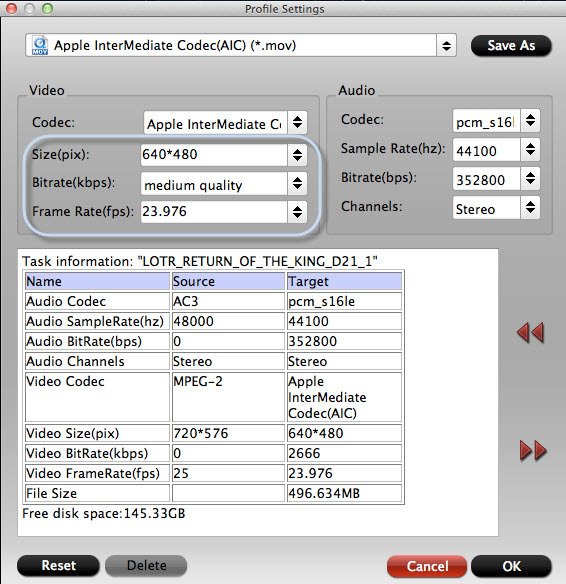
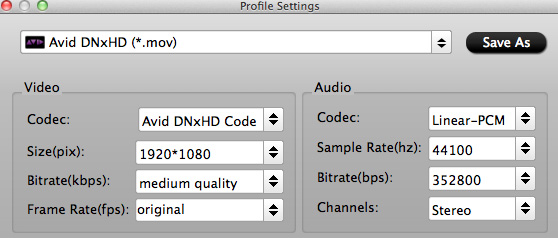
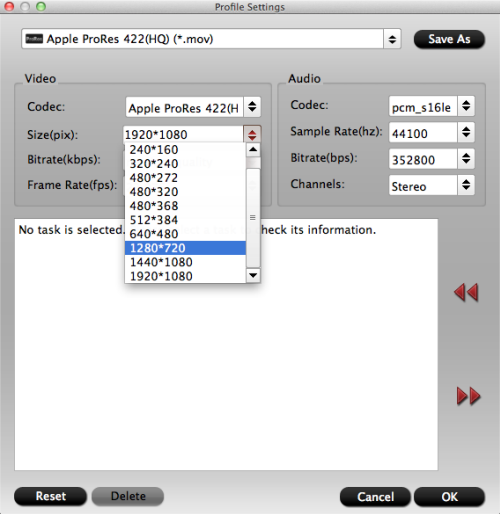
Step 4: Click "Settings" icon to adjust audio and video parameter. You can change the default codec, bit rate, frame rate, sample rate and audio channel according to your needs and optimize the output file quality.

Note: To get original(best) video quality, you can keep original video size and bitrate.

Step 5: Click the "Convert" button and it will losslessly convert Canon HF G30 AVCHD 50p/60p mts files to MPEG-2 for editing in Premiere Pro CS6 and After Effects CS6 immediately.

Step 6: Once the Mac MTS to Premiere and AE CS6 conversion is done, you will be able to get the output files for Adobe Premiere Pro CS6 and After Effects CS6 via clicking on "Open" button effortlessly.

Now you can easily and correctly import the converted video in Premiere Pro CS6 and After Effects CS6 for editing keeping high quality.

Read More:

Sunday, August 18, 2013

Enable Sony PMW-200 XDCAM MXF to work with Final Cut Pro

Summary: From this article, you can learn the best way to import Sony PMW-200 XDCAM MXF footage into Final Cut Pro on Mac by transcoding Sony XDCAM HD422 MXF to Prores for FCP.

 
The PMW-200 is Sony's successor to the hugely popular PMW-EX1 Camcorder. It is the first handheld camera in its class to be equipped with 3 x 1/2-inch Exmor CMOS sensors for excellent sensitivity and enhanced depth of field characteristics. Sony PMW-200 can record in Full HD 4:2:2 at 50 Mb/s, delivering exceptional performance, operational versatility and workflow efficiency. Its high-quality MPEG HD422 50 Mbps recording is fully compliant with the latest EBU commendations for long-form broadcast production and is widely accepted in broadcasting stations and production houses.

After making some 50 Mbps MPEG HD422 recordings from Sony PMW-200, you may find the MXF files are not support by Final Cut Pro on Mac natively. To solve the importing problem with Sony PMW-200 MXF and FCP workflow. Of course, you can choose to get a XDCAM Transfer. While, things can be different if you get some help from third-party software.

Now come and meet this Pavtube Sony XDCAM MXF Converter, which is capable of converting Sony PMW-200 MXF footage to Prores encoded mov files for that's the most compatible format for FCP. 


How to convert Sony PMW-200 1080 50i MXF to Final Cut Pro on Mac

Step 1. Connect your Sony PMW-200 to mac and keep it on, or use a card reader to transfer your footage to mac. Get this MXF Converter for Mac installed, click top left two icons to load individual videos or the entire folder correspondingly.


Step 2. Choose best format for editing in Final Cut Pro.

Click the drop-down list besides Format, choose Final Cut Pro > Apple ProRes 422 (*.mov) as the most compatible format as well as best video quality for FCP.


Step 3. Adjust output video settings including video size, codec, bitrate, frame rate by clicking Settings, all according to your needs.


Step 4. Click the big red circle to start conversion. Wait for a while, you can get the fresh hot converted video which is compatible with Final Cut Pro.

Tips:

Pavtube MXF Converter for Mac support outputting the original one audio track separately; if you want to retain and combine all the audio tracks, the Pavtube iMixMXF is highly recommended.

Pavtube iMixMXF integrates all features of Pavtube MXF Converter for Mac and multi-track preserving and mixing features. Other than the unique multi-track preserving feature, you can also Mix the multi tracks into one track for broadcasting. And this makes the iMixMXF as a wonderful MXF Audio Mixer. And this feature enables you to mix the audios of interviewer, interviewee, surroundings, or editors'/directors' comments into one.

Read Related Articles:

Thursday, August 15, 2013

Why can't I open Sony PMW-200 XDCAM MXF files in iMovie on Mac?

Summary: Follow this article below, you will learn how to use Sony XDCAM Converter to convert Sony PMW-200 XDCAM MXF video to iMovie for editing with best optimized codec. 


Hi, I filmed using Sony PMW-200 camcorder and want to edit in iMovie. Somehow iMovie could not recognize my MXF footage. How can I solve this? Any reliable workflow recommended?

Designed to meet the needs of broadcast productions, Sony PMW-200 records on to solid state media using 50 Mbit/s 4:2:2 XDCAM HD, also record using the same 35 Mbit/s 4:2:0 codec as the original EX cameras as well as standard definition DV. 

As the PMW-200 records MPEG HD422 codec MXF format, you will meet the incompatiblity problem when importing Sony PMW-200 MXF into iMovie as above. So how to get Sony PMW-200 XDCAM MXF files be editable in iMovie with the lossless quality?

It is easy--- a quicker and easier way is to convert Sony PMW-200 XDCAM MXF to iMovie compatible AIC MOV format. Thus, the third party component is vital in achieving your goal. 

The best tool for you is the Pavtube MXF Converter for Mac, the powerful Sony XDCAM MXF Converter for Mac. It can convert all the .mxf files, no matter where and how you get them, to ProRes, AIC or DNxHD with the original quality. 

Here listed the three-step guide on how to transcode Sony PMW-200 MXF files to AIC for iMovie.

Step 1: Install Pavtube XDCAM Converter for Mac. Click "add video" button to import the mxf files from Sony PMW-200, click "add from folder" button to add MXF folder, or you can also directly drag and drog mxf clips to the program.


Step 2: Click on the "Format" and get the dropdown menu, then move you pointer to "iMovie and Final Cut Express -> Apple Intermediate Codec (*.mov)" to choose it as best codec and format for iMovie editing.


Step 3: You can customize the output settings as you want, such as resolution, bitrate, frame rate and video/audio codecs.


Step 4: Start to convert Sony PMW-200 XDCAM MXF files to iMovie.

Click the "Convert" button, the MXF to AIC Converter for Mac will start to transcode Sony PMW-200 XDCAM HD422 MXF to AIC .mov for iMovie.

After the XDCAM MXF to AIC conversion, you can easily add the Sony PMW-200 MXF files to iMovie and edit them by clicking on "import" button. And now, you can get rid of the worries about the incompatibility problem of Sony PMW-200 MXF and iMovie.

Tips:
If your MXF files have 2 audio tracks or more, here is a new program specially designed for multi-track preserving and mixing features, named iMixMXF. Featured formats include: MOV/MP4/MPG/WMV/FLV/MKV and more.

Read More:

Wednesday, August 14, 2013

Canon XA20 MTS/MP4 importing workflow in Sony Vegas, Avid, Premiere, Pinnacle, Cyberlink and Windows Movie Maker

Summary: To edit Canon XA20 mts/mp4 files smoothly on your editing software including Sony Vegas, Avid, Premiere, Pinnacle, Cyberlink, Windows Movie Maker, you need to transcode mts/mp4 to AVI/MOV/WMV/MPEG-2 for Windows editing software at first. And this article will show you how.

Canon XA20 is one of the new announced Ultra-Compact Professional Camcorder which cover the needs of the professional that need compact cameras with pro feature sets.

First off, Canon heard the cries for 1080/60p from the masses and it looks like they're finding ways to please the end-users. With 1080/60p & 1080/24p in both AVCHD (28mbps) & MP4 (35mbps) codecs, everyone is covered. Plus, the 20x Optical HD Video Zoom Lens with 8-Blade Circular Aperture mounted to the 2.91 Megapixel HD CMOS Image Sensor will help make anyone's day brighter. Second, Canon has added WiFi to the cameras to enable file transfers on the go, making them perfect tools for ENG & EFP applications.


Since AVCHD/MP4 is quite complicated codec and format, currently there are not much software being able to support the AVCHD and mp4 video. Actually, you can't directly import Canon XA20 mts/mp4 footage into Windows editing software like Sony Vegas, Avid, Premiere, Pinnacle, Cyberlink, Windows Movie Maker, etc. That's why so many users asking if there are any easy solutions that can help them edit XA20 mts/mp4 files on Windows Editors.

To make Canon XA20 mp4/mts video workable with  Sony Vegas, Avid, Premiere, Pinnacle, Cyberlink and Windows Movie Maker , you only need to convert XA20 MTS/MP4 video files to AVI/WMV/MPEG-2, the most suitable video format for editing on Windows PC.

Now go to find Pavtube HD Video Converter for Windows.Lots of users are impressed by this converter since it is powerful enough to convert camcorder videos to multiple video formats for iOS/Android/Windows Tablets & Phones and HD Media Players as well as video editing software including Adobe Premiere, Sony Vegas, Avid Media Composer, and more. And you can enjoy the powerful edit function, like trim, crop, watermark for text, image and video, 3D effect, subtitles and so on.

The following guide will show you how to transcode/convert Canon XA20 MTS/MP4 files to AVI/MOV/WMV/MPEG-2 for Sony Vegas, Avid, Premiere, Pinnacle, Cyberlink, Windows Movie Maker.

Download it and follow below steps.

Step 1. Load Canon XA20 MTS/MP4 files.

You can choose "add video" directly or "load files" to add the whole folder.


Step 2. Select output format for video editing software.

Click "Format" menu you will find various video formats listed by different devices. Just choose a compatible video format for your editing software. Choosing the editing software option directly will help you to take less time to find a more preferable video format.


Step 3. Edit loaded Canon XA20 MTS/MP4 video files.

Click "Edit" button and you are allowed to trim, crop, add text/image/video watermark or some effect to your output video for making it perfect. Here the function of adding subtitles to output files will contribute to make your own videos. You can use free software Subtitle Edit to edit your subtitle content then add it to output videos.


Tips: Click "Settings" on the interface and you can adjust the parameters including size, bitrate, frame rate, etc. to get a high quality of output files. And keep the settings the same as original video recordings will provide you the least loss of video quality.

Step 4. Start conversion.

Click the "Convert" button to start conversion. When it completed, click the "Open" button to get the generated videos for your editing software.

More features about it:

1. Rip and convert Blu-ray and DVD including 1:1 backup Blu-ray/DVD movies to PC hard device for future needs.

2. Directly Copy feature will save 100% intact .M2TS main movie from original BD disc.

It is an integration of Blu-ray Ripper, DVD Ripper and Video Converter and it will meet almost all your requirements about converting videos. Good news for you that Pavtube 2013 Summer Holiday Sale Round 2 is coming and 20% discount is provided to Video Converter Ultimate and iMedia Converter for Mac during sale time. Catch the chance to try it now.

Now get ready for importing and editing Canon XA20 MTS/MP4 videos in Sony Vegas, Avid, Premiere, Pinnacle, Cyberlink and Windows Movie Maker. Enjoy your editing workflow!

Read More:

Tuesday, August 13, 2013

Sony RX100 Mark II (M2) Hands-on -Sony's best point-and-shoot camera to date


Last year, Sony's RX100 changed the way many of us think about point-and-shoots. The camera's one-inch sensor enabled brilliant image quality and stellar low-light performance, netting DSLR-like results in a device you can slip in your pocket. It really did change the game when it comes to everyday photography, and I instantly fell in love. What remained to be seen, however, was how Sony would build on the RX100's success by releasing an even more capable model this year. In an unexpected move, the company opted not to retire 2012's blockbuster, and kept pricing exactly where it's always been, at $650. The RX100 Mark II, meanwhile, was marketed as a modest step up -- an even more well-rounded package, for 100 bucks more.


When my Mark II sample arrived, I did what any jaded New Yorker would after a half-dozen years of shooting sample photos in Manhattan: I booked a flight to somewhere else. United's last-minute weekend specials made Chicago the best bet, and off I went for a weekend of perfect weather, approachable restaurants and sidewalks that weren't so crowded that I had to walk in the street. It's like New York -- if you take away a million tourists and pepper in smiling Midwesterners and affordable adult beverages.

Key Features:

  • 1"-type Exmor-R BSI-CMOS sensor (13.2 x 8.8mm, 3:2 aspect ratio) 
  • 20.2 million effective pixels 
  • 28-100mm (equiv), f/1.8-4.9 Carl Zeiss Vario-Sonnar T* lens 
  • Steady-Shot image stabilization 
  • ISO 160-12,800 (Down to ISO 100 and to 25,600 expanded) 
  • NFC-mediated Wi-Fi allowing file transfer and control from smartphones 
  • Rear control dial and customizable front control ring 
  • 10fps continuous shooting in 'Speed Priority' mode 
  • Tiltable 3" 1.2M-dot 'WhiteMagic' LCD screen 
  • 13 Picture Effects (27 with variations) 
  • Memory Recall feature can store up to three groups of custom settings 
  • 1080p60 video, (AVCHD) with MP4 option (50p in PAL regions) 
  • Built-in stereo microphones 
  • 330-shot battery life (CIPA)  
The final notable physical adjustment is the new Multi Interface Shoe. It looks like a typical hot shoe that you'd find on any ol' DSLR, but this version adds a multi-pin connector for interfacing with accessories like an OLED EVF or a microphone rig -- neither of which I needed to try out on a brief vacation. Some photographers clearly prefer shooting with an EVF, but the tilting LCD suited me just fine, even with the bright summer sun hitting the camera from above.


The pictures, as expected, look great. The camera did a fine job of exposing, and colors and white balance were spot on. Everything I loved about the previous RX100 is present here, too, so you can absolutely expect a top-shelf experience through and through. The one notable setback is the price. It'll run you $750, which admittedly is a bit more than we'd like to pay for a point-and-shoot, regardless of its performance. But when you start looking at this strictly as an ILC replacement, that sky-high price tag begins to make a bit more sense. Cheap it's not, but if you want the absolute best, consider this your only option.

Monday, August 12, 2013

Convert NXCAM to H.264- Transfer Sony NXCAM AVCHD video for playback and sharing

AVCHD from Sony NXCAM is not really a friendly format for playing/sharing and usually we go from Sony NXCAM to H.264 converting and this article will provide the detailed info.


For the past few days, I've been evaluating a prototype of Sony's first NXCAM camera family member. This first NXCAM model has a striking resemblance to a Sony Z5, which is an HDV tape-based camcorder with optional chip recording. Announced on November 18th, Sony's new NXCAM family brand offers class-leading, professional performance for AVCHD technology.

Sony NXCAM records stunning quality 1920 x 1080 images at 24Mbps (50i or 25p), and operational flexibility is maximised by AVCHD recording onto affordable and readily available consumer memory cards. Now I have a client who is a NXCAM user, he passed to me a bunch of .mts files came from his NXCAM with no camera info. He want to get some suggestion for playing and sharing NXCAM AVCHD video on Mac.

Then I recommend him to look for a converter that can convert NXCAM MTS files to H.264, thus, after enjoying the video on Mac, he can also transfer the H.264 files to media players or video devices for playback or sharing. He tries some converter from the web, but only received an error message while converting NXCam video to h.264. Didn't get to write it down because the app crashed. And then want me to give him some hope.

In that case, I will share my easy solution here. Since H.264 is fully supported by most media players and video uploading website, first you need to transcode NXCAM AVCHD MTS to H.264 with the top NXCAM AVCHD Converter for Mac from Pavtube.

For background, the app from Pavtube worked the first time we tried it but not this time. It works perfectly in converting NXCAM AVCHD video to H.264 codec. Not only is it extremely easy to use but it's also often faster than any other Compressor. What's more, it can convert NXCAM mts videos to other common target readable format in which you want the video to be played. Then it has quickly become my absolute favorite way of converting my Sony NXCAM footage. Well, below is a step-by-step guide for you.

Guide to convert Sony NXCAM AVCHD videos to H.264 for playback and sharing

1. Install and run the best Mac NXCAM to H.264 Converter. Transfer Sony NXCam video to hard drive, and then click "Add video" or "Add from folder" to add the avchd files you need into the program.


2. Click Format column and choose the output format, you can choose "H.264 Video (*.mp4) from "Common Video" for output. This is the perfect format for playing on Tablets/Smartphones and sharing on website.


3: Click settings button to adjust the output video’s parameters, such as bitrate, resolution, etc.

4. You can edit the Sony NXCam videos in this program before converting to other formats on Mac OS. Trim, crop, add watermark or adjust effect as you want.

5. Start converting Sony NXCAM AVCHD video to H.264 MP4 for Mac.

In this way, you can use Sony NXCAM recorded MTS footages to playback or sharing. Please take a try now, hope it will do a great favor for you.

Read More:

Importing/editing Canon 5D Mark III H.264 mov files in FCP X on Mac

Summary: From this article, you can know the best codec for importing Canon 5D Mark III mov clips to Final Cut Pro X editing on Mac, and only transcode Canon MOV to ProRes 422 or ProRes 422 HQ with Canon H.264 MOV Converter.

The Canon 5d Mark III that everyone has been waiting for has been announced. The camera brings a handful of improvements including speed, greater resolution, more processing power, and more options for shooting HD video. The full-frame sensor has been upped to 22.3 Megapixels and shoots up to 6 frames per second with a 61-point AF system. What’s great about the new sensor in this camera is that the pixel pitch is smaller, which allows for better low light performance.


I have really gotten everything I wanted out of my 5D Mk III. Best camera I ever had, it shoots mov files – which pains me is that FCP X could not recognize my mov footage. Did I miss something?

After searching, I find that the reason, that is, Canon 5d Mark III records video in H.264 MOV, it is not supported by FCP X perfectly. To edit Canon 5d Mark III mov video with Final Cut Pro X smoothly, I need to encode Canon mov recordings to FCP X compatible codec - Apple ProRes 422 MOV format on Mac.

Now on the web, I came accross this Pavtube H.264 MOV to ProRes Converter for FCP X. I am impressed by how quickly the converter runs to give me the files from my 5D MK-III that I need for Final Cut Pro X, becides it make it possible to do some little editing some simple editing features. You can follow the steps below to convert 5D Mark III mov footages for editing in FCP X.

Step 1: Free Download the best Canon MOV to FCP Converter. Install and run it on you Mac. It’s excellent Canon MOV video converter which can convert nearly all canon cameras’ videos to any formats you need, such as Apple Prores 422 MOV, Apple InterMediate Codec MOV, QuickTime MOV, etc.

Step 2: Click “Add videos” to load individual videos, or click “Add from folder” to load the whole folder from Canon 5D Mark 3.


Tips:

If you have multiple MOV files, you can select the “Merge into one file” box to merge the MOV files into one single file so that you can play these files without interruption.

Step 3. Click on the “Format” and get the dropdown menu, then move you pointer to “Final Cut Pro”.

Here we recommend the Apple ProRes 422 (*.mov) or Apple PreRes 422(HQ) (*.mov) for as best video format for editing in FCP X as well as good video quality. Then you can set the output folder by clicking “Browse” icon.


Step 4. Click the “Settings” icon and you will go into a new interface named “Profile Settings”.

You’d better set the video frame rate as 30fps, video size as 1920*1080 to keep the best quality for editing in Final Cut Pro X. If you want to have a smaller file size but keep the good quality, you can change the video size to 1440*1080.


Step 5: Click the “Convert” button; it will convert Canon 5D Mark III H.264 MOV to ProRes 422 for FCP X on Mac immediately.

Tips: Before you try to do the conversion, if you are also a FCP X user, please make sure that you have installed the Apple ProRes Codec manually since the FCP X asks users to install it by themselves.

After the workflow, you can go to the output folder to find the converted video files. Now you are free to import the ProRes 422 MOV to FCP X under Mac without rendering.

This Canon MOV Converter for FCP can help you convert the video format/codec you need quickly, video and audio quality are best guaranteed. You can also follow this article: How to Import Media contents to Final Cut Pro X for editing. 

Read Related Articles:

Thursday, August 8, 2013

Easy Solution to import Panasonic HVX200 MXF to iMovie 8,9,11 on Mac OS X Mavericks

Summary: If you cannot use iMovie 8, iMovie 9, iMovie 11 on Mac OS X Mavericks to edit Panasonic HVX200 MXF file, do not be upset, below article will show you the solution about how to transcode Panasonic HVX200 P2 MXF to iMovie compatible format.


Panasonic AG-HVX200 answers the demands of the professional HDTV photographer with a compact and feature packed acquisition tool. This versatile prosumer High Definition camcorder packs an array of features into a handheld design. For recording video, the HVX200 includes a Mini DV tape mechanism along with two P2 (Professional Plug-in) card slots. The P2 cards allow for true variable frame rates and recording options that Mini DV tape can't offer. These include DVCPRO HD 1080/24p and 720/60p, along with normal interlaced video.

My work with the prototype camera I used over a period of six weeks started with what I know, which is 720p/24p. The P2 card of AG-HVX200 is capable of storing large amounts of video and audio data in MXF-format files. I prefer iMovie for editing with AG-HVX200, but I failed to open the MXF files with iMovie many times. (iMovie 11, Mac Mavericks). I am looking for the easy-to-use and reasonably priced converter to make my MXF files from AG-HVX200 to be readable in iMovie. I have more than 200 MXF files, I need to batch process them. Can anyone help regarding this conversion?

As far as I know, in order to edit Panasonic AG-HVX200 MXF files in iMovie 8,9,11 flawlessly, the best best method is to convert Panasonic MXF to Apple InterMediate Codec (AIC) which is a best editing codec for iMovie 8,9,11.

At first, you need 3rd-party tool- Pavtube MXF Converter for Mac

It is a professional MXF to iMovie Converter which can not only convert Panasonic AG-HVX200 recorded MXF files to AIC for iMovie 8,9,11 editing on Mac OS X Mavericks, but also provide simple video editing functions for you. This Mac MXF Converter is especially designed for converting Panasonic P2 MXF, Sony XDCAM MXF, Canon XF MXF files for editing in Final Cut Pro, Final Cut Pro X, Final Cut Express, iMovie, Avid, Adobe Premiere etc. Below is how.

Guide - Encode Panasonic AG-HVX200 MXF to AIC for iMovie 8, 9, 11 editing on Mavericks

Step 1. Import MXF files from Panasonic AG-HVX200 to the top MXF to iMovie Converter for Mac.


(Note: Before conversion, you need to transfer MXF files from your Panasonic AG-HVX200 to Mac Hard Drive, then click the "add" button to browse to import MXF videos. This MXF Converter for Mac support batch conversion)

Step 2. Click the Format bar, and move mouse cursor to "iMovie and Final Cut Express -> Apple InterMediate Codec (AIC) (*.mov)", it's the best format for editing in iMovie 8,9,11.


Step 3. Click "Convert" button to start transcoding Panasonic AG-HVX200 MXF files to AIC Codec for iMovie 8,9,11 under Mac OS X 10.9 Mavericks.

Some more helpful features of the app:

1. Settings- click to set video resolution(1920×1080/1440×1080/1280×720/720×480), bitrate(from 1Mbps to 20Mbps), frame rate (24p/30p)


2. Editor (next to "Add" icon)- click to set deinterlace, denoise, mute, volume up, trim, crop, etc.

So there you have it. Pretty simple. After the workflow, you can go to the output folder to find the converted video files. Now you are free to start importing/editing Panasonic AG-HVX200 MXF files in iMovie 8,9,11 under Maveircks without problems.

Read More:

Wednesday, August 7, 2013

Sony F55/F5 XAVC 4K videos and Avid Media Composer, Xpress Pro workflow

This article outlines how to ingest Sony F55/F5 XAVC footage to import into Avid Media Composer and Xpress Pro for smooth editing.

The Sony PMW-F55 CineAlta 4K Digital Cinema Camera functions an eight.9MP Super 35mm image sensor, capable of capturing 4K, 2K and HD resolution video within a wide variety of formats by way of the camera's internal recorder. The F55 is amongst the initial digital motion image cameras using a international shutter, which fully eliminates motion skew and also other "rolling" shutter distortions.

XAVC is usually a video format that was introduced by Sony and extensively exist in Sony PMW-F55 and Sony PMW-F5. It may assistance 4K resolution (4096 x 2160 and 3840 x 2160) at as much as 60 frames per second (fps). XAVC supports colour depths of 8-bits, 10-bits, and 12-bits. Chroma subsampling is usually four:two:0, four:two:two, or four:four:four.


Having a lots of clips from my Sony F5 in 4K XAVC file format and want to edit them with Avid Media Composer and Xpress Pro, but often failed. How to resolve it?

Since Avid Media Composer and Xpress Pro (especially some versions) doesn't support the lastest 4K XAVC videos, to solve the incompatible problem, I have to convert Sony F5/F55 4K XAVC video to a native format for editing in Avid Media Composer and Xpress Pro.

By Google search, I find an excellent Mac XAVC Video Converter called Pavtube iMedia Converter for Mac which is specially designed to convert Sony F5/F55 4K XAVC to Avid friendly DNxHD mov format for editing in Avid Media Composer and Xpress Pro at high fast conversion speed and excellent output quality. No matter you are an expert or novice, you could easily use it for its intuitive interface.Just take a look at the brief guide below.

1. Download Pavtube iMedia Converter for Mac, it's an excellent Mac XAVC to Avid Converter. Follow the prompts to install the program. Click "Finish" when the installation is complete, and it will launch automatically.

2. Click "Add Video" to load 4K video files or directly drag the files into file list.


3. Click "Format" bar to determine output format. 

For natively editing in  Avid Media Composer and Xpress Pro, you are recommended to choose Avid Media Composer -> Avid DNxHD (*.mov), this format is best for native editing.


4. If you would like to customize the video and audio parameters, you can click "settings", adjust the parameters as you want, like Video Codec, aspect ratio, bit rate, frame rate, Audio codec, sampling rate, bit rate, channels.


5. Click "Convert" to start.

Pavtube XAVC to Avid converter can help you to convert Sony F5/F55 4K XAVC video to Avid DNxHD MOV for Avid Media Composer and Xpress Pro natively for editing.

Editor's Recommendations

Tuesday, August 6, 2013

First Canon 7D RAW video shown courtesy of Magic Lantern


If you've been lustfully eying the latest DSLR models, you want to give your trusty Canon 7D another look. Magic Lantern has been enhancing the features of Canon EOS digital SLRs for some time now, the popular, but aging semi-pro model has been given the RAW video treatment from Magic Lantern, and the first samples have now been posted (after the break). Maximum resolution still falls short of the much newer 5D Mark III's full HD at 1,736 x 1,156, but otherwise, the images are improved in every way. The video has a full 14-bit color spectrum, for starters, is completely free of compression noise and has much less (though still some) moire and aliasing. Now video can only be captured in 2 second bursts, but we saw similar limitations on early Magic Lantern builds for the 5D Mark III, as well -- meaning the 7D may finally live up to its beast-like video potential.

So far, a 7D owner named Florian has put this feature to the test, by combining a series of ~2 second DNG files taken in silent shooting mode into a 33-second video. While there's some moiré at times, the video quality is lightyears ahead of the standard H.264 movies recorded by a stock 7D.

See for yourself:

More Related:

Magic Lantern firmware boosts dynamic range of Canon 5D III and 7D
Canon 50D gains video recording through Magic Lantern RAW hack
Canon EOS 70D Hands-On, Review, Main features, and More Info
RAW 24fps DNG video hits the Canon EOS 5D Mark III via Magic Lantern!
Canon 6D FCP workflow- Transcode Canon EOS 6D 1080p MOV to Final Cut Pro

Monday, August 5, 2013

How to play XAVC video on QuickTime on Mac?

Summary: Follow this article to learn how to play Sony XAVC footage with QuickTime Player on Mac. With this Sony XAVC Mac Video Converter, you can easily convert XAVC footage to QuickTime MOV on Mac.


The Sony PMW-F55 CineAlta 4K Digital Cinema Camera functions an eight.9MP Super 35mm image sensor, capable of capturing 4K, 2K and HD resolution video within a wide variety of formats by way of the camera's internal recorder. The F55 is amongst the initial digital motion image cameras using a international shutter, which fully eliminates motion skew and also other "rolling" shutter distortions. The XAVC format is used by Sony PMW F5 or F55 camcorder.

Shoot with Sony PMW camera, you will got some files with .xavc extension. With 4K resolution (4096 × 2160 and 3840 × 2160) at up to 60 fps, we know the recording XAVC footage is not supported by most of players like QuickTime on Mac. When opening XAVC video QuickTime, you will find a pop-up windows said mistake. So the best way to watch XAVC with QT is to convert XAVC to MOV which is the most popular format for QuickTime player.

Here Pavtube XAVC HD Video Converter for Mac is usually a handy and effective video converting plan to convert XAVC video to MOV for playing on QuickTime Player. In addition, it might help you convert XAVC to other frequent formats such as XAVC to FLV , MP4,AVI,MPG,3GP,and so forth for distinctive customers.

If you are a XAVC camcorder users and troubled with how to play XAVC on QuickTime as above, you can follow simple step-by-step guide to transcode Sony XAVC video to QuickTime MOV for playback:

Step 1. Install and launch the best XAVC to QuickTime Converter for Mac, click top left two icons to load individual videos or load the entire folder.


If you want, you can merge several XAVC clips by ticking "Merge into one file" box.
If the supposed size of the input files is 1GB, then the memory space should be up to 40GB.

Step 2. Click "Format" and choose Common Video> MOV-QuickTime(*.mov) as the best video format for playing XAVC footage on QuickTime.

xavc-to-mov-quick-time


Tips: Pavtube XVAC Video Converter for Mac can also convert Sony XAVC files to FCP, iMovie, FCE, Avid Media Composer, Avid Xpress Pro, Adobe Premiere Pro, Adobe After Effects, DaVinci Resolve or Apple Aperture 3 compatible video format for editing. Just select the corresponding option.

Step 3. You can also click "Settings" to change the output video bitrate, frame rate, size, etc. all according to your needs.

Step 4. When everything is done, click the "Convert" button at the bottom-right corner to finishe the Sony XAVC to QuickTime MOV conversion. While you wait, have a coffee or take a nap and let XAVC Video Converter do the work in the background.

After conversion, you can click "Open" to find the output quicktime mov file, then you can transfer the video files to QuickTime Player for playback smoothly.

See also:


Does Canon XF MXF files works ok with After Effects CS6 on Mac?

Summary: This article will focus on talking about how to transcode Canon XF MXF files to Adobe After Effects CS6 compatible format for Canon XF MXF and AE importing workflow on Mac.


Canon's XF series camcorders like Canon XF100, XF105, XF300, XF305 record high-definition MXF video with its own XF codec. 

Does the Adobe After Effects CS6 support Canon XF MXF footage? 

Hi All.. we are considering picking up a Canon XF-100 as our acquisition camera. However I heared that these MXF files can't work with After Effects natively. Will we need to transcode via Prelude? Thanks... 

This is for .MXF files shot on a Canon XF300. Things were working fine, but suddenly I am unable to open those mxf files in AE CS6. Even projects previously created with AE CS6 now won't open, and give me the 'file damaged or unsupported' error message in AE. Why does this happen? Any help would be much appreciated. 

As above, much to the disappointment of filmmakers that are not familiar with the .mxf format, the footage created with Canon XF Camcorders can't be imported to After Effect CS6 smoothly. If you need to edit Canon XF MXF in Adobe After Effects CS6, you are suggested converting the Canon MXF clips to an AE friendly format.  

And here  the professional and powerful MXF to AE Converter can help you do the job. With it, you can easily transcode Canon XF .MXF files to Adobe After Effects accepted AVI, MOV, MPEG or other formats that After Effect can handle well. Below is a quick guide of converting Canon XF .mxf to .mov for editing in After Effects CS6.

Before processing:

1. Back up/Transfer the Canon XF MXF footage to Mac computer – copy the whole XF video folder to your computer hard drive, not just the individual .mxf files.

2. Install Pavtube MXF Converter for Mac ($29). Click here to download a free trial for test.

Step-by-step Guide: Convert Canon XF.mxf to AE CS6 supported format with best  video quality

Note: this is a Mac oriented solution. For Windows users the Pavtube Studio offers alternative MXF Converter for PC, which is very similar to the Mac MXF Converter.

Step 1. Launch the Mac Canon MXF Converter for After Effects. Click “Add Video” and browse to a Canon .mxf clip and the software will add it to file list. Repeat the operation to load multiple mxf videos. Or you may click the “Add Folder” button to import all the .mxf files in the XF file structure.

image

Step 2. Click on “Format” and choose “Click on “Format” and choose “MOV(AVC) (.mov)” from "Adobe Premiere/Sony Vegas" as the best codec for editing Canon XF MXF file in After Effects CS6.

image

Tips: You may also use AVI, MP4, MPG, QuickTime mov or any other format that AE supports.

Step 3. Click on “Settings” to redefine output quality. You can also set a different video resolution (1920×1080/1440×1080/1280×720/720×480), frame rate (24p/30p), bitrate, audio channels, etc. For users who would like to retain exactly the same settings (without any quality loss), set target settings the same to source video.

Step 4. Click “Convert” to start transcoding Canon XF MXF to MOV for After Effect CS6 editing on Mac.

After conversion click “Open” to find .mov videos and import converted .mov files to Adobe After Effect CS6 for editing.

If your MXF files have 2 audio tracks or more, here is another worth-buying software from Pavtube named iMixMXF with multi-track preserving and mixing features. You can download the trial version to have a try!

Read More:

Thursday, August 1, 2013

Seamlessly transcode MXF to MP4 with multiple audio tracks for playing and editing

Having so many MXF collections, and don't know how to edit/play MXF on Mac? You come to the right place. Get the easiest solution here!


Maybe you are a video lover. Have you ever encountered such problem that when you have shot many MXF footage with your lovely camcorder, looking forward to play or edit these mxf files on your mac, but only get the error message. Now just read the article to learn how to solve it in detail.

What is MXF?

According to Wikipedia, MXF is a file format for professional digital video and audio media defined by a set of SMPTE standards. MXF format is often used by more and more professional camcorders like Sony XDCAM, Panasonic P2 and Canon etc. to store video, audio, and programmed data.

What is the problem?

The fact is that MXF is MXF is a container or wrapper format which makes it incompatible with most of popular Mac editing software including iMovie, Final Cut Pro, Final Cut Express, Avid Media Composer, Adobe Premiere ,etc and not playable by many video players and portable players on Mac. Therefore, it will be like a mission impossible for us to edit/play the MXF video footage on Mac directly due to the format issue.

How to solve the problem?

To transport MXF to Mac for post production and playback without the format restriction, we had better convert MXF videos to something more common, like H.264 encoded MP4 video with a solid and intuitive MXF to MP4 Converter for Mac.

Pavtube iMixMXF which is strongly recommended to conduct the MXF to MP4 Conversion on Mac seamlessly. It is professionally designed to deal with the problems of edting/playing MXF on Mac. Particularly it features with keeping multiple audio tracks. In other words, it can help you to transcode MXF to MP4 with multiple audio tracks for playing and editing in a very short time. Refer to the following guides to convert MXF to multi-track MP4 on Mac.

Step 1. Download and install Pavtube MXF audio Mixer. Transfer the MXF files to HDD first and then click "Add" and browse to source .mxf video clips.


Step 2. Click on "Format" and choose "Multi-track Video>Multi-track MP4 (*.mp4)". This format will let you convert MXF to Multi-track MP4 H.264 video at 1920Χ1080 resolution and keep full HD quality.


Step 3. Click "Convert" to start transcoding MXF recordings to MP4 with multiple audio tracks for playing and editing on Mac.

Spare a few minutes to have a look at how to convert MXF to MP4 on Mac quickly and precisely.

After conversion click "Open" to find 1080p HD shootings in MP4 format and use them freely in QuickTime Player,Final Cut Pro and many other media players/editing software. Now you can import MXF on Mac for editing and playing MXF files on Mac without causing any problems.

Additional Contents

If you don't want to get multi-track videos or your videos has less that two audio track, you can try Pavtube MXF Converter for Mac (only $29), an alternative professional MXF to MP4 Converter and a good partner with your simple and efficient MXF to MP4 Conversion workflow on Mac.

Read More:

Adobe After Effects Renders Taking Forever? You Can Speed Them Up with Network Rendering

If you don’t have the latest and greatest system (and even if you do), there is a great way that you can actually speed up your renders in Adobe After Effects. If you’ve got another computer system or two hanging around collecting dust, you can put those machines to good use by setting up Network Rendering in AE. Check out the tutorial below from Aetuts+ to get the full scoop and get your renders flying:


It’s great that the other machines don’t need another license of After Effects to actually participate, so you can take as many systems as you want and as long as they are on your network, you can get Network Rendering up and running. Faster is faster, so even if it’s an older system, shaving off a few minutes from a render can be a big deal in the end (especially if it means you can go home early, or move on to something else sooner).

Check out this link for more information on different render setups in AE.

Who has set up Network Rendering? What would you recommend if you’ve faced any issues?

Links:

How to Set Up AE for Network Rendering on Multiple Machines — Aetuts+
Automated rendering and network rendering — After Effects Help

Wednesday, July 31, 2013

Flawlessly Convert Sony HX200V 60p MTS files for using in FCP, iMovie, QuickTime Player


Sony Cyber-shot DSC-HX200V is a fast-shooting megazoom with excellent photo and video quality for its class, and plenty of shooting options to make casual and advanced shooters happy. Recently, I take some pictures with it of birds, try to capture flight and movement and want to select individual frames. I'm satisfied with the full HD Movie Shooting capability (1920×1080/60p) and Optical SteadyShot Active Mode.

However, My HX200V camera gave me videos as AVCHD file which I have not acknowledged with. I tried with both FCP, iMovie and quicktime, but none of them could recognize it. Is there any step-by-step work flow for this? Which software can convert video taken with my Sony HX200V Cybershot camera for working with my mac? PS: the footages are on 1080 60p. 

In this case, I googled to search the solutions. I find this 60p MTS and M2TS video format is not friendly for use on Mac, Mac platform best supported format is .mov format. So I tried to seek for the best avchd converter for mac to do convertering. Now I get this MTS/M2TS Converter for Mac from Pavtube.

I have successfully convert Sony HX200V 60p AVCHD to best codec for editing on Mac. This software is top MTS converter for Mac that can transcode AVCHD files to Apple InterMediate Codec (AIC), Apple ProRes 422 codec, QuickTime codec, etc. These output formats are specially presetted, so the conversion quality is guaranteed, I can get lossless video conversion with this tool. 

Here I will share the easy steps that you can follow to transcode Sony Cyber-shot DSC-HX200V 60p AVCHD MTS to MOV for using in FCP, iMovie and QuickTime Player. 

1. Install and run the best Sony 60p MTS Converter for Mac, it's an professional AVCHD to FCP/iMovie/QuickTime Converter which can convert Sony DSC-HX200V 60p AVCHD files to different formats on Mac (including OS X Mavericks 10.9).  
Click "Add Video" to load the 60p .mts files from Sony HX200V Camcorder to the Mac Converter. 


2. Click "format" bar to choose output format:

Choose "Final Cut Pro -> Apple ProRes 422 (*.mov)" as the best output codec for importing 60p MTS files to Final Cut Pro (X) editing.


Choose "iMovie and Final Cut Express > Apple Intermediate Codec(AIC) (*.mov)" as the best video format for editing 60p AVCHD files to iMovie. 


Choose "Common video -> MOV-QuickTime (*.mov)" to play Sony 60p AVCHD mts with QuickTime Player.


Step 4. You can click “settings” to customize the output parameters, adjust the resolution, bitrate as you want. 

Tips:

If you would like to add Anaglyphic 3D effect or Subtitle for your footage, click "Edit" icon to start video editing with your 3D files, such as adding Anaglyphic 3D effect(Red-Blue, Red-Green) as well as adding watermark, trim your videos and so on.

You can also click "Subtitles" option, add srt, ass, ssa suntitle you want.

Step 5. Click convert button to start converting Sony HX200V 60p AVCHD MTS to Prores/AIC/QuickTime mov for FCP, iMovie editing and QuickTime Playere playback.

After the Mac MTS to MOV conversion, you can import the converted footages to FCP, iMovie  and QuickTime Player for editing and playing smoothly on Mac.

GoPro App 2.0 lets action cam owners save and share their footage

A new version of the GoPro app has been released for iOS devices bringing several important improvements. 

The GoPro App makes it easy to control your camera remotely with your iPhone, iPad or iPod touch. New features let you view, play back and share select content—so you can do more with your photos and videos than ever before.


Features:

• Full remote control of all camera functions
• Live preview for easy shot-framing
• Instantly view photos and playback videos*
• Copy photos and videos* to your device, then share via email, text, Instagram, Facebook or other app
• View the GoPro Photo and Video of the Day
• Compatible with all HERO3 cameras and HD HERO 2 cameras + Wi-Fi BacPac

What's New In This Version:

• View photos and play back videos
• Copy photos and videos* to a GoPro album on your iPhone, iPad or iPod touch
• Share the photos and videos copied to your device via email, text, Instagram, Facebook or other app
• Browse and delete files on the camera’s memory card

You can download GoPro App from the App Store for free.

Since launch, the GoPro App has primarily served as a remote control; it hasn't been much good for reviewing the day's shooting. That won't be an issue with the newly launched GoPro App 2.0. Both Android and iOS users can now browse their action camera's memory card, save and play media on a mobile device, and share any saved clips through email, MMS and social networks like Instagram. Windows Phone users aren't in line for the update right now, but their Android and iOS counterparts can grab both the new app and corresponding camera firmware upgrades at the source links.

Monday, July 29, 2013

Down-convert Panasonic GH2 MTS footage from 1080p to 720p for editing in FCP/Premiere

Summary: In this article, you can learn the best way to convert Panasoni GH2 AVCHD MTS to a file that FCP/Premiere can recognize on Mac(Mavericks 10.8 included) with downsizing 1080p HD video to 720p.


Panasonic Lumix DMC-GH2 

Panasonic Lumix DMC-GH2 updates the highly acclaimed if rather pricey GH1 Micro Four Thirds system camera. As such the GH2's styling is closer to that of a baby DSLR than its sibling's, the GF2 compact camera form. While stylistically similar, its size is roughly a third of the size of Olympus' Four Thirds E-5 DSLR, and closer in fact to that of a bridge camera. Except unlike a bridge camera, the Panasonic's added appeal is the ability to swap the lens in use. Therefore it's fair to say that for those who like the feel of a DSLR but not the attendant bulk, the GH2 is potentially a very attractive proposition. It's in effect a DSLR 'lite'. 

Easiest way to convert GH2 1080p .mts to 720p?

I'm a Director, DP-Editor/Gaffer. I do commercials and corporate work. I got my Panasonic GH2 and I shot all the .mts footage myself about Teaching Practices in Public Schools in Maryland. I like One-touch HD video recording and manual controls. And now I need to down-convert GH2 MTS footage from 1080p to 720p for storage and editing in FCP&Premiere. Is there any easy way (free or nominal fee)? 

Why we need to downsize the HD video?

By google search, you can see many folks are asking about how to downsize 1080p to 720p. It is my impression that if I edit with actual 720p files, it will be less strain on the system both in editing and rendering as well has hard drive space. In fact, it really does. After reducing the big video size, we will edit more smoothly, save space and make 1080p video playable on protable device like iPad.

An easy to use 1080p to 720p Converter

As in the above case, you have the need to find a professional MTS Converter for FCP/Premiere to downsize 1080p HD video to 720p. Pavtube MTS Converter for Mac is exactly the one ease of use. I have used it on my project, it is helpful in down-converting Panasonic GH2 1080p full HD video to 720p video quickly and transoding GH2 MTS file to FCP/Premiere editable Prores codec, then I can wok well with GH2 mts file in FCP and Premiere. Overall first impression is excellent. Below I will share the step-to-step guide to you.

Simple way to downconvert GH2 1080p to 720p for editing in FCP/Premiere

Step 1. Download Pavtube MTS Converter for Mac. This professional Panasonic MTS Converter can help you convert 1080p AVCHD MTS files to rich formats for use on Mac(Mavericks 10.9 included). 

Step 2. Install and launch this 1080p to 720p MTS Converter. Import 1080p MTS footage from GH2 to it. 

Step 3. Click "Format" bar to choose format for output, you can choose Final Cut Pro > Apple ProRes 422 HQ (*.mov) for editing in FCP and Premiere Pro.


Step 4. You can click “settings” to customize the output parameters, adjust the resolution, bitrate as you want. To down-convert 1080p to 720p, you just need set Size(pix) to 1280*720. That is the exact 720P.


Step 5. Click convert button to start converting Panasonic GH2 1080p AVCHD MTS to Prores for FCP and Premiere editing with 1280*720 definition.

As long as the conversion is done, you will get the 720p mov video files in full screen from its destination folder, and then you can import the files with 720p resolution to FCP/Premiere editing
 smoothly on Mac (including Mavericks 10.9).

Read More: