Saturday, October 12, 2013

Only 2 Days! 40% OFF! Pavtube Free MTS/M2TS Converter for Mac Upgrade to official retail version

Good news on this weekend (2013, Oct 12~13th)! Pavtube now offer 40% OFF to upgrade your Free MTS/M2TS Converter for Mac to Paid MTS/M2TS Converter for Mac, the official retail version, which is just updated several days ago and perfect support more latest cameras from Sony, JVC, Panasonic and Canon.

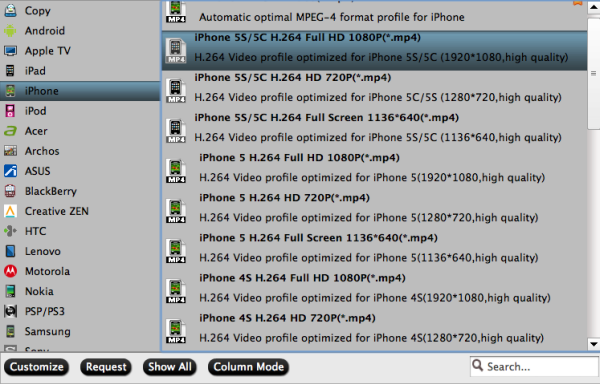
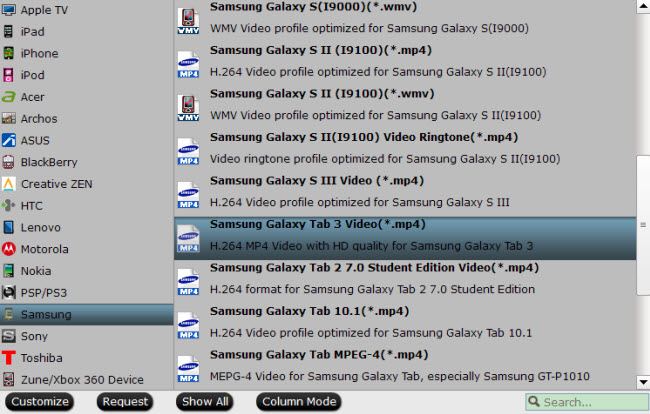
The Pavtube Free MTS/M2TS Converter for Mac, a powerful free Mac MTS/M2TS Converter software to help convert your 2D/3D MTS/M2TS/M2T/AVCHD file at 1080i/1080p/720i/720p to MKV/MP4/MPG/WMV/MOV/FLV/F4V for editing in NLEs such as Avid Media Composer, Adobe Premiere Pro, After Effects, Apple Aperture 3, Kdenlive, Keynote, Avid Xpress Pro, Adobe Creative Suite 6, DaVinci Resolve, iPhoto, or playback on iPad 4, iPhone 5S, iPhone 5C, iPhone 5, iPod 3, Samsung Galaxy Tab 3 10.1/8.0, Galaxy Note 3, Google new Nexus 7, Asus Fonepad 7, Motorola Droid Mini, Moto X, Asus Transformer Book T100, Asus Transformer Pad TF701T, Kindle Fire HD, Surface RT/Pro, Surface 2, Surface Pro 2; it well supports Apple TV and other HDTV videos outputting and other devices like XBox 360, PS3, WD TV, Wii, TVs, etc.

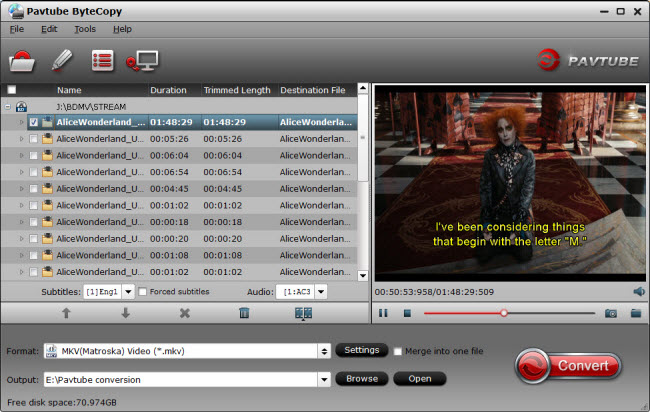
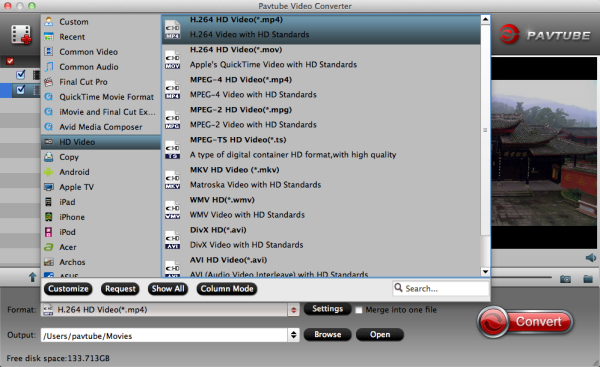
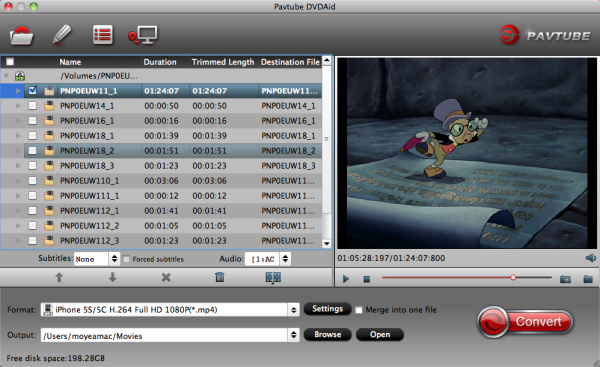
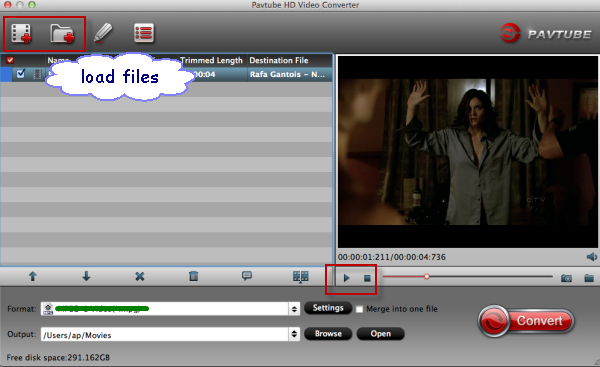
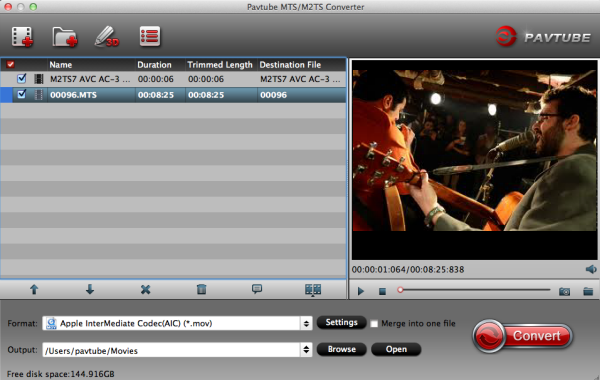
As we can see, it has a simple and straightforward interface to enable quick conversion within a few clicks. As long as your camera is recognized by Mac directly, it could detect your MTS/M2TS/M2T/MOD/TOD/AVCHD footage automatically without risky of losing intact file structure.

And the most important thing is your can download it totally Free in App Store with 100% safety.


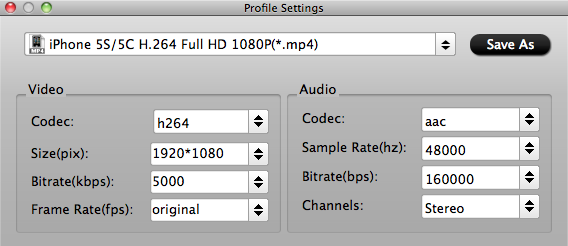
See this specification:


This Free MTS/M2TS Converter for Mac comes with bellowing features:

Full Support to AVCHD footage
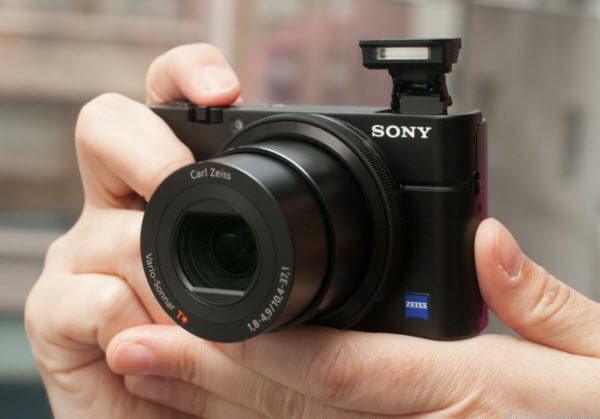
Support interlaced and progressive AVCHD 1920*1080, 1440*1080, 1280*720 videos shot with Sony, Panasonic, Canon, JVC, etc.

Simple gauss blur effect
Simple gauss blur effect is very useful to recorded file formats, since it can eliminate the recorded videos noise. If you like, you can also add other special effects including simple laplacian sharpen, gray, flip color, invert, aged film and deinterlacing. What is worth mentioning is the deinterlacing, which can convert interlaced video into a non-interlaced form so that you can enjoy a better and clearer video effect.

Accurate trim and crop your AVCHD (*.m2ts or *.mts)
The accurate trim and crop function allows you to trim the proper time length for MTS/M2TS videos, as well as cut off any unwanted area. Its original video and output video preview windows will also be convenient for you to edit.

Replace original audio
To replace the original audio is easy to be realized under the Editor sections.

Split selected video file
Using the Split function, you can split the selected video file into required video clips by specifying the clip quantity, duration time and file size.

Audio and video sync technology
The program adopted advanced audio and video sync technology; never let you troubled by the audio and video issues.

Built-in codec
Its built-in codec will not install any codec on your computer, so as to avoid the unexpected codec problem.

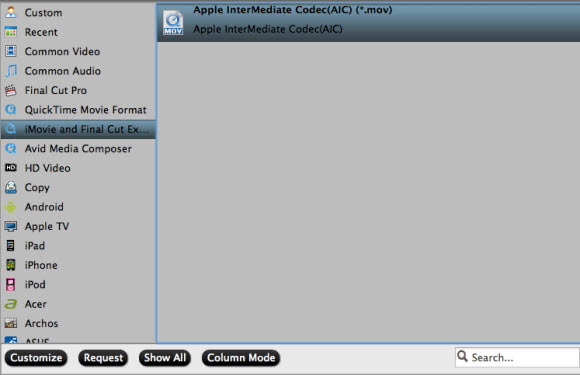
Note: Comparing with Pavtube MTS/M2TS Converter for Mac, the Free MTS/M2TS Converter for Mac removed Apple ProRes codec for Final Cut Pro and Apple Intermediate Codec(AIC) codec for iMovie & Final Cut Express.

Learn more Free products from Pavtube: https://www.facebook.com/pavtubefans/app_193168050721272

Wondering how to do the conversion?

The Correct Way to Ingest and Import AVCHD to Final Cut Pro 7
Import Canon XA25 AVCHD footage to iMovie or Final Cut Express
Transcode Panasonic AVCHD MTS to Avid Media Composer
How to Import MTS Clips to Aperture editavle files?

More step-by-step guide of how to start the conversion:
Start Using Pavtube MTS/M2TS Converter for Mac | MTS/M2TS Converter for Mac Guides

Source: http://mediaconverting.blogspot.com/2013/10/40-off-upgrade-pavtube-free-mts-m2ts-converter-for-mac.html

Friday, October 11, 2013

MakeMKV vs ByteCopy vs DVDfab - Top Blu-ray/DVD Ripping & Coping Tool Review

Backup the Blu-ray discs onto computer is really a good method to store Blu-ray movies. In order to backing up Blu-rays, we need the help of Blu-ray ripping software. Still have no idea about which one is suitable for you? This article will give you full reviews of top 3 Blu-ray Ripper in 2016. 

Blu-ray discs are widely used by film producers, so people who love watching movies, may store kinds of Blu-ray discs in their home. These discs need a lot of space. Meanwhile, the discs are easily scratched. 


To protect the expensive Blu-ray Discs from scratching, more and more people are tending to make a backup of their Blu-ray collections. As an experienced user of various Blu-ray ripper tools, the author of this post is pleased to help beginners find their best fit. The following passages take a brief review of three top Blu-ray rippers in 2016: ByteCopy, MakeMKV, and DVDfab.

Pavtube ByteCopy Review

Pavtube ByteCopy is your best tool to rip and convert Blu-ray movies and DVDs to MKV container format with multiple audio tracks and subtitle sincluded. It preserves chapter markers in the converted MKV file. All that and more make it possible for you to easily select your needed tracks, subtitles, as well as chapters when watching Blu-ray and DVD movies with your media players.

And other than that, you can backup and convert latest Blu-ray and DVD movies to any other formats like MP4/MOV with multi-track audios, M4V, AVI, WMV, MPG, M2TS, etc for playback on iOS/Android/Windows Tablets/Phones, HD Media Players (WDTV), editing software (Avid Media Composer, Adobe Premiere, etc.), and more.


Trial and Download
  • ByteCopy for Mac OS X

    Requires Mac OS X 10.9 Mavericks, 10.8 Mountain Lion, 10.7 Lion, Snow Leopard10.6, Leopard 10.5.

Pavtube ByteCopy rips Blu-ray in 2 ways, lossless copy and lossy conversion. In trial version lossless backup runs 7 times only; for loss conversion, a watermark is put on the screen. A full version is offered at $42 USD. The purchase includes a lifetime license and unlimited upgrades.

Note:
 Currently you can't edit videos by merging, splitting, trimming, cropping, adding .srt, .ass subtitle files, etc if choosing multi-track output formats. 

Highlight features of ByteCopy: 

* Automatically detect Blu-ray/DVD main movie 
* Full disc copy Blu-ray/DVD by chapters without quality loss 
* Rip/convert/backup BD/DVD to any other format for playback on any iOS/Android/Windows tablets and phones 
* Backup BD/DVD to MKV format with multi audio/subtitle tracks and chapter markers without any quality loss. 
* Convert BD/DVD to MP4/MOV with multi audio (language) tracks 
* Add SRT, ASS, and SSA subtitles to BD/DVD movie 
* Edit BD/DVD movies: trim off commercials, crop off black bars, merge several chapters into one, split one movie into several pieces, and more 
* Support TrueHD 6.1 and TrueHD 7.1 decoding 
* Support latest BD and DVD (BD/DVD/Ultimate/iMedia) 

Related Guide 


MakeMKV Review

MakeMKV is a nice choice for those who feel like to make lossless copy of their Blu-ray and DVD collections. The software does one thing- converting the video clips from encrypted disc into a set of MKV files, preserving most information but not changing it in any way- and does it well. It is very easy to remove unwanted audio or subtitle tracks and pretty fast to back up a Blu-ray. The copying of Blu-ray Avatar took only 86 minutes. All video streams, audio tracks and subtitles are included in resulting MKV file.

Import source: Blu-ray Disc/folder/ISO, DVD

Export file format: .mkv (with original codecs)

To add- MKV (also known as Matroska) is a container file format, in which there can be many audio, video and subtitles streams, allowing the user to store a complete movie in a single file. Practically this means that it is possible to put entire movie with multiple sound and subtitle tracks, chapters and movie thumbnail into single file.


Trial and Download
  • MakeMKV 1.6.8 for Windows

    Requires Windows XP, Vista or Win7, x86 or x64.
     
  • MakeMKV 1.6.8 for Mac OS X

    Requires x86 Mac OS X 10.5 or later.
  • MakeMKV 1.6.8 for Linux
MakeMKV allows for a 30-day trial, and $50 USD is all you pay for lifetime Blu-ray ripping feature. Its DVD ripping feature always stays free, so let’s say thank you to the generous developer of MakeMKV.

Read Review: Mac MakeMKV Alternative 

DVDfab Blu-ray Ripper Review

DVDfab used to stand for an excellent free DVD ripper. Now we know they can do more (and ask for more too). DVDfab Blu-ray Ripper decrypts and rips Blu-ray title to various video files playable on next generation consoles like PS3 and Xbox 360, HD player like WD TV Live, or mobile devices like iPod, iPhone, iPad, etc. Unlike MakeMKV, it exports a lot of video codecs and formats:

Video: MPEG-4, H.264, MP4, MKV, AVI, WMV, M2TS, TS etc.

Audio: MP3, MP4, M4A, WMA, WAV, AAC, AC3, DTS, etc.

So you see the differences here. With MakeMKV you get lossless Blu-ray backup but only in MKV format; while with DVDfab you lose original Blu-ray quality but get much smaller movie clips in desired format. A preferred feature of DVDfab is their “Lighting speed”, i.e., multi-core CPUs and NVIDIA CUDA support. By taking advantage of CUDA accelerating, the conversion time is greatly shorted.


Trial and Download
  • DVDfab Blu-ray Ripper

    Requires Windows XP, Vista or Win7, (x32/x64). Not a Mac version is provided. 
Everyone can evaluate the trial for 30 days before it stops work. To continue using the software, you can buy a one-year license of DVDfab Blu-ray Ripper at $60 USD and $105.6 USD for lifetime license. If you purchase Blu-ray Ripper and DVD Ripper in bundle, it’ll be $93.5 for one-year use and $154 for lifetime. Pretty high price, isn’t it? Especially when you can get a similar Blu-ray Ripper- BDMagic at much lower price?

Get Best DVDFab Alternative in Mac OS X Yosemite 

Compare: MakeMKV vs. DVDfab vs. ByteCopy

MakeMKV and ByteCopy are good for lossless Blu-ray and DVD backup, while DVDfab focuses on Blu-ray trans-coding to portable devices like PS3, Xbox, etc.

Q: Which Blu-ray ripper keeps Blu-ray movie structure (including chapters)?
A: MakeMKV and ByteCopy

Q: Which Blu-ray ripper keeps multiple audio tracks and subtitles?
A: MakeMKV and ByteCopy

Q: What about the ripping speed of the three Blu-ray Rippers?
A: MakeMKV = ByteCopy (lossless copy) > DVDfab

Q: Which en-decodes Blu-ray with NVIDIA’s CUDA support (GPU computing)?
A: ByteCopy and DVDfab (Tip: CUDA works only when exporting H.264 encoded videos)

Q: Which does better on Blu-ray hacking/cracking?

Not a Blu-ray ripper is able to crack all the Blu-ray Discs as decryption always falls behind encryption. So it’s a question of upgrade and tech support. All the three updates their software along with the come up of new BD+ keys. MakeMKV and ByteCopy charge free for updates while DVDfab asks you pay extra money for the updates.

Learn more Money-saving Tips:


Some posts you may interest:

Thursday, October 10, 2013

Sync MKV, VOB, AVI, MPG, Tivo, WMV, Flash Videos to iTunes on Mac


Summary: Do you want to sync MKV, VOB, AVI, MPG, Tivo, WMV, Flash Videos to iTunes on Mac for transferring to Apple devices? This article mainly introduces the Mac solution to put any kinds of 720/1080p videos onto iTunes.

iTunes proviedes a media library for iOS devices. Before you can sync music and movies to iPad, iPhone, iPod Touch, you need to add your music, video, and other items to create your iTunes library. However, iTunes only supports limited video formats (files that end in .mov, .m4v, or .mp4), many videos can't be directly streamed to iTunes, such as MKV, VOB, AVI, MPG, Tivo, WMV, Flash etc.

How to get MKV, VOB, AVI, MPG, Tivo, WMV, Flash easily syncing to iTunes? The answer is to convert these 720p/1080p Videos to iTunes compatible videos so you can transfer them to your iPhone, iPad, iPod, or stream to Apple TV etc for playback. Now let's go to learn how to do it.

Do either of the following to transfer videos to your iTunes library:

Drag a file or folder from the desktop to the iTunes window. If you add a folder, all the files it contains are added to your library.

In iTunes, choose File > Add to Library, locate a file or folder, and click Open.


Download 1080p movies and TV shows to iTunes from iTunes Store


The iTunes now supports up to 1080p full HD video contents. You can add HD movies to iTunes by purchasing them from the iTunes Store or by downloading them from the Internet. Video purchases from the iTunes Store are delivered SD and HD. HD content is offered in either 720p or 1080p. iTunes by default is set to purchase, download, and playback HD content in 720p. You must change your local preference setting if you prefer to download, purchase, and playback HD content in 1080p:

1. From the iTunes menu, choose iTunes > Preferences > Store (for PC, choose Edit > Preferences > Store).

2. Next to "When downloading High Definition videos, prefer:" set your preference to 1080p. Click OK.

Depending on your computer's hardware configurations, you may be unable to purchase, rent, or playback content in 1080p though.

Transfer 1080p videos/shootings to iTunes

You can transfer QuickTime, H.264 and MPEG-4 movies (files that end in .mov, .m4v, or .mp4) to iTunes and use them in a video-enabled iPad or iPhone and with Apple TV. Just drag and drop the HD videos to iTunes. But not all kinds of music and video are compatible with iTunes– videos in MKV, VOB, AVI, MPG, Tivo, WMV, Flash Videos will not import to the software. To convert MKV, VOB, AVI, MPG, Tivo, WMV, Flash Videos videos to iTunes supported format before you can add them to iTunes library, you need to get a Video Converter for Mac here.

How to convert MKV, VOB, AVI, MPG, Tivo, WMV, Flash Videos to iTunes

Step 1. Run the Pavtube Video to iTunes Converter for Mac, drag and drop source video to the program.


Step 2. Click on “Format” bar, and Choose iTunes compatible format for Apple devices.

Choose the iTunes supported formats in the "Format" dropdown list. You can go to "Common Video" or "HD Video" options to find what you like. I think MP4 format is better for iTunes.

But, here you are recommended to choose the Apple devices like iPad, iPone, Apple TV, etc directly. Find a suitable format under these Apple devices options.

Tips: For some advances users, you can go to adjust video and audio parameters like bitrate, resolution, channels, etc. Click "Settings" button you can go to check and change them as you like.

Step 3. Press on “Convert” to start encoding MKV, VOB, AVI, MPG, Tivo, WMV, Flash Videos to iTunes compatible video.

Step 4. When conversion completes, press on “Open” to locate converted videos. Drag and drop these movies to iTunes.

Now open your iTunes and then sync the converted MKV, VOB, AVI, MPG, Tivo, WMV, Flash Videos movies to iTunes library for convenient playback on Apple devices. In this way, you can enjoy your favorite MKV, VOB, AVI, MPG, Tivo, WMV, Flash Videos on your iPad/iPhone/iPod wherever you are.

You may also
Encoding OBS FLV Footage to Final Cut Pro X for Editing
Convert Torrent to iTunes on Windows/Mac with No Trouble

Wednesday, October 9, 2013

iPhone 5C Review and Video Tips- How to convert DVD to iPhone 5C

Summary: This article focus on iPhone 5C Review and Video Playback Tips. I write it aiming to show users a perfect way to watch DVD movies on iPhone 5C.

The 2013 iPhone 5C takes the 2012 iPhone 5 in a less-expensive, more fun direction with colorful unibody polycarbonate shells in red, green, blue, yellow, and white, along with an improved FaceTime HD camera. Well, first of all let's have a look at this cheaper version of the iPhone.


iPhone 5C Review :

GADGET DESIGNER

Apple's iPhone 5C is a slightly cheaper, more colourful alternative to the firm's latest flagship iPhone 5S smartphone.

While some expected the iPhone 5C to launch below the £300 mark, it seems Apple has instead decided that it's not willing to compromise on price or user experience, designing its new "cheaper" smartphone with the same specifications as last year's iPhone 5.

It's clear that the smartphone is going to divide opinions, mainly with its refreshed design and overhauled iOS 7 operating system. However, we think that the more you use it, the more you might be won over.

Design

The iPhone 5C's colourful plastic casing is the first thing that will divide opinion. Some who encountered our bright green iPhone were quick to dismiss it as "toy-like" and "cheap", while others said they were impressed by the premium feel of the device.

As we pointed out in our iPhone 5C first impressions, the phone's polycarbonate plastic back has a surprisingly quality feel. The unibody casing feels sturdy and tough, and as we found when we accidentally lost hold on the glossy handset above concrete, it's pretty resistant to scratches too.

The glossy casing will be a nuisance for some, and during our first couple of days with the iPhone 5C we found it difficult to keep a firm grip on it. However, now that we have got used to the handset we find it comfortable to hold, perhaps more than the iPhone 5 due to the new handset's smooth, rounded edges.


That could also be helped by the handset's size, as it's slightly thicker and heavier than the iPhone 5 and iPhone 5S handsets at 132g and 8.9mm thick, making it feel more solid and comfortable in the hand.

We liked the physical buttons too, which match the colour of the device - be it a white, blue, yellow, pink or green iPhone 5C. The volume buttons are larger, and more rectangular than those on the iPhone 5, and we found these more satisfying, and easier to press.

Beyond the slippery, glossy back, we have another small gripe with the redesigned casing, and that's the SIM slot. We found the port on the iPhone 5C's right hand side is prone to picking up dust and dirt, and we had to be remove it in order to clean it properly. The headphone jack on the bottom of the phone can also feel spiky to touch, which could be an annoyance for some depending on how you hold the handset.

Screen 

The iPhone 5C's 4in 1136x640 326ppi Retina display is unlikely to disappoint. Despite being the same as on the last generation iPhone 5, which has since been succeeded by the Samsung Galaxy S4 and HTC One, the screen still stands out as one of the best on the market. Colours are vibrant, text is crisp, and although the display isn't great in bright sunshine, not many are.

Our only real issue with the screen is its size. With Samsung, HTC and Nokia releasing smartphones with larger displays, the iPhone 5C's 4in screen feels small, in turn making the handset seem somewhat dated.


That said, the screen is much more usable one-handed than most of its competition, and given that Apple is targeting younger users and new smartphone users with the iPhone 5C handset, this could work to its advantage.

iPhone 5C Video Playback Tips

I believe more people will buy this new coming Apple iPhone and it would be good to play DVD movies on iPhone 5C during a boring travel or a long flight. Unfortunately, you cannot directly transfer DVD to iPhone 5C.

I cannot help telling you that I just got my blue iPhone 5C. Anyway there is another problem that I need your help. I want to convert some of my DVD movies like Toy Story 3 to my iPhone 5C so that I can watch them when I'm boring outside. What is the best software you know? Thanks!

In this case, you need to rip DVD to iPhone 5C compatible formats first with the help of a DVD to iPhone 5C RipperAfter many trials, we select this DVDAid from Pavtube for that it's capable of removing DVD protection quickly (a few minutes during the importing) and smoothly converting them to MP4 which is preferred by IOS devices without any quality and sync issues.

Read more: Top DVD Ripper Review - Get Top 5 DVD Ripper Program for You 

I once used this dvd ripper to convert DVD to iPhone 5C mp4 format. It's a simple one, only need a few steps and the outcome is quite well I think. Download a free trial version and follow the guide as below to convert DVD movies to MPEG-4/H.264 MP4 format for iPhone 5C with best quality.

The Mac version is Pavtube DVDAid for Mac.


Step 1. Get this DVD to iPhone 5S/5C Converter installed and import DVD.

Click "Import DVD" to load disc from ROM, IFO/ISO or DVD folder. Pavtube DVD Ripper will detect and check the main title automatically; keep it as default unless you also want to convert the tidbits.


Step 2. Choose iPhone 5C video format.

Tips:
For windows users, if you want to convert videos to iPhone 5C with best settings, you need to download profile patch for the software at first.

This app contains an optimzed presetting for iPhone 5C. You just need to go to Format -> iPhone -> iPhone 5S/5C H.264 Full HD 1080P(*.mp4), and the output files will be fully compatible with your iPhone 5C.


Step 3. Customize outputting video specs. (Optional)

You can click Settings bottom to adjust the output parameters including video codec, size, bitrate, framerate and sample rate(Hz).


Step 4. Start converting DVD to iPhone 5C.

Click the red "Convert" to start converting DVD to MP4 for iPhone 5C. After conversion, you can click "Open output folder" to quick location converted videos.

How to sync video, photo, music to iTunes on Windows/Mac?
How to sync media contents from iTunes to iPhone/iPad/iPod?
How to transfer videos, music, photos from PC to iPhone 5S? 

Related Articles:

Rip Blu-ray to iPhone 5S/5C with best quality
Can iPhone 5S/5C play 1080p/720p HD Videos
Play MPG/MPEG Files on iPhone 5S/5C without any Audio & Video issues

Tuesday, October 8, 2013

Can Galaxy Tab 3 play MKV, AVI, WMV, M4V, Tivo, VOB, FLV, MPG Videos?

Summary: This guide shows you the best way to play MKV, AVI, WMV, M4V, Tivo, VOB, FLV, MPG Videos on Galaxy Tab 3 via converting SD/HD videos to Galaxy Tab 3 supported video formats on both Mac and Windows.


The third generation of Galaxy Tab slates consists of three tablets of different sizes, and the Samsung Galaxy Tab 3 8-inch is the middle child in the family. It is an Android 4.2.2 based tablet that fits perfectly in the mid-range category – with an 8-inch touchscreen, 1.5GHz dual-core processor, 1.5GB of RAM, and a 5MP auto-focus camera to top it all off. But hardware specs aren't all that this device has to grab our attention with. The 8-inch Galaxy Tab 3 actually stands out with being pretty light and portable for its class.

It is worth getting Galaxy Tab 3- this decent portable media player to enjoy HD videos and movies, however, it's a pity that we can't put some popular videos with various format like   MKV, AVI, WMV, M4V, Tivo, VOB, FLV, MPG, etc. on Galaxy Tab 3. Don't worry. Things will be easy if you convert SD/HD videos (MKV, AVI, WMV, M4V, Tivo, VOB, FLV, MPG Videos) to Galaxy Tab 3 via Top Galaxy Tab 3 Video Converter Ultimate. Can't wait to transfer all kinds of videos to Galaxy Tab 3 for watching? Read the following guide now.

How to convert MKV, AVI, WMV, M4V, Tivo, VOB, FLV, MPG videos to Galaxy Tab 3?
Preparation:
  • Your Galaxy Tab 3
  • Your favorite Videos or Movies
  • A Professional Galaxy Tab 3 Video Converter is a professional video to Galaxy Tab 3 conversion program which support most mainstream video formats including Blu-ray and DVD discs. With it, you can convert all 1080p/720p videos like MKV, AVI, VOB, Tivo, MPG, WMV, MOV, M4V, VRO, FLV, F4V, etc to Galaxy Tab 3 compatible MP4 formatfor playback. Plus, this video converter also provides the optimal presets for Galaxy Tab 2, Galaxy Note II, Galaxy Nexus, Galaxy S3, Galaxy S4, Amazon Kindle Fire HD, Nexus 10/7/4 and other popular portable devices.

    (Mac users: Mac Video Converter for Galaxy Tab 3 and Read Top 5 Best Video Converter for Mac Reviewed 2015)
Step 1. Import source videos to the Video to Galaxy Tab 3 Converter.
Install and run the best Video to Galaxy Tab 3 converter on your computer. Add videos in the following two ways:

1. Click "Add video" button to choose video files from your hard drive for converting.

2. Directly drag the videos to the Galaxy Tab 3 Video Converter Ultimate.

Tips: To save your time, you can add multiple video files for converting at a time since batch conversion is well supported.
 
add hd video files

Step 2. Choose presets for Galaxy Tab 3.
Click the "Format" list to check all the profiles. This Video to Galaxy Tab 3 Converter integrates various presets for different devices; click "Samsung" on the left column to find MP4 presets for Galaxy Tab 3. Or you can key in "galaxy tab" in the little search box to get all the presets specific for Galaxy Tab 10.1, Galaxy Tab 2 7.0, Galaxy Tab 3 and more:


Step 3. Edit video and customize specs before conversion. (Optional)
You can edit these videos before conversion by clicking the pencil-like icon on the top. Some of the source video such as MXF/MTS/MKV could be interlaced which is not good for playback; in this case you can check "Deinterlacing" in Effect tab to get perfect progressive HD MP4 videos. Trim, crop, edit audio, add srt/ass/ssa subtitles and 3D effect are all supported in this edit window.

Back to main interface, you can click Settings to free customize video size, bitrate(quality), frame rate, sample rate and other specs.

Step 4. Start converting all Videos for Galaxy Tab 3.
Click the red "Convert" to start converting MKV/AVI/VOB/Tivo/MPG/WMV/FLV/F4V to Galaxy Tab 3 MP4.

Wait for a few moments, and you can click "Open output folder" to locate the converted video quickly. Now you can transfer videos to your Galaxy Tab 3 for entertainment.

What's more, Pavtube Video Converter is an all-in-one Converter that can not only convert all SD/HD videos but also does well in legally removing Blu-ray/DVD protection and put Blu-ray/DVD/ISO/IFO movies on your Galaxy Tab 3, Galaxy Note 4, Sony Xperia Z4, LG G-Pad, iPhone 6, iPhone 6 Plus, Surface RT/Pro and more other devices.

See also:

Friday, October 4, 2013

AVI to iMovie: Easily and Successflly import AVI files to iMovie on Mac

This article will explain why we often failed to import AVI to iMovie, and I will introduce a step by step guide on how to successfully import all kinds of AVI files to iMovie on Mac.


Question: I shot video footage and then captured using Scenalyser to an avi file. A friend would like to import the footage into iMovie (he also has Final Cut Express but doesn't use it much). iMovie will not import my avi files. Is there a way to do this?

Best answer:

In fact, the iMovie can only support MP4, M4V, MOV files and some types of AVI files. You may know that AVI file can be associated with three coedcs like AVI, XviD and DivX. Supposed that your handy .avi can't be recognized by iMovie, it's because of the AVI codec used to .avi file isn't compatible with iMovie.

As a result, importing an AVI file to iMovie directly always end up stuck in the copying process. Even an AVI video is successfully imported to iMovie, it is either without sound or video, or with jarring images.

So, how to import AVI to iMovie and achieve the perfect result?

In order to edit AVI videos in iMovie, you can try converting AVI to iMovie acceptable file format like AIC .mov on Mac, then you can get the generated file to be imported into iMovie for further editing in iMovie.

Pavtube AVI to iMovie Converter can give you easy but effective solution for importing AVI footages into iMovie for editing on Mac. With the assistance of the HD Video Converter for Mac, you can effortlessly transcode AVI to AIC for iMovie editing. As it has presets for iMovie, so the output video quality can be optimized. More than that, it can do other video like Prores, DNxHD, MPEG-2, etc to a specific programs like FCP, Avid MC, Adobe etc. Also, you can extract audio from the source video with it.

The easy guide on how to convert AVI for importing to imovie for editing on Mac 

Preparation:

1. Install and launch Pavtube HD Video Converter for Mac. You can directly drag and drop .avi video files to this software. 


2. Click Format bar to choose the output format. Click and choose iMovie and Final Cut Express>Apple Intermediate Codec(AIC) (*.mov). 


3. (Optional) You can click "Settings" to customize the output parameters, adjust the resolution, bitrate as you want. 


4.Start convert AVI to AIC for iMovie editing on Mac OS X. 

Click the "Convert" button to start transcoding AVI to AIC .MOV videos to be compatible with iMovie. 

After the AVI to AIC conversion finished, you can easily import video files and projects into iMovie for further editing without any trouble. Congratulations! You have successfully taken the first step to make your own masterpiece. 

With this AVI to AIC Converter, you can easily change AVI files to iMovie for editing. This software runs fast, so you can convert your AVI video to iMovie in less time. video and audio synchronization are perfectly guaranteed. 

Read More:

Tuesday, October 1, 2013

Best solution for importing Sony DSC-RX100 mts video in iMovie


Summary: Have got a Sony Cybershot DSC-RX100 and have issues with importing movies from RX100 into iMovie. Is there any solution? Just convert MTS video to AIC .mov for iMovie for editing on Mac.


If you are planning to buy a mid-range HD camera, RX100 could be a smart choice. It is an enthusiast compact camera features with 1080 60p or 1080i video capture in AVCHD format. However, AVCHD is not friendly with iMovie, many users encounter the problem when transferring RX100 AVCHD MTS files to iMovie.

Q1: 
iMovie cannot import movies from the RX100. Anyone has a work around?

Q2: I'm using iMovie, and I'm trying to import the video from my camcorder (Sony RX100). But when I clicked the camera button, iMovie crashes. Why I can not import the clips to iMovie directly? Am I missing something? Pls help me!

Q3: I have a Macbook with Mac OS X installed. I have installed iLife 09. I have just bought a sony rx100. I can download the photos but I am unable to open mts in iMovie. They are in MTS format (AVCHD). Is there any software which I can import mts files to imovie? 

What's the problem? And then how to realize this goal for native editing RX100 1080/60p mts in iMovie? Since Apple hasn't added full supported to the 1080/60p mts recordings within iMovie, and you have to change MTS videos to iMovie acceptable AIC .mov format. This is the best Sony RX100 1080/60p AVCHD to iMovie Solution.

Hot Search: Canon MTS to iMovie | VOB to iMovie | H.264 to iMovie

For this case, a professional Sony MTS to iMovie application - Pavtube MTS/M2TS Converter for Mac comes to help you which is your first choice to transcode Sony RX100 1080/60p AVCHD footages to AIC MOV for iMovie. Here is a step-by-step tutorial for your to figure out your Sony RX100 MTS/M2TS iMovie problem:

Notes: Free MTS/M2TS Converter for Mac you can also have a try!

Preparations

1. Copy your MTS videos from Sony RX100 to Apple hard drive.

2. Free Download the best MTS to iMovie Converter on Mac, install and launch it.

Brief Steps

Step 1. Drag and Drop source MTS videos to Sony MTS to iMovie Converter. Or click "Add Video" to import the mts footage from RX100.


Step 2. Set up output format for AVCHD to iMovie Conversion.

From "Format" list, choose "iMovie and Final Cut Express > Apple InterMediate Codec (*.mov)" for editing in iMovie smoothly.


Step 3. Press the big "Convert" button to start transcoding Sony RX100 AVCHD MTS to AIC MOV for using in iMovie. The program adopted advanced audio and video sync technology; never let you troubled by the audio and video issues.

Once finished, click "Open" to get converted MOV videos. Then you could open up iMovie, and go to "File > Import > Movies…" to import converted video files to iMovie.


More Tips:
1. If you want to merge multiple MTS files into one for easy editing, please tick the box "Merge into one file" to merge all the imported clips.

2. In case the MTS footage is taken under interlacing mode, just click "Edit" to go to Video Editor, and hit Effect to select the Deinterlacing and interlacing lines will be eliminated. (Checked by default)

Read More: