Tuesday, November 12, 2013

Easy way to rip Blu-ray movies to MKV for streaming to Roku 3


Summary: How to prepare your blu-ray videos for playback on Roku 3? – Read on this article to get the way for converting blu-ray movies to play with Roku 3 directly. 

I have a hard drive full of blu-ray movies that I want to rip my blu-rays to MKV file to work with my Roku 3, and playback on iPhone. I'm currently using a bluray ripper but am running into playback issues half way thru movies.  Roku is telling me to use a different software but I'm sure you guys would know what I need to do. Is there a certain software that you recommend over another to rip blurays for roku 3 playback? 

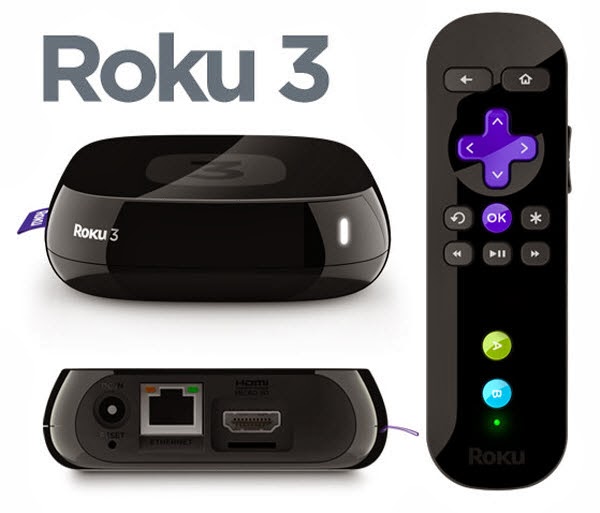
Roku 3 is such a power device that not only a video game console but also a great video player which could play Blu-ray and HD movies. So for lots of movies lovers, it’s a good assistant because most of them may have different puzzlement. Some of them may find it’s hard to search the right one among tons of disks; others want to backup their discs in order to avoid physical damage. In fact Roku 3 can help them to solve these problems. Then how to play Blu-ray movies on  Roku 3? You just need a Blu-ray to Roku 3 Converter. Next I will show you an easy way to convert Blu-rays to Roku 3 for enjoying.


If you have lots of blu-ray collections that you'd like to convert to MKV, the best recommend is Pavtube Blu-ray Ripper (30% off now). With this app, you can help you remove the Blu-ray/DVD disc protection. With its clean interface, fast converting speed and good video quality, converting Blu-rays to MKV will be simply finished within a few clicks. Refer to the guide below for how to rip blu-ray to MKV to play via Roku 3 streaming media player.

The app is also available for Mac OS – Get 30% off Blu-ray Ripper for Mac if you work with OS X 10.5/10.6/10.7/10.8/10.9. 

FYI: If you want to keep all the audio tracks (language) and soft subtitles, here’s another choice for you: Blu-ray/DVD ISO Converter Pro.

Refer to DVD & Blu-ray Ripping Tools:


How to convert Blu-ray to Roku 3 playable MKV format

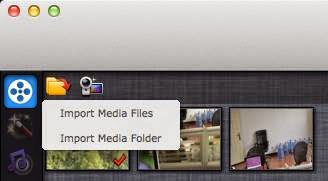
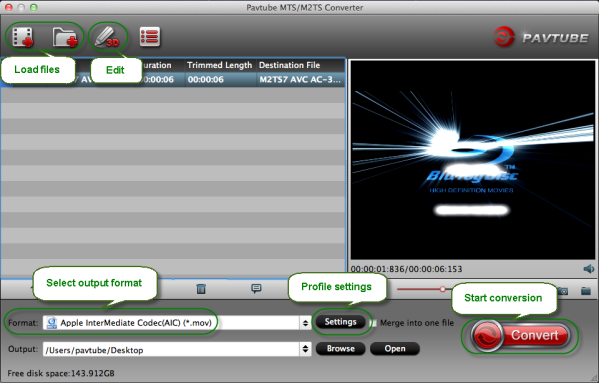
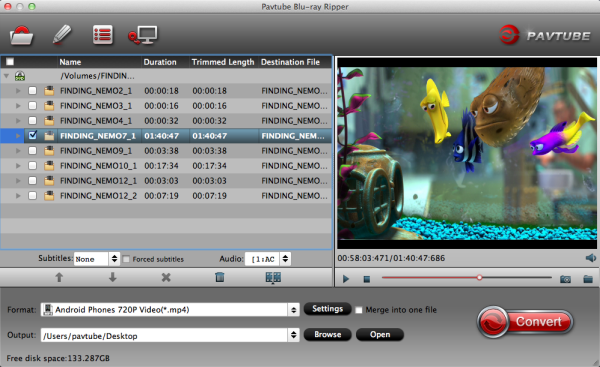
1. Launch the highly recommended Blu-ray to Roku3 Ripper.Insert your Blu-ray movie to disc drive, and click “Load Disc” button on Pavtube Blu-ray Ripper interface to load Blu-ray from ROM; it also support importing Blu-ray ISO and Blu-ray folder.


2. Select the main title and set subtitles/audio language you'd like to preserve.

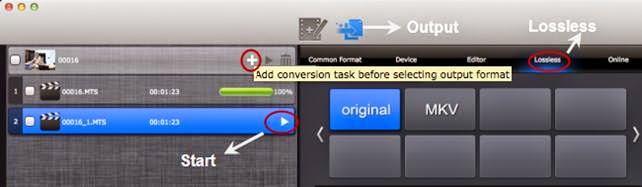
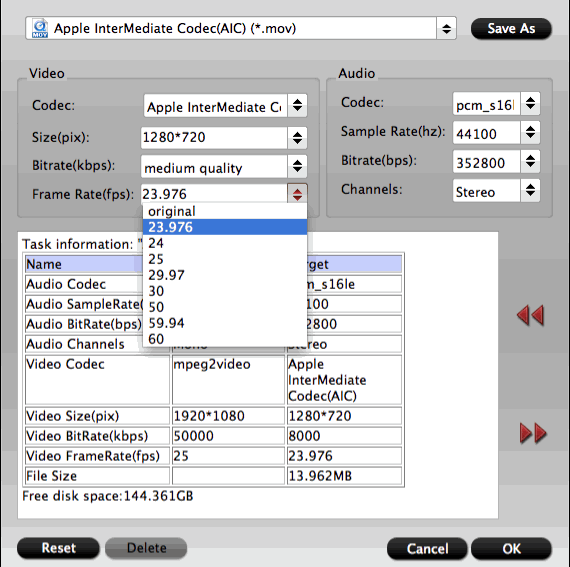
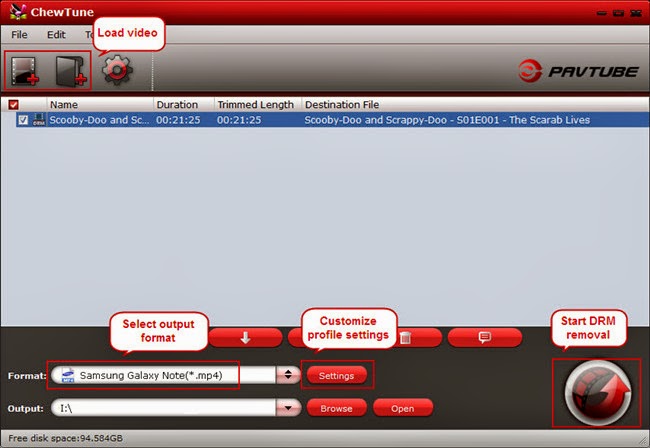
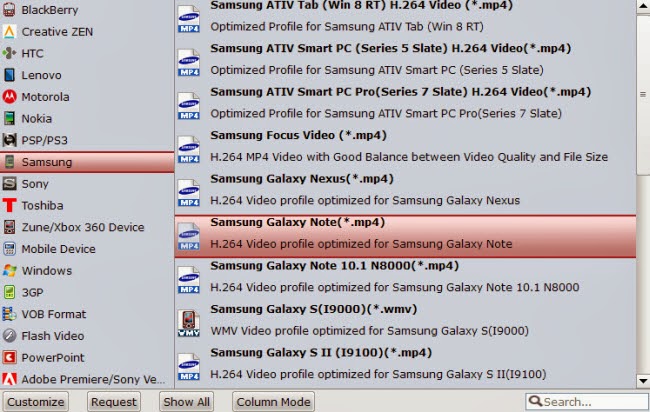
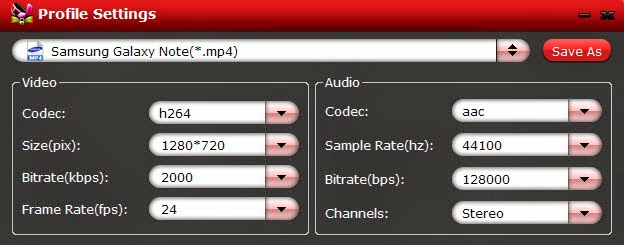
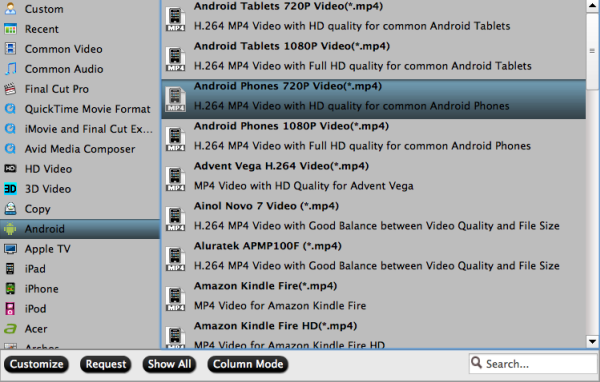
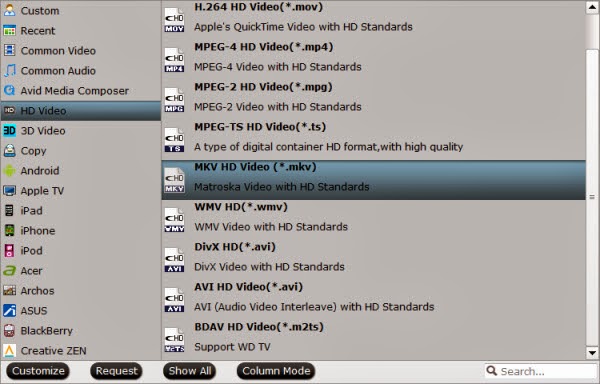
3. Select a format for conversion. To convert Blu-ray to MKV video, press on "Format" and choose "Common Video>> MKV(Matroska) Video (*.mkv)" format.


4. Start ripping Blu-ray movie to MKV for Roku 3, Roku 2 XS, and Roku HD-XR playback.

5. After conversion completes, press "Open" to locate resulted MKV files. Copy these MKVs to USB stick.

How to set a minimum length for conversions and ignore the rest

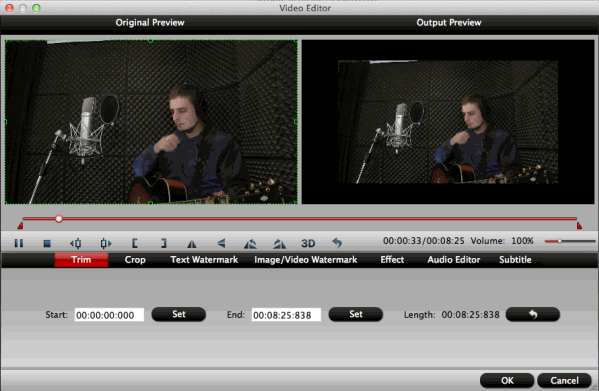
When converting Blu-ray to MKV, you can trim the movie and export only a short clip. Follow the steps below to proceed movie trimming.


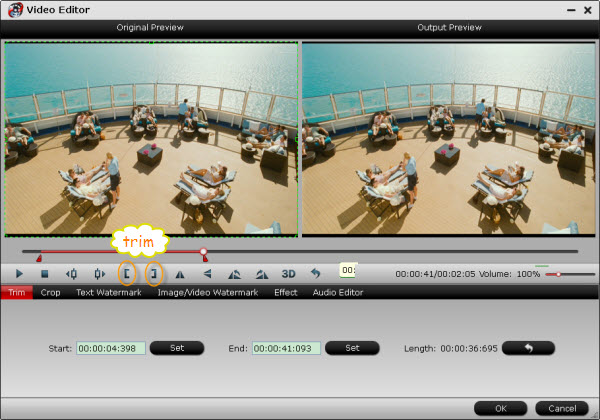
1. Select the main movie, or the chapter you'd like to trim.

2. Press "Edit" button.

3. In Video Editor, play the movie and set starting and ending time point by clicking "[" and "]" button.

4. Click OK.

Will the file names stay the same during batch converting?

The file name will stay the same as original name (except for extension). If you need to change/designate output file name, move your mouse to destination file name and click on it, then input a new name.

Supported formats and Best possible quality that Roku 3 streaming player plays via USB channel:


Related Articles:

Merge/Join hard drive camera recored MTS videos into one with no conversion

In this guide, you will learn how to combine and join m2ts files recorded by hard drive camera without losing details. 

OK, I have a hard drive camera this year. I’m trying to take multiple files and convert them to one? Here is a sample of the file I attached. I shot this in the hallway but will be filming Basketball games and it’s going to have multiple files. Does anyone know of a way to join multiple .M2TS files - without having to re-encode the video? Thanks in advance. Below is a screenshot of my video files.

P.S. The hard drive camera is used for filming basketball games. I am a high school basketball coach. My software that I use needs the game film in DV format. My old camera was a mini DVD camera and it was simple to use that pavtube to convert to DV format. This new hard drive camera is recorded on a sd 64 GB card and is played back on to my hard drive. For some reason everytime you hit start and stop on record it makes that segment into a file. Since games are constantly stop and start I have over 80 clips that need to merge into one file for DV format. 


There are some MTS converters that can convert my m2ts media from hard drive camera in mp4 file as I read, but it will definitely lose a lot of details doing it and it usually takes a long time encoding the H.264 contents. Also, it can't join my m2ts files together.

To fast organize and join .MTS/.M2TS files without encoding, the Pavtube Media Magician for Mac is a best choice. Its "Lossless Output" option provides a jointless MTS/M2TS/TOD merging and rewrapping solution. Using the software, you can join m2ts/mts clips into one without encoding. Not only the processing time is greatly shortened, but also you get the original HD quality. I have used Pavtube products for about 6 years now. And I have already purchased this program for a PC and a Mac. I was surprised by its amazing speed and high qualtiy video output. Below is a guide I share for your reference.

Free Download Pavtube Media Magician or Mac (Download a dmg file for Mac OS X 10.5 users)

Tip:

If you are a Windows user, please turn to Pavtube Media Magician

Note: The free trial version of Pavtube Media Magician for Mac has the following limitations:
  • It will add Pavtube logo watermark in output file(s).
  • Lossless output has a file size limit of 5 minutes.

Warnings:

To remux camera videos to MKV/M2TS, you need to use "Lossless Output" in Media Magician for Mac. There are some things you need to pay attention to while using "Lossless Output":


1. Currently the "Lossless Output" only handles MTS, M2TS, MOD, and TOD formats, thus you are limited to do the following rewrapping without conversion:

- Remux MTS to MTS

- Remux M2TS to M2TS

- Remux TOD to TOD

- Remux MOD to MOD

- Remux MTS to MKV

- Remux M2TS to MKV

- Remux TOD to MKV

- Remux MOD to MKV

2. The format and codec of video files on timeline should be substantially the same;

3. Any editing effects (such as Effect, Audio, 3D) will be ignored when output.

The steps to merge/join AVCHD MTS/M2TS camera videos on Mac

1. Import source files into Media Magician for Mac

Run Pavtube Media Magician for Mac, load source videos into it. (Learn the details on how to import source videos into Media Magician)


2. Drag and drop hard drive camera m2ts recordings to timeline

In the Timeline panel of Pavtube Media Magician for Mac, you can copy a video clip by "Duplicate This Clip" in the Timeline. You can also change the start time and end time of a clip to trim/cut off unwanted parts in a movie clip. To remove clips, select one or more clips in the sequence and press "Delete". You can also change the order of clips once they are there in the Timeline. If you would like to split a clip into two parts, you can drag the cursor/pointer to the right place and click the "Cut" button to cut off the clip.


Read how to Duplicate, Trim, Split and Delete a Clip with Media Magician for Mac.

3. Remux hard drive camera recored MTS videos with no conversion on Mac

Choose "Output" in the main interface, then switch to "Lossless" > "original" or "Lossless" > "original". Click "Plus" icon to add conversion task, and click "Start" to begin merging and remuxing hard drive camera MTS recordings without recompression on Mac.


Soon after the rewrapping task is finished by Media Magician for Mac, you can add the generated MTS file to your Mac media server and play hard drive camera recored M2TS video over Wi-Fi. Enjoy it now!

Read More:

Sunday, November 10, 2013

Make Sony NEX-VG10/VG20/VG30 MTS files editable in iMovie

Description: If you want to edit AVCHD .mts files shot by Sony NEX-VG10/VG20/VG30 smoothly in iMovie, here is right for you. Go to following article to get the instruction.

Sony NEX-VG10/VG20/VG30, which offer excellent image and video quality with interchangeable-lens systems, capture footages in both AVCHD format high definition video and MPEG-2 format standard definition video. Most users prefer to choose AVCHD format in order to get high quality videos. However, many users will face the similar issue about editing in iMovie on Mac OS X as below:

"I'm strictly an amateur hobbyist hoping to make some good videos for a hugely popular blog. I wanted to covert the AVCHD 60p clips from my recently purchased Sony NEX-VG10 to a mac friendly format for editing in imovie."


That is probably because the AVCHD .mts files cannot be recognized by iMovie. In this case, we can count on third-party software to transcode them to a compatible format for iMovie. Here comes Pavtube MTS/M2TS Converter for Mac, a professional MTS to iMovie Converter tool for converting MTS/M2TS/M2T/TS files to a variety of video formats. It will help to transcode Sony NEX-VG10/VG20/VG30 AVCHD .mts files to iMovie friendly AIC codec MOV format, which is intermediate format that features high performance and quality, being less processor-intensive to work with on Mac OS X. With it you are able to edit AVCHD .mts files in iMovie smoothly and then share a better video with friends or post the edited videos to blog. Now follow me to learn how to convert AVCHD .mts files to iMovie on Mac OS X Mavericks.


You are free to download the MTS to iMovie Converter and install on your Mac. Then go to the guide here:

1. Load AVCHD .mts files to the MTS to iMovie Converter.


Tips: You can joint multiple AVCHD files on to one output file by checking Merge into one file on the interface.

2. Select AIC MOV format for iMovie.

Many output format here and you are recommended to select "AIC .mov" files under "iMovie and Final Cut Express" because it best compatible format for iMovie.


3. Adjust output settings and edit the video. (Optional)

Settings: You are allowed to change the parameters of video and audio, such as Size, Bitrate, Frame Rate, etc.


Edit: Here you are able to edit the video before conversion. You can cut off the unnecessary part of the video in Trim, crop the video, add watermark or 3D effect, attach subtitle and so on.


4. Convert AVCHD MTS to iMovie.

Click "Convert" button to start conversion and then click "Open" button to locate the generated files for iMovie.

If you want to convert more videos in different formats, you could try HD Video Converter for Mac, which is capable of converting both various HD videos and latest DVD/Blu-ray. You are also allowed to 1:1 backup the whole discs for further playback or editing. 20% discount will be provided if you get it during the time of Thanksgiving Promotion 2013.

Good news! In this promotion page, if you get MTS/M2TS Converter for Mac, you can get FLV/F4V Converter for Macfree which can help you to edit and play flash video (flv, f4v) on Mac with ease. Take a look now and grasp this opportunity! Never miss!

More related:

2013 Thanksgiving Free Gifts at Pavtube Thanksgiving Special Offer

Summary: Great News, Pavtube Studio is now offering FREE apps, Buy one Get one free and UP to 66% off promotion on Pavtube Thanksgiving Special Offer for you to celebrate the coming Thanksgiving Day from November 6, 2013 to December 10, 2013.

Pavtube provides you promotional items that you can enjoy free and up to 66% off discount on its featured Blu-ray/DVD and video tools. You can receive our Thanksgiving wishes and have a happy Thanksgiving. And go to get another 20% off discount by sharing the activity on your Facebook.


Apps available for free includes Pavtube Free DVD Ripper for Windows & Mac, and Pavtu now! Free Video DVD Converter Ultimate for Windows. In addition, Pavtube Studio are also offering Pavtube Free MTS/M2TS Converter for Mac on their Facebook page.

Part 1. Thanksgiving Best Sellers - 20% ~ 30% off 

1. Pavtube Blu-ray Ripper - $34.3 (original $49) 
Highlights: full disc copy; Directly Copy only main movie; rip any Blu-ray/DVD to various formats 

2. Pavtube DVD Ripper - $24.5 (original $35) 
Highlights: convert standard DVDs to MP4, MKV, AVI, MPEG, MOV, M4V for smartphones, tablets, HD media players and more 

3. Pavtube Video Converter - $28 (original $35) 
Highlights: transcode videos to virtually any video/audio format for editing and playback 

4. Pavtube Video Converter Ultimate - $52 (original $65) 
Highlights: combination of a Blu-ray ripper, a DVD ripper and a Video converter to meet your needs for Blu-ray, DVD and video conversion 

Part 2. Thanksgiving Giveaway - Free Softwares 

1. Pavtube Free DVD Ripper - a fun, easy and fabulous way to rip DVDs to various video formats with fast speed. Support adding SRT, ASS, SSA subtitles. 

2. Pavtube Free Video DVD Converter Ultimate - provides with full Blu-ray, DVD and video solutions for your ultimate multimedia entertainment needs. 

Part 3. Buy One Get One Free 

1. Buy MTS/M2TS Converter – handle AVCHD MTS/M2TS footages in an easy way 
Free Get FLV/F4V Converter - convert any YouTube or Hulu videos (FLV/F4V) for portable devices 

2. Bug MXF Converter - encode MXF clips for editing and playback 
Free Get MKV Converter – convert MKV media contents to Android, Windows and iOS devices 

3. Bug HD Video Converter - get your camera videos and TiVo recordings onto editors and players 
Free Get DVD Creator - burn any kind of video sources to playable DVD 

Part 4. Thanksgiving Hot Deals - Only $9.9 

1. Pavtube MKV Converter - select wanted subs/audio/video track from MKV to be kept in the output files 
2. Pavtube FLV/F4V Converter – convert, trim, crop FLV or F4V to other formats 
3. Pavtube TOD Converter - fast convert, compress, and edit TODs from JVC camcorders for any portable devices 
4. Pavtube MOD Converter – stream, convert and edit MOD recordings shot by camcorders(JVC, Panasonic, Sony) 

Part 5. Sharing at your Facebook page - Get more discount 

1. 20% off ByteCopy (Windows/Mac) 
2. 20% off MXF MultiMixer 
3. 20% off iMixMXF 

Click "Share on Facebook" button, insert "#PavtubeThanks2013", choose "Public", and click "Share Link". You will get another 20% coupon. The discounted link will be sent to your Facebook "Inbox" or "Other" within 24 hours on work days. 

If don't receive message from strangers, please don't forget to contact us for the discounted link via faq@pavtube.com. 


More Pavtube Thanksgiving Special Deals are available on Pavtube Thanksgiving page. Share this activity at your Facebook page and more discounts you can get. 

Part 6. Hot Bundle Deals - Save Up to $35 

1. ByteCopy($42) + Blu-ray Video Converter Ultimate($65) = Only $80, Save $27 
2. ChewTune ($29) + Blu-ray Video Converter Ultimate($65) = Only $75, Save $19 
3. ChewTune($29) + ByteCopy($42) = Only $54, Save $17 
4. ByteCopy($42) + DVD Creator($35) = Only $60, Save $17 
5. ByteCopy($42) + MXF MultiMixer($45) = Only $70, Save $17 
6. ByteCopy($42) + Video Converter($35) = Only $60, Save $17 
7. Blu-ray Video Converter Ultimate($65) + DVD Creator($35) = Only 65$, Save $35 

Please visit the promo page here to download the free programs and to learn more about Pavtube Thanksgiving Special Deals.

Friday, November 8, 2013

Play Amazon WMV movies on Samsung Galaxy Note 3

Summary: Here you will find the easiest way to remove the protections and turn the Amazon movies and TV shows into a friendly format (H.264 MP4) so that you can freely play downloaded Amazon Instant WMV Video contents on Galaxy Note 3.

Samsung Galaxy Note 3 is shaping up as a beast of a smartphone, ranking among the best that have been announced so far. In fact, Samsung's newest Note handset lands right into the high-end smartphone department, packing hardware that will easily get any tech geek excited. That includes a massive, 5.7-inch Super AMOLED display, a last-generation quad- or octa-core processor, and a 13MP camera, all of that complemented by software features and stylus functionality found on no other handset. The Samsung Galaxy Note 3′s light, bright colorful 1920×1080 pixels screen makes the 5.9″ gadget great for watching movies.


If you have downloaded Amazon WMV movies on Galaxy Note 3 and want to put them on your Galaxy Note 3 for enjoying on the go, you should first konw that Amazon Instant videos, though mainly .wmv format, are not supported by Samsung Galaxy Note 3. The problem is, those WMV videos you downloaded from Amazon are protected (by DRM), and can’t be played on any Android tablet except for the Amazon Kindle Fire. To get the Amazon WMV playable on Samsung Galaxy Note 3, you’ll have to remove the DRM protection first.

To transfer Amazon WMV movies to Samsung Galaxy Note 3, you need this Pavtube DRM Video Removal Tool which can strip DRM protection from Amazon Instant WMV videos and  convert them to Samsung Galaxy Note 3 supported MP4 format and freely transfer converted DRM videos to Galaxy Note 3. (There is Mac version: Pavtube ChewTune for Mac)


Now download it and convert Amazon WMV movies to Galaxy Note 3 playable videos.

Here are few tips before starting the whole DRM video to Galaxy Note 3 conversion:

1. Make sure that your computer is authorized for source videos, that is to say you can play the Amazon WMV movies using Windows Media Player.

2. Allow the audio driver installed during the Pavtube ChewTune installation.


3. It would take as long as the source movie length for the whole Amazon WMV video to Galaxy Note 3 conversion process since Pavtube ChewTune records source DRM videos in 1:1 video and audio quality.

How to Remove DRM-protection and transfer Amazon WMV Videos to Galaxy Note 3?

Step 1. Run Pavtube DRM Media Removal tool, drag and drop the source video from local computer to ChewTune. Or hit the “Add Video” button to import your Amazon movies.


Step 2. From “Format” drop-down list, choose “Samsung > Samsung Galaxy Note(*.mp4)” as the output format.


Step 3. If you like, you can enter “Settings” option to adjust profile parameters, such as video codec, bitrate, frame rate, size, etc to get better video and audio quality on Galaxy Note 3.


Step 4. Click the big “Convert” button on software main UI to start Amazon WMV video to Galaxy Note 3 conversion.

When conversion completes, click the “Open” icon to locate the DRM-free movies, and transfer converted movies from PC to Samsung Galaxy Note 3. You are ready to watch Amazon WMV movies on Samsung Galaxy Note 3 the nest time you wait for a bus, travel, or go camping trip.

Related Articles:

Rip Blu-ray to Samsung Galaxy Note 3 for enjoying
Transfer Blu-ray/DVD ISO Files to Galaxy Note 3 on Mac
Play MKV, AVI, WMV, VOB, TiVo, MPG, M4V, FLV on Galaxy Note 3
Convert DVDs to Galaxy Note 3 for leisure use when traveling

Learn More Special Offer: 

ChewTune ($29) + Blu-ray Video Converter Ultimate($65) = Only $75, Save $19 
ChewTune for Mac($29) + iMedia Converter for Mac($65) = Only $75, Save $19 
ByteCopy($42) + ChewTune($29) = Only $54, Save $17

Wednesday, November 6, 2013

Mac OS X: Copy Blu-ray ISO image file to Xperia Z1, Xperia Z Ultra

Description: This step-by-step guide reveals how to transfer Blu-ray ISO image file to Xperia Z1, Xperia Z Ultra for playback via Blu-ray to Xperia Converter for Mac.

Blu-ray, DVD and kinds of video files boost your multimedia life, if you have a large Blu-ray ISO files collection, it should be such a cool thing to enjoy them on your Sony Xperia series smartphones including Xperia Z1, Xperia Z Ultra anytime and anywhere. But how to make it happen? What should we do to transfer Blu-ray ISO image files to Xperia Z1, Xperia Z Ultra for playback?

Best Selling Blu-ray/DVD movies for October, 2013


This professional Mac Blu-ray ISO to Xperia Converter (30% off) is just designed to help you convert Blu-ray ISO image files to Xperia Z1, Xperia Z Ultra MP4 for playback and you don't even need to run virtual drive to mount the ISO file, just simply import. With its clean interface, fast converting speed and good video quality, converting Blu-ray ISO to Xperia Z1, Xperia Z Ultra will be simply finished within a few clicks. Now download it and follow the guide below.

FYI: If you want to keep all the audio tracks (language) and soft subtitles, here's another choice for you: Blu-ray ISO Converter Pro.


3 Steps to Rip Blu-ray ISO image files to Xperia Z1, Xperia Z Ultra support video format on Mac

Step 1. Run this Top Blu-ray Ripperfor Mac, as the Blu-ray ISO to Sony Xperia Converter.

Click "Load file" to choose Load IFO/ISO file. It will recognize the ISO image file automatically so that you will not have to run virtual drive to mount the ISO any more.


Step 2. Select Xperia Z1, Xperia Z Ultra compatible format.

Hit the "Format" menu you could choose the suitable profile for Sony Xperia Z1/Xperia Z Ultra/Xperia Z. When you cannot find the particular profile for your device from Pavtube Blu-ray Ripper for Mac, don't worry, it includes several general presets which are compatible for most Android phones and tablets.


Tips: Customize video specs. (Optional)

Click the "Settings" icon on program interface, you are allowed to set presets to get better video and audio performance on your Sony Xperia Z1, Xperia Z Ultra.

Video
Codec: h.264
Size: 1280*720/1920*1080
Bitrate: 1500~2500
Frame rate: 24

Audio
Codec: aac
Sample rate: 48000
Bitrate: 128000
Channels: Stereo

Note: Higher Bitrate leads to better video quality in saved file, but it also creates larger video size. Don't forget the balance between video quality and size.

Step 3. Start the Blu-ray ISO to MP4 conversion.

When everything is OK, just press the "Convert" button to start the Blu-ray ISO to Xperia Z1, Xperia Z Ultra MP4 conversion. It will not take much time. Just wait for the conversion process to get done.

Note: Keep in mind that some of the settings can be tweaked to improve the video quality but it's a balance between quality and size. Using the settings we suggested, a 120-minute Blu-ray encoded to about a 1.3GB MP4 file.

After the conversion, you can click "Open output folder" to quick locate the converted video.

Additional Tips:

If you are looking for a powerful all-in-one ultimate video converter software to convert various 1080p/720p videos, Blu-ray and DVDs to your tablet or phone for enjoying, simultaneously saving time and effort, the 20% off Video Converter Ultimate program will be a nice choice for you. If you are running a Mac OS X computer, iMedia Converter Mac is the alternative, also 20% off now, never miss!

Related Articles:


Put and play Blu-ray and DVD movies to Sony Xperia Z1
Can Sony Xperia Z1 play MKV, AVI, VOB, WMV, Tivo, MPG, Flash videos
Record iTunes videos to Sony Xperia Z1/Xperia Z Ultra
Transcode Blu-ray/DVD Digital Copy movies to Sony Xperia Z1
How to Free Rip a Blu-Ray Disc?

Saturday, November 2, 2013

Play DVD ISO/IFO on Kindle Fire HDX, Kindle Fire HD with preferred subtitles

Want to transfer your favorite DVD ISO/IFO images onto Kindle Fire HDX and Kindle Fire HD?Well, this article will share you the solution.

Jeff Bezos posted yet another “Dear Customers” letter to the front page of Amazon.com announcing the new Kindle Fire lineup – that’s great advertising right there. The lineup consists of three tablets – the 8.9″ Fire HDX, the 7″ Fire HDX and the 7″ Fire HD. The Kindle Fire HDX, in 7- and 8.9-inch models, has improved the screen, processor, RAM, software, and body of last year's Fire HD.


If you have owned one, no matter Kindle Fire HDX or Kindle Fire HD, it is amazing for you to enjoy movies on the flight of business trip, on the railway of travel or wherever you are.

Well, have a quick glance of Amazon Kindle Fire HDX or Kindle Fire HD video format list, I got know Kindle Fire HDX or Kindle Fire HD can fully support MP4 video, but not the ISO files or IFO files. In other words, if I want to play DVD ISO/IFO on Kindle Fire HDX or Kindle Fire HD, I need to convert them in advance. Now, I’ve a big success converting DVD ISO/IFO movies to Kindle Fire HDX or Kindle Fire HD optimized MP4 format by using Pavtube DVD to Kindle Ripper.

This program is specialized in ripping DVD including commercial DVD with protections like BD+, region code. What’s more, you do not need to worry about the ripping and converting speed. It is excellent for it and it supports CUDA acceleration technology, which will provide you 6 x faster speeds. Apart from it, it will provide the high quality output files for Kindle Fire HDX, Kindle Fire HD and many other videos formats. Becides, you can freely add srt, ass, ssa subtitles you need to the converted video files. Go to get it and freely enjoy your favorite DVD movies on Kindle Fire HDX, Kindle Fire HD. If you are a Mac user, please turn to Pavtube DVDAid for Mac.

Note: If you still have a variety of Blu-ray movies waiting for transferring to Kindle Fire HDX, Kindle Fire HD for playback, or want to output 3D video, you’d better turn to Pavtube BDMagic. It can rip and convert both DVD and blu-ray disc.

How to convert DVD ISO/IFO to Kindle Fire HDX, Kindle Fire HD?

Firstly get your DVD in your DVD drive and then launch the software to get things ready.

1. Load DVD ISO/IFO image file to Pavtube DVD to Fire HDX/Fire HD Ripper.

Click "Load ISO/IFO" button on the top left to load the DVD IFO/IFO images, you can also "Import DVD" or "Load from folder". It will only take few seconds for ripping and importing DVD ISO/IFO and you will be kept informed of timely state with a progress dialogue box.

When it has been imported successfully, you can preview the whole movie and select the subtitle and audio you want.

DVD to Fire HDX/Fire HD Ripper

2. Choose Kindle Fire HDX, Kindle Fire HD friendly format.

Click "Format" menu to find the "Android" option in the dropdown list, choose "Amazon Kindle Fire HD H.264(*.mp4)" for output. It is the most compatible format, which is especially made for   Kindle Fire HDX and Kindle Fire HD.

Kindle Fire HDX, Kindle Fire HD friendly format

Tip 1. Click "Settings" button on the interface, you will be able to check and adjust the video and audio parameters like bitrate, size, channels, etc. Just do it when you need.

Tip 2. In order to get customized videos, you can add srt, ass, ssa subtitles to your own videos.

The free Subtitle Edit will help you to edit your own subtitles then put it into videos.
3. Convert DVD ISO/IFO image file to Kindle Fire HDX, Kindle Fire HD MP4.

You can "Browse" your computer to choose a new folder for output file before conversion. When everything is ready, click "Convert" button to start converting DVD ISO/IFO image file to MP4 Kindle Fire HDX, Kindle Fire HD, then "Open" button will show you the location of output files.
Pavtube DVDAid More Features:
  • Edit the videos before conversion, such as trim, crop, add subtitles, video effect, etc.
  • Convert DVD to many other mobile devices and editing software like iPad 3, iPad mini, ATV 3, Nexus 10, Galaxy Tab 3, S4, Note 2, Sony Vegas and more.
  • Backup DVD main movie to VOB format with original quality.

Now you can watch DVD ISO/IFO movies on Kindle Fire HDX, Kindle Fire HD anytime and anywhere. Hope it will help you.

Related Articles: