Tuesday, December 31, 2013

Transcode JVC GY-HM650U ProHD MXF to ProRes 422 LT for FCP 6/7

To smoothly import JVC GY-HM650U MXF to Final Cut Pro 6/7, you can follow it to solving the problem by transcoding ProHD MXF to Prores 422 LT for FCP editing.

ProHD is a JVC's term describing a suite of professional high definition camcorders. JVC's GY-HM650 is the perfect camcorder for next generation newsgathering. With dual codec recording, clips can be transferred to the station immediately with built in FTP. Light, versatile and extremely easy to use, this camera offers superb low light performance, a long (23x) wide angle zoom lens, and MXF file interoperability from acquisition to air.


The MXF video is excellent, however, it cannot be directly edit on Apple software such as FCP 6 or FCP 7, for example:

“I record some video clips with the JVC GY-HM650U Camcorder and want to edit the MXF files in FCP X, however, the FCP just could not accept the HM650U MXF video clips, so how can I solve this problem? Thanks.”

First, you should know FCP native format is the Apple ProRes 422 codec. This is a common format developed by Apple. ProRes 422 is intended for non-linear editing with Apple Final Cut Pro. It retains higher quality when you convert MXF to ProRes for FCP. Below are some useful tips for you and you will know how to import and edit JVC GY-HM650U MXF to Final Cut Pro 6/7 on Mac. 


1. Download Pavtube iMedia Converter for Mac here. This is excellent software which can help you convert MXF video to ProRes 422, ProRes 4444, ProRes 422 LT for FCP 6/7 and FCP X. Besides, it supports many other formats for output. 

2. Install and launch the Professional MXF to FCP Converter for Mac, import the MXF video from JVC GY-HM650U. 


3. Choose the best output format for Final Cut Pro. Click on "Format" and choose "Final Cut Pro >>Apple ProRes 422(LT) (*.mov)" format. 


The Apple ProRes 422 (LT) codec provides the following: 
  • Roughly 70 percent of the data rate of Apple ProRes 422 (thus, smaller file sizes than Apple ProRes 422)
  • Higher quality than Apple ProRes 422 (Proxy)  
Learn more Apple ProRes, please refer to Types of Apple ProRes Codecs 

Tips:

a. You can click settings to adjust the output parameters, such as resolution, bitrate and frame rate. 


b. You can click edit button to edit MXF video, such as deinterlace, denoise, mute, volume up and crop. 


4. Click convert button to start JVC GY-HM650U ProHD MXF to ProRes 422 LT conversion.

After converting, you can import converted MXF footage to FCP 6/7 instantly without rendering. 


What's more: 

1. This MXF Converter for Mac from Pavtube will retain the timecode for Final Cut Pro after converting. And refer to the picture below to see how this cool mac mxf converting tool keep the timecode for FCP. 


2.Futhermore, if your MXF files have 2 audio tracks or more, here is a new program named iMixMXF with multi-track preserving and mixing features. You can download the trial version for evaluation!

In a word, hope you to enjoy your JVC GY-HM650U MXF footage workflow in Final Cut Pro 6/7 with ease.

Read More:

Friday, December 27, 2013

Import Sony F65 MXF to Premiere Pro CS6/CS5/CS4/CS3 on Mac/Windows

Can't import Sony F65 MXF video to Adobe Premiere Pro smoothly? In this article will give you the answer how to load and ingest Sony MXF footage to Adobe Premiere Pro CS6/CS5/CS4/CS3 for smooth editing. 

Sony F65 users include some of the most world's most demanding cinematographers. It's an advantage you can exploit no matter what your delivery format: true 4K, supersampled 2K or supersampled HD.


I have 4K footage shot on the Sony´s F65 I'd like to composite with in Premiere Pro. The files are saved in an MXF container.It seems that cs6 natively desn´t support this file, is there a plug-in available for Sony's SR RAW codec? Thanks in advance!
Many nonlinear editing programs including Adobe Premiere Pro (CS6/CS5/CS4/CS3) don't support importing MXF encoded files directly. So here comes up the question: how can we import Sony F65 MXF recordings to Premiere Pro without any problems?

Method 1. Sony MXF plug-in. Use the plugin to create a single MXF file of your spanned clips on the memory card and import the new file into the project.
Method 2. To solve the incompatible trouble you’d better change Sony F65 MXF a native format for importing to Premiere Pro (CS6/CS5/CS4/CS3). To get the best quality with 5.1 sound, you can MXF to MPG. If you also want to play it with QuickTime, you can reformat MXF to MOV videos. If you want to get a smaller file for quickly editing, you can encode Sony F65 MXF to WMV.

As you seen above, Pavtube MXF to Premiere Pro Converter for Mac is the best choice for you, and it is capable to convert Sony F65 P2 MXF to Premiere Pro efficiently and stably. 

With the Mac app, you not only can convert Canon XF/Panasonic P2/Sony XDCAM MXF video to MOV, MPG, WMV, you also can batch convert MXF clips to ProRes 422 for FCP (X), AIC for iMovie/FCE, etc. with included Profiles. I believe it is helpful for you. Below is a very easy guide on Sony F65 MXF to Adobe Premiere Pro’s native formats conversion.

Good News! Pavtube Release a New Site - multipelife.com with Product Migration and Name Change.

To thanks for your continued support, we are holding a 'New Site Special' in which you can get 20% off Video Converter Ultimate on Windows/Mac platform now:

Read more: http://1080p-video-tool.blogspot.com/2014/05/pavtube-new-site-release.html

PS: If you are a Windows user, please choose the Video Converter Ultimate, the workflow is the same.

Click here to download the free trial version, get it installed and let's start!
How to convert Sony F65 MXF footage for Premiere Pro CS 6/5/4/3

Step 1. Add MXF files to Pavtube iMedia Converter for Mac.

Connect you camcorder to Mac and keep it on until it show as a hard drive on desktop.

Install and run Pavtube iMedia Converter for Mac.

Click top left icon to load you footages. You can choose "Add videos" or "Add from folder" directly.


Step 2. Choose compatible format for Adobe Premiere Pro CS 6/5/4/3

Click "Format", you can choose "Final Cut Pro > Apple ProRes 422 (*.mov)". Or find Adobe Premiere Pro at left, choose "MPEG-2 (*.mov)" or "MOV(AVC)(*mov)" etc. All of them are the preferred codec for Premiere Pro (CS6/CS5/CS4/CS3)

Apple ProRes 422:


MOV, MPEG, WMV:


Step 3. Set up output videos settings for Premiere (Optional)

Click "Settings" which is marked as 3, you can fix the bitrate, frame rate, sample rate and video size, it's all up to you. Usually the higher bitrate you choose, higher video quality will be, and larger video size correspondingly.

Step 4. Start converting Sony F65 MXF for Premiere Pro (CS6/CS5/CS4/CS3)

Now click the big red circle at right bottom, wait for moments till the conversion complete. You can click "Open" to locate the converted video directly.

For beginners, here is a guide on how to import video files to Premiere Pro.

Here, Pavtube iMixMXF can exactly do this for you. It is a great MXF Mixer and Converter that enables you to convert multi-track MXF from Sony F65 to Prores for Premiere Pro preserving all the audio channels without quality loss, but also can make it easy for merging multiple video clips. The Windows users can Pavtube MXF MultiMixer.

Read More:

Thursday, December 26, 2013

Getting DVD (ISO) video files into iTunes for Apple TV 3 with Dobly Digital 5.1 audio

If you'd like to stream DVD and ISO to Apple TV 3 with Dobly Digital 5.1 audio, you'll need to convert DVD yet ISO to iTunes or ATV 3 compatible video formats first. Read on to learn more.

Externally, the Apple TV 2012 (1080p 3rd-Gen Apple TV) is virtually indistinguishable from the Apple TV 2nd generation. That difference is its support for native 1080p video, as streamed from iTunes, over the Internet, or via AirPlay from a third-generation iPad. Yeah, you can stream 1080p HD movies and TV shows your buy on the iTunes store for enjoying on your 65-inch HDTV.

Besides, with proper DVD ripping software, you can get DVD and ISO into iTunes for Apple TV 3 streaming with original stunning image quality. But sometimes you may have problems in audio, in specific, Dolby Digital 5.1 surround sound. To help those who wanna backup and rip DVD and ISO's to Apple TV 3 with Dobly 5.1 audio, below, I'll throw a quick tutorial up.


First, to achieve your goal smoothly, the most important piece of the equation is that you have a suitable DVD ripping software hooked to your PC. There are many programs out there that allow you to make copies of your DVDs and let you watch them the way you want to view them.

If you're looking for ease of use, and don't mind spending $30 (they currently have a sale), I've had success using Pavtube's BDMagic for Mac (alternative Windows version) to convert DVD discs and ISO image files to a format playable with Dobly Digital 5.1 audio by Apple TV 3 and iTunes. I've found the quality to be excellent, and see no difference when compared to playing the discs themselves.

Converting/Importing DVD and ISO's into iTunes for Apple TV 3 streaming

1. After installing, launch the DVD Converter app on your Mac. and then press "Load Disc" icon to import DVD movie. Choose "File > Load from ISO/IFO" if you'd like to import DVD ISO image file.

blu ray to apple tv Rip Blu ray to Apple TV 3 with AC3 5.1 audio on Mac

2. Choose output profile. You can easily find several optimized profiles for Apple TV 3 under "Apple TV" category. Here I recommend you select "Apple TV 3 1080P Dolby Digital Pass-through(.m4v)" which works well for ATV 3 while maintaining 5.1 surround.

apple tv format1 Rip Blu ray to Apple TV 3 with AC3 5.1 audio on Mac

You can click "settings" to change the setting from the new default HD profile 4000 to 5000~8000 bitrate (Note: bitrate higher results in big file size, and lower visible quality loss).

apple tv settings1 Rip Blu ray to Apple TV 3 with AC3 5.1 audio on Mac

P.S. The key setting Video Size for your new Apple TV is according to your source video exactly. If your source video is in 1080p such as Blu-ray, you can set your video size in 1920*1080 in H.264 codec; while, if your original video size is in standard, 720p in enough. For example, to play DVD on the Apple TV 3, 720*480 video size with 4000~6000kbps birate is enough due to the dvd movies' native resolution.

3. Press "Convert" to start converting DVD to Apple TV 3 MP4 videos with Dobly 5.1 audio under Mac OS X.

4. Wait till conversion completes. Then press "Open" to find the ripped movie.

Add DVD rips to iTunes movie library for streaming to Apple TV 3:

You can then add the new mp4 videos into iTunes movie library. Open up iTunes and follow "File>> Add file to Library…" to sync video to iTunes.

For more information about how to stream HD videos to Apple TV 3 and connections for the Apple TV to pass-through AC-3 5.1 audio, please check Setting up Apple TV for Dolby Digital 5.1 pass-through.

Other You May Concern

1. Can the Apple TV 3 support AC3 5.1 audio?

The answer is Possible. According to my experience, the 2012 new Apple TV is not able to decode 5.1 surround sound to stereo by itself, if you want to play AC3 5.1 (Dolby Digital surround) audio you will need an AV receiver.

2. Does the Blu-ray rip play silence or gray screen in iTunes?

No. iTunes does not play video contents with AC3 audio, but the Apple TV pass-through presets create video with both AC3 and AAC, so iTunes will find and play the AAC track instead.

3. Does the Apple TV 3 Dolby Digital Pass-through preset work with iPad?

Yes. The preset also work with new iPad. It plays stereo by default. If you'd like to play surround sound effect, enable Airplay to have iPad stream the video to Apple TV 3, which pass-through AC3 audio to receiver.

I hope you enjoyed my guide and enjoy your synced up Apple TV 3!

Read more:

Import Panasonic AG-HPX370 P2 MXF to FCP 6/7 with multi audio channels on Mac OS X 10.9 Mavericks

To make it easier for editing Panasonic AG-HPX370 P2 multi audio channels MXF videos with Final Cut Pro 6/7 on Mac OS X 10.9 Mavericks, you need to convert P2 MXF to multi-track ProRes codec first.

Panasonic has announced the immediate availability of the AG-HPX370 P2 HD camcorder, an affordable second-generation, interchangeable lens camcorder with 10-bit, 4:2:2 , independent-frame full 1920 x 1080 resolution AVC-Intra recording.  The AG-HPX370 is a top-level image capture device that also offers a high degree of versatility. It can accommodate both 1/3″ and 2/3″ lenses, it shoots in standard definition as well as HD.


AG-HPX370 is a professional camcorder which is able to shoot video clips in MXF format, but the HD experience also brings a problem to the users who want to ingest MXF files from HPX370 P2 card into FCP 6/7. Actually it’s not hard for you you can import Panasonic AG-HPX370 P2 MXF directly into FCP 6/7 as long as you have converted your P2 MXF footage to FCP compatible MOV with ProRes codec.

However, you may got the MXF footage taken by AG-HPX370 camera with several video streams or audio tracks. So for people who want to edit them in FCP 6/7 always want to keep the multiple audio/video track separately as original. Is it possible to solve this big puzzle?


Of course! YES! Come and meet this multi-audio track MXF Converter for Mac and follow these steps as below.

With Pavtube iMixMXF you are allowed to preserve all or any audio tracks for output Prores .MOV and mix the multiple audio tracks into one if you need.

Transcode Panasonic AG-HPX370 P2 MXF to Multi-audio track ProRes 422 for FCP 6/7 with all audio tracks preserved on Mac OS X 10.9 Mavericks

1. Connect your AG-HPX370 P2 camera to Mac and keep it on. (Please make sure you have the entire MXF file structure as it saved on your camcorder’s P2 card)


Get Pavtube iMixMXF installed. Now follow the top left two icons to load individual mxf or in batch.


2. Click "Format" and choose Multi-track Video>Multi-track Apple ProRes 422(*.mov) as the most compatible codec for FCP 6/7 editing.

import-files-to-mts-converter

3. Click "Settings" to free select needed video/audio tracks.

Check the tracks you need and left others unchecked, thus you can get Multi-track MOV with your needed audio streams. Note there’s a mix into one track icon on the bottom, it will combine all your checked audio tracks into single one.

settings-for-output-format

4. Click the red "Convert" and just let it go!

Wait for a while to get this Panasonic AG-HPX370 multiple audio track into ProRes MOV for FCP 6/7 editing on Mac OS X 10.9 Mavericks.
P.S.

1. Pavtube also have a Mac MXF to FCP converter program for users that do not need to deal with multi-track video/audio files; only $29 is needed atm. Refer to here to quick look this MXF Converter for Mac (Mac OS X 10.9 Mavericks supported).

2. Good news for Blu-ray/DVD fans! Pavtube studio now provides ByteCopy for Mac plus iMixMXF bundle, saving $17 immediately! (ByteCopy for Mac is a multi-track featured blu-ray ripping program. With it, you can easily backup blu-ray to lossless multi-track MKV without any quality loss, transcode to multi-track MP4/MOV/ProRes and other mainstream video formats.)

Read More:

Tuesday, December 24, 2013

We wish you a Merry Christmas and Happy New Year!

2013 Christmas is coming, you may have bought many new digital for play in the holidays, such as tablet, smartphone, camera or camcorders, you may need multimedia software to better enjoy content on the portable devices or recorded by the cameras. Now we are pleased to announce our Year-End Holiday Big Deal, in which four promotionitems allowing you to get awesome free Xmas gifts and Specials at the coming Christmas Day! 

Merry Christmas to everyone! Pavtube is offering our best wishes to every Pavtube member and all potential customers in this holiday season. In addition, it provides excellent customersupport service, including lifetime free upgrade of product and technicalsupport. Users can contact the support staff via email for help and suggestion. For detailed information, please visit the activity page toget the latest news.


Finally, Pavtube Studio members give our best wishes to all our customers inadvance:

Merry Christmas and Happy New Year!

Wednesday, December 18, 2013

Import Panasonic HX-WA03 MP4 recordings to iMovie for free editing

Summary: This guide will show you how to ingest mp4 movies from Panasonic HX-WA03 and edit them in iMovie quickly and easily on Mac OS X 10.9 Mavericks.

Panasonic HX-WA03 Video Camera

First off...it's blue and white, very gorgeous! This compact little vid cam is also water proof, shock proof, freeze proof and records in HD! I'm a video producer, always looking to travel lightweight. I bought this camera specifically to shoot video at the LA Auto Show. The camera shoots beautiful 1080 HD video in low light and the audio is great.


Panasonic WA03 MP4 video not work with iMovie?

The video camera we are using is Panasonic HX-WA03, it gives us videos in .mp4 extension while iMovie 11 seems to not working with it. We are wondering if anything simple workflow to help with this?

Reason:

Since MP4 is created by Microsoft and it isn't compatible with most Mac software program, and iMovie is one particular. When importing a MP4 file from Panasonic HX-WA03 to iMovie, it'll goes gray, that signifies iMovie does not assistance WA03 MP4 files. Thus, we will have to do anything just before editing Panasonic HX-WA03 files with iMovie. To get iMovie willing to import MP4 files from Panasonic HX-WA03 cameras, the ideal resolution should be to convert WA03 mp4 video to iMovie compatible formats, right here, AIC .mov, the natively supported format by iMovie.

Solution:

To perform this job, a third-party software is needed. Here Pavtube HD Video Converter for Mac is highly recommended. It's a professional and powerful high-quality Mac video converter and editor. With it, you can effortlessly transcode Panasonic HX-WA03 MP4 files to AIC encoded MOV for iMovie. Meanwhile, the Mac Video Conversion tool can create files compatible with various non-linear editing systems like Avid, FCE, FCP X, and Adobe Premiere (Pro) etc. Just download it and follow the tutorials below to transfer and import Panasonic HX-WA03 footage to for smoothly editing in iMovie.

Guide: Transcoding Panasonic HX-WA03 MP4 to AIC codec for iMovie

Step 1. Download, install and run the Mac MP4 to AIC Converter, click "Add" or "Add From Folder" to load your WA03 footage.

import-files-into-hd-video-converter


Step 2. Click the format bar, and move mouse cursor to "iMovie and Final Cut Express > Apple InterMediate Codec(*.mov) as output format.

Some more helpful features of the app:

1. Settings- click to set video resolution(1920×1080/1440×1080/1280×720/720×480), bitrate(from 1Mbps to 20Mbps), frame rate (24p/30p)

2. Editor (next to "Add" icon)- click to set deinterlace, denoise, mute, volume up, trim, crop, etc.

Step 3. Click "Convert" button to start WA03 MP4 to AIC MOV conversion.

As soon as the encoding process finished, you can get the final output aic .mov files via clicking "Open" button effortlessly. The transcoded files now are ready for editing in iMovie.

Additional Tips:
1. If you want to edit Panasonic HX-WA03 MP4 video in Final Cut Pro X or FCP 7/6, you just need to choose the "Final Cut Pro > Apple ProRes 422 (*.mov)" as output format in the second step; For Avid Media Composer, choose "Avid Media Composer > Avid DNxHD(*.mov)" as output; For Adobe Premiere Pro or Vegas Pro, choose Adobe Premiere/Sony Vegas> MPEG-2(*.mpg) as output.

2. Need to convert more various formats besides MP4, or convert DVD and blu-ray movies for backup or further playback? Pavtube iMedia Converter for Mac can help you to accomplish both of them. It is integrated software for converting different videos, DVDs and blu-ray discs. Good news to you that you can get 20% discount at Pavtube Christmas Giveaway. Go to get it now.

Read More:

Tuesday, December 17, 2013

Canon C500 Workflow - Two ways to import MXF footage (Mult-track) from C500 to FCP X

Summary: Here are top two ways to import Canon C500 MXF to Final Cut Pro X, you can follow it to solving the problem "FCP X doesm't support C500 MXF files well".

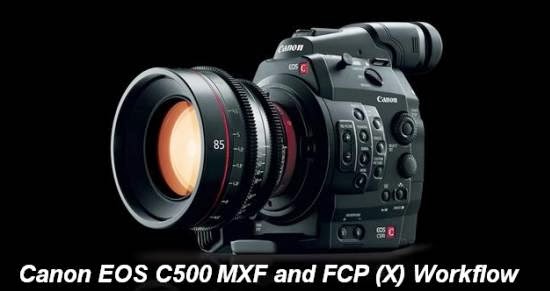
Canon C500 is an impressive 4K Cinema Camera, which has the ability of capturing 2K footage (2,048 x 1,080 pixels) at 12-bit, full 4K RAW output of up to 4096 x 2160 pixels. As the Canon C500 owners, you can enjoy vivid video recordings. With every camcorder, comes many new questions about workflow. The term ‘workflow’ can be fairly broad, but today I am looking at importing Canon C500 MXF footage into Final Cut Pro X.


Fortunately, there are some ways to fix the issues. Let's find them out here. If you're editing Canon C500 MXF footage in FCP X, keep reading to find your best way.

Read More: Two Ways to Import Canon XF100 MXF footage to Premiere Pro

Method 1: Using Canon XF Plugin

Prepararion:
latest Canon XF Plugin for Final Cut Pro, Canon XF Utility

Pros:
- Free
- Supports native MXF importing

Cons:
- Doesn't work well wtih 50Mbps (CBR) 4:2:2, 1920×1080, (60i/30p/24p)
- With a lot of steps
- May cause errors due to incompatible codecs
- Spends a lot of time
- Occupies a large amount of RAM
- Only available for Canon MXF files

Requires: Mac OS X 10.5.x or Mac OS X 10.6.x
I have to tell you the importing way is a tedious process, which needs your patience. If you haven't installed the above plugins, please download and install them. Click here to free download the latest Canon XF Plugin for Final Cut Pro. 


For Canon XF Utility, you have to go to website to download by following the step: Open the Canon C500 product page and click "Drivers & Software", choose your operating System and OS Version, then you will find the "Canon XF Utility 1.3.1 for Mac OS X" in the "Software" category. Here, you also can free download the "Canon XF Plugin for Final Cut Pro 1.3″. Once plugins are all installed, you can follow the below parts to import MXF to FCP X. 

Tip: Before downloading, please enter your product serial number with no hyphens "-". 

Part 1. Back up Canon C500 MXF footages with XF Utility: 


1. Connect your C500 camera to your Mac OS, you also can insert your CF card into your computer. 

2. Launching the XF Utility, you will see your CF card showed up as the Canon drive and "Backup" in the upper left corner as the below picture. 

3. Click Backup on the upper left corner, Canon C500 MXF footages on the CF card will be backed up with the XF Utility. 

PS: Before backing up videos, please make sure you have set the location to store your footage in the Preferences menu. 

Part 2. Import the footages to Log and Transfer window: 


1. Once your footage is saved with XF Utility, please run Loag and Transfer plugin in Final Cut Pro for rendering

2. Click on the folder icon in the top left corner of the Log & Transfer window to load C500 recorded HD MXF files you've soved. 

3. Choose the editing format: Click on the small flower-shaped icon in the top middle of the Log & Transfer window, which will open the Import Preferences panel. You can choose ProRes or natvie format as the editing format. 

Tips: 

1) In general, you can smoothly edit native MPEG-2 MXF, but FCP is designed to work best in ProRes. 

2) By default, Log & Transfer will either convert the footage to ProRes or just re-wrap clips into MOV format. 


4. Click OK when you are done, and continue to import your footage by clicking Add Selection to Queue. Now your C500 MXF recording file is in FCP X, you can freely editing. 

Method 2: With MXF Converter

Preparation: Pavtube iMixMXF ($45) 
System: 
Mac OS X (Mavericks, 10.8 Mountain Lion, 10.7 Lion, Snow Leopard10.6) 

Pros:


- Fastly convert MXF to ProRes
- Five types of ProRes for FCP
- It is also available for Sony and Panasonic MXF footages.
- Supports to transcode MXF to any other video format for all NLE’s
- For all FCP 5/6/7/x users
- You can get 5.1 Channels
- Freely change video/audio settings
- Can keep original quality
- Save rendering time
- Convert MXF to MKV/MP4/MOV formats preserving multi-track audio Output multi-track Apple Prores MOV for further editing in Final Cut Pro (X)- Mix the multi tracks in to one track for broadcasting
- Merge/split/trim/crop MXF footages- Add *.srt/*.ass/*.ssa subtitle files to MXF footage
Cons:

Not free
You can't edit native MXF files

As is known to us, ProRes MOV is the best format supported by FCP X, so, to make Canon C500 MXF editable in FCP X, you need to convert MXF to ProRes codec, which is also editable in FCP X.

Did a lot search and tried some but not very satisfied for the transcode speed, quality or audio tracks saving. Recently found a program on mac named Pavtube iMixMXF and it work well till now; it really helps in converting muti-track mxf to FCP X. Come and meet this multi-audio track MXF Converter for Mac and follow these steps to easily convert XF100 multiple video/audio track MXF to ProRes for Final Cut Pro X.


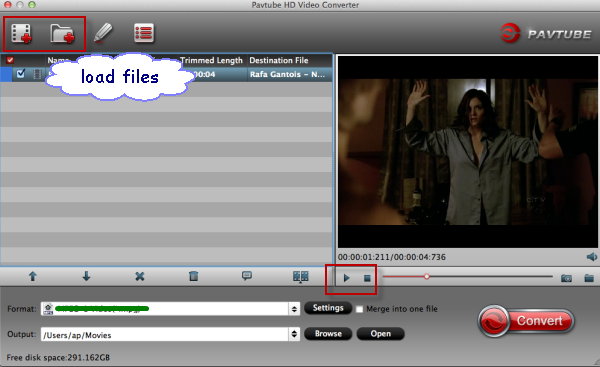
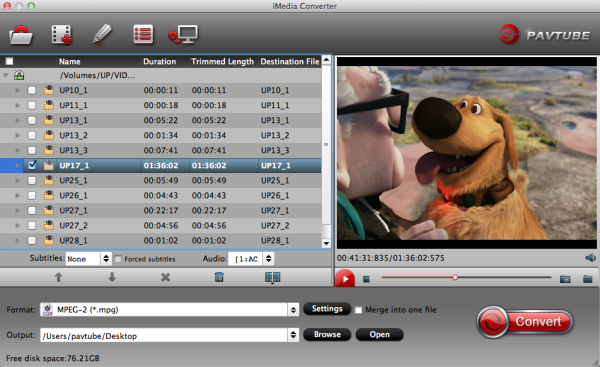
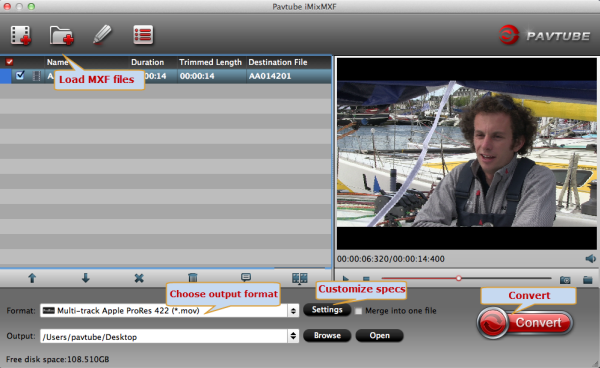
Step 1. Get this Mac multi-track MXF Converter installed, click 'Add video'to load individual C500 mxf videos; or click'Add from folder' to load the entire folder. It will recognize all the audio channels. 


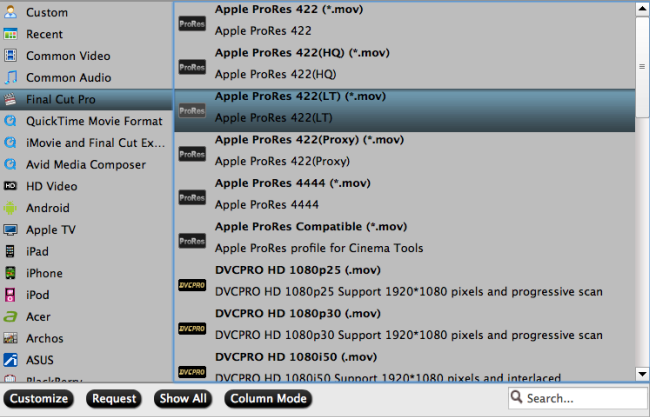
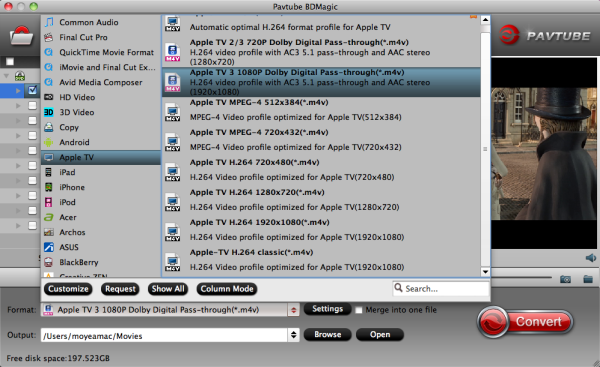
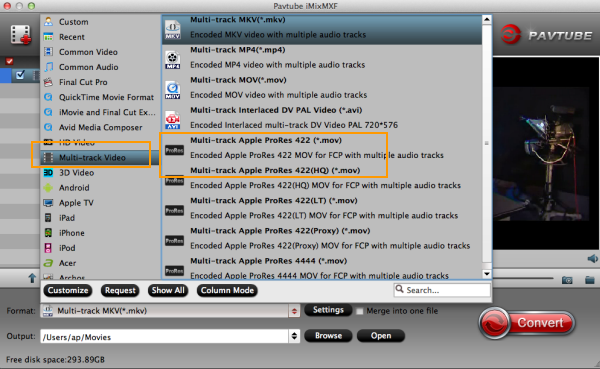
Step 2. Click "Format" and choose Multi-track Video>Multi-track Apple ProRes 422(*.mov) as the most compatible codec for FCP X editing. 
 
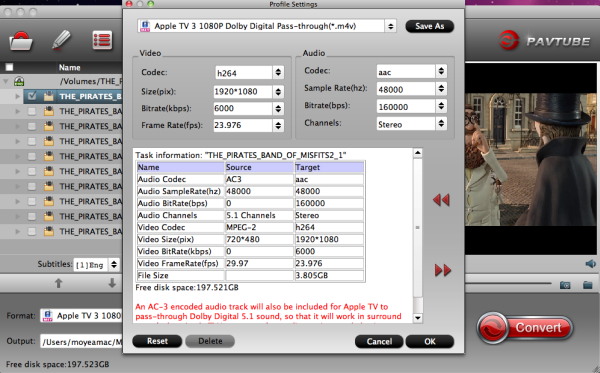
Step 3. Click "Settings" to customize your video size, bitrate, frame rate and other specs; and check video channels that you want to keep. 

Follow the bottom left icon to "mix into one channel"; or that it will keep all the audio tracks apart. 


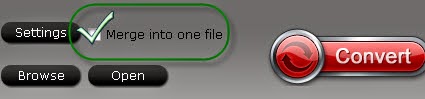
Step 4. Click "Convert" to start converting multi audio channels C500 MXF to multi-track Apple Prores 422 mov saving multi audio channels for editing in FCP X on Mac. 

Tips: 
1. Read this step-by-step guide to learn how to load the converted video to FCP X.

2. For users don't need to deal with multi-track thing, just simple want to convert MXF to other formats, the MXF Converter for Mac (only $29) is highly recommended. And at Pavtube Christmas Giveaway, get it you can free get one of the products like MKV Converter for Mac, FLV/F4V Converter for Mac or MOD Converter for Mac. 

3. If you want to transcode Canon C500 MXF for Premiere Pro, please choose the "Adobe Premiere/Sony Vegas --> MPEG-2(*.mpg)" as output; For iMovie or FCE 4, choose the "iMovie and Final Cut Express -> Apple InterMediate Codec (AIC) (*.mov)". For Avid MC, choose "Avid Media Composer > Avid DNxHD(*.mov)"

In Coclusion:

The first Method is a free work for all Canon users and it can make FCP edit the native MXF videos. If you think this too complex and find your computer doesn't support pulgins well, I believe the second way can easily solve the incompatible troubles with C500 MXF to FCP X importing. In a word, hope you to enjoy your Canon C500 MXF footage with Final Cut Pro.

Read More: