Wednesday, May 21, 2014

A Nice Method for You to Upload DVD to YouTube

Summary: To quickly and easily upload DVD files to Youtube, you need to convert DVD to Youtube supported WebM video at first. This guide will teach you to learn how to upload DVD video to Youtube without quality loss with the best DVD to WebM Converter.

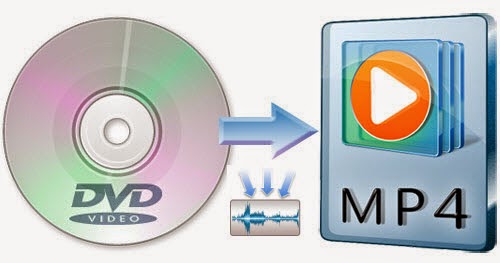
In all these years, your high school reunion, your dozens of other DVDs must have piled up in the cupboard waiting to be seen. Would like to share your large DVD collections with your friends overseas? YouTube is the biggest video sharing website allowing us to watch, download, and even upload videos to share with friends or the world. 


At first, letl's see the supported video format for YouTube:

* WebM files (Vp8 video codec and Vorbis Audio codec) 
* MPEG4, 3GPP and MOV files - (typically supporting h264 and mpeg4 video codecs and AAC audio codec) 
* AVI (Many cameras output this format - typically the video codec is MJPEG and audio is PCM) 
* MPEGPS (Typically supporting MPEG2 video codec and MP2 audio) 
* WMV 
* WebM (Adobe - WebM1 video codec, MP3 audio)

So the problem is DVD files (such as .VOB, .IFO and .BUP files) cannot be uploaded directly to YouTube.
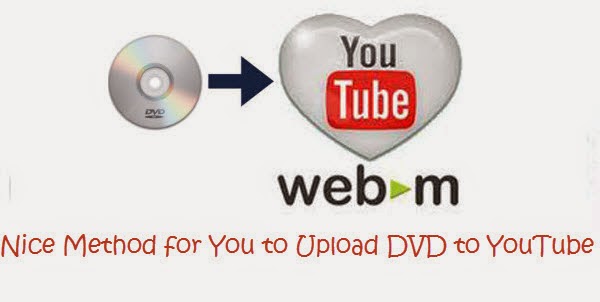
In fact, DVD video has poor compatibility with some popular uploading website, as an example, when we are trying to import DVD files to YouTube, issue pops up to say hi to us. It is seriously a nuisance. To upload and share DVD footage to YouTube, the first thing you need to do is converting DVD files to video files which can be supported by YouTube like WebM format.

As WebM is a recent year emerging video format and is getting more and more popular for streaming,  and this free and open format can provide us with high video quality with smaller size and great playback performance, transcoding DVD to WebM is a good choice for uploading YouTube or other site supporting this format.
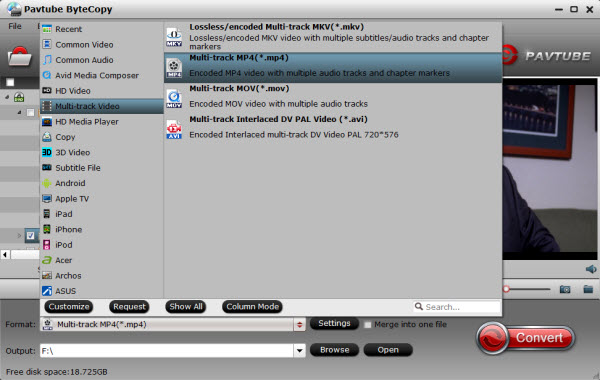
Here comes with Pavtube DVDAidDVDAid for Mac, you are able to encode DVD to FLV, MP4, AVI, WMV, WebM, etc that supported by YouTube. What we need to do is rip DVD and get the DVD clips.
It is really easier said than accomplished.
Great News! To thanks for your continued support all along our previous site and the new www.multipelife.com, we are holding a 'New Site Special' with fantastic discounts up to 40% off, pay less to get more powerful Pavtube Blu-ray/DVD backup tools!
Like us to get 20% off BDMagic(Blu-ray Ripper), 30% off ByteCopy, 40% off DVDAid(DVD Ripper) and 20% off Video Converter Ultimate on Windows/Mac platform:
https://www.facebook.com/pavtubefans/app_209569249055691
If you feel like playing on iPad, iPod, iPhone 5S/C, iTunes, PS4, Apple TV, Android Phones, etc, this converter will in no way let you down by converting DVD to MP4 format with major outcome top quality.

Guides on converting DVD to YouTube WebM Easily and Quickly

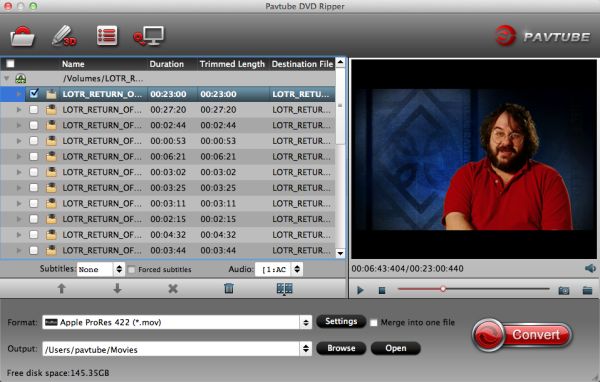
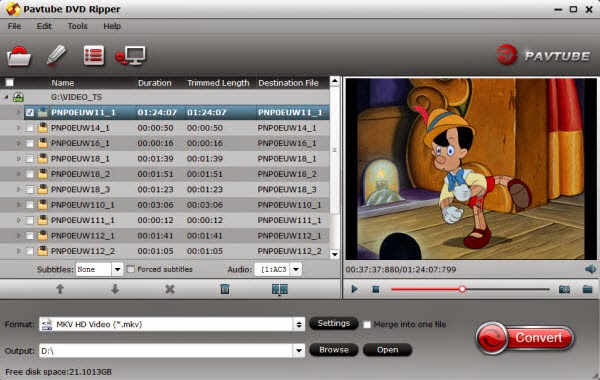
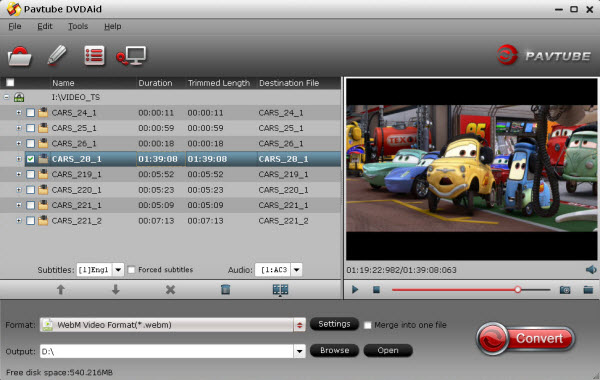
Step 1. Free download Pavtube DVDAid, install and launch the program.

After running Pavtube DVDAid, just click "Load disc" button to load source .DVD files.


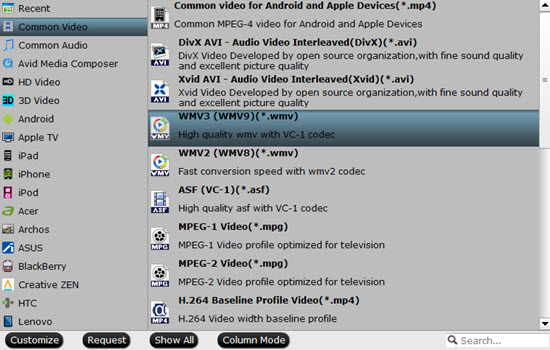
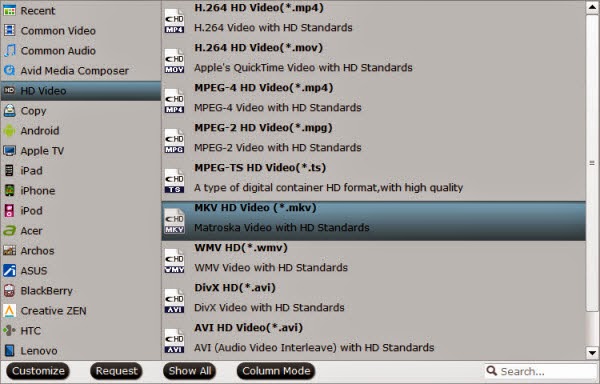
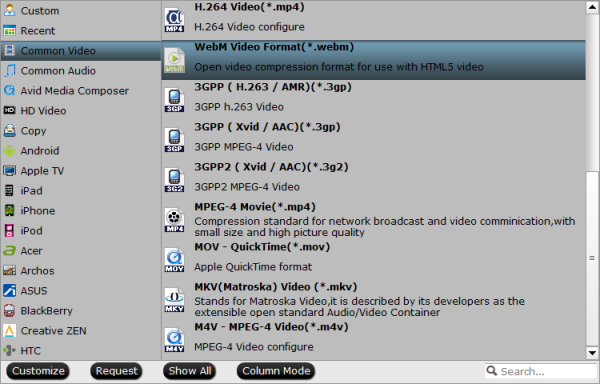
Step 2. Select WebM as output format for playing and uploading.

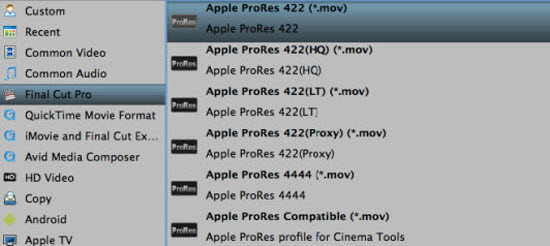
Click on "Format", and select output format from the drop-down list. Follow "Common Video" -> WebM Video Format(*.webm)" to get Youtube supported format.


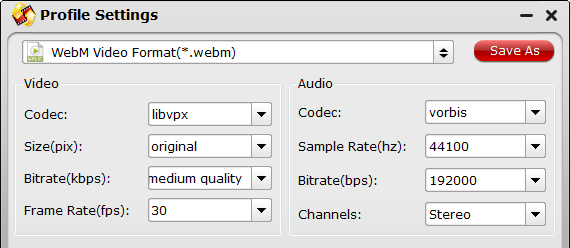
Step 3. You can customize the A/V parameters based on your personal requirements. Adjust the resolution, bitrate, frame rate or codec to meet your requirement.


Step 4: Start converting DVD to WebM format.

After the above steps are done, you can click "Convert" button to convert DVD to WebM format for Youtube uploading. 

Edit DVD Video before Uploading to YouTube

After you successfully ripping DVD to YouTube supported video formats, you could either upload the video clip immediately or edit them as you like with software such as iMovie or Windows Movie Maker to add titles and special effects. Thus you could get personalized videos and also avoid any infringement issue.
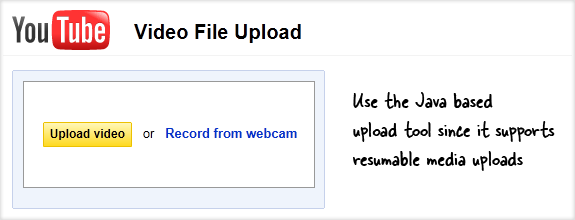
How to Upload DVD Video to YouTube 

You must first sign up for a free YouTube membership to upload videos, then click "Upload Videos" in the upper-right-hand corner of any YouTube page. Enter as much information about your video as possible, including Title, Description, Tags, and Category. All the things left is following its instructions.

Link the YouTube videos
 

Now that your entire DVD image is on YouTube but in parts, it’s important that you link all these parts so that people may enjoy them all in a sequence. This is possible through the video annotations feature of YouTube.

Open the first video clip in the YouTube Annotations editor, scroll to the end and insert a speech bubble that points to your second video clip. Repeat this with all the other clips.

Annotations involve a little effort so a good alternative is playlists. Put the all DVD parts in one YouTube playlist and then advantage here is that your friends can watch everything from one page without having to manually navigate through videos.

That’s it. Good luck!

Related articles:

Edit movie clips from DVD with FCP X to upload to Youtube
Open or Play your recordings from GoToMeeting on PC/Mac
How to Save Pictures from a DVD to a Mac

Pavtube Release a New Site: multipelife.com


Announcement:

Aiming to improve customers' experience and product improvements, Pavtube Studio recently launched its new official website - multipelife.com.

Along with the new website, Pavtube has migrated its all BD/DVD Copying & Ripping software products to the new site with some brand new names, fantastic discounts waiting for you:
  • DVD Ripper (Windows/Mac) -> DVDAid (Windows/Mac
  • Blu-ray Ripper (Windows/Mac) -> BDMagic (Windows/Mac)


Great News!

If you always fan our Facebook or will be a new fan, you might have a chance to get "New Site Special" with up to 40% off fantastic discounts now!

Seems wonderful? Take action now without hesitation!!! Start to experience more fresh enjoyment while exploring Pavtube new website- multipelife.com.

More detailed information is published on prweb.com.

Monday, May 19, 2014

How to Rip and Convert DVD to multi-track MP4 on Windows/Mac Easily and Fast

Are you looking for a way to convert your DVD collection to high quality MP4 files with multi-track? Read this article to learn how so as to play or share your DVD movies more conveniently. 

Question: I'm trying to convert a DVD disc from local shop to .mp4 and it has 3 audio tracks and 3 subtitle tracks. I want to change the format but preserve the all the audio and subs so that I can play it on my iPhone and iPad? Any suggestion?


As MP4 is a popular video format supported by various media players, video editing apps, online video websites, etc., to play, edit or share your DVD movies more conveniently and easier, you need to convert DVD to MP4 format at first. But how to finish the DVD to MP4 conversion while preserving multiple audio channels as the above question?

In fact, with the right program, you can get all done easily and quickly. I recommend you Pavtube Bytecopy, which is special designed for users to rip Blu-ray/DVD to MKV/MOV/MP4 with multiple audio tracks. Moreover, it's also a professional Blu-ray/DVD ripper, allows you to rip and convert Blu-ray/DVD discs to any video format you like. Intimate is, there are many optimized presets for tablet and smartphone, including Kindle Fire HDX, Google Nexus 7/Nexus 10/Nexus 4, Galaxy S4, Galaxy S5, Galaxy Tab 3, iPad, iPhone etc. which will give you best video quality.

Here, this post will give you a guide on how to convert DVD movies to multi-track mp4 format on Windows/Mac.

Tips:

1. Although this ByteCopy should be able to rip Blu-rays, I have no experience with it as I don't have an external Blu-ray drive. But one of my friends had a test and said it's quite worthy a try. 

2. Mac version is also available: Pavtube Bytecopy for Mac. 

Get this ByteCopy installed and let's start the workflow easily.

Step 1. Import DVD disc, DVD folder, IFO/ISO image files.

Step 1. Free download and install the Best Blu-ray/DVD Copying & Ripping tool on your PC. Insert DVD disc to your ROM, click "Load files" to import DVD disc directly from ROM. If you have IFO/ISO and DVD folder, choose the corresponding option to load DVD movies from your computer.


The main title in your DVD will be checked by default; so let's move on and choose format.

Step 2. Choose format.

Click the "Format" drop-down list and choose "Multi-track Video>Multi-track MP4(*.mp4)" as below:


Step 3. Adjust video&audio settings (optional)

Click the "Settings" button to check all video&audio settings. By default it will check all the audio tracks (languages), so if you only need some of the languages, just check the unwanted ones.

Btw, video size, bitrate and frame rate can all be changed if you are not satisfied with default settings.

Don't forget to click OK to confirm all the changes.

Step 4. Start conversion.

Click the big red "Convert" to start converting DVDs to MP4 with multiple languages. The original DVD chapter marker will be kept automatically.

After conversion, hit the "Open" or "Open output folder" icon to quick locate converted MP4 videos, transfer it to your iPhone/iPad/iPod or other portable devices for playing.

OK! We now can freely watch DVD movies with chapter markers and languages on MP4-compliant devices.

FYI: QuickTime cannot work with all the videos with chapter markers; in case of the problem, you are suggested to download a VLC Player for your tablets and phones.

Money saving bundles

ByteCopy($42) + Video Converter Ultimate($65) = Only $79.9, Save $27.1
ByteCopy($42) + DVD Creater($35) = Only $44.9, Save $32.1
ByteCopy($42) + Vidpie($29) = Only $54.9, Save $16.1
ByteCopy($42) + MXF MultiMixer($45) = Only $69.9, Save $16.1

Related articles:

Monday, May 12, 2014

Getting a SRT file to MP4- How to add srt subtitles to MP4 video natively?

Summary: In most of cases, people can get some awesome foreign movies without the subtitles. If you want to add srt subtitles language to your mp4 files, here is a guide to help you do it.

Subtitles can be a great way, sometimes the only way, to watch a movie in a foreign language. And SRT files are videos' subtitle files, storing dialogue and commentary form videos including movies and television shows. SRT subtitle files are so useful that they can be usually embedded into videos to help viewers understand the videos better.


Supposing you have a truckload of downloaded MP4 movies in foreign language, but the devoid of subtitles in these movies drives you on the verge of collapse. Have you ever created your own movie with your recordings but found your clips are difficult to understand? One feasible solution is to add SRT, the most basic subtitle format, to MP4 video file. It is a great demand in the current market.

Part 1: Download External SRT Subtitle or Create Your Own SRT before Adding to MP4 Video

This part is available for people who do not have any .srt subtitle or who want to add some of their own words to the .srt subtitles displayed onscreen. If you have saved SRT subtitles you need, just skip this part and directly move to part 2.

Download SRT subtitle: You can put "movie title" + "your preferred language" + "subtitle" as the search strings and select the subtitle file saved in .srt for an effective SRT subtitle file searching. Alternatively, finding the needed subtitle in .srt format from those popular subtitle download sites like Moviesubtitles.org is also a practical way.

Edit or make your own .srt file: Here we take Notepad as an example. Just open Notepad, create the subtitle you like in the text editor, click menu File->Save As; change the subtitle file name based on your name of video file and save it in .srt format.

Tips: The SRT subtitle needs to contain the following parts while creating the SRT subtitle:

1. The number showing which subtitle it is in the sequence.
2. The time that the subtitle should appear and disappear on the screen.
3. The subtitle itself.
4. A blank line indicating the begin of a new subtitle.


Part 2: How to Add SRT Subtitle to MP4 File

To get it done effortlessly, I recommend you Pavtube Video Converter, which is most user friendly, professional and the outlook of it is smart. With it, users can add subtitles in *.srt, *.ass, *.ssa to MP4 videos with just a few clicks. It can not only add subtitles to MP4, but also supports many other video formats, like AVI, MKV, etc. Besides adding subtitles to movies, it is an easy-to-use program with many other functions, which enables you to edit videos, convert videos(MKV, AVI, WMV, MOV, VOB, MPG, FLV…) quickly without quality loss. Just download the program and follow the guide below, you’ll find it is really simple to embed subtitle to MP4. The Mac version is Pavtube Video Converter for Mac.

1. Import mp4 source.

Click "Add video" button to import the *.mp4 files. After few second, it will be imported successfully and you can preview the whole movie in the preview window.


For BD/DVD videos, force subtitle can be checked for output so as to help you to read the unknown language and fully enjoy the blu-ray/dvd movies.

2. Choose output format.

Now go to "Format" menu to select output format there. A variety of options are listed, and choose the one you desired like rvmb, mp4, WMV format. For example, you can select "Common Video > H.264 Video(*.mp4)".


Tip:

By the way, if you want, you can adjust output video and audio parameters according to your own needs. You can change bitrate, frame rate, channels, etc. Click "Settings" button to set output profiles.

3. Add subtitles

In order to get customized videos, you can add subtitles to your own videos.

Find "Edit" icon and then click it, you will find video editor. There you can Trim, Crop, Add watermark and Effect. Above all, Subtitle can be added here.

For creating customized subtitle, you can count on free software for subtitle editing: Subtitle Edit. Go to write the subtitle content there and it will be saved as SRT files, which is supported by Video Converter Ultimate. Then load it to the software for output videos and you will get a characteristic video.

4. Convert your mp4 files.

Now it's time to start conversion. Click big Convert button on the interface and then you will get a conversion dialogue box to show the exact progress, like time left, estimated size, state and so on.

Note: If you are bothered about waiting for conversion to finish, you can choose to check "shut down computer after conversion". Then just let it alone, you are free to go out to do anything you like.

With it you can get your mp4 video played in your media players and portable devices with added subtibles. Just try it now!

Read More:

Thursday, May 8, 2014

Get 40% OFF Ultimate Converter for Win/Mac at Pavtube Mother's Day Special Offer

Description: Haven't figured out a strategy or got any plan to show as well as tell your mom how much you love her at 2014 Mother's Day? Take a look at up to 40% off Specials and Deals from Pavtube Facebook! 

Good news: 2014 Mother’s Day is just around the corner, have you got something unique and special for Mom? A bunch of flowers? It droops easily. A Mother & Baby Pendant, a bracelet, or a pair of earrings? Sounds nice but first you have to pick out the right style. LOL. Anyway, they can be easily lost too. So this Mother’s Day, let’s give mom a super surprise!

To thanks for your faithful support during the past years, Pavtube now offer 30% off ByteCopy, 40% off Ultimate Converter and 40% off DVD Ripper as 2014 Mother’s Day specials for your beloved Mom. It starts from May 8th to May 12th, five days in total. Time-limited! Never Miss these promotion items!

This is 2014 Mother's Day best Gift Idea from Pavtube Facebook


1. 30% off Pavtube ByteCopy Windows/Mac

A magic Blu-ray/DVD ripping software (Pro version), it’s not only capable of ripping Blu-ray/DVD to desire formats (MP4, MOV, M4V, TS, MKV, AVI, WMV, MPG, VOB, etc), but also offer a Multi-track preset to enable you backup movie to lossless MKV or MP4/MOV/ProRes with multiple audio tracks and subtitles, so that you can free choose wanted languages during playback. Now start watching your favorite BD/DVD discs with your deal mom.

2. 40% off Pavtube Video Converter Ultimate/iMedia Converter for Mac

The best deal of Ultimate Converter ever! With this tool at hand, you’re not only able to rip Blu-ry/DVD movies, but also convert footages of your Mom and make a easy-to-watch video to put on portable devices, computers, to video editing programs or uploading to your YouTube channel.

3. 40% off Pavtube DVD Ripper Windows/Mac

It has outputs for almost all the mobile devices, so you can start getting DVD movie library ready for your various Apple/Android/Windows Tablets and Smartphones like Kindle Fire HDX, iPad Air, Galaxy Tab Pro, Galaxy Note Pro, Galaxy S5, Google Nexus 7, Google Nexus 10, Nexus 4, Google Nexus 5, Sony Xperia Z2, Surface 2, Surface Pro 2, etc... This is definitely a good gift for frequent travelers. If you already bought a tablet or a smartphone for your mom, begin your journey with wonderful movie entertainment.

Like us at Facebook to get up to 40% OFF Mother's Day awesome Gifts (for fans only):

https://www.facebook.com/pavtubefans/app_201742856511228

More money saving bundles can be found here:

http://www.pavtube.cn/special-offer.html

From: http://samsung-galaxy-video-converter.blogspot.com/2014/05/2014-mothers-day-special-deal.html

Wednesday, May 7, 2014

How to Import and Rip DVD to Final Cut Pro X/7/6 for Further Editing

Want to import DVD movie to Final Cut Pro X/7/6 for editing on Mac OS X? This guide will show how to convert and rip DVD to Apple ProRes for FCP without losing quality.

From time to time, you may find some favorite DVD videos with beautiful scenes or your own DVD with recording the exciting moments. Final Cut Pro is a comprehensive professional editing software. If you a mac user, you will consider of making these DVD contents into your own film with FCP 6/7/X. But most them will result into failure when importing DVD to FCP 6, FCP 7 and FCP X, it seems hold a candle to the sun, as DVD is not supported by Final Cut Pro.

As for the trouble of how to import and edit DVD to Final Cut Pro, there are quite a few ways to do it. But the easiest and quickest way is to use a proper DVD Ripper for FCP to assist with the process of ripping DVD Disc to FCP.

Here, Pavtube DVD to Final Cut Pro Converter is the ideal tool for you to do it. With it, mac users can directly load any DVD disc, DVD folder or IFO/ISO with one click to remove CSS, region code or analogue copy protections from DVDs and rip them to Apple ProRes including Apple ProRes 422, Apple ProRes 422 (HQ), Apple ProRes 4444, Apple ProRes 422 (LT) and Apple ProRes 422 (Proxy) with the easiest and fastest way. And you can also select the output format according to your own situation.

  • ProRes 422 (Proxy). For craft editing or offline editing on a MacBook or MacBook Pro.
  • ProRes 422 (LT). For projects such as news, sports, and multicam events that require reduced file sizes at broadcast quality.
  • ProRes 4444. For compositing and digital workflows that require the highest-possible image fidelity.
Note: Now Buy! You can get 40% off on this program at 2014 Mother's Day Hot Deals, don‘t miss it!

For people who want to edit DVD in FCP keeping the multiple audio/video track separately as original, Pavtube ByteCopy for Mac (30% off) is a powerful tool to transcode DVD to multi-track Apple Prores codec. Suppose you are good at both English and Francia, and want to preserve both of them from original DVD discs when converting, that is what Pavtube ByteCoy for Mac can do for you. And you can select the audio you want when enjoying movies.

This tutorial would make a guide on how to import DVD to Final Cut Pro on Mac with the help of DVD to Final Cut Pro Converter for Mac users.

1. Download Pavtube DVD Ripper for Mac.

2. Install and launch this DVD to FCP Converter. Import DVD video to the converter by clicking "load file(s)" botton.


3.Click Format bar to choose the output format. Click and choose Final Cut Pro -> Apple ProRes 422 (*.mov).


4.You can click "Settings" to customize the output parameters, adjust the resolution, bitrate as you want. (Optional)

5.Click convert button to start.

With this DVD to ProRes 422 converter, you can easily convert DVD files to FCP for editing, this software runs fast, so you can convert your DVD footages to FCP in less time.

See also:

Tuesday, May 6, 2014

Rip DVD to MKV - Backup ALL DVD Content to One Single MKV File

Summary: Convert your favorite DVD movies to MKV easily by using Pavtube DVD Ripper, it offers your the DVD MKV solution with an super fast speed and high converting quality.

Everyone’s looking for that magic one-click solution to digitizing their personal video and movies collection. Often you find yourself having to jump through a number of hoops before you can get the movies in a format you like, but if Backing up DVDs is key. Whether they're your company's training DVDs or discs from your personal collection, it's just smart to do. Backing them up to an MKV file lets you put the DVD files on a server. That way, you and your users can view them on the network.

Plus, the biggest feature of MKV is the ability to accommodate many different types of encoded video, audio and subtitle streams. A range of software has native Matroska support. Those include media players such as Zoom Player, VLC, GOM Player, ALLPlayer, Elmedia Player and PowerDVD and media centers such as PS3 Media Server and XBMC.

Here Pavtube DVD Ripper, the best and easy-to-use converting software to help you complete the task. It has the capability to convert DVD video to MKV format with super fast speed and high output quality.

And for Mac users, here is a DVD Ripper for Mac which can remove DVD protections that prevent you from watch DVD movie as you please on Mac (Moutain Lion and Mavericks 10.9 supported)

Rip DVD to MKV - Backup ALL DVD Content to One Single MKV File

Step 1. Import DVD source.

Insert one of DVD discs you need to convert and then double click the icon on the desktop to launch the software. Click "Load DVD" icon and select the DVD disc in the drop-down list.


It is obvious that the software has already recognized the inserted DVD automatically for you, so you do not need to find the desired DVD manually. Meanwhile, you can choose to "Load IFO/ISO" or "Load from folder".

Tips: After having load DVD successfully, the actual Main Title will be ticked automatically by the software. And only by clicking the selected Main Title, you are able to select Subtitles tracks and Audio tracks on the interface and preview the whole movie in the preview window on the right.

Step 2. Choose an output format and make settings.

Go to Format menu and choose a suitable format you want in the drop-down format list.

Click "Format" menu to select "MKV HD Video (.mkv)" from "HD Video", or choose "MKV(Matroska) Video (*.mkv)" under "Common Video" option which is perfect for playing on media players.


Tips: You can click "Settings" button on the interface you will do to video and audio parameters of output profiles. Here, you will see detailed parameters, estimated target files size and free disk space. If you want a smaller size when the free disk apace is not enough, you can choose to adjust Bitrates (kbps) and Size (pix). Choosing a little lower Bitrates and Size will help you to get a smaller target file.

Step 3. Start DVD to MKV conversion.

Now, you can convert DVD to MKV format by clicking the "Convert" button. During the conversion starts, you will get the following window about the conversion. You can see the Time elapsed and Time left and it will keep you informed of timely state of conversion. A definite number will give you a clear progress of conversion.

The conversion time depends on the size of your output videos. Once completed, you can click "Open output folder" to locate the generated files. If you have closed the conversion window after conversion, don't worry, "Open" button on the interface can also bring you to the output files, very convenient!

More features about DVD Ripper:

1. Click "Edit" icon on the interface, you will be able to see every individual frame there, rotate and flip it. And what's more, you can cut off the undesired part, crop output size, edit output audio, and add subtitles, etc. Go to try it if you need.

2. Click "Option" icon on the interface and then go to Acceleration option, you can choose to check Enable GPU acceleration, which will help to speed up conversion. Here you can check your graphic card is supported or not.

3. Moreover, "Directly Copy" will help you to 100% backup the intact main movie of DVD, and "Copy the entire disc" will support 1:1 backup the whole movie with original structure and chapter mark. It is a better way to copy DVD for playback and safekeeping.

With great decrypting capability, high quality video output and popular video format for outputing, Pavtube DVD Ripper ranks top on the list of top DVD ripping application. It will bring you great experience of converting DVD and you cannot suffer any video and audio out of sync issue.

Now it will be easy to import the converted MKV files to media players like Western Digital TV and enjoy the videos on HDTV. Backup DVD to MKV will keep all audio subtitle tracks and chapters. Thanks to H.264 encoding, MKV is ideal output format to preserve the DVD quality. Have a good time!

Related Articles: