Friday, August 1, 2014

Rip Blu-ray to MP4/MKV format for playing in a sanctuary at a church of about 300

This article will discuss how to rip Blu-ray to MKV/MP4 format for playing in a sanctuary at a church of about 300.

Why Convert and Rip Blu-ray to MP4/MKV?

Remove your Blu-ray encryptions and Play it wherever you please - though you have paid a good price for BD disc, perhaps you have not enjoy full copy right on it. But with Pavtube BDMagic, you can easily defeat upcoming Blu-ray encryption technologies. And after rip Blu-ray to MP4/MKV, you can right unfold Blu-ray disc's wrap, get the content inside and enjoy it as you please.

play on a church


Here with this versatile Blu-ray ripping tool, you can easily remove all kinds of Blu-ray copy-protections and after you convert Blu-ray to MP4/MKV, the output quality is still as vivid as original. And a lot of videos formats are supported to output, so you are able to watch them on your smartphones or Android tablets, as well as to upload them to YouTube or Facebook for sharing with friends.

Download and installed the software and experience all the functions now. I will share my guide to rip Blu-ray to MP4/MKV for watching on a sanctuary at a church of about 300.

If you wanna a Mac version, please go to Pavtube BDMagic for Mac.

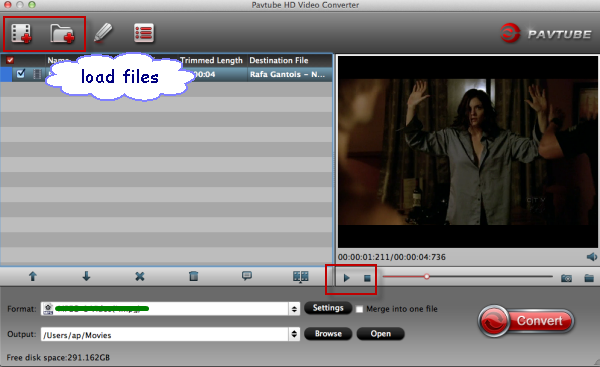
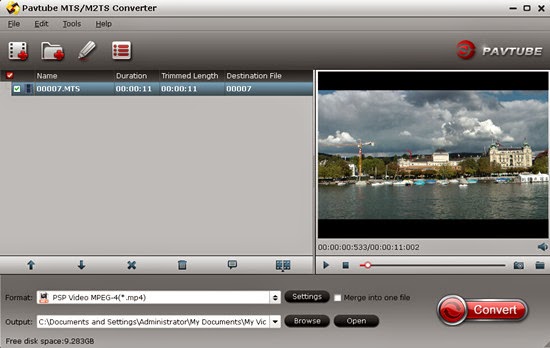
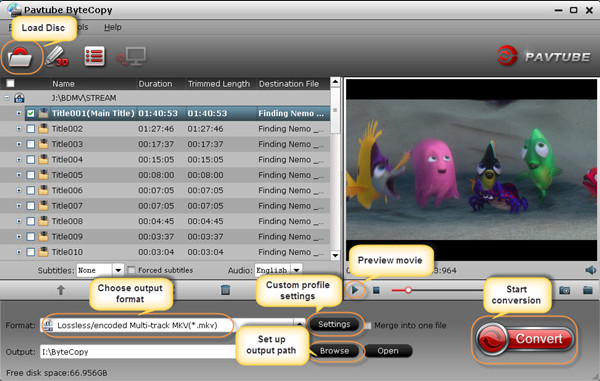
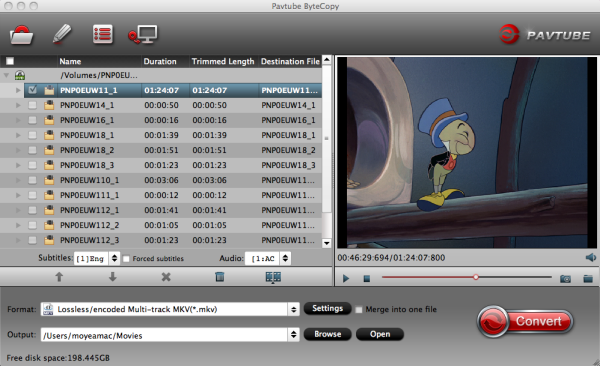
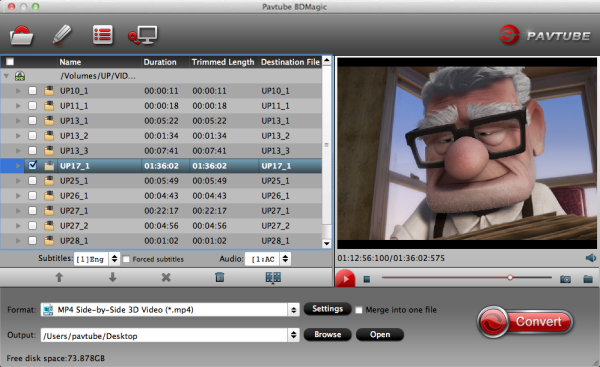
Step 1. Launch the best Blu-ray Ripper and load Blu-ray discs.

convert blu-ray to mp4

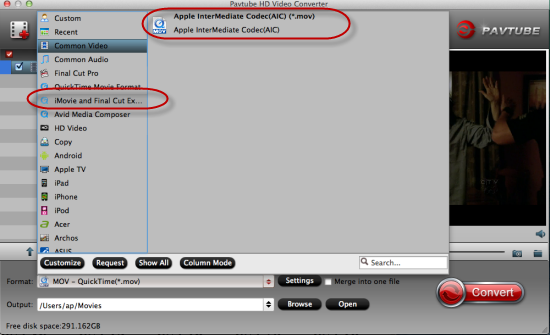
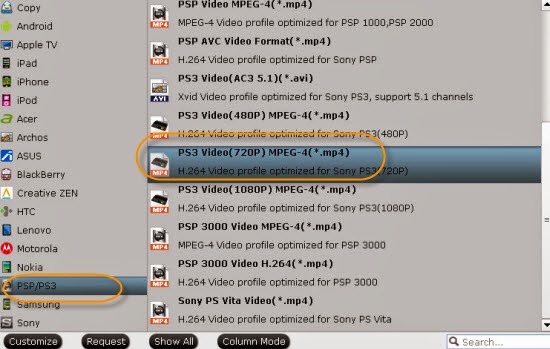
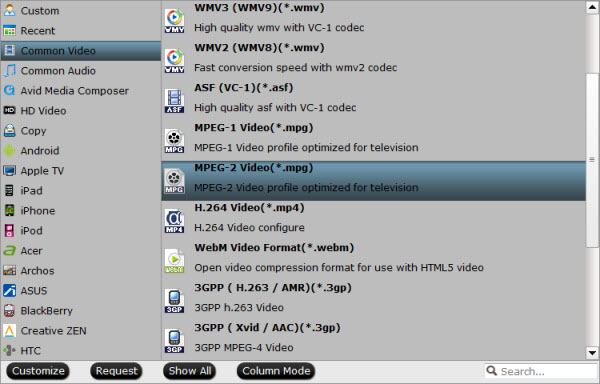
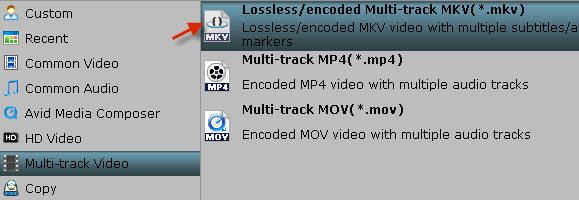
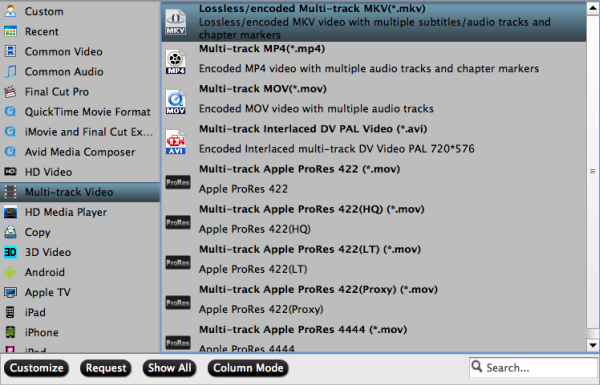
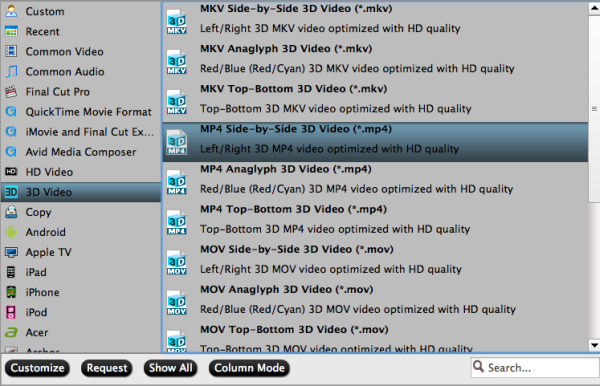
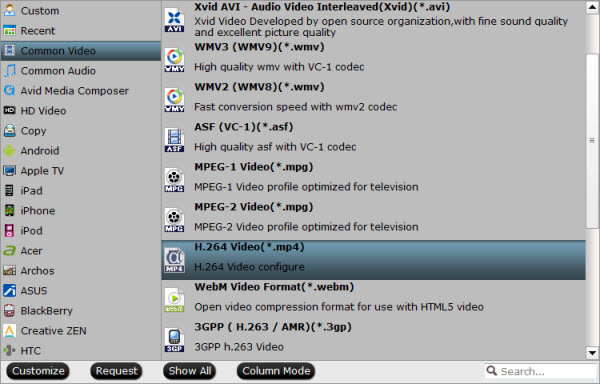
Step 2. Click "Format" to find "Common Video" catalogue, select "H.264 Video(*.mp4)" or "MKV(Matroska) Video (*.mkv)".

mp4 video format

Step 3. Click "Convert" to start backing up Blu-ray to MP4/MKV, when completed, click "Open" to find the generated files. Obviously, it is easy to use software to backup and convert blu-ray to mp4/mkv for enjoying in a sanctuary at a church of about 300 without any audio and video out of syn issue.

More features of BDMagic:

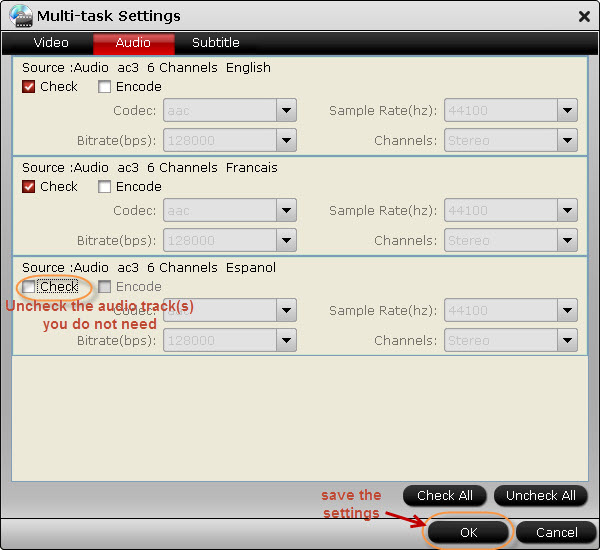
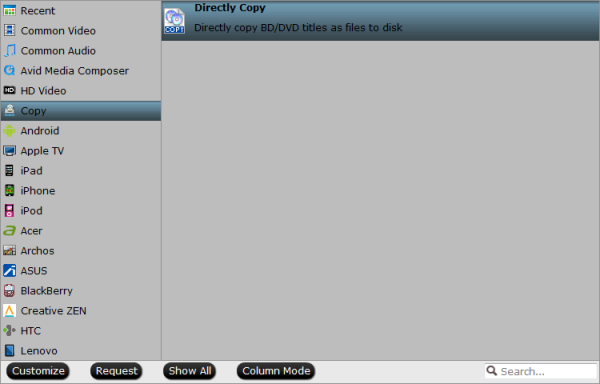
1. Directly Copy will help to backup the 100% intact Blu-ray main movie and output an m2ts files with multiple audio and subtitle tracks for blu-ray.

2. Full Disc Copy can 1:1 backup the entire Blu-ray with original structure and chapter markers.

3. Convert Blu-ray/DVD to many other devices like iPhone 5S, iPad Air, Samsung Galaxy S5/Galaxy Note 3, Galaxy Tab 3, Amazon Kindle Fire HDX, Surface Pro 3, etc.

Meanwhile, there are many Money Saving Software Bundles, such as BDMagic($49) + DVD Creator($35) = Only $49.9, Save $28.1 for rip blu-ray and burn to DVD which will help you save more money. Go to find the one you need.

Thursday, July 31, 2014

Convert DVD Movies to NTSC VOB Files for burning into DVD

Read this article to backup DVD movies to NTSC VOB easily with an super fast speed and high quality by using Pavtube DVDAid and burn them into playable DVD for viewing with Pavtube DVD Creator.

DVD disc is easy to be lost or damaged. Have you thinking of watching it on your computer so that you can preserve it on the shelf? Now you can rip DVD to NTSC VOB format, after that, you still can have a DVD experience on computer, not only limited to DVD players! (Most countries in the world use the PAL video standard which has a frame rate of 25 frames per second (fps). The US, Canada and Japan use NTSC which has a rate of 29.97 fps.)

Convert DVD Movies to NTSC VOB

Here is Pavtube DVDAid, an excellent DVD converter that enables you convert DVD to NTSC VOB format easily with high output quality. Moreover, the professional and easy DVD ripper has upgrade with NVIDIA® CUDA™ technology, and the conversion speed is 6X faster now to save your time! Besides converting DVD to NTSC VOB, this DVD ripper can also help you rip DVD to WMV, AVI, FLV, MOV, MKV, etc. and extract audio from DVD with high quality.

Step-by-step tutorial to convert DVD to NTSC VOB format

Step 1. Insert your DVD disc into your DVD drive, run the best DVD to NTSC VOB converter and click “Load disc” icon to load movie from DVD source (Disc, folder, ISO). Set your wnted subtitles and audio track from the drop-down box of “Subtitles” and “Audio” tab. If you are Blu-ray lover, here is a guide for you to backup Blu-ray to NTSC VOB.

DVD to NTSC VOB converter

Step 2. Click the “Format” option, and choose “VOB format > DVD-Video Format – NTSC(*.vob)” as output format.

NTSC VOB Format

Tip: If you like, you can click “Settings” to change the video encoder, resolution, frame rate, etc. as you wish. Keep in mind the file size and video quality is based more on bitrate than resolution which means bitrate higher results in big file size, and lower visible quality loss, and vice versa.

NTSC VOB Settings

Step 3. Click the convert button under the preview window, and the Pavtube DVDAid will start the conversion from DVD movies to NTSC VOB format.

When it is finished, click "Open" to get the converted DVD VOB movies.

How to burn converted NTSC VOB files into playable DVD?

Get Pavtube DVD Creator features which can help you burn any kind of video sources to playable DVD video. Learn how to burn NTSC VOB videos into DVD here.

Now it will be easy to backup DVD to NTS VOB format and get playable DVD with preserving the DVD quality. Have a good time! Here I suggest you can get this bundled software DVDAid($35) + DVD Creator($35)= Only $35.9, Save $34.1 to help you save more money.

Mac users can learn the solution to convert DVD to VOB files on Mac.

Saturday, July 26, 2014

How to play 1080p Blu-ray on WD TV Live Plus Media Player

If you are just curious about how to play 1080p Blu-ray on WD TV Live Plus Media Player, get the best BD ripping tools/applications to rip Blu-ray to WDTV best supported format.

The WD TV is a hot consumer device produced by Western Digital that plays videos, images, and music from USB drives. It has been updated a few models including WD TV Live, WD TV Live Plus, WD TV Live Hub, etc. It will be a delightful experience to enjoy your Blu-ray movies on your HDTV via WD TV Live over network.


Rip Blu-ray on WD TV Live Plus Media Player

However, WD TV Live Plus doesn't support Blu-ray. In order to play your Blu-ray movies on WD TV Live Plus Media Player, you need to rip these BD to WD TV Live supported video formats.

Here Pavtube ByteCopy is such a Blu-ray & DVD backuping/coping/ripping application to help you out. Acted almost like a Blu-ray player, it’s a breeze to access and enjoy up to 1080p HD movie with AC3 5.1 surround sound out. Although full Blu-ray navigation is not supported so far, you can select desired audio track, subtitles language, and chapter to play with.  The Mac version is ByteCopy for Mac. 

The following passage shows a best way to convert a Blu-ray Disc for WD TV Live Plus Media Player with multiple subtitles while maintaining original Dolby Digital 5.1 audio.

To begin:

Launch the program and add the movie you want to encode by clicking the “Load file(s)” icon on the main interface. You can see the chapter information of your Blu-ray movies on the main interface after you loading to the program.

Lossless Blu-ray to MKV

Then choose the output format. In order to preserve the chapter structure and subtitles, you’d better choose the “Multi-track Video”. Under this profile, you have three choices which all can preserve chapter structure.

If you choose "Lossless/encoded Multi-track MKV(*mkv)" format, you can output the BD disc with lossless quality and allow multiple audio tracks, multiple subtitles.

Lossless MKV format

One special function that makes ByteCopy stands out is you can easily select you needed tracks, subtitles.

Multi-track Setting

The last thing you need to do is hit the “Convert” button to copy Blu-ray to H.264 MKV format. Just wait a moment and then you can output the mkv videos with the chapter and subtitles preserving. Then you can copy the result files onto WD TV Live Plus Media Player for watching.

Have a fun of it!

Wednesday, July 23, 2014

Xbox 360 won't play DVD- Rip DVD Movies for Playback on Xbox 360

Does Xbox 360 play DVD? Many Xbox users have this question. Today, I will share the Xbox 360 DVD playback solution with everyone in this article. Keep on reading.

The new Xbox 360 devices are not only a game cansole, but also a media player that could store and play various HD movies. And the most exciting thing is Xbox 360 works as a DVD player in a pinch.
rip dvd to xbox 360

If you want to protects your precious DVDs from being scratched or damaged, back up your borrowed or rent DVD movie, or even wanna remove region code from DVD, it’s a wise idea to rip DVD to Xbox first with a DVD ripper provided. Then everything will be ok and you will not bother to insert the DVD disc every time when you planning to watch DVD on Xbox 360.

As is mentioned above, a professional DVD ripper can help you remove all embarrassments you encountered. Here Pavtube DVDAid is highly acclaimed among a mass of customers for its omnipotent DVD ripping ability and utmost video quality when ripping DVD to Xbox compatible video formats: *.wmv, *.mp4. Besides that, its build-in editor lets you touch up the DVD video as you like, which include trimming, cropping, rotate, merge and apply special visual effects, etc.  You can reach the Mac version here: DVDAid for Mac.

Follow the 1-2-3 steps, you will find the conversion from DVD movies to Xbox 360 is so easy and fast and then watch DVD movie on Xbox 360. (Here is Xbox 360 Blu-ray solution)

Step 1. Import your DVD movies

Download and install Pavtube DVDAid. Launch it and click the Load DVD button to import the DVD files that you want to convert to play with Xbox 360. Both ISO, IFO and files in DVD Folder can be loaded.

convert dvd to xbox 360

Step 2. Choose Xbox 360 preset as the output format

This DVD to Xbox ripper provides optimized presets for Xbox 360 (HD output format). So in this step, you can just choose the ready preset for Xbox 360 like "Xbox 360 Video - Windows Media Video(*.wmv)", "Xbox 360 Video (640*480)(*.wmv)" or "Xbox 360 HD Video (*.wmv)" as the output format, which will remove all the incompatibility issue.

xbox 360 video format

Tip: This Xbox 360 DVD Ripper let users control/customize output file quality. To improve video quality, simply click “Settings” and set video bitrate up.
xbox 360 wmv settings 

Step 3. Start converting DVD movies to Xbox

Before start ripping, you can also edit the DVD movies as you like. When all settings are done, simply click the "Convert" button to begin the conversion from DVD to Xbox 360. You will get the files converted ready in a few minutes


Now you can copy this ripped DVD movies to Xbox 360 hard drive or use the MCE to steam them to Xbox via your home network to watch DVD on Xbox 360.

Friday, July 18, 2014

MKV to iMovie Workflow - Convert MKV to an iMovie acceptable AIC .mov file

This article will explain why we often failed to import MKV to iMovie, and I will introduce a step by step guide on how to successfully import MKV files to iMovie.

Why We often Encounter Problem in Importing MKV to iMovie?

MKV (Matroska Video), an open and free container format able to keep diverse video, audio, and subtitle components in just one file, can let you enjoy high definition videos at home easily. Yet, if you download a swathe of videos with the file extension MKV and intend to convert MKV to iMovie for editing on Mac, then the problem pops up.
Solution:

So if your source MKV files can't be accepted by iMovie on Mac , you need to convert MKV to  iMovie compatible code AIC. I know a program that named HD Video Converter for Mac, is just the ideal MKV to  AIC  conversion software. It can easily transcode MKV video to AIC .mov for adding MKV to iMovie for editing. Below is a step by step guide to show you how to convert MKV videos to iMovie.

Preparation: 
Download and install the Mac MKV to AIC converter on your Mac computer, it works on Mac OS 10.5 or above.
Step 1. Run the program and load your MKV video files into it.


Step 2. Choose "iMovie and Final Cut Express>Apple InterMediate Codec(AIC) (*mov)" as output format for editing in iMovie.


Step 3. Start transcoding MKV to AIC .mov by clicking on "Convert" button.

Of course, the process will take some time, please wait patiently. When it's finished, you can easily import the converted media file into iMovie for editing.

Ok then launch iMovie, click "File > Import" to load these MOV videos:

Except help you handling MKV video files, this MKV to iMovie Converter can deal with Blu-ray, DVD and other video files like AVI. Meanwhile, it's able to convert them for your tablets or smartphones with optimized presets. Overall, it's really a good helper that worth having.


More guides:


Thursday, July 17, 2014

Convert DVD to mp4 for watching on iPad with multi-track or only one audio track

Look for DVD to multi-track/one-track video solution? Pavtube ByteCopy will help you rip DVD to multi-track mp4 or standard mp4 for iPad streaming via icloud with few clicks.

Question: Since I’ve seen how easy and fast it is to convert a DVD (already stored in my HD) into a single mp4 file, I’ve thought about converting all my dvd’s into mp4’s then I can directly stream them onto all my iPad via icloud. But what is important (to me) is to be able to rip some DVDs keeping at least two audio tracks in one conversion (ex: both English and French audio, or German, English and Spanish audio) and for some DVDs I only need one audio track. With VLC, I would then be able to select which audio track to hear, if any.

However, DVDFab only supports one audio track; FairUse only supports one subtitle track; AutoGK does not seem to do h.264 at all and HandBrake seems to be limited to a single subtitle track as well. So I am wondering if there is a software (free or not) that can do that? Please note that I am quite new to DVD conversion and would prefer a software that's relatively easy to use, i.e. with simplified options or some sort of pre-validated presets. 


In fact, it is easy to archive DVD to mp4 container conversion with one track or multiple audio tracks preserved. The following short guide shows you how to convert a DVD to mp4 with multiple audio track as well as one audio track. 

Software Requirement: Pavtube ByteCopy/ByteCopy for Mac

With such a tough task, I had spent a lot of time searching online, tried several SWs - some ok but always something that does not quite to do what I need. Luckily, I finally got this Pavtube ByteCopy. Not all videos output from a multi-track DVD can keep the original video effect, intact audio tracks in different languages. 

It is a pro version Blu-ray/DVD ripping program, it's not only able to remove disc encryption and rip them to iPad readable format, but also keeps the original DVD/Blu-ray multiple audio tracks, so that you can free switch the language during playback. The mac version is ByteCopy for Mac.

Get this ByteCopy installed and let's start the workflow easily. 

Part I: Convert DVD to Multi-track mp4 for watching on iPad 

Step 1. Import DVD disc, DVD folder, IFO/ISO image files. 

Insert DVD disc to your ROM, click "Load files" to import DVD disc directly from ROM. If you have IFO/ISO and DVD folder, choose the corresponding option to load DVD movies from your computer. 


The main title in your DVD will be checked by default; so let's move on and choose format. 


Step 2. Choose format. 

Click the "Format" drop-down list and choose "Multi-track Video> Multi-track MP4(*.mp4)". The original DVD chapter marker and audio tracks will be kept automatically. 


Step 3. Adjust video & audio settings (optional) 

Click the "Settings" button to check all video & audio settings. By default it will check all the audio tracks (languages), so if you only need some of the languages, just check the unwanted ones. 

Btw, video size, bitrate and frame rate can all be changed if you are not satisfied with default settings. 

Don't forget to click OK to confirm all the changes. 


Step 4. Start conversion. 

Click the big red "Convert" to start converting DVDs to MP4 with multiple languages. 

After conversion, hit the "Open" or "Open output folder" icon to quick locate converted MP4 videos, transfer it to your iPad via icloud. 

OK! We now can watch DVD movies on iPad with multiple languages using VLC player. 

Part II: Convert DVD to mp4 for watching on iPad with only one audio track 

Step 1. Run the program, load your DVD movies into it. DVD discs, DVD iso or ifo files are all OK. 

Step 2. Choose iPad video formats. Click on “Format” box, you can easily find the “iPad” category.  

You can select the one accroding to your device model. If this choice can’t meet your need, you can also click on “Settings” to set parameters. 

Step 3. After the above steps, start the process by converting DVD to iPad. 

Once the task is finished, locate the converted video files by clicking on “Open” and stream them to the iPad via icloud with ease. So there you have it. Pretty Simple! 

Now just enjoy and watch DVD movies on iPad the way you like (with multiple audio tracks or one audio track). Hope the article helps.

More related:

Copy DVD Disc for playback on Mac with multi-track MOV format

Friday, July 11, 2014

Convert M2TS with DTS for Playback on PS3 with AC3 5.1 Surround

This guide shows you how to convert an m2ts file (with DTS audio) to AVI/MP4 so that it can be played on the Playstation 3 with AC3 5.1 surround soundIt just like the way of enjoying YouTube Videos on PS3. Any good suggestions there?

'I'm watching M2TS through a HDTV on my PS3. All works fine except the M2TS files with DTS audio (I can see the video, but there is no sound). Then what's the problem? Any way to make my M2TS files with DTS audio playable on PS3 correctly?'

Play M2TS on PS3


In fact, M2TS files can also be played on Sony PlayStation 3 (Learn how to convert MKV to PS3 with tsMuxeR). However, DTS audio is basically higher quality than AC3, which can't be playable on the PS3.

Therefore, the DTS audio will need to be converted to AC3. This is a lossy conversion, but it is a very acceptable sacrifice considering AC3 can have a very high bitrate.
 Here with Pavtube MTS/M2TS Converter, you can convert M2TS with DTS to playable format on PS3 much faster and easier-to-use than other similar tools with high quality AC3 5.1 audio. Besides, it integrates many presets for iPad 4, iPad Air, Amazon Fire Phone as well as the upcoming Nexus 8; many other presets waiting for you to pick up.

Here is how to encode M2TS with DTS audio to AC3 5.1 AVI/MP4 for playing on PS3

Please make sure the output and speaker setup support 5 channel audio which can be accomplished by using an optical out connection with a surround speaker system. 

1. Import source media files
Download, install and run this M2TS to PS3 converter. Click “Add video” button to load your source M2TS files into the program. The DTS to AC3 Converter is multi-task based and supports batch conversion, this means you can load in multiple video files to convert at one time.


2. Select output format
From the Format bar, navigate to “PSP/PS3” catalogue, and choose "PS3 Video(AC3 5.1)(*.avi)" which can directly output AC3 5.1 audio without settings.


P.S.
If you only want to get mp4 format, choose "PS3 Video(720p) MPEG-4(*.mp4)" or "PS3 Video(1080p) MPEG-4(*.mp4)" depending on your requirement.

Tip:
If you choose mp4 format, you need to change the settings from AAC Stereo to AC3  5.1.

Click “Settings” button, the “Profile Settings” windows pops up, on which you need to set the audio codec to ac3 and set audio channels to 5.1 Channels. This ensures your output videos encoded with ac3 and create 5.1 surround surrounds for PS3 playback.

Apart from changing audio codec and channels, you are also allowed to reset video resolution, video bit rate, frame rate, audio bit rate and sample rate on this window.

AC3 5.1 Settings

4. Start conversion
Click “Convert” button to start converting M2TS with DTS to MP4/AVI AC3 with 5.1 Channels. As soon as the conversion finished, you can click “Open” button to get the generated files with ease. Now, you can transfer converted videos to PS3 via USB flash drive for smooth playback without any problem.

See also:


Sunday, July 6, 2014

Best 4K Ultra HD Video Converter to Convert/Compress 4K Videos on PC or Mac

If you've got some 4K Ultra HD videos, this article will give you the best 4K Ultra HD Video Converter to Convert/Compress 4K Videos on PC or Mac in a simple way.


4K is the hottest buzz word in the tech world right now, and it's rewriting the rulebook when it comes to image quality. It affects not just the world of 4K TV and cinema, but also cameras and image capture, smartphones and tablets, computer monitors and PC games - practically anything that displays images or records video. For example, play 4K videos on VLC could not be an easy workflow.

Hot Search: 4K to QuickTime | 4K to FCP X | 4K to Xbox

4K Ultra HD is a much more intimate viewing experience than Full HD. In many respects, the best way to view 4K is analogous to the way we view films in a cinema. Old style cinemas were shoe-box shaped and most patrons sat typically 3-5 screen heights away, because that was the most comfortable viewing distance.

However, it is also costly to achieve 4K Ultra HD, for the data amount of each frame is as big as 50MB. That is to say, the facilities of top configuration are required for both decoding, playing and editing a 4K Ultra HD video.

The optimal tool I prompt here is Pavtube HD Video Converter. (Mac version) Just like the way it is dealing with 1080p HD videos, this all-in-one converting tool is surely in the support of converting 4K UHD videos in any formats faultlessly. As the best 4K Ultra HD Video Converter, it can 4K Ultra HD videos in MP4 (AVC coder) or other extension not only for playing on portable devices like iPad, iPhone, Galaxy Tablet, Surface Tablet, Kindle Fire HDX, but also for editing in Sony Vegas, Adobe Premiere Pro, Windows Movie Maker, Pinnacle Studio, Cyberlink Powerdirector, etc.. 

Follow the steps below, and you can get the easiest way to edit convert/compress 4K Videos on PC or Mac with the top 4K Ultra HD Video Converter. And the mac workflow it here. First, download or buy Pavtube Video Converter Ultimate as the 4K Ultra HD Video Converter.

Notes:

1. The free trial version is provided for you to see if it would be able to convert your 4K UHD to your required file type with expected quality.

2. The trial version will create videos with PAVTUBE logo standing in the center of the output image. To bypass the watermark, you should purchase its full version.

Step 1. Follow the installation wizard to install the program onto your computer. After transferring 4K Ultra HD Video files to hard disk, run 4K HD Video Converter. Click the "Add video" icon. button to import 4K UHD video to the program.


Step 2: Choose an output format on a smaller window of this 4K video converter which accords the format you want the output 4K Ultra HD video to become, be it AVI, MOV, MPEG, WMV, FLV, etc.


Step 3: Make any other personal settings you need and click the "Convert" button under the preview window, and the 4K Video Converter will start converting any 4K YouTube Ultra HD videos. When the conversion is finished, you enjoy the compressed 4K Ultra HD video easily.

P.S. Can 4K UHDTV play original HD videos? The answer is yes. The principle is almost similar to that of playing a standard video on an HD TV. 4K UHDTV is 2016p and 3840 pixels wide, having an aspect ratio of at least 16:9

Good News is that Pavtube HD Video Converter allows you to change video resolution, as well as the aspect ratio, from 4:3 to 16:9, to faultlessly fit the 4K Ultra HD TV. After converting ,you can freely transfer the video to 4K UHDTV for watching by use of HDMI or the like. Now just have a try. 

Read more:

Thursday, July 3, 2014

2014 Summer Holiday Coupon Starts, 20% OFF BD/DVD Coping Tool comes!

Woo-hoo, after a long-term study, 2014 Summer Vacation begins! Havn't got any plans? If you are a frequent traveler or ready to prepare a travel this summer holiday by hiking, fishing, camping, or going to seaside with your kids, chances are they'll be clamoring to see some favorite movies when they aren't off at camp or jumping in the pool.


Now with 20% OFF Pavtube ByteCopy, you can get the holiday more enjoyable! Now just watch your favorite Blu-ray/DVD discs with multiple audio and subtitle tracks, or make your own summer video freely!

Follow this link to enjoy 49% off and more FREE products~

https://www.facebook.com/pavtubefans/app_186981981345123

Expire on Jul. 15th.

It's never to later to make your choice!

More details here:

http://www.multipelife.com/summer-2014-deals

Friday, June 27, 2014

How to enable VLC to play Blu-ray movies by chapters

Having issues playing BluRay discs with VLC Media Player chapters? This brief guide assist you to solve the problem by converting your Blu-ray to lossless mkv format. 

VLC, powerful multi-functional media player software, can run on Windows, Mac OS X, Linux, etc. which is widely used now. The 2.0 and later version support Blu-ray media playback with some extra operations.

Now I have tested it on my Windows 8.1 PC, but I find I cannot get VLC player to play Blue Ray discs, I have downloaded a file called libaacs.dll, and placed it in the VLC folder that is in the Roaming folder inside AppData but I still cannot get VLc to play Blue Rays discs.

Since I cannot directly play blu-ray movie using VLC, I tried many ways. But here is the best way to make it work, that is to rip/convert Blu-ray disc to VLC friendly format such as MKV, AVI, MP4, MOV. Read the guide about how to rip Blu-ray to MKV with full preservation of all audio tracks, subtitles and chapter markers, you will get it.

What we need?

Here recommended this Pavtube ByteCopy which does a great job in quick decrypting the protected discs within a few clicks. Best of all, it can handle the latest Blu-ray and is capable of backup Blu-ray to lossless MKV preserving all the multiple audio and subtitle tracks as well as chapter markers. In this way, I can freely watch my favorite Blu-ray movie on my VLC Player by chapters.

You are free to try free trial version (Pavtube ByteCopy for Mac is for Mac users).

Now let me show you how to backup Blu-ray to lossless MKV with chapter markers for VLC player no recoding in 3 steps.

1. Import Blu-ray to Pavtube ByteCopy.

Click "Load file" icon on the top left to load the Blu-ray disc.


2. Choose Lossless MKV with chapter markers.

Under "Format" menu, there are lots of video formats. Go to find "Multi-track Video" option and choose "Lossless/encoded multi-track MKV (* mkv)" because it will contain chapter markers in output MKV.


Tip: Click "Settings" button on the main interface; you are brought to Multi-task Settings. You are allowed to customize profile presets as you like, you could remove unwanted audio track in Audio tab under Settings menu, and uncheck subtitles you do not need in Subtitles tab.


3. Start conversion.

Click big "Convert" button to start conversion. It won't take much time for conversion and then you will get lossless MKV once completed. Hit "Open" button you will go to location of generated files.

Afterwards, run VLC Media Player, follow "Media" > "Open Fie..." to browse converted Blu-ray and from the playback drop-down list, you can click "Chapter" to select specific chapter as starting point when playing ripped blu-ray movie in VLC Media Player.

Now go to fully enjoy your favorite Blu-ray on VLC by chapters whenever you wanna. 

Tip:To transcode DVD discs to MOV/MP4/Apple Prores with multiple audio and subtitle tracks, that is what Pavtube ByteCoy for Mac can do for you which means you can select the audio you want when enjoying DVD movies in VLC player.

Meanwhile, with Pavtube's new site releasing, there are many new Money Saving Software Bundles like:

ByteCopy($42) + Video Converter Ultimate($65) = Only $79.9, Save $27.1
ByteCopy($42) + DVD Creater($35) = Only $44.9, Save $32.1

Friday, June 20, 2014

Backup DVD to lossless MKV format on Mac with multiple audio tracks and chapter markers


Do you want to backup DVD to lossless MKV format on Mac with multiple audio tracks and chapter markers keeping when playing with your media player or TV? Here you will find an easy way to do it. 

Every time you play DVD discs on your DVD ROM, the disc will suffer little quality loss. So a digital backup will help to save the storage space of DVD collection, and make it easier to access and carry with. For instance, you could keep the DVD backup in different according to different years, so you can find the desired movie easily without going through your storeroom. 


Then comes the question: "Is there any way to get lossless mkv files with all multiple audio and subtitle tracks, and chapter markers from original DVD disc?"

Best answer:

To get DVD playable on Mac preserving original structure and chapter marks, you should convert Blu-ray to multi-track MKV format first.  Here, this post will give you a solution to copy DVD movies with lossless mkv format.

Tools required:
What you need is only a professional Blu-ray/Blu-ray Ripper Pro for Mac- Pavtube ByteCopy for Mac that can help you convert Blu-ray movies to MKV format with multi-track easily. (Windows version: ByteCopy), It's an ideal app for you to remove the strict Blu-ray protection and region restrictions and Blu-ray contents to Multi-track MKV/MP4/MOV video very quickly with great video quality.

How to rip DVD contents to MKV with multi-track on Mac Mavericks & Mountain Lion

Step1: Load DVD movies.

Launch the best DVD to multi-track converter; import DVD movies into the program. Loaded DVDs can be previewed in the right preview window.


Step 2: Choose output format

In the dropdown list of Format menu, you can find several MKV options for output. Here we recommend "Lossless/encoded Multi-track MKV (* mkv)" under "Multi-track Video" catalogue. Because it will save multiple video, audio and subtitle tracks form original DVD in output MKV and you won't suffer any quality loss.


Tip: You can check the audios you want to keep and uncheck the audios you don't need. It all depends on your own choices.


Step 3: The last step you need to do is hit the "Convert" button to start the conversion of DVD to Multi-track MKV on Mac Mavericks & Mountain Lion.

When the conversion is over, just find the folder of your output videos. Then you can play and organize your DVD videos on your portable devices.

Good news for you: To save your money, Pavtube Special Offer offers various product bundles, such as:

ByteCopy($42) + Video Converter Ultimate($65) = Only $79.9, Save $27.1
ByteCopy($42) + DVD Creater($35) = Only $44.9, Save $32.1
ByteCopy($42) + Vidpie($29) = Only $54.9, Save $16.1
ByteCopy($42) + MXF MultiMixer($45) = Only $69.9, Save $16.1

Related articles:

Transcode BD/DVD to Lossless multi-track MKV for streaming to TV/Projector via STB
Copy DVD Disc for playback on Mac with multi-track MOV format
How to Rip and Convert DVD to multi-track MP4 on Windows/Mac Easily and Fast

Tuesday, June 17, 2014

Rip 3D Blu-ray disc to 3D SBS MP4 format with preferred subtitles


If you have bought some 3D Blu-ray Discs and want to convert them into playable 3D video for watching on 3D devices, you come to the right place. Get the best solution here.

3D effect is destined to give audiences a fantastic and lifelike visual experience. Since 3D Blu-ray like The Hobbit, Resident Evil 5 come into being, the owners are enabled to watch 3D movies at home instead of going to cinema.

 
Possible to Transform 3D Blu-ray to 3D Movie for watching at home? What you need?
As we know, most commercial Blu-rays are protected with advanced encryption technology, we can't directly watch 3D Blu-ray on 3D devices. For enjoying 3D Blu-ray movies on 3D TV or 3D smartphone, here are the requirements:


* 3D Blu-ray movie disc
* 3D HDTV or 3D Blu-ray Player (with 3D glasses)
* External Blu-ray drive to hook up to your Mac
* A 3D Blu-ray Ripper to rip 3D Blu-ray to 3D video for watching

Which is the best 3D BD Ripper to do the 3D to 3D conversion?

Here, Pavtube BDMagic for Mac is the best 3D Blu-ray to 3D ripper to assist you with ripping 3D Blu-ray to side-by-side, top-bottom, anaglyph 3D MKV/AVI/MP4 format for enjoying. Windows users could use BDMagic which is specially designed for Windows users to create 3D video out of 3D Blu-ray movies. Free download the right version and follow the steps below:

Rip and convert your Blu-rays into 3D SBS MP4 for watching with preferred subtitles on Mac 

a.) Insert your Blu-ray to external Blu-ray drive and load disc to this 3D Blu-ray to 3D Converter.

Tip 1: Because the subtitles are not hardcoded on the Blu-ray video, so we can choose the subtitles which you want to keep. Just click the drop down menu after "Subtitles", force subtitle can be checked for output so as to help you to read the unknown language and fully enjoy the Blu-ray movies.


b.) Choose Format.

From the “Format” drop-down list, you are suggested to follow the path “3D Video > MP4 Side-by-Side 3D Video(*.mp4)” for ripping Blu-ray to side-by-side 3D MP4 video.


Tip 2: In order to get customized videos, you can add subtitles to your own videos.

Find "Edit" icon and then click it, you will find video editor. There you can Trim, Crop, Add watermark and Effect. Above all, Subtitle can be added here.

c.) Adjust target video settings and 3D effect.

If you like, click "settings", and you are free to change your target video size, bitrate, frame rate and 3D depth. If you want to get best video quality, pls switch them to "original".

d.) Start conversion.

Now hit the big red "Convert" to start converting videos to start converting 3D Blu-ray to SBS 3D MP4. After the conversion, click "open output folder" to quick locate the generated media file.

Then you can easily enjoy the 3D shook in the home with your desired subtitles, more cozy and comfortable than going to the cinema.

Read more: 

Rip 2D/3D Blu-ray to 3D MKV/MP4/AVI/MOV/WMV format
Convert MKV movie to 3D MKV format on Windows 8.1/8
Getting DVD (ISO) into iTunes for Apple TV 3 with Dobly Digital 5.1 audio

Sunday, June 15, 2014

Up to 50% OFF Father's Day Sales 2014: 3 Software Deals And Specials from Pavtube Studio

Now it’s time to celebrate that all-important guy in your life—dad. Dad is notoriously the toughest family member to shop for. If you've waited until now to pick up this year's Father's Day Gift, then you're going to need a great idea — fast.

Luckily, to celebrate Father's Day with you, Pavtube Studio launch a huge Coupon Code as the 2014 Father's Day Special Offer. Up to 50% off for your beloved dad! Backup your dad's favorite Blu-ray/DVD movie to iOS/Android gadgets, HD TV, home theatre or game console. Even better you can make a father's day video for your beloved dad on your own! It’s more precious than just picking up something on store casually! 


Her are Pavtube Great Deals and Specials at Father's Day 2014 weekend

1. 50% OFF Pavtube DVDAid (Win/Mac) as Father's Day Gift 2014

With this professional DVD ripping tool, playing DVD movies on DVD player at home has never been a problem for you. And you can now freely enjoy your favorite DVD movies on the road without worrying about the issues they jump on the most crucial scenes and are prone to scratches.

2. 30% OFF Pavtube Video Converter Ultimate/iMedia Converter for Mac as Father's Day Gift 2014

An all-in-one solution to fast convert Blu-ray/DVD and various videos to virtually any video/audio format for watching on any Android/iOS/Windows devices. Save a 100% intact BD M2TS/ DVD VOB movie without extras.Backup 3D Blu-ray movies to 3D video for watching on 3D devices with pleasant quality. 

3. 20% OFF Pavtube ByteCopy (Win/Mac) as Father's Day Gift 2014

An easy to use Blu-ray and DVD movie ripping program is capable of ripping 3D Blu-ray discs, 2D Blu-ray Discs and standard DVDs to required video formats. Most important, it can lossless BD/DVD to MKV backup with multiple audio/subtitle tracks and convert BD/DVD to Multi-track MP4, MOV, AVI for watching on Plex, Roku 3, WDTV Live, Popcorn and more HD media players.

Like our Facbook page to get it Now! Expires on June 21, 2014. Never miss it!


More money saving bundles can be found here: 


Thursday, June 12, 2014

How to collect classic DVD movies with DVD Copying tool

DVD discs are fragile and susceptible to scratches, nicks, and getting lost. So you want an easy way to make a backup copy right? This article will be your right answer.

If you are a movie lover, you may be not hesitated to buy the hottest Hollywood films or interesting Disney films in DVD discs for collection after wathing in the cinema. However, day after day and year after year, when DVDs filled the entire cabinet or even half of the room, it is necessary to know that How to collect these classic DVD movies.
With the progress of era, some of the DVD player is no longer in production, some formats already slowly be we rejected. When a year later, after two years or ten years later our DVD player is broken or we need to watch DVDS on other devices, then what shall I do? Here I would like to say, whatever happened to make a backup all of your DVD is the best choice in case your discs get damaged or destroyed, then you can freely enjoy your favourite DVDs without loading DVD disc, isn’t it fantastic?

What you need is a powerful tool for ripping DVD movies. Pavtube DVDAid is a professional program in making digital copy of DVD. It can also rip the latest DVD (Disc/Floder/ISO/IFO) and convert to various video formats for some popular smartphones and tablets as well as editing software. Simple interface and CUDA acceleration will bring you an easy but effective conversion. The following guide will show you detailed steps.

You can have the trial version to try all the functions firstly, and then download the retail version to install it. (Mac users go to get DVDAid for Mac).

How to convert/copy classic DVD movies for a safe storage:

Step 1. Install Pavtube DVDAid on your Windows/Mac.

Step 2. Launch Pavtube DVDAid , and load your DVD movie from your DVD-ROM to the app.


Step 3. Click the “Browse” button to set output folder where you want to save the copied DVD movies.

Step 4. Hit the Copy the entire disc icon on the main interface and start DVD backing up process. It enables you to makes 1:1 copy of original DVD Disc without quality loss with all audio streams, subtitle tracks, extras, etc.

Note: You can find the “Directly Copy” option to backup DVD main movie without extras. It will support to backup 100% intact the DVD main movie with all multiple tracks preserved. And you will get one M2TS file for output.


Alternatively, you are suggested to choose “Common Video -> H.264 MP4 Video (*.mp4)” for putting DVD to an external drive for playback.


Click big Convert button on the interface and then you will get a conversion dialogue box to show the exact progress, like time left, estimated size, state and so on.

Now coping classic DVD to an external hard drive, hard disk drive (HDD) or thumb drive is extremely easy. Have a try now! Only a few simple steps can reduce your worries.

More topics:

Free Download Windows 8.1 DVD Ripper
DVD Ripper Mac - Rip DVD to Any Video/Audio on Mac
Copy 2014 Disney Blu-ray movies to Android Tablet/Phone for watching

Thursday, June 5, 2014

How to Convert recorded Brazil FIFA World Cup Tivo videos to Avid MC for editing at Your Free Will

You may come across problems when you import 2014 FIFA World Cup TiVo recordings into Avid Media Composer for editing. Fortunately, there is an easy way to fix the issue. Let's find it out here!

As one of the most influential events, ranking only second to Olympic, FIFA World Cup is doomed to be the cradle of exciting games and legend and bring football lovers wonderful moments. So there is no surprise football followers hold on to their TV set for every minute of move. However, nobody can stay sticking to every second on TV without letting a splendid moment slip away. In this case, it is wise to choose a Tivo DVR and record world cup video to save these heart-stirring World Cup shocking moments, since the not only deserve merely few seconds cheers, but a decade or even longer.


What's more, to make the FIFA world cup Tivo recordings more meaningful, you may first choose to import .TiVo files into Avid Media Composer for further editing. I'm writing this topic for those who also intend to save the 2014 FIFA World Cup Brazil Games video from TiVo onto computer or edit TiVo in Avid Media Composer on Win/Mac.

On Avid official website, it recommends DNxHD or XDCAM codec for editing natively. So what we have to accept that TiVo is not a supported format by Avid MC. To get Avid Media Composer work perfectly with World Cup TiVo files, it’s necessary to change TiVo files to DNxHD mov format.

Here, Pavtube HD Video Converter for Mac is an ideal tool to help you use 2014 FIFA World Cup TiVo files in Avid MC. It works as the best World Cup TiVo Converter for Mac for transcoding Tivo to best editing format/codec for different NLE apps, such as Adobe Premiere Pro CS4/CS5/CS6, Avid Media Composer, Adobe After Effects, iMovie, Final Cut Express, Final Cut Pro 6/7/X, and more. You can also get the Windows version World Cup TiVo Converter. This guide will show you how to convert 2014 FIFA World Cup Brazil Tivo recordings to DNxHD for editing in Avid Media Composer on Mac.

Before transcoding World Cup Tivo files, you need to transfer recorded TiVo from TiVo DVR to your Mac. To stream TiVo shows to PC, you need to use a Tivo Decode Manager.


1. Run the app, and enter your TiVo's IP address in the TiVo IP Address box.
2. Click the Prefs button in the lower-right corner.
3. Fill in the Media Access Key to get the TiVo files to the download Queue list.

Once the TiVo files are transferred on your Mac, then the second important step here is to convert TiVo files to Avid MC.

After transfer TiVo files to your Mac, you can free download the Mac TiVo to Avid Converter. Install and run the application. Do as follows.

Step 1. Import TiVo to the program.

First click "Option" button, enter Media Access Key.


Then, load TiVo files to the World Cup TiVo Converter on Mac.


Step 2. Choose best editing format for Avid Media Composer editing without rendering.

Click on "Format-> Avid Media Composer-> Avid DNxHD(*.mov)" as output video format for editing in Avid MC with high quality

Tips: Adjust the video and audio parameters as the below screenshot, including the Bitrate of Video&Audio, Video Size, Sample Rate, Frame Rate, Audio Channels, etc., by clicking the Settings button on the main interface for getting the best quality before starting conversion.

Step 3. Start World Cup TiVo to DNxHD (*.MOV) conversion for Avid MC on Mac.

After conversion, you can easily import converted video files to Avid Media Composer for editing without rendeing.

That's all. Now smoothly import and edit your 2014 World Cup soccer match tivo files in Avid Media Composer and enjoy the wonderful 2014 FIFA World Cup Tivo videos without any format limitation!

More Related Guides: