Friday, August 29, 2014

Editing Avid Project with DNxHD MXF in Premiere Pro CC, CS6/5

Do you need a favor of importing Avid Project with DNxHD MXF in Premier Pro CC,CS6/5? No worries about that if you follow the pages below.

‘Excuse me, Now, I have an avid project which I would like to transfer to premiere pro cc. I exported the files from the Media Composer imported it into premiere pro and tried to connect with the Avid Media Files which are dnxhd-mxf's. It reported a generic error. Is there a possibiliy that Premiere Pro CCreads the dnxhd-mxf's? -John

Aims at the problem we got in transferring avid MXF project to Premiere Pro, maybe I could give you some advices! Firstly, Cause Premiere Pro CC is a professional editor that it can’t accept most video formats, such as MXF,MTS/M2TS, etc. Additionally, I can tell you the best formats that Premiere Pro mainly supported are WOV, MPG and WMV.

So here we may get a avid MXF converter to have a try. Pavtube MXF Converter for Mac/Win can be a nice choice for you! It is a professional MXF converter that not only works for Premiere Pro, but also for other editors such like FCPor iMovie. Here we’ll show you some major steps of converting avid MXF project.

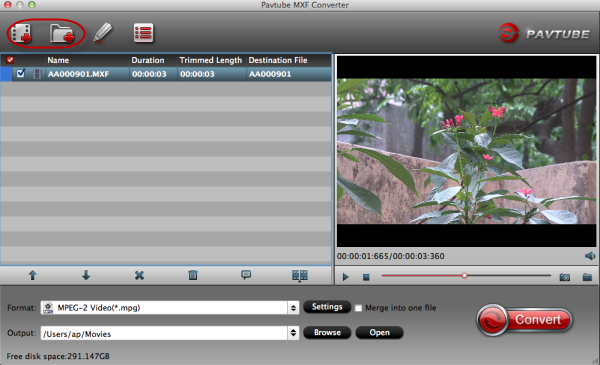
Step 1.Download your Avid MXF converter and load your MXF project:


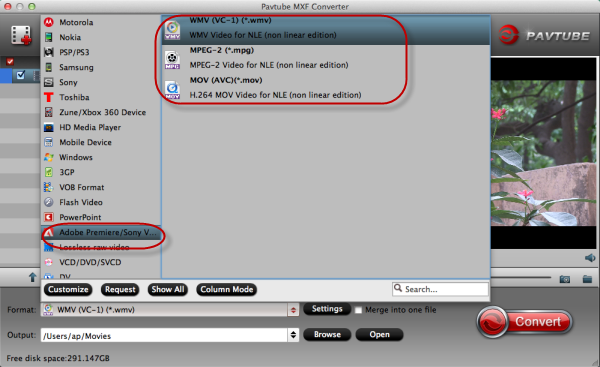
Step2. Make sure you choose the best format that Premiere Pro supported: ’Adobe Premiere>>WMV(VC-1)(*.wmv).


Step3. Some settings about the output formats:


In the end, ‘Convert’ to finish your work.

Another tip to those new users of importing files to Premiere Pro here. Best wishes for you to smoothly edit your Avid MXF project in Premiere Pro with a help of Avid MXF converter!

More guides about Premiere Pro:


Wednesday, August 27, 2014

Extract clips from Blu-ray Documentary to Premiere Pro

If you have a trouble in importing DVD or Blu-ray clips in Adobe Premiere Pro for editing, you can take this paper for a reference.

Recently we receive some feedback from users, as they said ‘I’m a professional video editor and I also need to do some editings in special documentary. Mostly, we have burned them in DVD or Bly-rays and want to edit some clips in Premiere Pro. How can I rip them into clips?---From a video editor.

From the questions mentioned above, in order to solve this problem, we need to use BD converter to cut footage into clips and convert the format that Adobe supported. Like MOV, WMV and MPG. At this time , Pavtube BDMagic for Win/Mac can help us a lot. 


bd-dvd-to-adobe


A professional BD converter not only supports Adobe but also FCP,iMovie and Avid Media Composer. Multiple choices for editors so it is popular in editing area especially in BD movies world. What’s more, this product offers us primary function to customize BD/DVD videos.

Also, several major steps for loading BD/DVD videos to BDMagic.

Step1.Three ways available to load files:

load-disc

Step 2.Click ‘Editor’ to cut the clips you want.

editor

Step3. Click the Format bar, you can choose output format from the format list or customize which formats to be shown on the list. ‘Adobe Premiere Pro>>MOV(AVC)(*.mov).

choose-format-for-adobe

Step4. In the Profile ‘Settings’ window, you can choose or specify exactly the parameters you like. And in the Task information section, you can compare the detailed information of the source video and the target video.
 
 bdmagic-profile-settings

At last, click ‘Convert’ button to finish.

To make your video smoothly edited in Adobe, BDMagic will not disappoint you. Multiple functions can also attract your interest a lot.

More:
How to Import Media Files to Adobe Premiere Pro on Windows/Mac?
Rip Feature Documentary Footage for Final Editing in Adobe Premiere Pro

Monday, August 25, 2014

Encoding OBS FLV Footage to Final Cut Pro X for Editing

 No trouble in editing OBS FLV videos in FCP X after reading this article below! Do you believe that this paper can do you a big favor? 

As long with the more and more popular short videos on many websites like YouTube, etc. People always love watching short videos online because they are so many kinds. Do you know why so many people love it? Maybe because they are so funny, touching and interesting. Indeed we can search any kind of video you like on the Internet. OBS FLV format videos has a good quality to play smoothly so it was loved by so many folks.

However, we usually have not enough time to watch online because we need to work. So most people would like to download it and do some editing to watch them on some devices. The most editor people use may be FCP X I think so can we load FLV files in FCP X directly for editing? Of course not! At this moment, we recommend you a professional tool called Pavtube HD Video Converter for Mac

With a help of this kind of FLV converter, we can easily transcode FLV format to FCP X best supported Apple ProRes 422 codec MOV to let FCP cuts some video parts we don’t need. 

Also, this converter can make FLV files accepted by Adobe Premiere Pro.Ideas For Bringing OBS FLV into Adobe Premiere Pro

Don’t know application methods of FLV Converter, here we go:

Step 1. Click ‘File’ menu to select the files you wanna load:

import-files-to-hd-video-converter 

Step 2.The ‘Format Bar’ offers you some usual output format for choosing, Apple ProRes 422 codec(*. mov) is included.

flv-to-prores-422-mov 

Step 3. The button ‘Settings’ also helps do more on output video files.

settings-for-output-format 

Finally, click the ‘Convert’ button to get FCP X supported format.

Don’t know how to have a trail or buy, here we go:

 mac-buy                              mac-trial

Here we also offer you some major tips of importing files into FCP .

Whenever you are free, waiting for a bus or having a short rest, after editing this FLV files in FCP X with Mac FLV Video Converter, you can enjoy your life more!   

Read Related Articles:

Friday, August 22, 2014

No Problem in Importing Blu-ray /DVD to FCP X with Multi-track

This paper can detailedly tell you the way of importing Blu-ray/DVD to FCP X with multi-track Prores 422LT/HQ/Proxy by Pavtube ByteCopy for Mac.

As we all know, there are always some people who are fond of play Blu-ray or DVD at home to enjoy its’ wonderful experience. Actually, due to its large storage and excellent quality, more and more people prefer to enjoy Blu-ray or DVD discs. On the other hand, some folks may ask: What if I want to watch only several clicks or editing some movies, What should I do to make it possible? Just like the question below:

‘Now I am testing to import a Blu-ray disk into Final Cut Pro but only find that is the Blu-ray files are not readable by FCP (no matter the version FCP 6/7/X). So in this case, it comes with the question that how can we rip Blu-rays and edit blu-ray movies in FCP?

 blu-ray-disc-to-fcp-x

I have to admit that’s a good question for most Blu-ray or DVD fans. Actually, we can’t load Blu-ray/DVD movies into FCP X directly, but we can get Blu-ray or DVD converted by a professional converter called Pavtube ByteCopy for Mac, you can have a try with a free trial.

This converter not only provides us the compatible format for FCP X but also offer us more, like Apple ProRes 422 LT, Apple ProRes 422 HQ and Apple ProRes 422 Proxy. What’s more, do not worry about whether Byte Copy will influence on movie audio effect, it also has multi-track item. 
To know more about Types of ProRes 422 codec

Know more about Byte Copy converter for Mac, you can take the following page for a reference:

Step 1: Three ways available to to load files into Pavtube ByteCopy for Mac 

import-files-byte-copy

Load from disc: Load Blu-ray disc or DVD from optical drive. When both Blu-ray and DVD exists, the software will load DVD. 

Load from folder: Load Blu-ray or DVD movie from BDMV or VIDEO_TS folder.

Load IFO/ISO: Load IFO or ISO image file.

 bytecopy-mac-load


Step 2. Clicking the Format bar, you can choose output format from the format list or customize which formats to be shown on the list. Choose ‘Multi-track Video’>>’Apple Prores 422(LT/HQ/Proxy)

format-to-apple-prores-422

Step 3. Click the ‘Settings’ button, you can set the items you like:

format-to-apple-prores-422 

Finally, just click ‘Convert’ and import the output movies into FCP X. You can take this for a reference about how toimport files into FCP X for editing.

We are looking forward to your wonderful movie with this Blu-ray/DVD to FCP converter!

More:
Import Blu-ray/DVD to Final Cut Pro X with 5.1 sound on Mac Mavericks
Best video export settings for Blu-Ray using Premiere Pro CS6
Convert Blu-ray to iMovie/FCE on Mac

Wednesday, August 20, 2014

Editing MTS Footage from Canon LEGRIA HF R56/R57/R506 to FCP 6/7

This article will offer you the easiest and fastest way to edit MTS files in Final Cut Pro6/7 with the best Pavtube MTS/M2TS Converter for Mac. 

‘Recently, I’m confused in importing my videos shot by Canon LEGRIA HF R56 into FCP7 for editing, I’m now anxious to do some decorations to modify my videos, it’s a fashion show which I took in Paris last week. I need a favor!’-John( a Canon fans)said.


mts-to-fcp

Generally speaking, most camcorders users prefer those small devices than those heavy types, so Canon LEGRIA HF R56/R57/R506 series walks into people’s hearts. Due to its’ exquisite body and easy operation, it is popular in photographers. When you walk on road, record the scene you see is a beautiful thing, Right? As a result, people sometimes wanna preserve the footages for editing or playing. But as John said, we can’t put the MTS files into FCP 6/7 directly.

So what’s the best solution to import Canon LEGRIA HF R56/R57/R506 MTS files to FCP 6/7 for editing without rendering? Here we introduce Pavtube MTS/M2TS Converter for Mac to you, it can generate best editing formats for filmmakers or video enthusiasts to use in different editors, such as FCP 6/7, iMovie, Premiere Pro etc.

Know more about the steps for importing files into MTS/M2TS Converter for Mac:

Step 1.Load Canon LEGRIA HF R56/R57/R506 MTS files.

Launch Pavtube AVCHD MTS/M2TS Converter for Mac, click to top left two icons to load individual videos or the entire folder.

import-mts-files-into-mts-converter

Step 2.Select best video format for FCP 6/7.

Click on the Format, you would see all profiles for different programs and devices. It’s recommended to choose Final Cut Pro>Apple ProRes 422 (*.mov) as the most compatible video codec for FCP 6/7.

transform-mts-to-prores-422-mov

Step 3.Click the “Convert” button to start the fast transcoding Canon MTS.

Extra tips for editing in FCP 6/7, Please click here: 

How to Edit MTS/M2TS/M2T/TS Files in FCP 6/7/X?

Now, I can freely use the Canon LEGRIA HF R56/R57/R506 MTS videos in FCP 6/7 on Mac. Hope the tutorial I shared can do some favor for you if you have issues with importing Canon LEGRIA HF R56/R57/R506 MTS files into FCP 6/7.

Read More:

Tuesday, August 19, 2014

Recognize XAVC and How to Open XAVC on Windows/Mac

The following guide can give you a comprehensive understanding on XAVC and making XAVC played freely on windows or Mac.

The Definition of XAVC Files

xavc-codec


For a number of Sony fans, they are not be unfamiliar with XAVC files. Although being a new recording format introduced by Sony, XAVC has been widely adopted now. Long GOP is a high-efficiency codec to serve more widely the requirements of the professional market. Along with the popularity of Sony XAVC, it supports the following content formats like:4K, HD and Proxy resolution, MPEG-4 AVC/H.264 video compression, up to 60 frames per second(fps),etc. Except for Sony, such as Canon, Panasonic, and Leica can also have XAVC files.

Multiple Efficient Ways to transcode XAVC on Windows/Mac

Method 1. Get a professional XAVC converter.

XAVC, as the latest format introduced by sony, we can’t make our XAVC files playable and open in by most portable devices and applications. We can use a decent video conversion application to convert XAVC footage to a wide range of popular videos, such as MP4, MOV, FLV, AVI, WMV, M4V, DV. But don’t be worry about it. Pavtube HD Video Converter for Windows/Mac is a nice choice for you. 


hd-video-converter-for-windows

hd-video-converter-for-Mac


What I have to specially mention is Pavtube HD Video Converter---a friendly XAVC converter for you. With this tool, we can transform XAVC codec into any other formats that accepted by most players or editors, iOS/Android series and more. Besides, some editing software like FCP X, iMovieAvid Media Composer and more, some players likeQuicktime Player etc.

If you wanna know more the steps about using Pavtube XAVC HD Converter, the following items can help you a lot.
Start using Pavtube HD XAVC Converter for Windows .
Start using Pavtube HD XAVC Converter for Mac.
Method 2. XAVC Viewer: Content Browser

It’s an all-in-one clip management application that can be used with the latest portfolio of Sony camcorders. XAVC and QFHD are added in the latest version.

Method 3. XAVC/XDCAM Plug-in for Avid (PDZK-MA2)

This plugin supports for XAVC files in Avid Media Composer or NewsCutter products with viewing and editing.

Method 4. XAVC Software Support

It supports XAVC codec, such as  Adobe CS6, Avid, Grass Vally, Final Cut Pro X, Sony Vegas Pro 12 and more.

After comparing four methods above, we find that the first method takes advantages of simple operation, convenient management and high quality image, so the Pavtube XAVC HD converter for Windows/Mac can surely be your first choice!

If you want more:

Thursday, August 14, 2014

Best Solution for importing Sony Alpha A6000 files into iMovie 11


Are you now anxious about the best way to get Sony Alpha A6000 MTS into iMovie 11 for a decoration? Pavtube MTS/M2TS Converter for Mac will be your partner.

sony-aphal-a6000

In the process of our growth, there are so many unforgettable or memorable moments that we want to reserve them down for good presents. No matter our children or our parents, we want to give them a big surprise on their birthday parties. Sony Alpha A6000 helps us a lot. Thanks for this kind camera, we have got so many precious presents in our lives. With full HD video recordings and built-in Wi-Fi connectivity. It enables to instantly share imagery to mobile devices for direct sharing online to social networking conveniently. What a nice assistant it is!

On the other hand, as our common users, we always would like to reserve the happy time instead of the sadness. So we need a editor to do some decorations to help us such as the latest editing tool iMovie 11, which is a professional software for editing. Except the editing function, it can also add some special effects.

mts-to-imovie

However do you find there is a problem we need to conquer? Yes, we can’t import Sony Alpha A6000 MTS recordings into iMovie directly. Just leave this mind behind if you got Pavtube MTS/M2TS Converter for Mac, such a kind friend that helps us change MTS files into Apple Inter Mediate Codec (AIC) .mov, the best format iMovie 11 supported. 

I’m so glad to introduce the converting steps for you:

1. When you start up Pavtube MTS/M2TS Converter for Mac, import your videos. Don’t forget to check it out in preview window. 

mts-m2ts-mac-main-ui

2. Clicking the Format bar, you can choose output format from the format list or customize which formats to be shown on the list.

mts-m2ts-mac-output-format-mov

3. In the Profile Settings window, you can choose or specify exactly the parameters you like. And in the Task information section, you can compare the detailed information of the source video and the target video.

mts-m2ts-mac-profile-settings

4. Clicking ‘Convert’ button. We’ll get the proper files which can be accepted in iMovie 11.

Best wishes to you if you are succeed in putting Sony Alpha A6000 into iMovie 11 by Pavtube MTS/M2TS Converter for Mac!

Other guides if you want: