Friday, January 30, 2015

Windows Movie Maker Won't Import GoPro Hero 4 MP4 Files? Fixed!

Summary: In the following article, we will show you an example that Windows Movie Maker cannot play the MP4 footage which shot by GoPro Hero 4 cameras. Why could this situation happen? Some reasons and solutions are offered below to teach you how to convert our GoPro MP4 files to WMV, which e all think the best one for Windows Movie Maker. 

In fact, before we start our topic on GoPro Hero 4 MP4 and Windows Movie Maker, let me show more details on this GoPro Hero 4 camera, okay? This kind of action camera can capture stunning 4K footage in extreme settings(30fps). Of course 2.7K50, 1440p80, 1080p120, 960p120 and 720p120 fps for crisp, smooth footage are supported as well. If you record some 4K videos, things would be a little more complicated when you work with the 4K MP4 files in Windows Movie Maker. 

Hot search: GoPro Hero to VLC | Play GoPro Hero 4K Videos on Mac | GoPro Hero 4K Video to Vimeo | GoPro Hero to Sony Movie Studio | GoPro Hero to DropBox 


For a further knowledge of GoPro MP4, it is not only compatible with Windows Movie Maker, but also some other popular editing tools like or FCP X/7, or Premiere Pro , etc. Or Upload to YouTube? You must need some related assistants. Fortunately, we here found a related article to help you out of the trouble in editing GoPro Videos

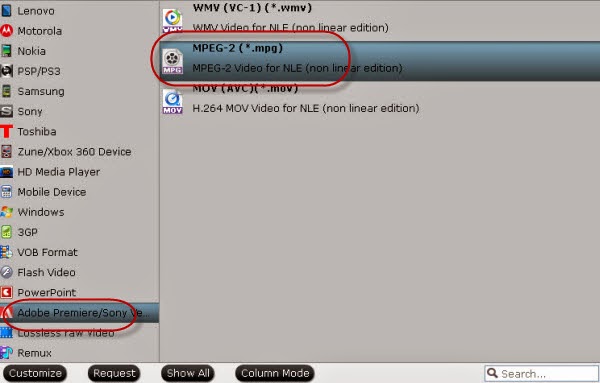
So how could we deal with GoPro Hero 4 MP4 files on Windows Movei Maker? Don't worry, here is a professional GoPro MP4 Video Converter ( Pavtube Video Converter ) I would like to introduce to you. (For Mac version?) Which is the best Video Converter for GoPro Hero4 footage, which will create an Windows Movie Maker friendly file format- WMV keeping the original quality in Windows XP/Vista/Windows 7/Windows 8. Besides Movie Maker, this software can also export professional encoders like DNxHD for Avid, ProRes for Final Cut Pro, AIC MOV for iMovie, MPEG-2 for Premiere Pro and more. 


Other Download: 
- Pavtube old official address: http://www.pavtube.com/video_converter/ 
- Amazon Download: http://download.cnet.com/Pavtube-Video-Converter/3000-2194_4-75734821.html 
- Cnet Download: http://download.cnet.com/Pavtube-Video-Converter/3000-2194_4-75734821.html 


Step by step guide is allowed here to teach you how to edit 4K MP4 files in Windows Movie Maker with HD WMV. 

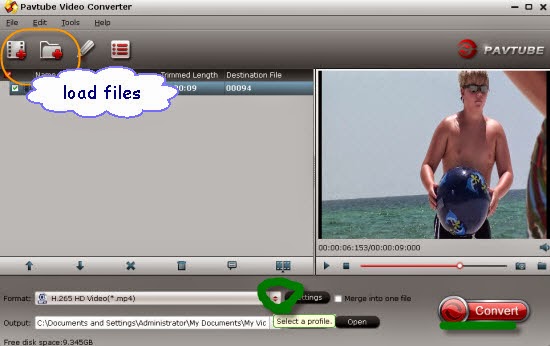
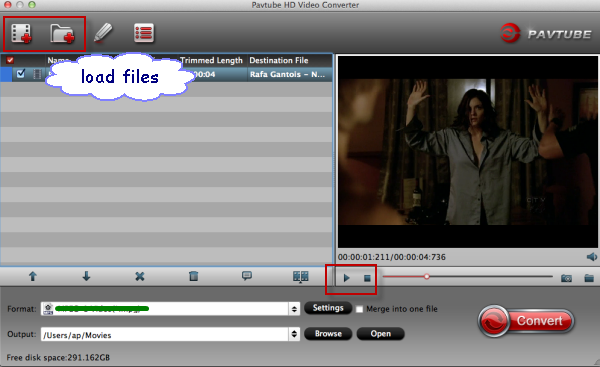
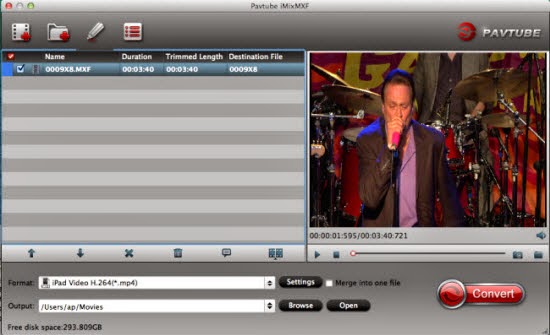
Step 1: Load your Source Videos 

When you correctly install the 4K MP4 toWMM Video Converter, launch it and the main interface will pop up there. With two buttons we can load our files in, 'Add video' can load you files with individual clips, or 'Add from folder' can load them in whole folder. They will listed on the blank there. 


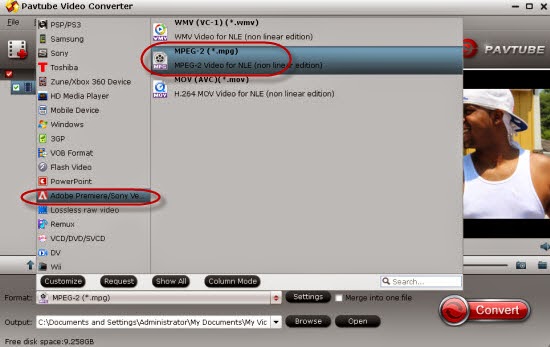
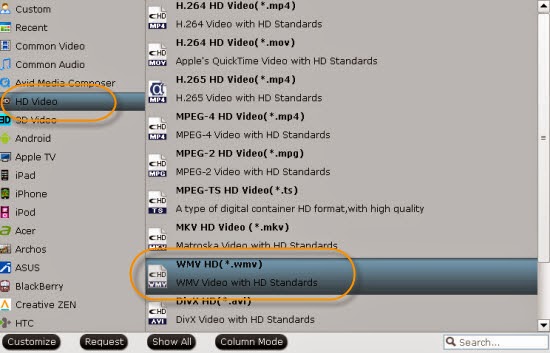
Step 2: Choose the suitable output for Windows Movie Maker 

Follow the steps to come to the output list, in order to preserve the original high quality, we suggest you to come to the 'HD Video' select the 'WMV HD (*.wmv) as the best. Look the screen shot below: 


Step 3: Set your output video resolution? 

Click the 'Settings' button on the main interface, you can adjust video and audio settings, including codec, aspect ratio, bit rate, frame rate, sample rate, and audio channel. For example, from 4K to 1080p WMV, do remember adjust video size to 1920*1080. You will not miss this function. 


Step 4: Finally, back to the main interface to hit the 'Convert' button, we can start the conversion as we want. When the conversion finished, check the generated 1080p video, you will certainly be satisfied with its final video quality. It would be easier for you to playback and edit in Windows Movie Maker. 

Hot News!!! Pavtube Summer Promotion has become something of a tradition, and it's back for 2015. Giveaway and Save up to 50% OFF for new Pavtube Software owners, this sale runs until Aug 7, 2015.  

More related tips: 

Wednesday, January 28, 2015

Why Sony Vegas Pro 12 Won't Import Any Videos Such as MTS/MP4?

As someone reflect that they are often refused when importing some recordings to Sony Vegas Pro for editing. In most cases, MTS and MP4 are typical common ones that not suitable for Sony Vegas Pro according to some errors or screen conflicts appeared there just like the example below:

‘I used Sony Vegas before yesterday, everything was fine. Today, I import a MP4, M2TS, and TS and they didn't want to open. I have QuickTime; Latest version. When I tried to import m2ts, it says that could not be found. I tried converting the files to avi and still the same. Help me!’


Sony claims that Vegas Pro 10/11/12/13 supports most commonly-used video codecs, including the MP4 (MPEG-4). However, problems like "Sony Vegas won't Open MP4 files" come up from time to time. In fact, the native import of some flavors of MP4 wasn't supported in Sony Vegas Pro 12. In addition, based on our testing, some MP4 files will import into Sony Vegas Pro without QuickTime perfectly. Of course some HD video formats are not available for Vegas pro, such like MOVXAVC or even the latest codec H.265 videos, etc.

Solutions: Install the Pavtube Video Converter for Windows (For Mac version?), which is designed for converting almost all videos to various NLEs or media players, including transcoding MTS or MP4 to MPG as the best one for Sony Vegas Pro 12. It is much easier and more effective than any other third-party converting plug-ins. 

Guide on converting MTS/MP4 to compatible formats for Sony Vegas Pro 12:

Step 1. Add your source files
You can drag any video file and drop to the program or add them by clicking Load Video button. It allows you to add several video files (including but not limited to MP4, VOB, MKV, MPG, TiVo, WMV, etc.) at a time and convert them at one go.


Step 2. Seeking suitable output ones

In the Profile tray, switch to ‘Adobe Premiere Pro/Sony Vegas’ to choose the ‘MPEG-2 MPG’ as the output format. In fact, the output videos seamlessly fit Sony Vegas Pro 10/11/12/13.


Tips: By clicking the Settings button beside Profile, you can adjust the output video/audio resolution, frame rate, bit rate, etc. to customize the output files to get the best quality you want.

Step 3. Start converting MP4 to Sony Vegas Pro
Go back to the main interface and hit the ‘Convert’ button there, we can easily start the work on converting MTS/MP4 files to MPG for editing in Sony Vegas Pro 12. Once the conversion done, you can click "Open" button to get the output files effortlessly.

Additional tips: We have to mention that with latest version of this Windows Video Converter, we can encode/decode the newest H.265/HEVC videos nicely here. You have my words that you can enjoy the higher quality and smaller sizeH.265 brought to us!

Read More:

Monday, January 26, 2015

Edit Nikon D750 MPEG-4/H.264 Footage in Avid Media Composer

How to import our Nikon D750 MPEG-4/H.264 footage to Avid Media Composer for smoothly editing? That’s the topic we are going to discuss in following article.

In this article you will learn the best method to import Nikon D750 H.264/MPEG-4 MOV files to Avid Media Composer and edit Nikon D750 files with Avid Media Composer native DNxHD codec. Have you ever met any issues such as ‘errors’ or conflict problems when editing your Nikon D750 footage in NLEs? As a Nikon theme article, here you can learn more details.


Brief introduction and reasons of Nikon D750 cannot be accepted by Avid Media Composer.
Nikon D750 is a hot DSLR on the market now, it has attracted great attention since it released, it is equipped with better hardware compared to the Nikon D600 and other cameras. While from Nikon D750 official website, we all know that the output footage H.264/MPEG-4 files  is good for playback, but if you need to edit Nikon D750 videos with editing programs like FCPiMovie, etc, you will find your videos can’t be edited smoothly. So in this article especially for Avid Media Composer, we know the DNxHD codec is the native one. 

What we need for converting Nikon D750 MPEG-4/H.264 mov to DNxHD mov for Avid Media Composer?
In order to help you import Nikon D750 footages and edit Nikon D750 video files with Avid Media Composer natively, we would like to highly introduce the best Nikon D750 converter for you: Pavtube HD Video Converter for Windows/Mac for you. this is the best HD video converter software on the market, it supports converting all the HD formats, like H.264 MOV, AVCHD, MTS, M2TS, AVI, MXF, M4V, MPG, MPEG, etc. the most important feature is that it supports many native codec for output.

Easy steps to convert Nikon D750 H.264/MPEG-4 files to Avid Media Composer:

Step 1.Free download Nikon D750 H.264 MOV converter from our product page, install this program on your Mac or Windows computer. Both Mac and Windows version are available to use. Then click the ‘Add video’ or ‘Add from folder’ buttons to load your original files.


Step 2. Choose output format. To edit Nikon D750 files with Avid Media Composer, please choose DNxHD codec for output. Come to the output list after hit the ‘Format’ bar, here we suggest you to drop the list and select the ‘Avid Media Composer’>>’DNxHD (*.mov)’ as the best one.


Step 3. (Optional) Beside the ‘Settings’ and ‘Edit’ on the main interface, here we would like to introduce you the button ‘Merge into one file’ on the left of the preview window. If you are confused of the batched video clips, it can help you join all the clips into one complete folder.


At the end, go back to the main interface to hit the big red button ‘Convert’ to start your conversion workflow of transcoding Nikon D750 MPEG-4/H.264 to DNxHD codec for Avid Media Composer. As soon as you get the output videos, just transfer them into Avid MC as usual. Is that still difficult for us to handle this job well?

More:

Thursday, January 22, 2015

Edit Canon XF100 MXF Files in Sony Movie Studio Platinum

Can’t import Canon XF100 MXF files to Sony Movie Studio Platinum smoothly? In the following page, just convert MXF to MPG with a professional MXF assistant you can work the job well.


Having Received a question form website like this:’ We’re a public access cable channel organization and editing videos for broadcast on our channels. Recently, our photographer has recorded the a heavy traffic accident with Canon XF100 Camera with MXF format but we can’t edit them in Sony Movie Studio Platinum due to the incompatible format. I had been using open source Handbrake, but it did some bad conversions. Form MXF to MPG for Sony Movie Studio, so I need some MXF transcoding tips!

Reasons for why can’t Canon MXF files be edited in Sony Movie Studio Platinum.

For editing in Sony Movie Studio Platinum, we have to know better about this program, do you agree? Searched online, we know that it is a consumer-based non-line editing software designed for the PC. It is a scaled-down version of Sony Vegas Pro and supports best video format as MPEG-2, MOV and WMV. So MTS, as the non-native format for Sony Movie Studio Platinum, we surely can’t make it possible in editing Canon MXF files. As the special HD video formats, MXF is not so compatible with other NLEs, such as Premiere ProFCP, etc.

Any good ways to solve the problem above?
With the Canon MXF Video Converter for Windows, you can be able to solve this problem in an easy and fast way. Also some necessary conversion information are offered below:

Firstly, Install and launch the Canon MXF Video Converter for Windows, and then click “Add Video” or ‘Add from folder’ button to import .MXF files. 


Secondly, Click “Format” bar and then move your pointer to “Adobe Premiere/Sony Vegas” and select “MPEG-2(*.mpg)” as the output format. Besides, you can also choose WMV (VC-1) (*.wmv) if you want to get a relatively smaller output file. Look at the picture below:


Then click the ‘Convert’ item to finish if you have the steps all done. Not? For those advanced users, more tips you can allow here:

1. Advanced Settings- If you would like to customize the video and audio parameters, you can click “settings”, adjust the parameters as you want, like Video Codec, aspect ratio, bit rate, frame rate, Audio codec, sampling rate, bit rate, channels.

2. Deinterlacing- Before start the conversion, click “Edit” button and you can deinterlace Canon MXF files for Movie Studio Platinum via checking off the “Deinterlacing” box in the Video Editor.


Editor's Recommendations

Tuesday, January 20, 2015

MXF to FCP X Flow: Convert Sony PMW-EX1R MXF to ProRes with 4 Audio Channels

Could you help me get rid of the trouble when I import Sony PMW-EX1R MXF files in FCP X with 4 audio channels? Luckily you may find answers below.


Similar issues you will meet when importing Sony PMW-EX1R MXF to FCP X:
‘I have footage shot on the Sony PMW-EX1R which usually is imported straight from the camera as .mxf files. Then I convert the .mxf to .mp4 and import that footage into FCPX. This time however I rushed when importing the footage, selected only the .mov codec to import, returned the camera, and now only have the videos in .mov format. The .mov footage plays fine on VLC but on QuickTime and once imported into FCPX is completely green and silent. Am I screwed?’

Changes of MXF footage when editing in NELs:
Frankly speaking, no matter what kind of camcorders you got the MXF recordings, you may be trapped in if you have some ideas of importing MXF videos to After Effects,iMovie/FCE, etc. So do you wanna some MXF transcoding Tips? Fortunately, today here, in order to get rid of the related troubles such as crashing errors or screen warnings, we are going to discuss the efficient solutions for you.

From MXF to ProRes MOV---Pavtube iMixMXF can do you a big favor.

If you are the first time to hear about this MXF to FCP X converter, let me introduce you some details to you. In a word, this MXF converting program is specially designed for transcoding MXF recordings to various formats for NELs or media devices. Surely FCP X is included. Besides, this one can help you convert MXF to ProRes codec with multi-track audios. Is that cool? It can indeed preserve the multiple tracks. No needs for multiple audios? Why not have the Pavtube MXF Converter for Mac to have a try? What’s more, cause it has the additional function of editing tools we usually call it with another name ‘Tiny Editor’. Any interests?

Guide to teach you how to convert MXF to ProRes MOV for editing in FCP X:
Step 1. Load your original files:
Launch the multi-track MXF to FCP X converter. When the main interface pops up in front of our eyesight, just click the ‘Add video’ or ‘Add from folder’ to let our files in nicely.


Step 2. Choose Apple ProRes 422 as output.
Tick the clips you want to do changes and press the ‘Format’ bar to get into the output list. Obviously we can find the item we need. ‘Final Cut Pro”>>’Apple ProRes Codec 422 (*.mov)’ as the best. Additionally, if you need to preserve the multi audio tracks, just select the ‘Multi-track Video’ on the output list, then the ‘Multi-track MOV(*.mov)’ could be your best choice I think. As the follows:


Step 3.Choose the audios you need in your output videos.
Next, on the main interface, let’s click the ‘Settings’ there to get into the ‘Audio settings’ column. Just tick the audio channels you want to preserve there. So cool for those advanced users, right?


At the end of this page, we would like to offer you’re the transferring guide on how to transfer files to FCP X for editing if you are the first time to work with FCP X. Hit the ‘Convert’ icon to make your conversion work start. Now, I don’t know if you have any other problems when editing your Sony PMW-EX1R MXF recordings? Just let us know as comments below.

Related guides:

Thursday, January 15, 2015

Easiest Way to Import H.265 to Windows Movie Maker

The following page aims to offer you a best H.265 encoder/decoder to help you out of the trouble in importing H.265 videos to Windows Movie Maker for editing. What are you waiting for?


Stopped when working with your H.265/HEVC videos? Don’t worry! This article is written for you to especially introduce you a best H.265 encoder/decoder to handle your H.265 movies well in editing software or media devices. In fact, this article has been divided into several parts, let’s read one by one below.

Part 1. Definition and Advantage of H.265/HEVC codec:
H.265 or High Efficiency Video Coding (HEVC) is a new video codec technology. It is a video compression standard that is the successor to H.264 or MPEG-4 AVC (Advanced Video Coding), one of the compression schemes used by Blu-ray. Compared to H.264 codec, H.265 has the biggest highlight: higher quality and smaller size

Part 2. H.265/HEVC has not accepted by most popular NELs and media devices
H.265/HEVC codec, as the latest codec released out not long ago in the video codec area. Most NELs such as Avid MCSony Vegas, etc have not yet offered the technology to decode the H.265 for editing. May be some third-party tools can help you in this way. For example: Cinemartin Cinec H.265 Exporter

Part 3. Pavtube Video Converter---Easiest way to import H.265 videos smoothly to Windows Movie Maker. 
Since we have no capacity to make the NELs or media devices accept the H.265 videos, why not do some changes with the H.265 codec itself? How about convert H.265 to WMV, which we know could be the suitable one for Windows Movie Maker? Do you wanna get closer to this H.265 encoder/decoder?

Part 4. Guide on how to convert H.265 to WMV for nice editing in Windows Movie Maker:
Step 1. When you download and install this H.265 encoder/decoder on PC, launch it and the main interface will pops up in front of your eyesight. Could you see the ‘File’ icon on the left corner? Just click it and you can choose the way to load your files.


Step 2.Select right output WMV for Windows Movie Maker. Next, follow my steps to get into the output list. In order to find the right item, of course you can tap it in the searching box or drop down the list, ‘HD Video>>’WMV HD (*.wmv)’ is offered for you.


Step 3. Optional function you should not miss. There are several attractive functional items you may be interested in for those advanced users. For example, the ‘Edit’ button, we could adjust out output videos with the favorite effect. Decide the video length, drop off the video edges? Do you all wanna a try?

Conversion: Finally, go back to the main interface to make your conversion start with the big red button ‘Convert’. Any suggestions or questions about your H.265 codec you can leave as comments below. So now, are you still worrying about importing H.265 recordings to Windows Movie Maker on PC? 

For others?

Monday, January 12, 2015

Without Video When Encoding MOV Files to Sony Vegas 13?

You got no video image when you planned to encode ProRes MOV files to Sony Vegas 13 for another dispose? Let’s find solutions here.

‘I got some files for a short movie I recorded to edit on Sony Vegas on my pc, the files are .mov files, Recorded by the DP with his black magic camera. I get home and it only imports audio into my Sony Vegas timeline. I don’t mean the video is black, I mean it does not import it at all, just the sound. I can play the file fine on both QuickTime and WMP with visual. What’s the matter with this job?’


Some similar questions like no audio from MTS to Adobe problems you must have met before if you a professional video editor, so what did you do with that issue? Surely it’s common that we may lose our video or audio when importing some incompatible videos, right? Though sometimes we have the same video format, we got the different codecs. For example, you should change your ProRes MOV to MPEG-2 MPG especially for Sony Vegas 13. Pavtube HD Video Converter for Mac/Windows is a good choice to encode your original MOV files to Sony Vegas 13 for a further dispose. At the same time, you will have no worries that you will miss the video files when to Sony Vegas.

Would you like to have a try? With a good reputation online, you may find this MOV to Sony Vegas converter has a easy operation and multiple output selections. Just download the item, there are two icons you can successfully put your files in, ‘Add video’ and ‘Add from folder’. Drop down the output list, have you found the ‘Adobe Premiere Pro>>Sony Vegas’>>’MPEG-2 (*.mpg)’? It is may be the most suitable one for you, also .wmv and .mov are available. 


How can I do with a batch of source files? Just go back to the main interface, on the left of the preview window, you can enjoy the function of ‘Merge into one file’ to combine mess of them into one single folder, it is so cool, right? 


Finally, hit the ‘Convert’ to start your conversion job on the main interface, you can smoothly get your files suitable output files for Sony Vegas 13 form MOV. If you also have another troubles in importing videos on NELs, you can leave some message below.

Related: