Summary: This article shows you how to convert Sony PMW-PZ1 XAVC to ProRes, MPEG-2, DNxHD especially for working with FCP, Premiere and Avid MC beautifully without a glitch.
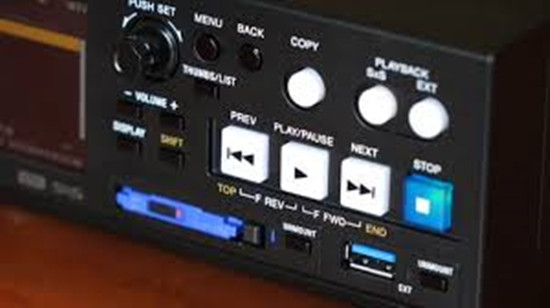 News-shooter was at Sony headquarters in New York as they introduced a new 4K playback deck for SxS memory cards, the PMW-PZ1, which will also copy cards to a USB-3 hard drive. The memory player has four 3G HDSDI outputs as well as an HDMI-2 4K output. Besides XAVC, it will handle a variety of formats (including HD) and will also take XQD and SD cards with adapters.XAVC as Sony newly released recording format brings a brand new technology innovation to the HD world which offers professional photographers extremely amazing shooting videos. But you may be disappointed when editing Sony PMW-PZ1 XAVC video clips in NLEs like FCP/Premiere/Avid Media Composer on Mac OS X El Capitan since they don’t support XAVC video format. You need convert Sony XAVC to FCP/Premiere/Avid MC especially compatible format first.Related: FCP supported video formats | Adobe Premiere Pro supported formats | Avid Supported Video FormatsPavtube HD Video Converter for Mac (review) provides an easy and effective way to convert Sony XAVC to ProRes/MPEG-2/DNxHD for FCP/Premiere/Avid MC editing and playback. With the inner decoder and recoder, this XAVC codec can be easily loaded and multiple presets are here for you to choose. Before conversion, you can also do some simple editing on your videos, like trim, crop, add subtitles, adjust aspect ratio, etc to make your very own videos for enjoyment.
 Other Download:- Pavtube old official address: http://www.pavtube.com/hd-video-converter-mac/- Amazon Store Download: http://www.amazon.com/Pavtube-Video-Converter-Mac-Download/dp/B00QI9GNZS- AppStore Download: https://itunes.apple.com/de/app/pavtube-hd-video-converter/id502792488?mt=12- Cnet Download: http://download.cnet.com/Pavtube-HD-Video-Converter/3000-2194_4-76177786.htmlHow to convert Sony PMW-PZ1 XAVC to FCP/Premiere/Avid MC?Step 1: Download and have a quick installation. The trial version will have a watermark on your converted files. Except for that, there are no time limitation, no virus, and no unnecessary bundle apps while downloading. After that, click “Add Video” button to load Sony PMW-PZ1 XAVC. You can load several files at once thanks to “Add from folder” button.
 Step 2: Here, you need to choose what you want the output to be. Click “Format” drop-down list, and then select “Final Cut Pro>>Apple ProRes 422 (*.mov)” as the best output format for editing in FCP.
 Tips: For editing Sony XAVC in Premiere, choose “Adobe Premiere/Sony Vegas>>MPEG-2 (*.mpg)”.
For editing Sony XAVC in Avid MC, choose “Avid Media Composer>>Avid DNxHD (*.mov)”.Step 3: Click “Settings” button to customize the output video and audio settings by yourself. But if you are not good at it, you’d better use the default parameters, they will ensure you a good balance between file size and image quality basically. You can change the resolution, bit rate, frame rate as you need.Step 4: When everything is done, you can take a preview by hitting “Play” button. If you are satisfied with the final result, you can click “Convert” button to finish the conversion work.Conclusion: When the conversion is done, you can click “Open” to get your generated files. Now, you can transfer Sony PMW-PZ1 XAVC to FCP, Premiere, Avid Media Composer without any hassles.Further Reading:
Summary: Want to edit AJA Cion 4K video in Avid Media Composer but it is very taxing on your Mac? In this case, you need to convert 4K video to DNxHD MOV for Avid instead. Learn how to.
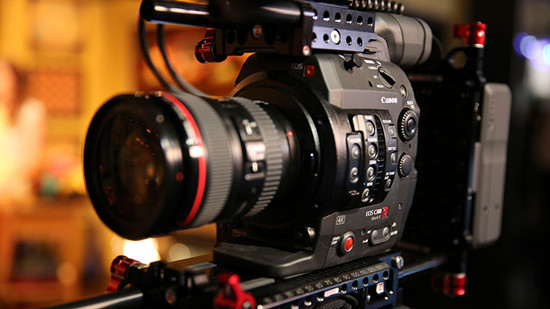
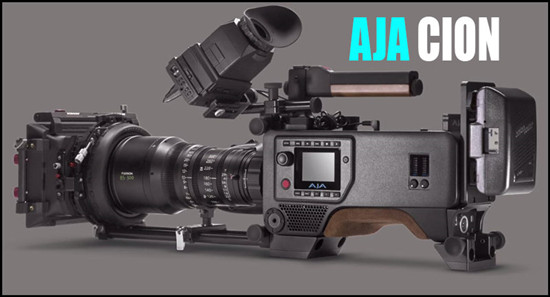 AJA’s CION is a new ergonomic professional production camera, capable of shooting at 4K/UltraHD and 2K/HD resolutions. “4K” has become the hottest word in the digital photography and video field in recent years. Lots of 4K products such as 4K camcorders, 4K TVs, 4K movies are springing up. However, format compatibility issue is quite common in the video world, which is also true to the stunning 4K.Although Avid Media Composer has already had 4K and “high-resolution” (i.e., higher-than-4K) support via Avid Media Access (AMA) in previous versions and now the 4K to Avid Media Composer workflow has been even improved in Media Composer 8. Whereas, there's actually no way to edit a 4K project natively with Avid. In most cases, editing 4K raw in Avid Media Composer is very taxing on your Mac. An ultimate solution we found would be to convert 4K video to DNxHD MOV for Avid Media Composer.Related: AJA Cion 4K video to Premiere Pro CC | AJA Cion 4K video to iMovie/FCEMain Supported Video Formats for Avid Media Composer:DNxHD: This is Avid’s baby. All kinds of DNxHD are supported natively via either of the import methods mentioned above.H.264: H.264 is the ubiquitous codec, and it looks like it will stay for quite some time. Avid Media Composer supports H.264 natively, via AMA as mentioned above.MPEG-4: Like H.264, Avid Media Composer supports MPEG-4 natively, via AMA as mentioned above. The Quicktime plug-ins are installed by default.All in all, to smoothly import AJA Cion 4K video to Avid Media Composer, you’d better to convert 4K video to Avid MC totally compatible formats as we searched above. To get the job well done, we need to use an all-in-one program-Pavtube HD Video Converter for Mac (review), applying which you are capable of converting AJA Cion 4K video to DNxHD MOV format, the compatible video format with Avid MC, with lossless quality at faster speed so that you can edit 4K videos in Avid without any problem. Besides, the program is developed with some useful editing features, including merging several clips into one for easy importing, downsizing the files for editing and storage, adding text/image/video to original files, adding subtitles, replacing original audio tracks, etc. Other Download:- Pavtube old official address: http://www.pavtube.com/hd-video-converter-mac/- Amazon Store Download: http://www.amazon.com/Pavtube-Video-Converter-Mac-Download/dp/B00QI9GNZS- AppStore Download: https://itunes.apple.com/de/app/pavtube-hd-video-converter/id502792488?mt=12- Cnet Download: http://download.cnet.com/Pavtube-HD-Video-Converter/3000-2194_4-76177786.htmlHow to convert AJA Cion 4K video to DNxHD MOV for Avid MC?Step 1: Download and have a quick installation. The trial version will have a watermark on your converted files. Except for that, there are no time limitation, no virus, and no unnecessary bundle apps while downloading. After that, click “Add Video” button to load AJA Cion 4K video. You can load several files at once thanks to “Add from folder” button.
 Step 2: Click the “Format” bar to get the drop-down menu and you can get “Avid Media Composer>>Avid DNxHD (*.mov)” as output format.
 Step 3: Click “Settings” button to customize the output video and audio settings by yourself. But if you are not good at it, you’d better use the default parameters, they will ensure you a good balance between file size and image quality basically. You can change the resolution, bit rate, frame rate as you need.Step 4: Click “Convert” button on the bottom of the screen to start AJA Cion 4K video to DNxHD MOV conversion process. The amount of time it takes will vary based on your system’s hardware and the quality settings you selected.Conclusion: When the conversion is done, you can click “Open” button to get the generated video files. Now, you can edit AJA Cion 4K video in Avid Media Composer freely.Further Reading:
Summary: As a consumer-based non-linear video editing software designed for the PC, Sony Movie Studio may be a good choice. This article aims to give you an easy solution to convert Canon C100 Mark II AVCHD MTS to Sony Movie Studio for further editing without hassles.
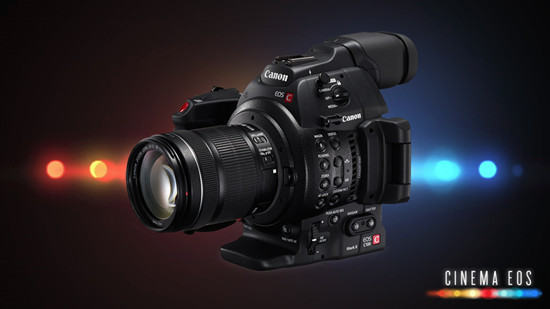 The Canon C100 Mark II Cinema EOS Camera with Dual Pixel CMOS AF is Canon's updated version of the C100 designed for event videographers, documentarians, and independent filmmakers. In addition to improved RGB video processing, the camera's dual codec capability supports simultaneous AVCHD and MP4 recording, including 59.94P capture along with slow and fast motion recording.However, due to different reasons, people sometimes may encounter incompatibility issues one or another while importing and editing Canon C100 Mark II footage in Sony Movie Studio. “Not long ago, I purchased the C100 Mark II camcorder. This device has helped me to record a lot of videos since I got it. Today I need to edit few of the videos in Sony Movie Studio, so I tried to import the footages into it, but it is disappointed to find that Sony Movie Studio can’t recognize the AVCHD MTS files recorded by C100 Mark II. It is said the video format is not supported.”As we know AVCHD MTS format is great for recording footage from the camera, but it can be a challenge for editing. To solve those problems, the quick workaround is to convert Canon C100 Mark II AVCHD MTS to Sony Movie Studio best accepted format. You can refer to detailed Sony Movie Studio supported formats below:Import: AAC, AA3, AIFF, AVI, BMP, CDA, FLAC, GIF, JPEG, MP3, MPEG-1, MPEG-2, MPEG-4, OGG, PCA, PNG, QuickTime, SND, SFA, W64, WAV, WDP, WMA, WMVExport: AAC, AIFF, AVC, AVI, BMP, FLAC, JPEG, LPEC, MP3, MPEG-2, MPEG-4, OGG, PCA, PNG, TIFF, QuickTime, W64, WAV, WDP, WMA, WMVTo achieve the goal, you can use Pavtube Video Converter, which can help you convert AVCHD MTS to Sony Movie Studio compatible video with original quality. Besides, this software can also convert MTS files for editing in FCP, iMovie/FCE, Avid Media Composer, Adobe Premiere, and etc. In addition, you can convert MTS files for playing on VLC, QuickTime and more.
 Other Download:- Pavtube old official address: http://www.pavtube.com/video_converter/- Amazon Download: http://download.cnet.com/Pavtube-Video-Converter/3000-2194_4-75734821.html- Cnet Download: http://download.cnet.com/Pavtube-Video-Converter/3000-2194_4-75734821.htmlHow to convert Canon C100 Mark II AVCHD MTS to Sony Movie Studio?Step 1: Download and install the program. Click “Add video” on the main interface to load AVCHD MTS videos to the program. You can also drag the files to the program’s window list directly. This program can also support the batch video clips.
 Step 2: Select the right formats for Sony Movie Studio. Here we suggest you to go to the “Adobe Premiere/Sony Vegas” list, you will get the “MPEG-2 (*.mpg)” as the best output.
 Step 3: By clicking the “Settings” button, you can adjust the output video/audio resolution, frame rate, bit rate, etc. to customize the output files to get the best quality you want.Step 4: At this point, you can change the output filename or output path if you wish. If you feel satisfied with your options, Just hit the “Convert” button to activate MTS file to Sony Movie Studio MPEG-2 conversion.Conclusion: This program is highly efficient because it’s boosted with CPU and GPU (30X faster). And a neat process bar will show the percentage and remaining time. When all conversions completed, you’ll get a pop-up notice. Just click “Open Folder”, you can fast find where your converted files are saved. Pavtube has summer sale provided for you. The expire date is Aug 7th. Go ahead and seize the chance!Further Reading:
Summary: If you want to import MXF to PowerDirector, just convert MXF to MPG so that you can edit Canon C300 Mark II MXF in PowerDirector smoothly. Keep reading and learn how to.
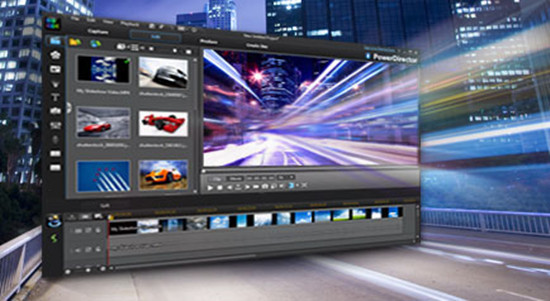 Hot search: C300 Mark II MXF to Avid MC | C300 Mark II MXF to iMovie | C300 Mark II MXF to FCP X | C300 Mark II MXF to Premiere ProCanon C300 Mark II is a hot camcorder on the market, since it released it has attracted great attention due to its excellent hardware equipment. It features a Super 35mm CMOS sensor, which will help you to record 4K, 1920*1080 60/50i, 23.98/25p True 24p videos. Besides Canon C300 Mark II uses Dual Pixel CMOS AF technology. This provides faster and more accurate autofocusing to assist users when operating with small crews. With C300 Mark II you can record high quality videos, it delivers the highest image quality with its XF Codec–the same codec used by other Canon XF professional camcorders.Canon C300 camcorder is shooting footage in MXF format- a file type not well supported by most popular professional video editing software, like Cyberlink PowerDirector. We’ve searched the supported file formats of PowerDirector 13/12/11/10/9/8, and we can easily find supported file formats of different versions. It’s clearly that MXF is not included in all the lists. So you must want to know how to edit Canon C300 Mark II MXF in PowerDirector to create your own masterpieces at this time, right?In this case, Pavtube MXF MultiMixer is what you need indeed. This Canon C300 MXF Converter is especially designed for MXF camcorders users, with which you can easily convert Canon C300 Mark II MXF to PowerDirector 13/12/11/10/9/8 editable format like MPEG-2 at super fast speed due to the advanced CUDA technology support. What’s more? This professional tool comes with powerful video edit function, like trimming, cropping, adding watermark, etc. Thus, you can do some simple edit first according to your need. The latest version can support H.265/HEVC encode/decode and encoding to M3U8, that’s may be the newest attractive point we would like to enjoy. Other Download:- Pavtube old official address: http://www.pavtube.com/mxf-multimixer/- Amazon Download: http://www.amazon.com/Pavtube-Studio-MXF-MultiMixer-Download/dp/B00QI35ELI- Cnet Download: http://download.cnet.com/Pavtube-MXF-MultiMixer/3000-2194_4-76171745.htmlHow to convert Canon C300 Mark II MXF to PowerDirector for editing?Step 1: Download and install the program. Click “Add video” button to load your original MXF files or directly drag the files into file list. By default, the files are selected. You can delete files which you don't want to import to.
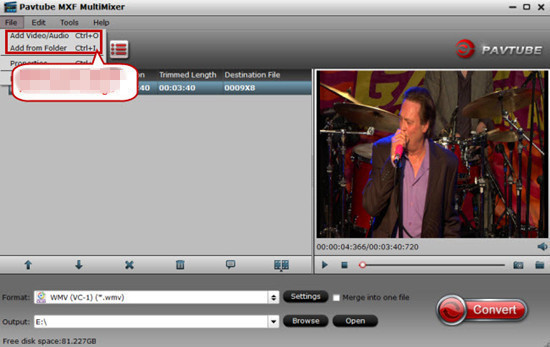 Step 2: Choose the output video format in the “Format” bar. There are all kinds of video formats, editing softwares and portable devices for your consideration. For converting C300 Mark II MXF to PowerDirector, you can choose “Common Video>>MPEG-2 Video (*.mpg)”.
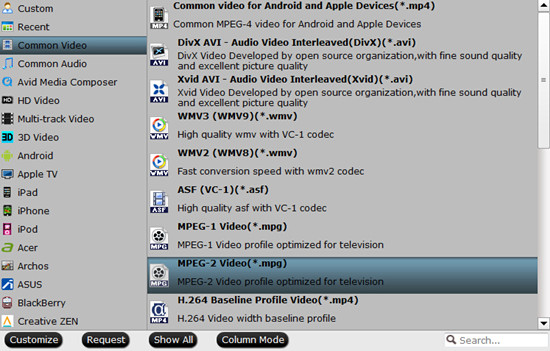 Step 3: Click “Settings” button to customize the output video and audio settings by yourself. But if you are not good at it, you’d better use the default parameters, they will ensure you a good balance between file size and image quality basically. You can change the resolution, bit rate, frame rate as you need.Step 4: Click the “Convert” button on the main interface if you have done all the preparation work. This is the workflow that we need to convert MXF to MPG.Conclusion: Once the conversion is finished, click “Open” to quickly find the converted files. Then, PowerDirector 13/12/11/10/9/8 will recognize, catalog, play and stream them just fine.
Read More:
Summary: Does Canon C300 Mark II recorded 4K MXF footages just go straight to Premiere Pro CS6/5/4/3? In this article, we’ll give you the tips how to import and edit C300 Mark II 4K MXF in Premiere Pro CS6/5/4/3 without problems.
 Hot search: C300 Mark II 4K MXF to Avid MC | C300 Mark II 4K MXF to iMovie | C300 Mark II 4K MXF to FCP XCanon C300 Mark II is a hot camcorder on the market, since it released it has attracted great attention due to its excellent hardware equipment. It features a Super 35mm CMOS sensor, which will help you to record 4K, 1920*1080 60/50i, 23.98/25p True 24p videos. With C300 Mark II you can record high quality videos, it delivers the highest image quality with its XF Codec–the same codec used by other Canon XF professional camcorders.Though Canon C300 Mark II camcorder can help you to record high quality 4K MXF footages, but usually it can make video editing a real nightmare. “I’ve got a ton of Canon C300 Mark II footage that I’m trying to import the C300 Mark II 4K MXF files to Premiere Pro CS4 for further editing. Since the files come out natively as MXF, Premiere Pro CS4 couldn’t recognize these files at all, let alone do the polishing work. What should I do?”If you are currently using an older version of the Adobe (for instance prior to Adobe version CS5), maybe an upgrade of the Adobe version could help. Still stuck with unsuccessful attempts? Perhaps there is some required codec missing or it is an incompatible video file format. Actually, it’s not so hard to do the trick. Why we always have trouble editing because Premiere Pro still cannot accept all codecs contained in an MXF file to go natively. From Adobe Premiere Pro supported file formats list, we can find Premiere supports MPEG-2. So here comes to the key problem.Now, the problem seems easier to be solved–a professional and powerful tool is the solution. Here we recommend Pavtube iMixMXF, applying which you are capable of converting C300 Mark II 4K MXF to MPEG-2 MPG format, the compatible video format with Premiere, with lossless quality at faster speed so that you can edit the footages in Premiere Pro CS6/5/4/3 without any problem. Besides, the program is developed with some useful editing features, including merging several clips into one for easy importing, downsizing the files for editing and storage, adding text/image/video to original files, adding subtitles, replacing original audio tracks, etc. Other Download: - Pavtube old official address: http://www.pavtube.com/imixmxf-mac/- Amazon Download: http://www.amazon.com/Pavtube-Studio-iMixMXF-Download/dp/B00QI7MY4Y- Cnet Download: http://download.cnet.com/Pavtube-iMixMXF/3000-2194_4-76171460.htmlHow to import Canon C300 Mark II 4K MXF to Premiere Pro CS6/5/4/3 for further editing?Step 1: Download and install the program from the website or click the free trial icon. Then, launch the best iMixMXF and load your original MXF files in with “Add video” or “Add from folder”. Directly drag files in is available.
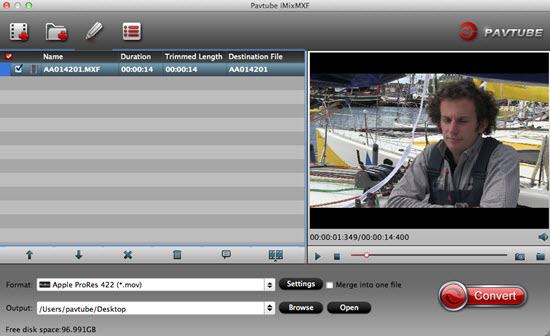 Step 2: Click the “Format” bar to get the drop-down menu and you can get “Adobe Premiere/Sony Vegas>>MPEG-2 (*.mpg)”.
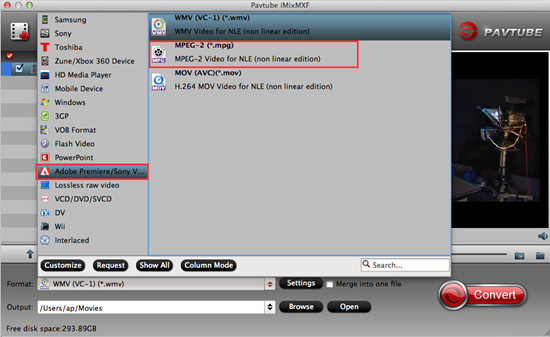 Step 3: Click “Settings” button to customize the output video and audio settings by yourself. But if you are not good at it, you’d better use the default parameters, they will ensure you a good balance between file size and image quality basically. You can change the resolution, bit rate, frame rate as you need.Step 4: Click the “Convert” button on the main interface if you have done all the preparation work. This is the workflow that we need to convert 4K MXF to MPEG-2 .mpg.Conclusion: OK, everything is ready, you can get the generated files by clicking “Open” button and instantly edit Canon C300 Mark II 4K MXF files in Premiere Pro CS6/5/4/3.
Read More:
Summary: When you have recorded videos using your GoPro Hero camera and found the videos can’t be played properly on your Mac, for example video is slow, most likely your computer is not able to process the data of the large HD video files fast enough. Check out these workarounds and troubleshooting tips below.
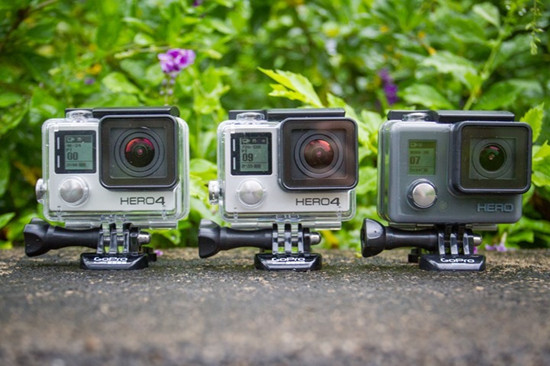 Hot search: GoPro Hero 4K video to DropBox | GoPro Hero 4K video to Sony Movie Studio | GoPro Hero 4K video to VimeoWe know that GoPro Hero cameras can capture professional-quality videos, for example Hero3 White can capture 1080p 30fps video, Hero3+ Silver can capture gorgeous 1080p 60fps video, Hero4 can take time lapse videos with high data rates, Hero4 Black can shoot incredible high-resolution 4K 30fps and 2.7K 60fps video and the high frame rate 1080p 120fps video.“I got a question about the videos of my GoPro Hero 4 Black. When I try to play the 4K videos on my Macbook Pro they are slow and ‘break’, they don't play smooth like an 1080p video would play. I don't have a 4K display, is that the reason? I have a Macbook Pro 15", 2 Ghz Intel Core i7, 16 GB Ram, 250GB SSD, OSX Mavericks, Intel HD Graphics 3000 512 MB + AMD Radeon HD 6490M 256MB.”As we know, the majority of playback, editing work is still being finished in 1080p. In most cases, we still need to downscale most of the 4K video files to 1080p. In fact, you may not see any real differences if you're not doing much to the footage. One of the huge benefits to 4K, that you can do a lot to the image and retain detail for a beautiful 1080p finish. For those who wanna play and edit 4K GoPro Hero4 videos on old computer (playing a 4K video requires more computing power and it could be more time consuming), we suggest you to convert all GoPro Hero 4K videos to 1080p then play in 1080p and smart-render.Although there are numbered tools and utilities can convert and compress the ultra HD videos, few of them can process at a fast speed. Well, Pavtube Video Converter for Mac is considered to be the best 4K to 1080p converter. It is surely in the support of compressing GoPro Hero4 4K videos to 1080p faultlessly. For Windows users, Pavtube Video Converter is the alternative choice. Other Download:- Pavtube old official address: http://www.pavtube.com/video-converter-mac/- Amazon Store Download: http://www.amazon.com/Pavtube-Video-Converter-Mac-Download/dp/B00QIBK0TQ- Cnet Download: http://download.cnet.com/Pavtube-Video-Converter/3000-2194_4-76179460.htmlHow to play GoPro Hero 4K videos smoothly on Mac?Step 1: Download and have a quick installation. The trial version will have a watermark on your converted files. Except for that, there are no time limitation, no virus, and no unnecessary bundle apps while downloading. After that, click “Add Video” button to load your GoPro Hero 4K videos. You can load several files at once thanks to “Add from folder” button.
 Step 2: Click the “Format” drop down list to select output format. If you want to play GoPro Hero 4K videos on decent media player, you’d better set a preset profile that best meets your needs. For instance, if you want to play GoPro Hero 4K videos on VLC smoothly, “HD Video>>H.264 HD Video (*.mp4)” would be the best choice.
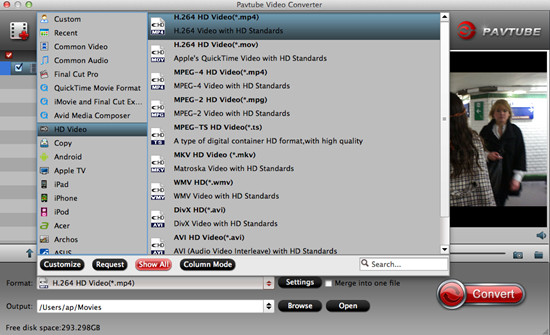 Step 3: Click “Settings” button; you can adjust video and audio settings, including codec, aspect ratio, bit rate, frame rate, sample rate, and audio channel. To down-convert ultra HD 4K to 1080p, do remember adjusting video size to 1920*1080. That is the exact 1080p.Step 4: After all the settings, you can preview the final result of movie. If you are happy with the effect, you can then press the big “Convert” button on the lower right to launch the conversion.Conclusion: Wait a moment, and then the conversion will be done flawlessly. After conversion, click “Open Folder” button to locate the converted video files. It would be easier for you to playback GoPro Hero 4K videos smoothly on Mac.Further Reading:
Summary: This article will talk about the SJCAM SJ4000 H.264 MOV to FCP importing issues and give the best solution. If you get a painful experience to edit SJ4000 H.264 MOV in FCP, get an easy way to fix this issue now.

Hot search: MOV to DaVinci Resolve | AVCHD MP4 to HD MOV | Nikon 1 V3 MOV To FCP | Nikon D7200 H.264 MOV to iMovie | DNxHD MOV to Avid Media Composer
At first glance, the SJCAM SJ4000 Action camera resembles the look and feel similar to a GoPro camera. Many available action cameras on the market have taken a cue in design and form from GoPro cameras and this camera is no different. In fact, many of the GoPro accessories and attachments work with this camera.
The camera has very good picture quality during the day and average picture quality at night. Some owners complain of a bluish tinge in the videos but this does not effect every camera. The SJ4000 records 1080p at 30f/s with an average bit rate of approximately 15,000kpbs.
Video
*Max Resolution1080p 30fps
*Max Bitrate (Mbps): 15
*Video Format : MOV
*Compression : H.264
*Diagonal Viewing Angle: 170°
Well, SJCAM Original SJ4000 recordings are in H.264 codec MOV format. It’s ideal for video recording but not ideal for editing in FCP. We all know that Final Cut Pro can natively deal with MOV files, but the MOV is compressed with Apple ProRes (all versions), H.264 codec is not friendly to FCP, so FCP cannot open the SJCAM SJ4000 MOV files. For those incompatible H.264 MOV files, we’ll need to convert SJ4000 H.264 MOV to FCP compatible Apple ProRes MOV format.
The program Pavtube HD Video Converter for Mac (review) will get you out of trouble. It is good at encoding camera shootings in different formats (H.264 MOV, MTS/M2TS, MXF, etc.) to video editing software compatible file types, i.e. ProRes for FCP, AIC for iMoive, MPEG-2 for Premiere and DNxHD for Avid Media Composer, making the experience of importing and editing SJCAM SJ4000 files in Final Cut Pro as fast and seamless as possible.
Other Download:
- Pavtube old official address: http://www.pavtube.com/hd-video-converter-mac/
- Amazon Store Download: http://www.amazon.com/Pavtube-Video-Converter-Mac-Download/dp/B00QI9GNZS
- AppStore Download: https://itunes.apple.com/de/app/pavtube-hd-video-converter/id502792488?mt=12
- Cnet Download: http://download.cnet.com/Pavtube-HD-Video-Converter/3000-2194_4-76177786.html
How to edit SJCAM SJ4000 H.264 MOV in FCP?
Step 1: Download and have a quick installation. The trial version will have a watermark on your converted files. Except for that, there are no time limitation, no virus, and no unnecessary bundle apps while downloading. After that, click "Add Video" button to load your SJ4000 H.264 MOV files. You can load several files at once thanks to "Add from folder" button.
Step 2: Click the "Format" bar to get the drop-down menu and you can get "Final Cut Pro". Choose "Apple ProRes 422 (*.mov)" as output format.
Step 3: Click "Settings" button to customize the output video and audio settings by yourself. But if you are not good at it, you’d better use the default parameters, they will ensure you a good balance between file size and image quality basically. You can change the resolution, bit rate, frame rate as you need.
Step 4: Click "Convert" button on the bottom of the screen to start SJ4000 H.264 MOV to ProRes 422 MOV conversion process. The amount of time it takes will vary based on your system’s hardware and the quality settings you selected.
Conclusion: When the conversion is done, you can click "Open" button to get the generated video files. Now, you can edit SJCAM SJ4000 H.264 MOV in FCP freely.
Read Related Articles: