Monday, November 23, 2015

Money-Saving Tips for Black Friday and Cyber Monday: 30% OFF MXF MultiMixer(Windows) / iMixMXF(Mac)

Only once a year, Pavtube offer 30% off on MXF MultiMixer / iMixMXF in the Black Friday & Cyber Monday Promotion.

Are you ready for a crazy online shopping after Thanksgiving Coupons in the next few days on Black Friday and Cyber Monday? If so, and you just have been in need to find a professional software to handle your MAXF video in the earlier days-you’ve come to the right place!


Pavtube Studio preparing a 30% OFF MXF MultiMixer / iMixMXF on the Black Friday and Cyber Monday, and the promotion lasts for a week. Pavtube MXF MultiMixer/ iMixMXF is a professional MXF video converter to achieve everything users need to watch and process MXF videos. Users can turn MXF videos into virtually any formats for multiple purpose, mix multiple audio tracks/channels MXF into one, transcode MXF to Mac editing programs for free and professional editing, convert MXF to multi-track MKV/MP4/MOV, output multi-track Apple ProRes MOV for Final Cut Pro (X), and edit MXF videos.

This top MXF MultiMixer Software original price is $45. Now only needs $31.5. You won’t get a Multi-track MXF Software at such low price in normal days. So if you have a plan to purchase a MXF MultiMixer in the next few days , why not push the schedule forward and get it in Pavtube Black Friday & Cyber Monday Promotion activity.

By the way, please distinguishing the Windows or Mac versions and get the right one from the button below:


Related Articles:

Thursday, November 19, 2015

Import Sony A68 4K XAVC S to After Effects CC for Editing

Summary: Don’t worry if you are trapped in converting XAVC S footage to MPEG-2 for After Effects CC editing from Sony Alpha 68. The following article can offer you the best solution.

If you like to edit your home movies with Adobe After Effects, then you will have some problems when trying to import Sony A68 XAVC S to After Effects since XAVC S(*.mp4) video files are not supported by After Effects(CS4/CS5/CS6/CC). To get these Sony A68 XAVC S videos accepted by After Effects, you’ll have to convert Sony A68 XAVC S to After Effects friendly video format like MPEG-2 with a video conversion tool.

Hot SearchSony A7S MP4 for FCP | Sony XDCAM to Social Networking Sites | Sony RX10 II 4K to FCP

Here Pavtube HD Video Converter for Mac is highly recommended as the best XAVC S file converter to transcode Sony A68 XAVC S files to After Effects compatible videos like MPEG-2 with ultra-fast conversion speed and lossless video quality. Besides XAVC S, this video converter program can also help to convert between any popular video and audio formats as you need. Plus, with the built-in video editing feature of the program, you can trim, crop, add watermark and more to your video files. Download it now and follow the steps to convert your XAVC S videos to After Effects for editing.


Other Download:


How to import XAVC S to After Effects CC for free editing?

Step 1. Import XAVC S files

Click “File” to add XAVC S video files into this ripping tool for After Effects CC as well as other editing systems like Adobe Premiere, Avid Media Composer, etc.


Step 2. Choose After Effects CC native format - MPEG-2

Since we have known the best format for After Effects CC, just go to the output format list where you need to follow “Adobe Premiere/Sony Ve…”> “MPEG-2 (*.mpg).”


Step 3. Edit XAVC S files (Optional)

As a video converter and video editor, you’ll find this converting tool can be helpful in both conversion and editing. Why do you need the built-in video editor? Above all, you can cut and get the video clips you want from a large size video file, which saves the conversion time tremendously. And you can edit the video files by using other functions like cropping, adding watermarks, affix special effects, etc.


Step 4. Convert video files to After Effects CC

Click on the “Convert” button which is red in bottom right screen to start transcoding XAVC S files to MPEG-2 - the perfect format for After Effects CC to import and edit.

Related program

Pavtube MXF Converter / Mac Version: can handle MXF/MXF footage produced by Canon, Sony and Panasonic camcorders and convert MXF video files to various video format supported by popular devices such as iPad Air/4/3, iPhone 5S/5C/5/4S/4, Apple TV 3, Google Nexus, Samsung Galaxy Tab S/3/2, Samsung Galaxy S5/S4/S3, Surface RT/Pro, PS4/PS3, WDTV, etc.

Pavtube MTS/M2TS Converter / Mac Version:The best MTS converter on the market, which can convert MTS videos and other HD formats to FCP X Apple ProRes codec MOV format, or convert MTS to Avid Media Composer/Adobe Premiere Pro/iMovie native supported video format.

Pavtube Media Magician / Mac Version: A nice camcorder assistant manager, lossless camcorder video joiner, MTS/ M2TS/ MXF/ MOV/ MKV/ TiVo/ WMV/ AVI/ MPG converter and editor. Meamwhile it supported upload edited video to YouTube directly.

Read More:

Tuesday, November 17, 2015

Canon XA35 Full HD AVHCD/MP4 in DaVinci Resolve

Summary: Here is my experience with load AVCHD mp4 clips from Cannon XA30/XA35 to DaVinci Resolve on Mac OS X El Captian, if you also have the AVCHD mp4 to DaVinci Resolve importing issues, just follow this article to solve.

I am an advisor in HR, and my hobby is shooting videos about business, for training sessions and presentations, also for home videos. I like editing the recordings with Edius Pro 7.2 and Blackmagic Davinci Resolve. This time I needed to convert my files from Cannon XA30/XA35 camcorder into Avid DNxHD F for importing into Davinci Resolve.

As AVCHD format not an ideal video format for editing softwares to support owing to its special codec, so I have to convert the AVCHD .mp4 files from Cannon XA30/XA35 into best editing codec for Davinci Resolve. 

Hot SearchAVCHD to QuickTime | AVCHD  in Premiere | iPhone 6S/6S Plus 4K Video to Resolve

To accomplish the task to convert Cannon XA30/XA35 AVCHD .mp4 to Davinci Resolve editable Avid DNxHD mov format, Pavtube HD Video Converter for Mac (read the review) is one good solution. This is the converter I use. Easy to use, speed, stability, very good workflow. This article will guide you through how to transcode Cannon XA30/XA35 AVCHD footage to best format for editing in DaVinci Resolve without problems. If you are a Windows user, then Pavtube HD Video Converter is your best choice.


Other Download:

Guide: Convert Cannon XA30/XA35 AVCHD .mp4 clips to DNxHD MOV for DaVinci Resolve

Step 1. Download the best MTS/M2TS Converter for Mac.

Install and run best AVCHD .mp4 to DNxHD Converter, and directly drag and drop Cannon XA30/XA35 AVCHD .mp4 videos.


Step 2. Select output video format compatible with DaVinci Resolve.

Click the drop-down list in the Format line to get the format box. And choose Avid Media Composer -> Avid DNxHD for DaVinci Resolve importing.


Step 3. Adjust the output video's parameters as you want.

Click the Setting button after the Format to get the Profile Settings. Change the Size to 1920*1080, the and set frame rate as 30fps.


Step 4. Convert Cannon XA30/XA35 AVCHD .mp4 to DaVinci Resolve for editing on Mac OS X.

Click the "Convert" button to start converting Cannon XA30/XA35 AVCHD .mp4 to DNxHD MOV on Mac for DaVinci Resolve. When the conversion finished, you can edit Cannon XA30/XA35 AVCHD video in DaVinci Resolve smoothly.

Related program

Pavtube MXF Converter / Mac Version: can handle MXF/MXF footage produced by Canon, Sony and Panasonic camcorders and convert MXF video files to various video format supported by popular devices such as iPad Air/4/3, iPhone 5S/5C/5/4S/4, Apple TV 3, Google Nexus, Samsung Galaxy Tab S/3/2, Samsung Galaxy S5/S4/S3, Surface RT/Pro, PS4/PS3, WDTV, etc.

Pavtube MTS/M2TS Converter / Mac Version:The best MTS converter on the market, which can convert MTS videos and other HD formats to FCP X Apple ProRes codec MOV format, or convert MTS to Avid Media Composer/Adobe Premiere Pro/iMovie native supported video format.

Pavtube Media Magician / Mac Version: A nice camcorder assistant manager, lossless camcorder video joiner, MTS/ M2TS/ MXF/ MOV/ MKV/ TiVo/ WMV/ AVI/ MPG converter and editor. Meamwhile it supported upload edited video to YouTube directly.

Read More:

Thursday, November 12, 2015

Red One 4K videos to iMovie 13/12/11/10/9/8

Summary: This article is about how to convert Red One camcorder recorded 4K RAW files to iMovie Apple ProRes codec MOV format, and then enable you to edit Red One 4K RAW videos with iMovie in Apple ProRes 422 or Apple ProRes 4444 codec on Mac El Capitan.

I have video from a RED ONE that was shot in 4.5k. I want to edit it in iMovie 13/12/11/10/9/8. How do I properly convert this footage to edit in iMovie so I can revert it back to 4k for coloring in post and not lose resolution in the process. Can anyone give me advice on what will effectively edit 4K (like processor wise and memory wise and graphics card wise., etc?) Maybe the current iMac will do it. I'm not sure. Maybe a low level version of the new Mac Pro will do it, I'm not sure. I'm an artist, not a technician.

Before solved the problem, I would give some information about Red One, and why you guys cannot handle the original 4k video in iMovie. 

Two generation Red One

The first Red Ones were outfitted with the 12 megapixel Mysterium sensor, capable of capturing up to 120 frames per second at 2K resolution and 30 frames per second at 4K resolution

The second generation, Red One Mysterium-X has a 14 megapixel Mysterium-X sensor. It captures up to 120 frames per second at 2K resolution and up to 30 frames per second at 4K resolution. With the upgraded sensor, the Red One Mysterium-X offers more dynamic range, higher sensitivity and enhanced color management tools than the Red One Mysterium.

Why you guys cannot handle the original 4k video in iMovie

There are many, many flavors of 4K files, and more to come. RED camera for example can be setup to shoot uncompressed RAW 4K, 3X compression, 5X compression, 8X compression, and 10X compression.

With an iMac, or even with the new Mac Pro, to handle 4K workflows effectively, you would have to add-on a Thunderbolt expansion chassis with a RED Rocket card or RED Rocket X card, at least one or two powerful graphics cards such a the GTX 680 Mac Edition, and a beefy Thunderbolt RAID like a Promise Pegasus 6-drive model. All the costs over $18800 totally.

That is to say, there is unfortunately no way you will be able to edit native 4K files at any of the higher quality, lower compression rates. The only alternative on a Mac would be to transcode to a lighter codec, such as Pro Res. Well...yes, if you convert to ProRes and scale to 2K for editing. 

Solution Here

The best solution to edit 4K video on Mac with iMovie is to convert Red One 4K RAW files to Apple ProRes codec.Pavtube Video Converter for Mac may help you a lot on this convert part, this is the top 4K video converter on the market, it can convert any 4K videos recorded by Red One camcorder or other Red 4K camcorders, Sony 4K camcordersPanasonic 4K camcordersCanon 4K camcordersJVC 4K camcorders, etc. Why need to convert 4K video on Mac to Apple ProRes codec? Because Apple ProRes codec is the native supported video codec of iMovie, once you convert 4K video on Mac to Apple ProRes 422 or Apple ProRes 4444 codec for iMovie, you will be able to edit Red One 4K videos with Final Cut Pro X smoothly. Now please download the the 4K video converter and follow the steps below to convert Red One 4K RAW files to iMovie Apple ProRes. If you are a windows user, please click to get thePavtube Video Converter(Windows Version).

Related program: 
Pavtube HD Video Converter for Mac: It is designed for converting HD videos from HD camcorders or DVs (like JVC, Panasonic, Sony and Cannon), non-protected HD or movies, DVR files (*.tivo) to other file types for playback on popular media devices like Apple TV, PS3, Xobx, Xobx360, WD TV HD Player.

Pavtube iMedia Converter for Mac: An all-inclusive converter to complete 2D/3D Blu-ray, DVD, ISO, SD/HD/4K Video to m3u8, H.265 MP4, do H.265 to non-H.265 conversion on Mac OS X El Capitan.


Other Download:
- Pavtube old official address: http://www.pavtube.com/video_converter/
- Amazon Download: http://download.cnet.com/Pavtube-Video-Converter/3000-2194_4-75734821.html
- Cnet Download: http://download.cnet.com/Pavtube-Video-Converter/3000-2194_4-75734821.html


Other Download:
- Pavtube old official address: http://www.pavtube.com/video-converter-mac/
- Amazon Store Download: http://www.amazon.com/Pavtube-Video-Converter-Mac-Download/dp/B00QIBK0TQ
- Cnet Download: http://download.cnet.com/Pavtube-Video-Converter/3000-2194_4-76179460.html

How to Downscale the 4K Red One RAW Video to Apple ProRes 422 for Editing in iMovie 

Step 1: Add Red One camcorder recorded 4K RAW files.

Launch the program on your computer, add Red One camcorder recorded 4K RAW files to the program by clicking the "Add Video" or "Add folder" button.


Step 2: Choose output file format.

From "Format" drop-down option, choose the output format according to your own preference, for iMovie editing, choose "Final Cut Pro" >"Apple Prores 422(*.mov)" to output.


Tips:
1.When converting video to Final Cut Pro oriented format templates(e.g. Apple Prores), please ensure that your computer has Final Cut Pro installed, otherwise the converted files will have audio only without image.
2.If you are using iMovie, please make sure you have installed ProApps QuickTime Codecs, or you may get files with sound only without video.

Step 3: Customize output video and audio settings.

Open "Profile Settings" window to adjust output video and audio parameter settings according to your own preference. For smooth workflow of Red One camcorder recorded 4K RAW files with NLE programs, you are recommended to downscale 4K video to 1080p from "Size(pix)" drop-down selection.


Step 4: Start the conversion process.

After all the setting is over, go back to the main interface and hit right-bottom "Convert" button to start Red One camcorder recorded 4K RAW files to iMovie conversion process.

When the conversion is completed, following the guides below to import Red One camcorder recorded 4K RAW files to iMovie individually.

Read More:
g

Tuesday, November 10, 2015

Panasonic Lumix DMC-GH4R 4K MOV in FCP X/7/6

Question: Panasonic Lumix DMC-GH4R editing workflow in FCP X 

If anyone has had any experience editing Panasonic Lumix DMC-GH4R 4K MOV format in Final Cut Pro X, I would be pleased to learn of their experience and the specs of the computer they are using. I am hopeful that editing 4K MOV footage on the new Mac Pro will be possible without the large file sizes produced by transcoding. Thanks in advance for responding. 

Final Cut Pro is a good tool to edit videos on Mac, however, for the new users, it is a big problem to loading 4K MOV files from Panasonic Lumix DMC-GH4R in FCP (including FCP 7 and FCP X), they will get some trouble for the video clips, or rather the 4K MOV clips, are not supported by FCP, such files will not be shown when importing.

Thus the post editing work would be troublesome, but I don't think it will be a problem that matters a lot. Actually, if you are just worrying about how to edit Panasonic Lumix DMC-GH4R 4K MOV videos in FCP, don't be panic now! Here, I will tell you in details on importing Panasonic Lumix DMC-GH4R to FCP to edit smoothly.

As FCP are not workable with Panasonic Lumix DMC-GH4R 4K MOV files natively, if you want to load Panasonic Lumix DMC-GH4R 4K MOV to FCP (including FCP 7 and FCP X), first you need to convert 4K MOV to FCP friendly codec like Apple Prores. of course, losslessly. To do so, you need a professional Pavtube Video Converter to help.

Hot SearchH.264 MP4 Footage into Final Cut Pro | AVCHD M2TS to FCP | XC 10 4K/1080p MXF to Premiere Pro

Here I'd like to recommend an excellent HD Video Converter for Mac from Pavtube, which is a great Panasonic Lumix DMC-GH4R 4K MOV Converter for Mac. It can convert Panasonic Lumix DMC-GH4R4K MOV videos to Apple ProRes codec which is intermediate format that features high performance and quality, being less processor-intensive to work with on Mac OS X.


Other Download:
- Pavtube old official address: http://www.pavtube.com/hd-video-converter-mac/
- Amazon Store Download: http://www.amazon.com/Pavtube-Video-Converter-Mac-Download/dp/B00QI9GNZS
- AppStore Download: https://itunes.apple.com/de/app/pavtube-hd-video-converter/id502792488?mt=12
- Cnet Download: http://download.cnet.com/Pavtube-HD-Video-Converter/3000-2194_4-76177786.html

How to load Panasonic Lumix DMC-GH4R 4K MOV videos to FCP 7/X?

Step 1: click top left icons to load your 4K MOV to Prores Converter for Mac. You can load individual videos from Panasonic Lumix DMC-GH4R by clicking "add videos", or load the entire folder by clicking ‘add from folder'.


Step 2: Choose Apple ProRes 422 codec for Final Cut Pro 7/X.

Click the "Profile" option, and move mouse cursor to Final Cut Pro > Apple ProRes 422 HQ (*.mov) as output format.


Tip:

To keep original video quality for editing in FCP, select “Apple ProRes 422”;
For SD levels – 480i/p and 576i/p and offline workflows, select “Apple ProRes 422 (Proxy)”;
To edit and finish 4:4:4 material, choose “Apple ProRes 4444″.

Learn more Apple ProRes, please refer to Types of Apple ProRes Codecs

To get 1080 videos, we need to click the "Settings" button and choose 1920*1080 as output video resolution.

Step 3: Convert Panasonic Lumix DMC-GH4R4K MOV video files for FCP.

Click the read button Convert to start transcoding Panasonic Lumix DMC-GH4R4K MOV video files to MOV for FCP 7/X. When the conversion is completed, click "Open" button to locate the converted Apple ProRes 422 MOV files for editing with Final Cut Pro.

Pavtube Video Converter for Mac: An all-in-one program integrating conversion and editing 4K videos, 1080p/720p MKV, MXF, M2TS, etc. on Mac OS X El Capitan.

Pavtube iMedia Converter for Mac: An all-inclusive converter to complete 2D/3D Blu-ray, DVD, ISO, SD/HD/4K Video to m3u8, H.265 MP4, do H.265 to non-H.265 conversion on Mac OS X El Capitan.

Read More:

Thursday, November 5, 2015

How do I Stream Sony RX1R 2 4K Video to an AppleTV Compatible M4V Format?

Summary: May be you have just recorded video by the latest full-frame mirrorless camera, the 42.4-megapixel RX1R II but have no idea about streaming the video to Apple TV for watching. Here is the best solution for you.

With the RX1R II, Sony continues to roll out 14-bit uncompressed raw capabilities to it. You really can record videos with professional Sony RX1R II in highest quality. However, lots of the people encounter the problem like below:

I have record many clips of my kids and party with my friend and prepare to stream this videos to Apple TV, but I failed to import some of the record source of Sony RX1R II, some are succeed. Any one can give some other useful solution? By the way, my Mac system is OS X El Capitan. Thx.

In fact, Sony RX1R II Record video in two different format MP4 and XAVC S, the video in MP4 parts can be smoothly stream to Apple TV, but video in XAVC S parts was cannot. The XAVC S recorded video was in LPCM 2ch codec, and Apple TV can not supported till now. Here show the detail recording format of Sony RX1R II in the table below.


Recording Format


[Still Image]: JPEG (DCF Ver.2.0, Exif Ver. 2.3, MPF Baseline compliant), RAW (Sony ARW 2.3 format),
[Movie]: XAVC S, AVCHD format Ver. 2.0 compatible, MP4


Recording Format (Movie Audio)


XAVC S: LPCM 2ch / AVCHD: Dolby Digital (AC-3) 2ch (Dolby Digital Stereo Creator) /
MP4: MPEG-4 AAC-LC 2ch

Also you can click to get Convenience Features (details) of Sony RX1R II.

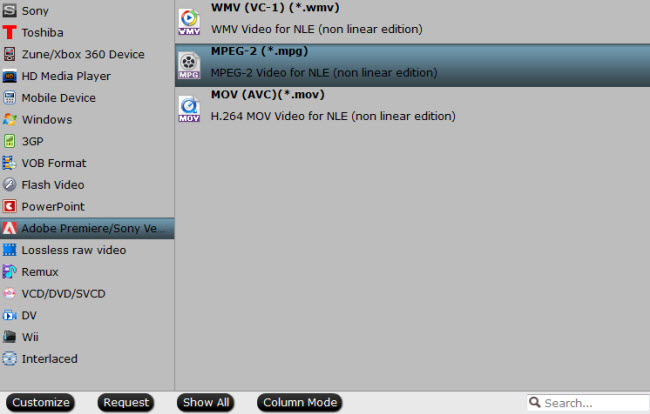
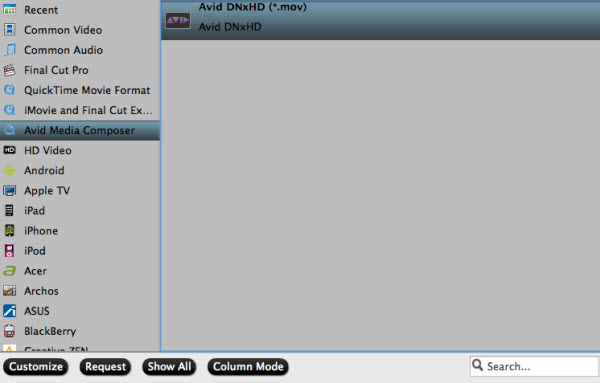
In order to solve the can’t stream issue, you’d better transcode the XAVC S format into other Apple TV supported format for watching. Here is a powerful software can transcode XAVC S to the m4v format which Apple TV can support perfectly for you. Pavtube HD Video Converter for Mac is just the tool you are looking for. This program can not only help you stream XAVC S files recorded from Sony RX1R II into Apple TV, but also many other format video recorded video by other devices. For example, the iPhone 4k videos or Samsung H.265 videos. Meantime, Pavtube HD Video Converter(Review) also supported output NEL editor(iMovieAdobe PremiereAvid Media Composer included) format, there you can choose more than 70 output formats for any other purposes. If you are a Windows user, Pavtube HD Video Converter also available.


Other Download:
- Pavtube old official address: http://www.pavtube.com/hd-video-converter-mac/
- Amazon Store Download: http://www.amazon.com/Pavtube-Video-Converter-Mac-Download/dp/B00QI9GNZS
- AppStore Download: https://itunes.apple.com/de/app/pavtube-hd-video-converter/id502792488?mt=12
- Cnet Download: http://download.cnet.com/Pavtube-HD-Video-Converter/3000-2194_4-76177786.html

How do I Stream Sony RX1R 2 4K Video to an AppleTV Compatible M4V Format? 

Step 1: Transfer Sony RX1R II Record XAVC S files to Mac computer.

You can fit the Micro SD card recorded with your Sony RX100 IV XAVC S video footage into a Micro SD adaptor and then plug it into the SD media slot on your Mac computer for transferring media files to your Mac local drive.

Step 2: Add source video footage files to the program.

Launch the application on your Mac computer, click the "Add Video" or "Add from folder" button to import Sony RX1R II source files to the program.


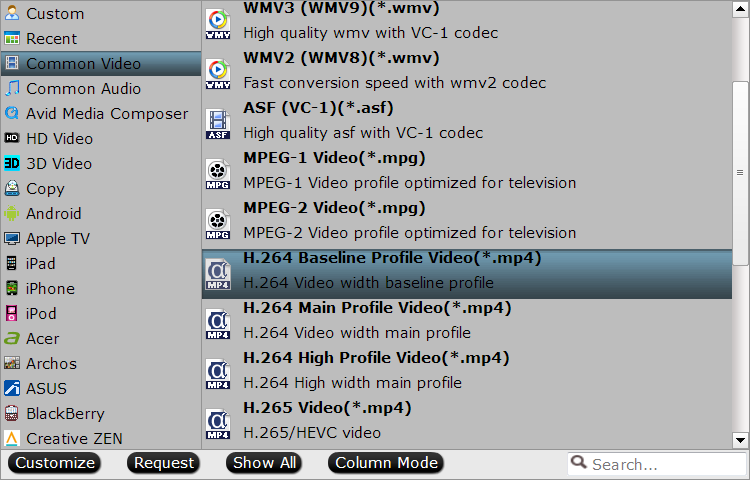
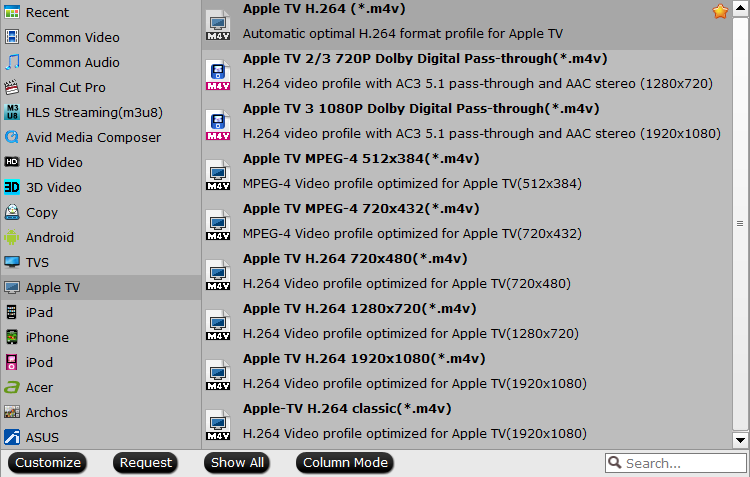
Step 3: Choose output file format.

Click "Format" bar and from its drop-down list, choose "Apple TV" > "Apple TV H.264 (*.m4v)" as the final output format for watching on Apple TV.


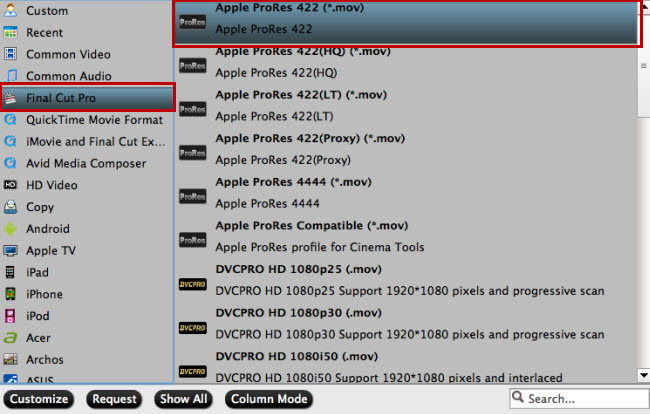
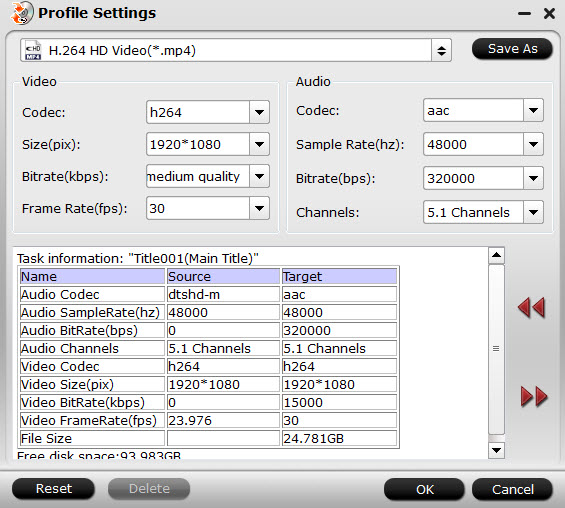
Step 4: Start to convert Sony RX1R II video to Apple Prores 422.

On the main interface of the tool, tap the "Convert" button on right-bottom to start the conversion process from Sony RX1R II XAVC S to Apple TV m4v transcoding process.

Hot News: Happy Halloween and Hurry up!!! Pavtube's 2015 Halloweenn Promotion is on the road (Offer Valid from Oct. 23, 2015 to Nov. 6, 2015). This Time Pavtube offers up to 40% Off discount on its featured software apps. Never miss this chance to get what you need. 

Read More:

Tuesday, November 3, 2015

Downscale GoPro sports videos for playback smoothly on windows 10 or Mac El Capitan

Summary: Are you troubled with how to downsize GoPro Hero 4K video to 1080p for playback and editing? Sometimes, 4K video can’t be played properly most likely your computer is not able to process the data of the large HD files fast enough. Check out the tips below.

We know that GoPro Hero cameras can capture professional-quality videos, for example Hero3 White can capture 1080p 30fps video, Hero3+ Silver can capture gorgeous 1080p 60fps video, Hero4 can take time lapse videos with high data rates, Hero4 Black can shoot incredible high-resolution 4K 30fps and 2.7K 60fps video and the high frame rate 1080p 120fps video.

As we know, the majority of playback, editing work is still being finished in 1080p. In most cases, we still need to downscale most of the 4K video files to 1080p. In fact, you may not see any real differences if you're not doing much to the footage. One of the huge benefits to 4K, that you can do a lot to the image and retain detail for a beautiful 1080p finish. For those who wanna play and edit GoPro Hero 4K videos on old computer (playing a 4K video requires more computing power and it could be more time consuming), we suggest you to convert all GoPro Hero 4K videos to 1080p then play in 1080p and smart-render.

Best solutions to downscale GoPro Hero 4K video to 1080p:
Although there are numbered tools and utilities can convert and compress the ultra HD videos, few of them can process at a fast speed. Well, Pavtube HD Video Converter for Mac is considered to be the best 4K to 1080p converter. It is surely in the support of compressing GoPro Hero 4K videos to 1080p faultlessly. For Windows users,Pavtube HD Video Converter is the alternative choice.


Other Download:
- Pavtube old official address: http://www.pavtube.com/hd-video-converter-mac/
- Amazon Store Download: http://www.amazon.com/Pavtube-Video-Converter-Mac-Download/dp/B00QI9GNZS
- AppStore Download: https://itunes.apple.com/de/app/pavtube-hd-video-converter/id502792488?mt=12
- Cnet Download: http://download.cnet.com/Pavtube-HD-Video-Converter/3000-2194_4-76177786.html

How to downsize GoPro Hero 4K video to 1080p? 

Step 1: Click “Add Video” button to load your GoPro Hero 4K videos. You can load several files at once thanks to “Add from folder” button.


Step 2: Click the “Format” drop down list to select output format. If you want to play GoPro Hero 4K videos on decent media player, you’d better set a preset profile that best meets your needs. For instance, if you want to play GoPro Hero 4K videos on VLC smoothly,“HD Video>>H.264 HD Video (*.mp4)” would be the best choice.


Step 3: Click “Settings” button; you can adjust video and audio settings, including codec, aspect ratio, bit rate, frame rate, sample rate, and audio channel. To down-convert ultra HD 4K to 1080p, do remember adjusting video size to 1920*1080. That is the exact 1080p.


Step 4: At the end, hit “Convert” button to let the 4K to 1080p conversion begin.

Conclusion: When the conversion finished, check the generated 1080p video, you will certainly be satisfied with its final video quality. It would be easier for you to playback and edit.

Knowledge:

What is the difference between 1080p and 4K resolution?
A High Definition TV with 1080p resolution is composed of two million pixels (1920*1080), while a 4K TV (aka Ultra High Definition) has over eight million pixels (3840*2160). Therefore, 4K has around four times more resolution than 1080p and produces a clearer picture.

Hot News: Happy Halloween and Hurry up!!! Pavtube's 2015 Halloweenn Promotion is on the road (Offer Valid from Oct. 23, 2015 to Nov. 22, 2015). This Time Pavtube offers up to 40% Off discount on its featured software apps. Never miss this chance to get what you need. 

Read More: