If you're an Android user thinking about switching to iPhone (or if you've already made the switch from Android to iPhone), you may be concerned about transferring all your data - music, photos, video and so on - and making sure nothing is lost in the process. Luckily you've come to the right place.The good news is that transferring contacts and the rest from Android phone to iPhone really couldn't be simpler - it turns out that Google is good at this stuff. The basic principle is to back up to either the cloud or a desktop machine, and then sync to iPhone. Even better, Apple recently launched an Android app specifically to guide you through this process.Here's what you need
- iOS 9 or later
- iPhone 5 or later
- iPad 4th generation or later
- iPad mini 2nd generation or later
- iPod touch 6th generation
- Android version 4.0 or later
Tap Move Data from AndroidWhile setting up your new iOS device, look for the Apps & Data screen. Then tap Move Data from Android. If you've already finished setup, you'll have to erase your iOS device and start over. If you don't want to erase, just transfer your content manually. Open the Move to iOS appOn your Android device, open the Move to iOS app and tap Continue. Read the terms and conditions that appear. Tap Agree to continue, then tap Next in the top-right corner of the Find Your Code screen.Wait for a codeOn your iOS device, tap Continue on the screen called Move from Android. Then wait for a ten-digit code to appear. If your Android device shows an alert that you have a weak Internet connection, you can ignore the alert.Use the codeEnter the code on your Android device. Then wait for the Transfer Data screen to appear. Choose your content and waitOn your Android device, select the content you'd like to transfer and tap Next. Then leave both devices alone until the loading bar that appears on your iOS device finishes—even if your Android indicates that the process is complete.The whole transfer can take a while, depending on how much content you're moving.Set up your iOS deviceAfter the loading bar finishes on your iOS device, tap Done on your Android device. Then tap Continue on your iOS device and follow the onscreen steps to finish setting it up.Finish upMake sure that all of your content transferred. If some didn't, you can move that content manually. Then go to the App Store on your iOS device to find and download apps that were on your Android device.If you need help after the transferYou might find that only some content transferred and your iOS device ran out of space, or your iOS device might appear full even though the transfer didn't finish. If so, erase your iOS device and start the transfer again. Make sure that your Android content doesn't exceed the available space on your iOS device. For important camera photos and videos, you can compress the size and then transfer it to iPhone via iTunes. There you can get a free compressor--Pavtube Video Converter / Mac Version. With it you can downsize the video size in the lower size and keep the high quality.With it you can:
- Hange default settings: You can change the parameters such as video size, bitrate, frame rate, and channels for your video file according to your need to get the best output effect.
- Batch conversion: Handle multiple videos and realize batch conversion to save your time and energy.
- Merging & splitting: Merge several video clips into one bigger file and splitting one video file into several clips according to the clip quantity, duration time and file size.
- Create new output format: Adjust profile parameters, rename and save it for future use.

 Read More:
I have an iPad 3 and also a Synology DS211 NAS. I already use the NAS to stream video directly to my TV but I'd like to be able to do stream some of Disney movie clips on the iPad for my kids. Is it possible?If you still have no idea about this, you've come to the right place. This article will teach you how to stream video collection to Synology DS216 NAS for playback on iPad.Synology DS216 NAS is a great option for storing your stuff from anywhere and helps you consolidate your photos, videos, and other documents. Here you should consider to stream the video into your iPad just like you have stream it to your TV before with the iPad compatible format.iPad supported file formats:Audio playback:AAC (8 to 320 Kbps), Protected AAC (from iTunes Store), HE-AAC, MP3 (8 to 320 Kbps), MP3 VBR, Audible (formats 2, 3, 4, Audible Enhanced Audio, AAX, and AAX+), Apple Lossless, AIFF, and WAV.Video playback:1. H.264 video up to 1080p, 60 frames per second, High Profile level 5.0 with AAC-LC audio up to 160 Kbps, 48kHz, stereo audio in .m4v, .mp4, and .mov file formats; 2. MPEG-4 video up to 2.5 Mbps, 640 by 480 pixels, 30 frames per second, Simple Profile with AAC-LC audio up to 160 Kbps per channel, 48kHz, stereo audio in .m4v, .mp4, and .mov file formats; 3. Motion JPEG (M-JPEG) up to 35 Mbps, 1280 by 720 pixels, 30 frames per second, audio in ulaw, PCM stereo audio in .avi file formatNow you make clear with the iPad compatible format, To reach the goal, you can use Pavtube Video Converter for Mac(read the review)to help you. It is one of the professional tool that can help you deal with all those unsupported media files and convert them to iPad with the astonishing features like fast conversion, video preview, rich editing function, file splitting and merging, etc.Hot Search: Blu-ray/DVD on iPad | GoPro Videos to iPad | 4K UHD Video on iPad  How to Stream Kids Films backuped on NAS to iPad?Step 1: Add files to the program.On the top menu bar of the program, click "File", from its drop-down list, select "Add Video/Audio" or "Add from folder" to add Samsung NX1/NX500 4K H.265 files to the program.
 Step 2: Pick output file format.Click the format bar to select a proper output format under “iPad” or “iPhone” or “Xbox 360” option. If you got other devices at home on network, just find it in the format list. If your devices are not covered in the format list, choose an intermediate format under “Common Video” option.
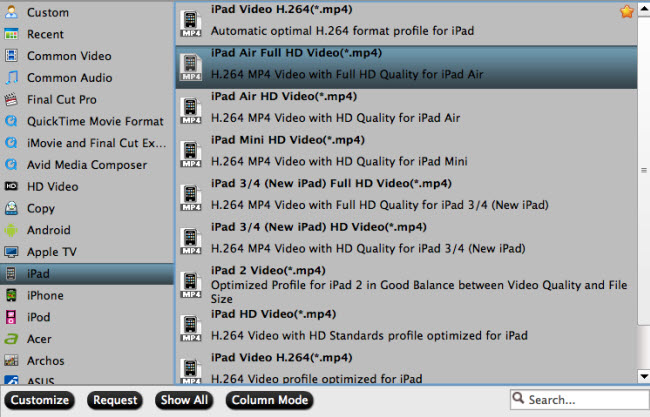 Step 3. Convert videos to iPadHit the red button “Convert” to begin convert videos to iPad.When the conversion is completed, you can upload the converted video to your Synology DS216 NAS and then you can stream the video to your iPad for your kids.Read More:
I have just got the Nokia Lumia two weeks ago, I am unable to play all video formats MKV, AVI files in lumia, any help immediately? THX!
It’s happened to us all. After purchasing your favorite song online, watching a funny clip, downloading your favorite artist’s new video or getting your friend’s new demo, you find that Windows, your Lumia doesn’t recognize the file and won’t play it.
Yes, you can watch movies on Lumia on the move! Nokia Lumia support following video formats: MP4, WMV, AVI, 3GP, 3G2, M4V, MOV. All you have to do is fit various videos to the Lumia support format with the help of Pavtube Video&Audio Converter. It can convert HD videos MKV, AVCHD, HD camcorder videos MOD, TOD, standard videos AVI, WMV, MPEG, M4V, FLV, etc, audio files in AC, AMR, QCP, M4A, MP3, WMA to Nokia Lumia for offline playback. It means that all videos existing on your computer can be transferred to Lumia to watch without consuming your bandwidth and worrying about the format compatibility. Pavtube has the solution:
Hot Search: Digital Video Workflow | AC3 5.1 Surround | iOS 9, Windows Phone 10, Android 6.0 Comparison
Quickly and easily convert video files to other file formats
Convert unprotected Internet videos, TV shows from media centers or protected movies purchased in shops. Pavtube Video&Audio Converter provides you with files optimized for playback on any of your devices, while also giving you the files in the highest quality available.
Quickly and easily convert audio files to other file formats
Pavtube Video&Audio Converter reliably converts all types of unprotected and protected audio files without sacrificing quality. Just import your file and choose the desired output format. Then let Pavtube do the rest.
>>Learn more about the Pavtube Video&Audio Converter
Here we show you a step-by-step guide of converting the video and audio into Lumia:
Free download and install Pavtube Video&Audio Converter on your computer, and then launch it.
Step 1. Clicking "Load file(s)" button. For video files, you could add a single video or a folder or full of video files by "Add video" icon.
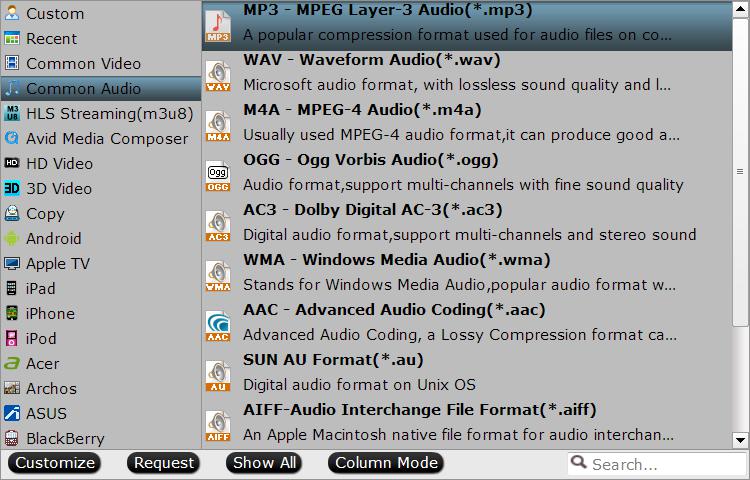
 Step 2. Pavtube offers you lots of choices for output. In order to get Lumia playable video and audio format, you are suggested to choose common video or common audio category under Format menu. Of course the Nokia category available too.
 Tip: If necessary, you are allowed to adjust profile parameters in Settings. Presets like video size, bitrate, frame rate, audio sample rate, channels can be customized to achieve a better video enjoyment on Lumia
Step 3. Double check your settings and hit on the "Convert" button to start converting any video and audio to Lumia conversion.
When the conversion is done, open output folder and you will find the created video and audio files. Now you can transfer the converted video and audio files to Lumia for playback without any issues.
Read More:
Tip: If necessary, you are allowed to adjust profile parameters in Settings. Presets like video size, bitrate, frame rate, audio sample rate, channels can be customized to achieve a better video enjoyment on Lumia
Step 3. Double check your settings and hit on the "Convert" button to start converting any video and audio to Lumia conversion.
When the conversion is done, open output folder and you will find the created video and audio files. Now you can transfer the converted video and audio files to Lumia for playback without any issues.
Read More:
Xvid Files?If you're finding it difficult to find information about Xvid on Mac, that's because there isn't very much out there, even on the Xvid site.In order to find support for Xvid, just keep one things in mind. Xvid is not a video format, most of which contain a divx, another varient of MPEG-4. That is to say, Xvid is a video codec library following the MPEG-4 standard, in this case, people often share their videos or home-made movie on the Internet with XviD format, meanwhile, Xvid can be compressed with the original video quality retained, and some DVD players can play Xvid files which have been burned to DVD or CD.Like all video, Xvid requires a component before it can be played or converted on your Mac.How to Play Xvid on Mac?Although all computers should be able to play an Xvid with player software, you may need to install a playback component if you haven't already done so.
- For Mac OS X 10.4 or later Users, install the Perian Quicktime Component
- To download this Xvid component, go to Digital Video Resource Page
- To install the component, double-click the installer and follow the instructions
- For Mac OS X 10.1 to 10.3 Users, install the Universal AVI Quicktime Components
- To download this Xvid component, go to Digital Video Resource Page
- To install the component, double-click the installer and follow the instructions
When the component installed on your mac, you can doubt click the Xvid files for playing on your Mac. This method is not effective for every Mac. If you failed open the Xvid files on your mac after installed the component, just read the rest article and you method below may be more helpful for you.Convert Xvid to MP4, MOV, M4V for MacWhen it comes to convert XviD video to Mac compatible format, Pavtube Video Converter for Mac(read the review) will be a better choice, which includes presets for all Mac popular formats like MP4, MOV, M4V,AVI, etc. It supports batch conversion and works several times faster than QuickTime Player, and works with many other video formats that QuickTime Player does not support natively. First free download and install Pavtube Video Converter on your Mac, and then launch it. Now just follow the step by step guide demonstrate how to convert Xvid to MP4, MOV, M4V for Mac.Step 1. From "File" drop-down menu, select "Add Video/Audio" to import Xvid files to the software for conversion. Step 2. Click "Format" bar, from its drop-down selection, define "MOV - QuickTime (*.mov)" or "MPEG-4 Movie(*.mp4)" or "M4V-MPEG-4(*.m4v)" as the output profile format.
 Step 3. Carry out Xvid to QuickTime Conversion process by clicking the right-bottom "Convert" button.When the conversion is over, click "Open" on the main interface to locate the converted Xvid files then you can play them on Mac with ease.Read More:
The Canon XA20 Professional Camcorder is ideal for any type of professional content project, which has multiple recording options. It allows you to record at AVCHD video of up to 28mbps in a 1080/50P and also provides a choice of industry-standard up to 35 mbps in a 1080/50P MP4.
AVCHD - 1080: 59.94P / 59.94i / PF29.97 / 23.98P
MP4 - 1080: 59.94P / 29.97P / 23.98P; 720 and 360: 29.97P / 23.98P
Regarding to the AVCHD codec, it is very popular in both the professional and consumer market. That means most non-linear editing software should have full support for the codec, but the thing is that users still have problems one or another while trying to open the XA20 AVCHD footage in Adobe Premiere Elements for further editing. Such as there is an audio track but no audio is heard during playback of entire clip, or video is choppy or non-responsive during entire clip.
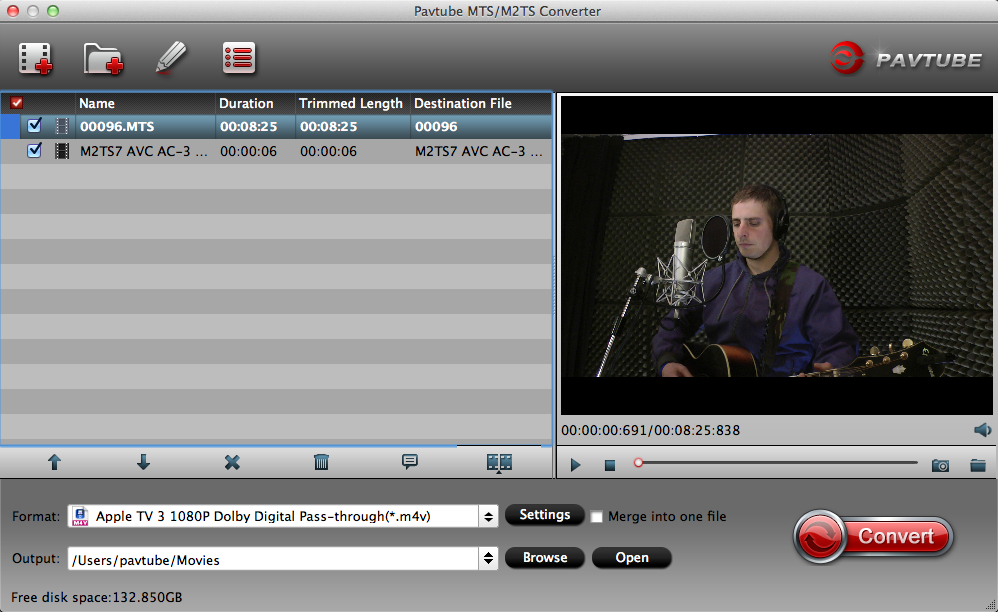
 In order to import and edit Canon XA20 AVCHD files in Adobe Premiere Elements without audio missing or video choppy issues, you'd better transcode the Canon XA20 AVCHD footages to Adobe Premiere Elements native format. Pavtube MTS/M2TS Converter / Mac Version(read the review) can help you solve the issues smoothly. It can aid you to change AVCHD files to MPEG-2/WMV/MOV for Adobe Premiere Elements with high quality. In fact, it's an all-in-one converter for fast transcoding, deinterlacing AVCHD footage from CanonXA20 camera that makes the AVCHD footage editing work much easier with Premiere. Besides the main conversion work, it is also equipped with some simple editing features, such as merging several videos into one file, deinterlacing the original footages, cropping video size, trimming video clips, adding special effects and subtitles to output videos, thus it will be on the top of your list.
Meanwhile, this video converter can create files compatible with NLEs like FCP, Avid Media Composer, iMovie, After Effects, DaVinci Resolve and etc.
Download Pavtube MTS/M2TS Converter for Edit Canon XA20 in Premiere Elements Smoothly:
In order to import and edit Canon XA20 AVCHD files in Adobe Premiere Elements without audio missing or video choppy issues, you'd better transcode the Canon XA20 AVCHD footages to Adobe Premiere Elements native format. Pavtube MTS/M2TS Converter / Mac Version(read the review) can help you solve the issues smoothly. It can aid you to change AVCHD files to MPEG-2/WMV/MOV for Adobe Premiere Elements with high quality. In fact, it's an all-in-one converter for fast transcoding, deinterlacing AVCHD footage from CanonXA20 camera that makes the AVCHD footage editing work much easier with Premiere. Besides the main conversion work, it is also equipped with some simple editing features, such as merging several videos into one file, deinterlacing the original footages, cropping video size, trimming video clips, adding special effects and subtitles to output videos, thus it will be on the top of your list.
Meanwhile, this video converter can create files compatible with NLEs like FCP, Avid Media Composer, iMovie, After Effects, DaVinci Resolve and etc.
Download Pavtube MTS/M2TS Converter for Edit Canon XA20 in Premiere Elements Smoothly:
 How to convert Canon XA20 video to MPEG-2/WMV/MOV for Adobe Premiere Elements
Step 1. Click the “File” and then choose "Add video" or "Add from folder" icon on the main UI of this software to load your Canon XA20 AVCHD footage. Of course, you can load your Canon XA20 MP4 footage to this software if you want to edit them with the more compatible MPEG-2/WMV/MOV format.
How to convert Canon XA20 video to MPEG-2/WMV/MOV for Adobe Premiere Elements
Step 1. Click the “File” and then choose "Add video" or "Add from folder" icon on the main UI of this software to load your Canon XA20 AVCHD footage. Of course, you can load your Canon XA20 MP4 footage to this software if you want to edit them with the more compatible MPEG-2/WMV/MOV format.
 Step 2. From the "Format" drop-down list, go to select "Adobe Premiere Pro/Sony V..." >"MPEG-2"/"WMV(VC-1)"/"MOV(AVC)" as the most suitable output format for Adobe Premiere Elements.
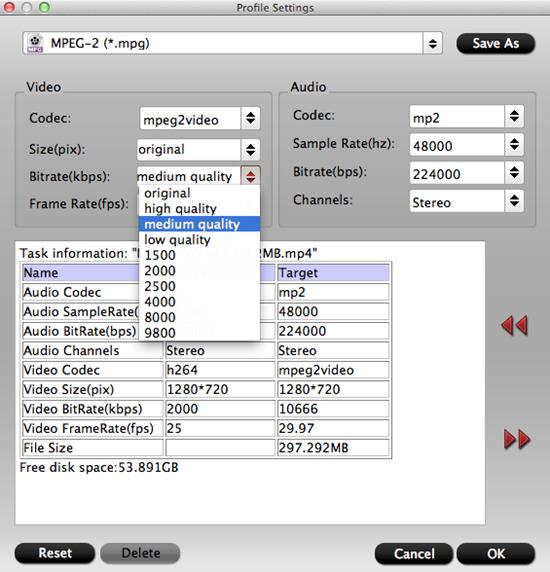
 Step 3. (optional)The Canon XA20 record footage with 1080p, but you may find that the output MPEG-2/WMV/MOV is not such high in resolution, therefore, you can type the output file size as "1920*1080" from the "Profile Settings" window to maintain the original HD video quality.
 Step 4. After all the settings is completed, go back to the main menu and start the conversion by hitting the right-bottom "Convert" button.
When the conversion is over, enjoy yourself transfer and import Canon XA20 to Adobe Premiere Elements for best editing workflow.
Read More:
Step 4. After all the settings is completed, go back to the main menu and start the conversion by hitting the right-bottom "Convert" button.
When the conversion is over, enjoy yourself transfer and import Canon XA20 to Adobe Premiere Elements for best editing workflow.
Read More:
The MOV format is a QuickTime media container format. A lot of users are still in the dark on how they could playback or watch an MOV video file on Windows(Windows Media Player) 10/8/7/Vista/XP. Why Windows(Windows Media Player) 10/8/7/Vista/XP Won’t Play QuickTime MOV Files? How to successfully play QuickTime files on Windows(Windows Media Player) 10/8/7/Vista/XP? The following article will give the answer!If the QuickTime MOV files are not corrupt, the main reason may be the QuickTime MOV video codec problem. And by installing QuickTime Player, you can get an MOV codec which allows you to play MOV on Windows(Windows Media Player) 10/8/7/Vista/XP without any problem. To point here, QuickTime player is larger in size and will also install lots of junks to your Windows computer.To open Apple QuickTime in Microsoft Windows follow the steps below.
- Click Start
- Go to Programs, QuickTime, and click QuickTime Player. If QuickTime is not found it is not installed on your computer. See the QuickTime definition for a link to where to download and install this program.
- Once open you can open the movie file through this program by clicking File, Open, and browsing to the location of the movie file or by dragging the movie file to Apple QuickTime.
Then how to Play MOVon Windows successfully?In order to solve can’t play QuickTime MOV on Windows(Windows Media Player) 10/8/7/Vista/XP issue, a recommended solution is to convert QuickTime MOV to Windows Media Player compatible QuickTime MOV, WMV, ASF, MPG. Pavtube Video Converter / Mac Version.(review) is just the ideal QuickTime MOV to Windows Media Player which can fast convert QT MOV files to WMP supported video format without quality loss. Besides, no extra system component will be installed to your Windows and would probably slow down your computer. It’s fully compatible with Windows 10, Windows 8.1, Windows 8, Windows 7, Windows Vista and Windows XP.Hot search: H.265 to Windows | MKV to Windows| YouTube to WindowsFree download it and follow the guide to convert QuickTime MOV to WMV format so you can import and play MOV files on Windows(Windows Media Player) 10/8/7/Vista/XP nicely.Step1. Drag & drop QuickTime mov files to the program directly. Or go to the “File” menu, choose “Add Video” to locate the QT mov files you want to add. You can add several files to do batch conversion.Step2. Click the Format menu, select Windows Media Player friendly format as your output video format. There, you can take WMV as your output video format. If you prefer high definition videos, move your mouse pointer to “HD Video” and then choose HD WMV. Step3. Press the big “Convert” button to start the QuickTime MOV video converting process. After the conversion, you can add your QuickTime (MOV) videos on Windows(Windows Media Player) 10/8/7/Vista/XP for playing at your will without hassle.Read More:
Summary: This article will illuminate how to convert MKV video to MOV format with Pavtube Video Converter for Mac, an all-in-one video converter program that provides both excellent quality and speed.MKV (Matroska Video) is a container format developed by Matroska that widely used on the Internet for high definition video. The MKV container can hold a variety of video and audio codecs and can includes multilingual subtitles as well as rich metadata. But Mac's MKV support is not that good and Mac user may suffer stuttering playback and other issues. If you have some of MKV movies or TV shows that you want to work with your Mac playing devices and applications, the most likely route to go will probably just be to convert into a mac-readable file (i.e. MKV to MOV). The solution is to convert your MKV videos to MOV, you then can play in QuickTime, edit them in iMovie and Final Cut Pro, or stream them to Apple TV, iPad, or iPhone.Without any question, a video converter for Mac can be a timely help to convert MKV files to MOV format on Mac. However, with the emergence of the latest Mactintosh operating system - El Capitan, many Mac MKV to MOV converters get stuck here due to incompatibility with the newest generation. So while you are searching for such program, the perfect compatibility with Mac El Capitan shall be also taken into consideration besides the MKV to MOV conversion ability.To smooth away barriers in converting MKV to QuickTime MOV on Mac OS X El Capitan, you can rely on Pavtube Video Converter / Mac Version since this program not only serves as the best yet free MKV to MOV converter for Mac but also makes perfect synchronization with Mac El Capitan, letting you easily and freely transfer video from MKV to MOV on your Mac El Capitan while holding the same video as original.Hot Search: YouTube to MOV | H.265 to QuickTime MOV | AVCHD/MTS/M2TS/M2T/TS to QuickTime MOVKey Features of Pavtube Video Converter.
- Convert almost all HD/SD audio/video formats: All types of audios and videos (e.g. SD/HD/Tivo/DRV/Camcorder HD/AVCHD footages, etc) to almost any audio and video formats.
- hange default settings: You can change the parameters such as video size, bitrate, frame rate, and channels for your video file according to your need to get the best output effect.
- Batch conversion: Handle multiple videos and realize batch conversion to save your time and energy.
- Merging & splitting: Merge several video clips into one bigger file and splitting one video file into several clips according to the clip quantity, duration time and file size.
- Create new output format: Adjust profile parameters, rename and save it for future use.
- Supported OS: Mac OS X 10.11 El Capitan, Mac OS X 10.10 Yosemite, 10.9 Mavericks, 10.8 Mountain Lion, 10.7 Lion, 10.6 Snow Leopard, 10.5 Leopard
How to Convert MKV to QuickTime MOV on Mac El CapitanFirst free download and install Pavtube Video Converter on your Mac, and then launch it. Now just follow the step by step guide to make editing work more smoothly.Step 1: Run it and click “File” > “Add Video/Audio” or “Add from Folder” to import files. You can also directly drag and drop the files.Step 2: As MOV is natively supported by QuickTime player on Mac, just go to the format list by clicking the format bar and choose “Common Video” and pick “MOV - QuickTime (*.mov).”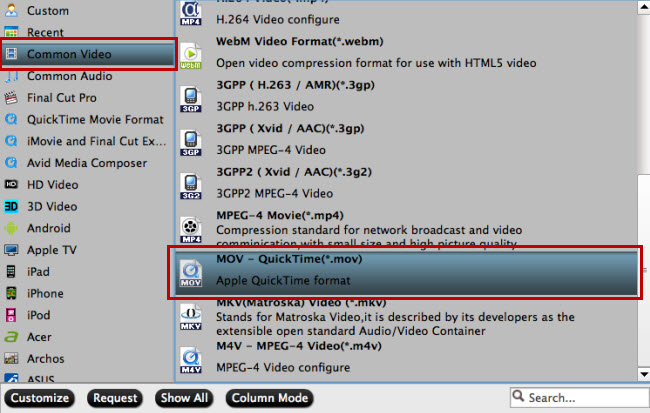 Step 3: Specify output folder on your computer to save the output files. Click the "Browse" button to choose the path where you want to save the output files in. Click the "Convert" button at the lower right corner of the interface to begin to convert MKV to MOV. After the conversion is finished, you can transfer the video to your desired output devices or editor for enjoyment.Read More: