Wednesday, April 19, 2017

Import MXF to HitFilm Pro 2017 for editing

t goes without saying, there’s plenty of video editing software on the market. The first ones that come to mind are big names like Adobe Premiere Pro and After Effects, Final Cut Pro, Magix Vegas, DaVinci Resolve, etc. What makes HitFilm unique compared to most other products on the market, though, is the fact that it’s a one of a kind combination of a non-linear editor (NLE) and a video compositing tool capable of working with 3D objects. For editing common videos, you can also import them to HitFilm Pro 2017. But no thing is perfect. Some video like MXF can't be accepted by HitFilm Pro 2017.

Why MXF wont be imported to HitFilm Pro 2017?

Though HitFilm Pro 2017 claims it does support MXF fomat. Buy you need to know only some MXF video like DVCPro HD MXF is supported by HitFilm Pro 2017. Just take a look at HitFilm supported formats:

Supported Video

• AVCHD (M2T, MTS, M2TS)
• AVI (including 10-bit and 12-bit GoPro Cineform) (Windows only)
• DV & HDV
• MP4 (AVC/H264 & AAC)
• MPEG-1 & MPEG-2 (TS, PS, MPE, MPG, MPEG, M2V)
• MXF (DVCPro HD)
• Quicktime MOV (including 10-bit and 12-bit Pro-Res) (requires that an up to date version of Quicktime is installed on your computer)
• WMV

Supported Audio

• AAC
• MP3
• M4A
• MPA
• WAV
• WMA

Solution for Importing MXF video to HitFilm Pro 2017

In order to make a highlight video out of Canon/Panasonic/Sony recorded MXF video files, we have to convert MXF to HitFilm Pro 2017 compatible format like AVI, MP4, MOV etc before importing. Turn to third-party programs or codec for help, you can achieve your goal smoothly. This will help you import the MXF file into HitFilm Pro 2017 correctly and save the rendering time.

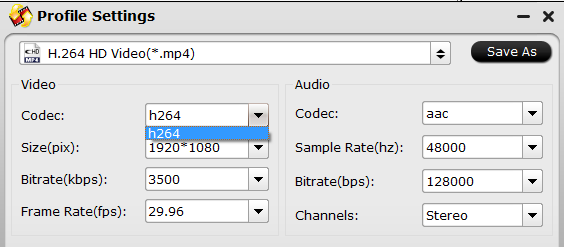
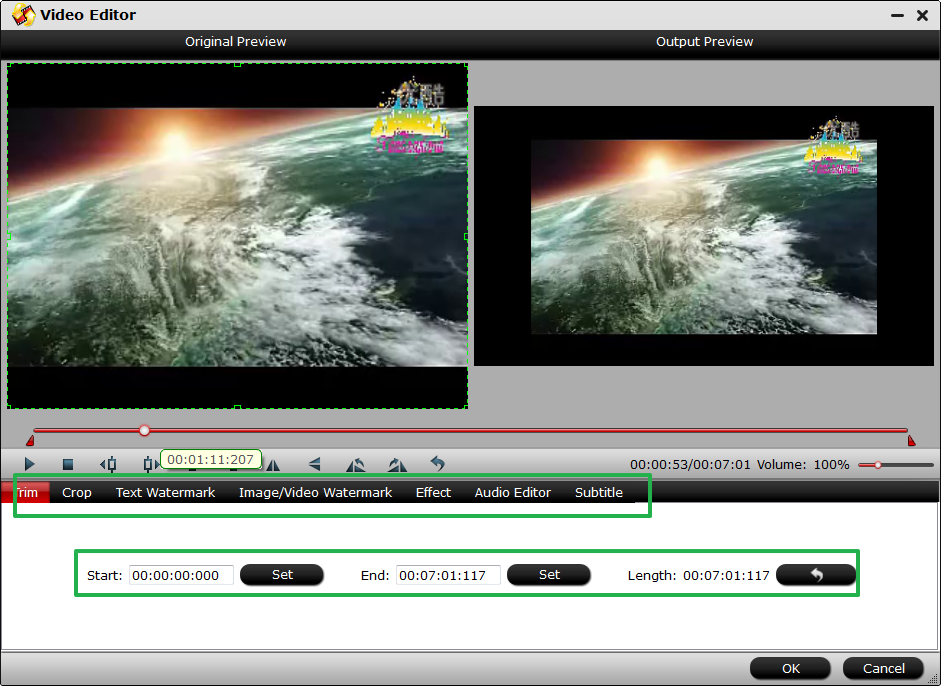
Here we recommend Pavtube MXF MultiMixer which is not only able to convert MXF to HitFilm Pro 2017 editable format for easy editing in HitFilm Pro 2017, but also edit all kinds of videos. Therefore, you have two options to edit HD-camera recorded videos. It also can convert MXF video to other editors like Davinci Resolve, FCP, iMovie, Premiere Pro, Avid Media Composer friendly formats for smooth editing on Mac. What’s more, it also helps import and export multi-track MXF. Choosing formats in Multi-track Video category from Format box, you can get MKV/MOV/MP4 videos with multi tracks encoded with Apple Prores, or other codec.

→ Now Free download MXF MultiMixer for converting MXF video to HitFilm Pro 2017 supported video on Mac. If you are a Windows user, you can free download Pavtube MXF MultiMixer.

Convert and Import MXF to HitFilm Pro 2017 for Editing

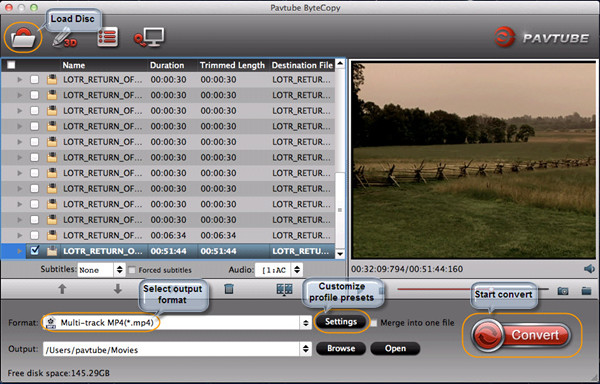
Step 1. Load MXF video files

Run the program and click "Add File" to import the MXFvideos. You can also directly drag the video clips into the program for conversion.

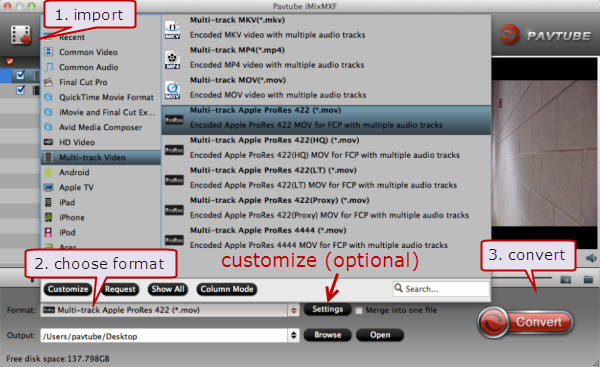
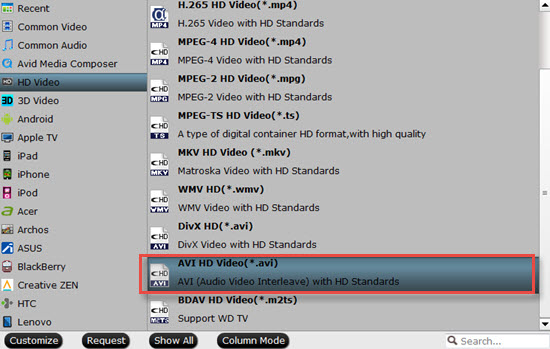
Step 2. Set right output format for HitFilm Pro 2017

Click "Format" bar, and select MP4, AVI, MPEG from "Common video" or "HD video" to fit HitFilm Pro 2017.

Step 3. Convert MXF to HitFilm Pro 2017 friendly video format

Click the "Convert" button on the main interface and the software will start to rewrap MXF to HitFilm Pro 2017 friendly video formats immediately. When conversion finished, click "Open" to find the converted video files. Then you can effortlessly import the converted MXF files to HitFilm Pro 2017 for editing later.

Thursday, April 13, 2017

Convert and Export iMovie Project to AVI in High Quality

Usually, iMovie exports typically in QuickTime formats with extension .mov. However, sometime we may have the need to export iMovie file to AVI for smooth playing on some devices. How to get that done? using Pavtube HD Video Converter for Mac will enable you to convert this iMovie to AVI. Read on to learn how to convert IMovie project to AVI format with simple steps in Pavtube HD Video Converter for Mac.

Best Converter to Convert iMovie Format to AVI

With Pavtube HD Video Converter for Mac, you can convert iMovie to AVI in HD, as well as MP4, WMV, etc. so that you can watch them on Windows computer, android devices, and more. What's more, this program can also works well with different videos from other NLEs like FCP, Premiere Pro, Avid Media Composer etc. Let's together see how to convert iMovie to AVI on Mac (macOS Sierra, El Capitan Yosemite, Mavericks, Lion included).

More features Pavtube HD Video Converter for Mac includes:

  • Convert iMovie file to any formats including AVI, MP4, MKV, WMV and more.
  • Convert MP4, MKV, AVI, MPEG-2, MXF, MOV, MTS, XAVC, FLV etc to iMovie editable format.
  • Convert MP4, MKV, AVI, MXF, MOV, MTS, XAVC, FLV etc to FCP, Premiere Pro, Avid Media Composer, DaVinci Resolve.
  • Convert iMovie, FCP, Premiere Pro, Avid Media Composer, DaVinci Resolve files to any formats.
  • Basic video editing functions: split, merge, trim, crop, add watermark, adjust video effect, edit audio and insert subtitles.
  • Custom Video: Personalize videos with diversified video editing tools.
  • Allow you to complete the conversion process with three simple clicks.

Simple Processl to convert iMovie videos to AVI format on Mac

As mentioned above, first you need to export your finished movie from iMovie to Mac, either through Share > Export Movie or simply pressing Command+E to open a dialog and export your movie to computer. The movie will be saved into M4V or MOV depending on your selected option. Now let's begin the iMovie to AVI conversion process.

1. The first step is to import your .iMovie file into the video converter. You have two ways to do this: simply drag-and-drop your files or use the files tab in the converter's interface to browse for your iMovie files in your computer.

2. In “Format”, you can choose HD AVI or AVI from “HD Video” or “Common Video” .

Tip: If you like, you can click the "Settings" to set parameters like video codec, resolution, bitrate, frame rate, audio codec... for your devices.

Step 3. Click the "Convert" button to start iMovie to AVI conversion on Mac. The excellent Mac Video Converter will do the rest for you automatically. The length of conversion time will depend on the length of your movie, the format you choose, and the speed of the computer.

Read More:

Thursday, April 6, 2017

Put DVD to Premiere Pro (CC/CS6/CS5/CS4) on macOS Sierra

Question:

"I have a wonderful DVD borrowed from my roommate, and I wish to import this DVD to my Final Cut Pro for editing on it and using some of the video in another project. However, each time I've tried to put DVD to my Premiere Pro I received an error code. Any suggestion? By the way, I want the picture quality to be as best as possible. Thanks in advance."- Lucy

Answer:

Adobe Premiere Pro is a timeline-based video editing software application. Touting non-linear advanced and powerful editing features, it is definitely the best tool to edit and make your personalized videos or movies on Mac & Windows. For those who want to import DVD to Premiere Pro for editing, it isn't without hiccups because Premiere Pro does not support DVD importing. Fortunately, there is an easy way to fix this problem.

MXF to Premiere Pro MP4 to Premiere Pro H.265 to Premiere Pro MP4 to Premiere Pro
M2TS to Premiere Pro MKV to Premiere Pro GoPro video to Premiere Pro iPhone video to Premiere Pro

Get a DVD to Premiere Pro Video Converter (Professional, Easy-to-use)

There are a number of DVD to Premiere Pro video ripping software for creating digital copies that are workable on your Mac. But you’d better choose one excellent one. Pavtube ByteCopy for Mac can convert the disc to a movie file compatible with Premiere Pro and other NLEs like Final Cut Pro, iMovie, Avid Mc etc with only 3 steps. It also can convert DVD to any formats including MP4, MOV, MPEG-2, WMV, AVI, MKV and more. Of course, if you have any needs of ripping Blu-ray to Premiere Pro, or copying Blu-ray, you can also use this professional Pavtube ByteCopy for Mac.

Know more about this powerful DVD/Blu-ray program:

  • Rip DVD, Blu-ray, 4K Blu-ray, 3D Blu-ray to any video/audio formats.
  • Lossless DVD/Blu-ray to MKV backup with multiple audio/subtitle tracks.
  • Convert DVD/Blu-ray to Multi-track MP4, MOV, AVI.
  • Rip DVD/Blu-ray to iPhone, Android, TV, PS3/PS4, Apple TV, VR etc supported video.
  • 2 ways to copy DVD/Blu-ray: Full disc copy, direclt copy.
  • Export single SRT subtitle file.
  • Personalize videos with diversified video editing tools.
  • Allow you to complete the conversion process with three simple clicks.

Free download this DVD to Premiere Pro Converter (Mac)

How to Rip DVD to premiere Pro supported video on mac

Step 1. After successful installation, click the "Load file(s)" to browse disc drive and import your DVD into this app.

Step 2. Hit the Format box and select Adobe Premiere/Sony Vegas --> MPEG-2(*.mpg) as output format and then set the output destination as you want.

Tips: The default settings may not satisfy you, and you can click the "Settings" button to change the settings by yourself including video resolution, bit rate, audio sample rate, audio channel etc.

Step 3. Finally, click “Convert” button to begin the DVD to MPEG-2 ripping for editing in Adobe Premiere Pro smoothly. After the conversion finished, you can get the videos highly compatible with Adobe Premiere Pro CS3/CS4/CS5/CS6. Just launch Adobe Premiere Pro and import the converted videos to it and enjoy editing.

Free download this DVD to Premiere Pro Converter (Windows)

Read More:

Wednesday, March 29, 2017

How to Edit and Encode Videos for Instagram for smooth Uploading?

Received an "invalid file format error message when you're uploading to Instagram"? So what're the best formats for Instagram sharing? This is the main anxiety problem with making video published to Instagram for the people first time do with video, because Instagram video whether has strong capability to best engage audience while staying true to creator's brand depends on that, not only the video contents of whatever entertaining, educational, or inspiring, but also the better video quality of sounds, biterate, and sizes, video codec etc.

And Instagram still has some importtant limitations, for example, Instagram limits videos to 60 seconds, so make sure your video is 60 seconds or less or it will be cropped automatically. This guide is going to tell you how to edit video and encode video for uploading to Instagram perfectly.

Part 1. Best Video Audio Settings Specifications for Instagram Upload

  • Video length: 3 secs - 60 secs.
  • Resolution: Maximum 1920 x 1080.
  • Frame rate: 30fps max.
  • Bit rate: 3,500 kbps video bitrate is preferred.
  • Audio codec: AAC (Advanced Audio Coding). 128kbps is the best for Instagram.
  • Aspect ratio: 1.9:1 to 1:1. 1:1 videos at 1080px1080p are commonly used.
  • Best video codec: H.264. Instagram accepts H.264 video compression. If your video is not encoded with H.264, use Instagram video converter to decode and encode videos to Instagram video format codec.
  • Best video format: MP4 and MOV. Instagram supports MP4 and MOV container format. The best video format for Instagram upload is MP4 with H.264 codec and AAC audio, 3,500 kbps video bitrate.
  • File size: 15MB max. If your video is larger than 15MB, you can compress the video file size, trim or split it to separate parts.

Part 2. How to Create Best Video Audio for Uploading to Instagram

How long can your videos be?

Instagram limits videos to 60 seconds, so make sure your video is 60 seconds or less or it will be cropped automatically. You can use Pavtube Video Converter to crop your long videos to < 60 secs.

How to Encode Best video for Instagram?

If your video is not friendly with Instagram, you can use Pavtube Video Converter to encode your video to H.264 MP4 (best video setting for Instagram) with several simple steps.

DJI 4K video to Instagram 4K videos to Instagram MP4 video to Instagram GoPro 4K videos to Instagram

Key features of Pavtube Video Converter (Read Review)

*Convert any SD, HD, 4K video to Instagram supported H.264 MP4 video format.
*Edit your video to suitable video like < 60 secs for Instagram.
*Basic video editing functions: split, merge, trim, crop, add watermark, adjust video effect, edit audio and insert subtitles.
*Lossless Conversion: Convers any video files without the risk of losing its original quality.
*Compatible with Windows 10, Windows 8.1, Windows 8, Windows 7, Windows XP
*Mac version is Compatible with macOS Sierra, El Capitan Yosemite, Mavericks, Lion.

Free download this best software for Instagram

Part 3. How to Use Pavtube Video Converter to edit video, encode video for Instagram?

Step 1: Load video files

After installed Instagram video converter, launch it on your computer. Then click "File" button on the top menu to load your any Instagram video that you want to upload to Instagram.

load video

Step 2: Choose MP4 Format

Click "Format" button to open drop-down list and there you can choose MP4 format. You can choose MP4 format for Instagram in "Common Video" and "HD Video" categories.

mp4

Step 3: Now, click "Settings" on the main interface to start to adjust video and audio parameters to fit in Instagram according to the below specs.

Video Size: 1080p
Video Bitrate: 3,500 kbps
Video Frame Rate: 29.96 fps
Audio Codec: AAC
Audio Bitrate: 128kbps

instagram settings

Step 4: Trim video to 3-60 seconds for Instagram

Now, click "Edit" to open video editing window. In “Video Editor” there are seven edit tabs: Trim, Crop, Text Watermark, Image/Video Watermark, Effect, Audio Editor and Subtitle.

The "Trim" feature allows users to decide where to start and where to end when converting the selected clip, so that unwanted segments will be cut out after conversion.

setting

Step 5: Click the "Convert" button on the main interface and the software will start to convert  to friendly video formats immediately. When the conversion finishes, click "Open" to find the converted video files. Then you can effortless transfer the video files to Instagram for somooth uploading.

Read More:


Thursday, March 23, 2017

Convert MP4 Files to TiVo Format on Mac

Do you have a Tivo and some MP4 video on Mac? Want to transfer MP4 files from your Mac to TiVo for enjoyment? It is difficult to transfer MP4 videos to Tivo directly. You’d better convert MP4 to Tivo format on your Mac for enjoying them by sitting comfortably on your cozy Sofa. This article gives you the way of converting MP4 to Tivo format on Mac for nice watching.

Best MP4 to Tivo Video Converter

Here Pavtube iMedia Converter for Mac is recommended to fulfill the task. The program is an all-in-one video converter tool that lets you effortlessly convert your video and audio files from one format to another at ultra-fast speed. It can easily convert MP4 to Tivo supported format like MPEG-2 with only 3 steps. With it you can also change your MP4, MKV, AVI, VOB, WMV, FLV, MOV videos etc to TiVo format without any quality loss. Besides, it can be designed as TiVo HD Converter so that you can convert and transfer your TiVo recordings to your portable devices for enjoyment anywhere anytime. Windows user can get Pavtube Video Converter Ultimate.

Key features of this MP4 to Tivo Video Converter

  • Convert MP4, MKV, AVI, MOV, FLV, VOB etc to Tivo supported formats
  • Convert Tivo recordings to MP4, MKV, AVI, MOV, WMV for usages.
  • Convert MP4 and other video to mobile phones, Android, iPad, iPhone, Apple TV, NLE and other popular end devices.
  • Custom Video: Personalize videos with diversified video editing tools.
  • Allow you to complete the conversion process with three simple clicks.
  • Compatible with macOS Sierra, El Capitan Yosemite, Mavericks, Lion.

Hot search:

2D to 3D MP4 MP4 to MOV MP4 to Audio
MP4 to projector MP4 to TV MP4 to PS4

Free download this MP4 video converter for Tivo (Mac)

How to Convert MP4 to Tivo on Mac?

Step 1. Add MP4 videos

Drag & drop MP4 files to the program. Or click "Add Video" button to locate the MP4 files you want to add.

Step 2. Choose format

Hit the drop-down list of "Format" to choose "Common Video -> MPEG-2 Video(*.mpg) as the best format.

Step 3: Start converting MP4 for TiVo

As soon as all the above settings are completed, you can press "Convert" button to start MP4 to MPEG-2 conversion for playing with Tivo. After conversion is done, simply click "Completed" to back to main interface, and click "Open" button to find generated output videos and then transfer it from your Mac to TiVo for playback flawlessly.

Free download this MP4 video converter for Tivo (Windows)

Related Articles:

Thursday, March 16, 2017

Edit Canon EOS 77D footage in Resolve, Vegas Pro

We loved the Canon EOS Rebel T6s, the first camera in the company's consumer family to incorporate premium features like a rear control wheel and a dedicated information LCD. But instead of following it up with a T7s, Canon has decided to call its successor the 77D, separating it from the Rebel line so enthusiasts will pay more attention. The 77D has a larger top information display than the T6s, and also adds a rear AF-ON button, which isn't included in any Rebel model. Video tops out at 1080p at up to 60 frames per second, which is a disappointment when you consider that more and more cameras are adding 4K capture as a standard feature.

And Canon EOS 77D record video in .mp4 format. Want to edit Canon EOS 77D MP4 in Vegas, Resolve, Camtasia, VirtualDub, GoPro Studio for sharing? From some forums, we found some users have troubles importing and editing Canon EOS 77D MP4 video in editors including Vegas, Resolve, Camtasia, VirtualDub, GoPro Studio etc. So how to get Canon EOS 77D MP4 video worked in Vegas, Resolve? The best workaround is to change your Canon EOS 77D MP4 video to Vegas, Resolve and otherCamtasia, VirtualDub, GoPro Studio editable format with a program.

Choose a Canon EOS 77D Video Converter for Vegas Pro, Resolve etc

What you need is a just a common Canon MP4 video converter like Pavtube HD Video Converter for Mac. It supports creating high quality Canon EOS 77D video for your editor, no matter what's the format of your source video files. It can convert and compress almost any video including MP4, MKV, MOV, MTS, XAVC, XAVC S, MXF, etc. to seamlessly suit for Vegas, Resolve, Camtasia, VirtualDub, GoPro Studio and other editors - Pinnacle Studio, Premiere Pro, Avid Media Composer, Windows Movie Maker, Sony Vegas Pro, PowerDirector, etc to satisfy your diverse editing demands. Plus, it comes with all regular video editing tools like Trim, Crop, Effect, Watermark, 3D creating, etc.. Now don't hesitate to download it and follow the step-by-step guide to transcode Canon EOS 77D videos for editing in Vegas Pro, Resolve, Resolve and more smoothly.

Free download this Canon EOS 77D video converter for Resolve, Vegas Pro

How to Get all Canon EOS 77D video to Resolve, Vegas Pro ediatble video on Mac?

Step 1. Launch the Canon EOS 77D video conversion software on Mac and click "Add File" to load the Canon EOS 77D video files you want to convert. Or directly drag Canon EOS 77D video videos to the NLE Converter. After the files are loaded, you can preview them and take snapshots of your favorite video scenes.


Step 2. Click the format bar or the pull down menu of “Format” to select output format-Adobe Premiere/Sony Vegas > MPEG-2 (*.mpg) for Vegas Pro editing, choose "Avid DNxHD (*.mov)" from "Avid Media Composer" for Resolve editing.

TIP: Specify the Settings. To get the best video quality and sound effect, you are allowed to easily adjust video/audio parameters such as bitrate, sample rate, frame rate, codec, channels, etc after clicking on "Settings"

Step 3. At the end, click the "Convert" button to start the Canon EOS 77D to Resolve, Vegas Pro conversion. When the conversion is finished, you can click "Open" button to get the generated video files effortlessly. After transferring files into Resolve, Vegas Pro, we are glad to tell you it’s time to enjoy editing Canon video files there.

Read More:

Thursday, March 9, 2017

Best 5 MXF Converter for macOS Sierra/Windows 10

MXF is a file format that is widely used by Canon, Panasonic, and Sony HD camcorders but remains unaccepted by media player, like QuickTime, and video editing software. Being a replace of dominated format, like MP4, AVI, MOV, etc. is still a long shot for MXF format. The best solution is to get a MXF converter, converting MXF to popular format like MOV, MP4 which not only delivers great simplicity and high quality, but also works perfectly with QuckTime, iMovie, Final Cut Pro, Windows Movie Maker etc.

Luckily, quality MXF video converters have been around for several years, allowing users to convert their precious video footage into a number of desirable formats as well as MXF. Here we list the Top 5 MXF converter for Windows and Mac in 2017 according to Google ranking and user popularity. Check them now.

We list best 5 MXF converters from MXF video conversion speed, safe, video quality, easy-to-use etc terms, you can choose your desire one according to the following lists.

[2017] Top 5 Best MXF Video Converter for Mac(OS Sierra)/Windows (10)

Tpo 1 MXF Converter - Pavtube iMixMXF/MXF MultiMixer

Known as the best MXF video converter software, Pavtube iMixMXF brings all tools into one amazing program that enables video conversion, and is also a video editor with powerful MXF video editing functions etc. It helps import and export MXF files with the multiple audio tracks/channel, if the video shot with an external mic , then this MXF Multimixer will be the best choice. Other than that, it helps convert the MXF files into any other formats for future editing in Avid Media Composer, Sony Vegas, Adobe Premiere, playback on iDevices, Android tablet, Windows phone, etc, HD Media Players like WDTV and more.

This brand new MXF Multimixer help to deal with MXF files come from XAVC shooting mode, add H.265/HEVC decode/encode to get better video quality, H.264 baseline/main/high profile added to solve the video compatible problem with old system and devices. For MXF videos from Panasonic P2 card, you can directly import the MXF video and the audios (either multi-track or not ) will be automatically detected and imported to match the MXF video.

If you running on Windows PC, please turn to Windows Version page >> MXF MultiMixer

Top 2 MXF Converter - MXF Converter for Mac/Windows

MXF Converter for Mac is a smart MXF ASSISTAND ON Windows that integrates Canon, Sony, and Panasonic MXF Converter for Mac; it enables you to convert, edit video including crop/trim/add watermark /add subtitles/add 3D effect and other features. This new version has updated some remarkable points that you cannot ignored. MXF videos which shoot under XAVC mode can be imported without any problem. H.265/HEVC decode/encode is also added to make the converted files with a sharp quality, new H.264 baseline/main/high profiles added to solve some compatible problems with old devices.

With this outstanding MXF Converter , you can sooothly convert Canon, Sony, Panasonic MXF files and Avid/Blackmagic Design edited MXF files to bunch of different HD compatible formats for Sony Vegas, Adobe Premiere, Avid Media Composer, Windows Movie Maker, Pinnacle Studio and more other video editing software for further editing. So powerful MXF conversion, edit functions, you can choose it as excellent MXF converter.

If you running on Windows PC, please turn to Windows Version page >> MXF Converter

Top 3 MXF Converter - Calibrated{Q} MXF Import

Calibrated{Q} MXF Import works as a QuickTime import component on Mac OS X, this component mainly for solving the MXF files to Final Cut Pro 6/7/X importing and editing issue. Besides FCP, you can use this component to import and work MXF video with CatDV, Sound Track Pro, QuickTime player, etc. with it you can also import DNxHD .MXF files into Adobe CS 5.0/5.5/6.0. In our Top 5 MXF converter review we find the Calibrated{Q} MXF Import component only supports limited MXF files, so we rate it as No.3, its features are not rich as Acrok MXF Converter or others, and it is difficult to use.

Top 4 MXF Converter - MXF Import QT

In our top 5 MXF converter review, MXF Import QT is the most expensive plugin, it mainly works as MXF file reader for QuickTime. It can help you to access or open a broad range of MXF variations to the QuickTime movie format. This feature enables you to open MXF files with Final Cut Pro, Final Cut Server and other solutions. In the top 5 MXF converter review 2016 test, we find the MXF Import QT can open MXF files recorded by Panasonic P2 (OP-Atom), Sony XDCAM (OP1a), and Avid Media Composer. Some MXF files are not supported. As this MXF Import QT is so expensive and complicated to use, we rate it as No.4 in our MXF converter review test.

Top 5 MXF Converter - MXF4Mac Player

Some users may only have the need to play MXF recordings on Mac and Windows, so you may want a MXF video player. MXF4Mac Player is a MXF file reader and player for Mac, just like the feature of MXF Import QT, in our top 5 MXF converter review 2017 test, this MXF file player is not so easy to get, you will need to contact the support of its vendor to get the program, the software is not so friendly. MXF4Mac Player can open limited MXF files recorded by Sony XDCAM, Panasonic P2, etc. and it only has Mac version, so you can't play MXF on Windows. Compared to Acrok MXF converter, this software is useless, because Acrok MXF converter can also works as free MXF files player, and all other formats are supported, full screen watch is also supported in Acrok software, so in our top 5 MXF converter review 2017 test, we rate it as No.5.

Top Recommendation to choose best MXF video converter for macOS Sierra/Windows 10

After knowing the features of the top 5 MXF Video Converters, you can clearly know which converter is your needed one. The widest choices of video conversions; outputting a highest video quality; fastest conversion speed; various multimedia editing, mirroring, creating tools; extremely intuitive interface only 3 steps, all of these remarkable features have made iMixMXF/MXF MultiMixer & MXF Converter for Mac/Windows the top one based on the user ratings and software testing in the market. Of course, if you want to get multi-track video, you can directly choose iMixMXF/MXF MultiMixer.

Read More Guides:

Read More Review:

Source: http://file-editing-tips.over-blog.com/2017/03/best-mxf-converter