Thursday, May 11, 2017

How to Upload Snagit videos to Youtube?

Snagit has one of the most compact and intuitive interfaces of the applications we reviewed. There are three modules to choose from: All-in-One, Image and Video. All-in-One allows you to capture what's going on your screen and take screenshots without interrupting your recording. Image and Video are self-explanatory: They both give you expanded options for capturing screen shots and videos. After recording videos, you can upload them to YouTube for sharing. But if you have problems uploading compress Snagit videos to Youtube, you can find a solution for that.

Why Failed to Upload Snagit videos to Youtube?

Because some Snagit videos are not friendly with Youtube. YouTube recommended file container: MP4 which overlaps all the advantages with small file size, high compression rate (for high quality) and popularity. MP4 includes two video Codecs, namely, MPEG4 and H.264, which are both widely supported, together with AAC (2 Channel - 8 Channel) and MP3 as audio Codec. So in that case, you can convert your Snagit videos to Youtube supported MP4 video.

Best Snagit Video Converter for Youtube

Pavtube Video Converter Ultimate just meets your needs. It specializes in converting Snagit videos to YouTube supported video. It also can convert many other videos like MOV, MXF, MTS, M2TS, MPG, H.265, MP4, AVI etc to YouTube supported video and other videos you need. Besides, before converting your Snagit videos, you can use the built-in video editor to trim the Snagit videos into multiple segments with short duration and personalize the videos to achieve a better overall effect. (Read review)

Hot search

4K to YouTube MP4 to YouTube H.265 to YouTube Powerdirector video to YouTube

If you want to upload Snagit video files to YouTube on Mac, please turn to Pavtube iMedia Converter for Mac. Now just download the program and check out the steps below.

Step-by-step Guide to Convert Snagit videos to Youtube Supported Format

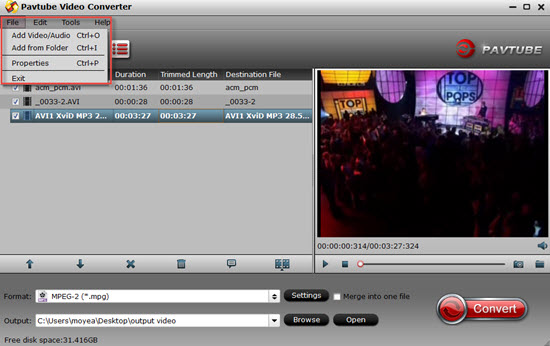
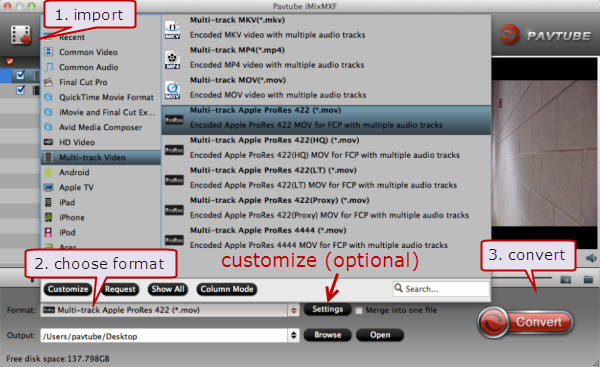
Step 1. Import Snagit video files

Lunch the converter; drag & drop Snagitfiles to it. Or click the Add video button to locate the files you want to add. Note that batch conversion is supported so you can add as many files as you like at one time.

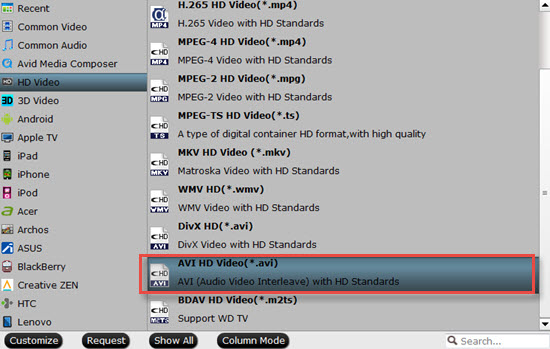
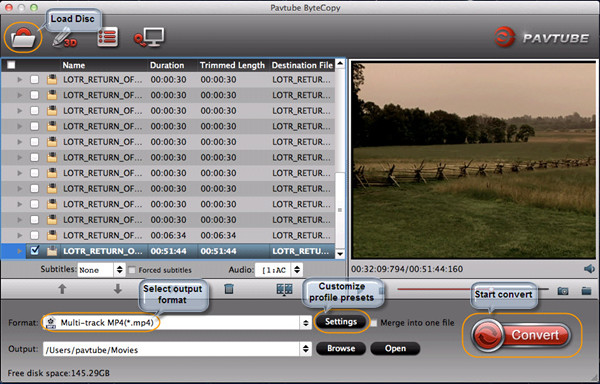
Step 2. Select output format

Click "Format" bar, and select .mp4 from "Common video" or "HD video" to fit YouTube. You can also press the Settings button to adjust the video size, bitrate, frame rate, audio sample rate, etc to optimize the quality.

Step 3. Trim/Split Snagit video

YouTube has limitations about the uploading video size and length. Here we should highlight the trim function on this software. Just click "Edit" to trim the Snagit videos to get the very part you want. Besides trimming, cropping, adding watermark, adjusting special effect, are well supported as well.

Tip: If the video clips you've trimmed are still longer than 15 minutes, you can choose to split the long Snagit video into smaller parts so as to share on YouTube without limit. Click the Split icon in the main interface, and you can cut your files according to time length and file size.

Step 4. Start the conversion

Click "Convert" button to start converting Snagit video for uploading to YouTube. After the conversion, click "Open" button to get the exported files and then upload the converted video files into YouTube for sharing with your friends, families, and fans.

Wednesday, May 10, 2017

Pavtube ByteCopy Gives you 50% OFF Promotion on 2017 Mother's Day

Mother’s Day is approaching soon. Great news for Blu-ray/DVD ripper software users for the upcoming Mother’s Day: Pavtube ByteCopy & Pavtube ByteCopy for Mac launch a big Mother’s Day promotion for all multimedia software users to celebrate Mother’s Day from now. You can get a Pavtube ByteCopy (for Mac) in only the half of the original price.

Everyone is invited to get the gifts and enjoy Pavtube ByteCopy/Pavtube ByteCopy for Mac 50% off discount coupon codes for Blu-ray and DVD enjoyment at: https://www.facebook.com/pavtubefans/app/198826126804423/

Pavtube ByteCopy & Pavtube ByteCopy for Mac 50% OFF Promotion on 2017 Mother's Day

A. Pavtube ByteCopy (Only $21 now)

Main features of Pavtube ByteCopy (Read Review)
*Rip Blu-ray, 4K Blu-ray, 3D Blu-ray, DVD to any video/audio formats.
*2 ways to copy Blu-ray/DVD: Full disc copy, direclt copy.
*Lossless Blu-ray/DVD to MKV backup with multiple audio/subtitle tracks.
*Convert Blu-ray/DVD to Multi-track MP4, MOV, AVI.
*Rip Blu-ray/DVD to iPhone, Android, player, TV, PS3/PS4, Editors, VR etc supported video.
*Improve H.265, H.264 Encoding Speed With NVIDIA GPU Acceleration.
*Allow you to complete the conversion process with three simple clicks.
*Editing tool: trim, crop, merge, insert subtitles, export srt/ass/ssa subtitles, add video effects.
*Compatible with Windows 10, Windows 8.1, Windows 8, Windows 7, Windows XP.
Free download and 50% off buy Pavtube ByteCopy

B. Pavtube ByteCopy for Mac (Only $21 now)

Main features of Pavtube ByteCopy for Mac (Read Review)
*Convert Blu-ray/DVD to 200+ Multimedia Devices and Formats
*Convert 2D Blu-ray/DVD to 3D Video/3D Blu-ray to movies in 3D MKV, 3D MP4, 3D AVI, 3D WMV, etc
*Best Blu-ray/DVD to multi-track MKV, MP4, MOV, Apple ProRes MOV solution.
*Rip Blu-ray/DVD to iPhone, iPad, player, TV, PS3/PS4, Apple TV, QuickTime, NLEs, VR etc supported video.
*Backup Blu-ray/DVD without Quality Loss with two copy ways.
*Personalize Movie With Customized Adjustments.
*Supported OS: macOS Sierra, Mac OS X 10.11 El Capitan, Mac OS X 10.10 Yosemite, 10.9 Mavericks, 10.8 Mountain Lion, 10.7 Lion, 10.6 Snow Leopard.
Free download and 50% off buy Pavtube ByteCopy for Mac

2017 Mother's Day Pavtube Other Products Big Promotion

A. 50% ~ 55% Discount Products

Windows Products
Pavtube Video Converter Ultimate
Pavtube BDMagic
Pavtube DVDAid
Pavtube Media Magician
Mac products
Pavtube iMedia Converter for Mac
Pavtube BDMagic for Mac
Pavtube DVDAid for Mac
Pavtube Media Magician for Mac

B. Only $9.9 Crazy Promotion Products

Windows Products
DVD Creator
Video Converter
MXF Converter
MKV Converter
MTS/M2TS Converter
HD Video Converter
MXF MultiMixer
FLV/F4V Converter
Mac Products
DVD Creator for Mac
Video Converter for Mac
MXF Converter for Mac
MKV Converter for Mac
MTS/M2TS Converter for Mac
HD Video Converter for Mac
iMixMXF for Mac
FLV/F4V Converter for Mac
To get more detailed information about the Pavtube 2017 Mother’s Day Big Promotion, don’t miss the Facebook promotion link: https://www.facebook.com/pavtubefans/app/198826126804423/, Happy 2017 Mother’s Day!!!
Source: http://i-freepedia.com/pavtube-bytecopy-mothers-day-promotion/

Wednesday, May 3, 2017

How to Import MKV to Sony Vegas Pro (14/13/12/11)

Sony Vegas is a professional non-linear editing system originally published by Sonic Foundry that can be workable with Windows computers. Many editor loves like to import their videos to Sony Vegas Pro for editing. However, when you import MKV to Sony Vegas, you may come across lots of problem:

“Hi, I have some video files in Matroska format (MKV). They don't seem to drag/drop onto the Vegas 14 timeline. Any workarounds or will I have to convert them to another format first? Which one/how?”

So what's the available workflow for getting Sony Vegas and MKV files to play nicely? If you're confusing about this, you've come to the right place. The article tells you an easy way to fix the issue.

See also:

MP4 to Vegas Pro
4K to Vegas Pro
AVI to Vegas Pro
MOV to Vegas Pro
ProRes to Vegas Pro

Sony Vegas Pro (14) Supported Formats

Import Format

4K XAVC S, 4K XAVC, XDCAM EX, XDCAM Optical, DV, HDV, AVCHD, NXCAM, MOV, MP4, WMV, MPEG-1/2/4, H.264/AVC, H.265/HEVC, WAV, FLAC, AAC, MP3, OGG, WMA, Surround Sound/5.1, BMP, PNG, JPEG, TIFF, OpenEXR-, DPX- and WDP image sequences

As you seen, Sony Vegas doesn't support MKV as an input format so it is impossible to import MKV files into Sony Vegas Pro including Sony Vegas Pro 14directly. The following step by step guide aims to introduce a widely used way to solve "Can't Open MKV in Sony Vegas" issue.

Best way to get MKV files into Sony Vegas Pro (14/13/12/11)

If you are unable to locate your MKV files into Sony Vegas Pro, you could adjust MKV toSony Vegas Pro file for editing immediately with professional video converting software at one go. Here Pavtube Video Converter is an easy-to-use yet professional MKV to Sony Vegas Pro Converter for Windows (Windows 10 also is included).

This full-featured MKV video converter will enable both novice users and advanced users to convert MKV to Sony Vegas Pro supported format and import MKV to Sony Vegas Pro with only a few mouse clicks, while retaining excellent video and audio quality for editing in Sony Vegas Pro. It also can convert Sony Vegas Pro file to any fomats you need like MP4, AVI, MOV etc. After the fast video conversion ends, you can import the video to Sony Vegas Pro directly and edit MKV in iMovie to create your own video clip. By running it, there's no need to set the codec by yourself: the Mac program has a optimized preset for Sony Vegas Pro. That’s great. (Read Review)

Free download the MKV to Sony Vegas Pro Video Converter

Full guide to Convert MKV to Sony Vegas Pro (14/13/12/11) supported video on Windows

Step 1. Load MKV video files

Run the best MKV to Sony Vegas Converter, and click the "Add" button to load .mkv videos. If you want to merge multiple clips just need to check the "Merge into one" box.

load-divx-file.jpg

Step 2. Choose output format for Vegas Pro

Click "Format" bar to determine output format. Follow "Adobe Premiere/Sony Vegas" and select "MPEG-2(*.mpg)" as the output format. Besides, you can also choose WMV (VC-1) (*.wmv) if you want to get a relatively smaller output file.

select-adobe-mpeg2.jpg

Tip Settings: In case the default settings do not fit your requirement, you can click "Settings" button and enter "Profile Settings" panel to adjust video size, bit rate, frame rate, sample rate and audio channels. If you want to keep you 5.1 Audio Channels, please set ac3 as audio codec.

Step 3. Start conversion

Click "Convert" button to start convert MKV to MPEG for importing to Sony Vegas Pro. When the conversion task is finished, click "Open" button to get the exported files. Now you have got it right, just to import and edit MKV files within Sony Vegas Pro 8/9/10/11/12/13/14 at ease.

Wednesday, April 26, 2017

Will Vegas Pro import AVI files?

Sony Vegas Pro can import most file types, but not all file types will work when you try to use them to make a movie. In this article, we take AVI as an example. Read on to get the reason and a solution for importing AVI video to Sony Vegas Pro for smooth editing on Windows (10).

Hot search MOV to Sony Vegas Pro MP4 to Vegas Pro 4K to Vegas Pro DJI 4K to Vegas Pro

AVI to Sony Vegas Pro Issues

  • When importing AVI to Sony Vegas, popup message says missing codec error.
  • When opening AVI with Vegas Pro, get "Unsupported video format" message.
  • No video in Sony Vegas when importing an .avi, only audio.
  • Sony Vegas no video when importing an .avi file (ONLY sound). Installing every possible codec still could not solve the problems.
  • Importing AVI files into Sony Vegas I could only see the audio. After installing Divx and Xvid codec, AVI problem solves temporarily. Then Xvid codec won’t work and there is no video for AVI files in Sony Vegas.

Why I can’t Open AVI files with Sony Vegas Pro

Sony Vegas Pro Import Format

4K XAVC S, 4K XAVC, XDCAM EX, XDCAM Optical, DV, HDV, AVCHD, NXCAM, MOV, MP4, WMV, MPEG-1/2/4, H.264/AVC, H.265/HEVC, WAV, FLAC, AAC, MP3, OGG, WMA, Surround Sound/5.1, BMP, PNG, JPEG, TIFF, OpenEXR-, DPX- and WDP image sequences

As you seen, Sony Vegas Pro does not support AVI format. So if you want to edit AVI video in Sony Vegas Pro, you can convert AVI to Sony Vegas Pro supported video like MPEG.

How to Get AVI to Sony Vegas Pro?

To import AVI to Sony Vegas Pro, the most obvious and direct solution here is to convert AVI to a format that's compatible with Sony Vegas Pro as mentioned before. The first thing we need is a powerful video converter to convert AVI to Sony Vegas Pro compatible format. I would recommend you Pavtube Video Converter, a powerful and practical video converter for Windows (10). With it, you can convert SD AVI, HD AVI, 4K AVI video to Sony Vegas Pro best video for smooth editing. (Read Review)

Why Choose Pavtube Video Converter:

-It is capable of converting a video like AVI, MOV, MP4, MKV, MXF etc. to a format that is compatible of working with Sony Vegas Pro.
-It enables you to convert the videos from the tape based camcorders like Canon 5D Mark IV, Canon T7i, Canon C15 etc.
-It supports converting video between any video and audio formats like MKV to MP3, MP4 to MP3, etc.
-It comes with a lot of practical video editing features like Trimming, Cropping, Adding watermark/effect etc..
-It comes with built-in device and editor presets like iPhone, iPad, Sony Vegas Pro, Avid MC, Premiere Pro, Windows Movie Maker etc.
-Compatible with Windows 10, Windows 8.1, Windows 8, Windows 7, Windows XP.

Free download the AVI to Vegas Pro video converter

How to Convert AVI to Sony Vegas Pro supported video on Windows (10)

Step 1. Add AVI Files

You need to add AVI files to the AVI to Sony Vegas Pro converter before all. You can do this by dragging the video files to the program. Alternatively, you can go to "Add file" to import AVI files you want to play on Sony Vegas Pro. Note you can only add AVI file one by one.

Step 2. Choose Format

Click the format column to choose output format. For Sony Vegas editing, Adobe Premiere/Sony Vegas > MPEG-2 (*.mpg) is one of the best compatible video formats for you to choose.

Step 3. Convert AVI to Sony Vegas Pro

You can then start AVI video to Sony Vegas Pro conversion. When the conversion is done, you can edit AVI video in Sony Vegas Pro without any problems. Enjoy!

Wednesday, April 19, 2017

Import MXF to HitFilm Pro 2017 for editing

t goes without saying, there’s plenty of video editing software on the market. The first ones that come to mind are big names like Adobe Premiere Pro and After Effects, Final Cut Pro, Magix Vegas, DaVinci Resolve, etc. What makes HitFilm unique compared to most other products on the market, though, is the fact that it’s a one of a kind combination of a non-linear editor (NLE) and a video compositing tool capable of working with 3D objects. For editing common videos, you can also import them to HitFilm Pro 2017. But no thing is perfect. Some video like MXF can't be accepted by HitFilm Pro 2017.

Why MXF wont be imported to HitFilm Pro 2017?

Though HitFilm Pro 2017 claims it does support MXF fomat. Buy you need to know only some MXF video like DVCPro HD MXF is supported by HitFilm Pro 2017. Just take a look at HitFilm supported formats:

Supported Video

• AVCHD (M2T, MTS, M2TS)
• AVI (including 10-bit and 12-bit GoPro Cineform) (Windows only)
• DV & HDV
• MP4 (AVC/H264 & AAC)
• MPEG-1 & MPEG-2 (TS, PS, MPE, MPG, MPEG, M2V)
• MXF (DVCPro HD)
• Quicktime MOV (including 10-bit and 12-bit Pro-Res) (requires that an up to date version of Quicktime is installed on your computer)
• WMV

Supported Audio

• AAC
• MP3
• M4A
• MPA
• WAV
• WMA

Solution for Importing MXF video to HitFilm Pro 2017

In order to make a highlight video out of Canon/Panasonic/Sony recorded MXF video files, we have to convert MXF to HitFilm Pro 2017 compatible format like AVI, MP4, MOV etc before importing. Turn to third-party programs or codec for help, you can achieve your goal smoothly. This will help you import the MXF file into HitFilm Pro 2017 correctly and save the rendering time.

Here we recommend Pavtube MXF MultiMixer which is not only able to convert MXF to HitFilm Pro 2017 editable format for easy editing in HitFilm Pro 2017, but also edit all kinds of videos. Therefore, you have two options to edit HD-camera recorded videos. It also can convert MXF video to other editors like Davinci Resolve, FCP, iMovie, Premiere Pro, Avid Media Composer friendly formats for smooth editing on Mac. What’s more, it also helps import and export multi-track MXF. Choosing formats in Multi-track Video category from Format box, you can get MKV/MOV/MP4 videos with multi tracks encoded with Apple Prores, or other codec.

→ Now Free download MXF MultiMixer for converting MXF video to HitFilm Pro 2017 supported video on Mac. If you are a Windows user, you can free download Pavtube MXF MultiMixer.

Convert and Import MXF to HitFilm Pro 2017 for Editing

Step 1. Load MXF video files

Run the program and click "Add File" to import the MXFvideos. You can also directly drag the video clips into the program for conversion.

Step 2. Set right output format for HitFilm Pro 2017

Click "Format" bar, and select MP4, AVI, MPEG from "Common video" or "HD video" to fit HitFilm Pro 2017.

Step 3. Convert MXF to HitFilm Pro 2017 friendly video format

Click the "Convert" button on the main interface and the software will start to rewrap MXF to HitFilm Pro 2017 friendly video formats immediately. When conversion finished, click "Open" to find the converted video files. Then you can effortlessly import the converted MXF files to HitFilm Pro 2017 for editing later.

Thursday, April 13, 2017

Convert and Export iMovie Project to AVI in High Quality

Usually, iMovie exports typically in QuickTime formats with extension .mov. However, sometime we may have the need to export iMovie file to AVI for smooth playing on some devices. How to get that done? using Pavtube HD Video Converter for Mac will enable you to convert this iMovie to AVI. Read on to learn how to convert IMovie project to AVI format with simple steps in Pavtube HD Video Converter for Mac.

Best Converter to Convert iMovie Format to AVI

With Pavtube HD Video Converter for Mac, you can convert iMovie to AVI in HD, as well as MP4, WMV, etc. so that you can watch them on Windows computer, android devices, and more. What's more, this program can also works well with different videos from other NLEs like FCP, Premiere Pro, Avid Media Composer etc. Let's together see how to convert iMovie to AVI on Mac (macOS Sierra, El Capitan Yosemite, Mavericks, Lion included).

More features Pavtube HD Video Converter for Mac includes:

  • Convert iMovie file to any formats including AVI, MP4, MKV, WMV and more.
  • Convert MP4, MKV, AVI, MPEG-2, MXF, MOV, MTS, XAVC, FLV etc to iMovie editable format.
  • Convert MP4, MKV, AVI, MXF, MOV, MTS, XAVC, FLV etc to FCP, Premiere Pro, Avid Media Composer, DaVinci Resolve.
  • Convert iMovie, FCP, Premiere Pro, Avid Media Composer, DaVinci Resolve files to any formats.
  • Basic video editing functions: split, merge, trim, crop, add watermark, adjust video effect, edit audio and insert subtitles.
  • Custom Video: Personalize videos with diversified video editing tools.
  • Allow you to complete the conversion process with three simple clicks.

Simple Processl to convert iMovie videos to AVI format on Mac

As mentioned above, first you need to export your finished movie from iMovie to Mac, either through Share > Export Movie or simply pressing Command+E to open a dialog and export your movie to computer. The movie will be saved into M4V or MOV depending on your selected option. Now let's begin the iMovie to AVI conversion process.

1. The first step is to import your .iMovie file into the video converter. You have two ways to do this: simply drag-and-drop your files or use the files tab in the converter's interface to browse for your iMovie files in your computer.

2. In “Format”, you can choose HD AVI or AVI from “HD Video” or “Common Video” .

Tip: If you like, you can click the "Settings" to set parameters like video codec, resolution, bitrate, frame rate, audio codec... for your devices.

Step 3. Click the "Convert" button to start iMovie to AVI conversion on Mac. The excellent Mac Video Converter will do the rest for you automatically. The length of conversion time will depend on the length of your movie, the format you choose, and the speed of the computer.

Read More:

Thursday, April 6, 2017

Put DVD to Premiere Pro (CC/CS6/CS5/CS4) on macOS Sierra

Question:

"I have a wonderful DVD borrowed from my roommate, and I wish to import this DVD to my Final Cut Pro for editing on it and using some of the video in another project. However, each time I've tried to put DVD to my Premiere Pro I received an error code. Any suggestion? By the way, I want the picture quality to be as best as possible. Thanks in advance."- Lucy

Answer:

Adobe Premiere Pro is a timeline-based video editing software application. Touting non-linear advanced and powerful editing features, it is definitely the best tool to edit and make your personalized videos or movies on Mac & Windows. For those who want to import DVD to Premiere Pro for editing, it isn't without hiccups because Premiere Pro does not support DVD importing. Fortunately, there is an easy way to fix this problem.

MXF to Premiere Pro MP4 to Premiere Pro H.265 to Premiere Pro MP4 to Premiere Pro
M2TS to Premiere Pro MKV to Premiere Pro GoPro video to Premiere Pro iPhone video to Premiere Pro

Get a DVD to Premiere Pro Video Converter (Professional, Easy-to-use)

There are a number of DVD to Premiere Pro video ripping software for creating digital copies that are workable on your Mac. But you’d better choose one excellent one. Pavtube ByteCopy for Mac can convert the disc to a movie file compatible with Premiere Pro and other NLEs like Final Cut Pro, iMovie, Avid Mc etc with only 3 steps. It also can convert DVD to any formats including MP4, MOV, MPEG-2, WMV, AVI, MKV and more. Of course, if you have any needs of ripping Blu-ray to Premiere Pro, or copying Blu-ray, you can also use this professional Pavtube ByteCopy for Mac.

Know more about this powerful DVD/Blu-ray program:

  • Rip DVD, Blu-ray, 4K Blu-ray, 3D Blu-ray to any video/audio formats.
  • Lossless DVD/Blu-ray to MKV backup with multiple audio/subtitle tracks.
  • Convert DVD/Blu-ray to Multi-track MP4, MOV, AVI.
  • Rip DVD/Blu-ray to iPhone, Android, TV, PS3/PS4, Apple TV, VR etc supported video.
  • 2 ways to copy DVD/Blu-ray: Full disc copy, direclt copy.
  • Export single SRT subtitle file.
  • Personalize videos with diversified video editing tools.
  • Allow you to complete the conversion process with three simple clicks.

Free download this DVD to Premiere Pro Converter (Mac)

How to Rip DVD to premiere Pro supported video on mac

Step 1. After successful installation, click the "Load file(s)" to browse disc drive and import your DVD into this app.

Step 2. Hit the Format box and select Adobe Premiere/Sony Vegas --> MPEG-2(*.mpg) as output format and then set the output destination as you want.

Tips: The default settings may not satisfy you, and you can click the "Settings" button to change the settings by yourself including video resolution, bit rate, audio sample rate, audio channel etc.

Step 3. Finally, click “Convert” button to begin the DVD to MPEG-2 ripping for editing in Adobe Premiere Pro smoothly. After the conversion finished, you can get the videos highly compatible with Adobe Premiere Pro CS3/CS4/CS5/CS6. Just launch Adobe Premiere Pro and import the converted videos to it and enjoy editing.

Free download this DVD to Premiere Pro Converter (Windows)

Read More: