Wednesday, May 15, 2013

RAW 24fps DNG video hits the Canon EOS 5D Mark III via Magic Lantern!


It's no secret that Canon's 5D Mark III is the go-to DSLR for videographers the world over, but things are about to become a whole lot more interesting. The people behind Magic Lantern have successfully coaxed the 5D Mark III into shooting 24 fps RAW video at resolutions up to 1,920 x 820 pixels using 1000x speed cards. If you're not familiar with Magic Lantern, it's an open source firmware add-on that brings additional functionality to Canon EOS cameras. The ability to capture RAW video at 24 fps improves dynamic range and resolution -- it also provides extra flexibility during post-production. According to the team at Magic Lantern, more work is required before the feature is ready to be deployed. So until then, you're invited to follow the via link below and watch the RAW vs. H.264 videos after the break, or if you're feeling brave, check the source for download locations.

Yes, thoungh initially the Magic Lantern team didn’t even think it was possible, they’ve now enabled 24fps RAW HD video (without sound) on the Canon EOS 5D Mark III

This is HUGE news. The dynamic range is now in the range of what people are so excited about with the Blackmagic Cinema Camera and Alexa and other cams. 


So what does this mean? As I mentioned above, the dynamic range of the video is stunning and is on par with the Blackmagic Cinema Camera and other cameras.  

Update: We just received news from Magic Lantern that Canon's Mark II is now also a go for 24 fps with the new firmware. Nic from the development team said "After some further testing it is clear the older, cheaper Mark II should be able to record at least resolutions of 1880x840 in full-frame mode (with line skipping)."

More info for you:

Tuesday, May 14, 2013

How to convert Panasonic P2 HD MXF to ProRes for Final Cut Pro

Pavtube iMedia Converter for Mac is an easy-to-use and intuitive Mac MXF to ProRes Converter tool which can help you transcode recorded P2 HD MXF clips to ProRes 422, ProRes 422 HQ or 4444 for smoothly editing with Final Cut Pro 6/7/X.
 
Recently many camcorder producers have released their high-end products to attract video editors with high tech in their camcorders. You'd know that professional camcorders series usually use MXF container format to record videos instead of AVCHD format, which is often used in family expenses camcorders.

MXF is a special HD video format which has been put to use in many high-end camcorders such as Cannon XF series and Panasonic P2 HD series (including AG-HPX170, AG-HVX200, AG-HPX300, AG-HPX370, AG-HPX500, AJ-HPX2100, AJ-HPX2700, AJ-HPX3000, and AJ-HPX3700, etc.). Files are saved onto the P2 memory card in MXF format allowing direct data transfer to broadcasting and production system.

However, those files in MXF format have proved to be not so well-suited when they are about to be edited in Final Cut Pro.

The footage came from a Panasonic DVCPRO HD P2 camera. I have converted many files from this same camera with no problem but for some reason now it has no audio. I cannot find that screen you have referenced below. Is there a way someone can help walk me through this? 

To edit Panasonic P2 video footage with Final Cut Pro, you have to convert P2 MXF to FCP natively supported video format like MOV with Apple ProRes Codec. Here we recommend you the best  P2 MXF Converter for Mac which can help you to transcode Panasonic P2 MXF to Apple ProRes .mov format for FCP on Mac OS X quickly and easily.  Here comes the detailed guide. 

Notes:
  1. Please ensure that the computer you are using to do P2 MXF conversion has Final Cut Pro installed, otherwise, the converted files will have audio only without image.
  2. If you are using FCP X, please make sure you have installed ProApps QuickTime Codecs, or you may get files with sound only without video. The FCP X does not install the ProApps QuickTime Codecs automatically, so you need download and install the codec manually.
While importing MXF clips to Pavtube MXF to ProRes converter for conversion, please make sure you have the entire MXF file structure as it saved on your camcorder’s P2 card. If you only have some loose .MXF clips, your files will have image only without audio. See MXF file structure on Panasonic’s P2 card as below.


The above screenshot clearly shows .MXF clips are all saved in ‘VIDEO’ folder, while audio files are all stored in ‘AUDIO’ folder. When you importing .MXF clips from the correct file structure, Pavtube MXF to FCP Converter is able to recognize audio tracks from ‘AUDIO’ folder automatically, which ensures the generated ProRes 422 MOV files have both image and sound correctly.

Step 1: Click “Add Video” button to import P2 .mxf files


Step 2: Choose “Apple ProRes 422 (*.mov)” as output (Pavtube iMedia Converter for Mac has a preset option to choose a format specific to the Final Cut Pro)

convert-avchd-prores-422-hq-mov


Step 3: Click “Convert” button to convert P2 MXF on Mac

As soon as the conversion is finished, click “Open” button to get the generated Apple ProRes 422 MOV files to FCP (X) for extending editing.

Read Related Articles:

Friday, May 10, 2013

2013 Mother's Day Sale-Big Promotion- Get 30% OFF Blu-ray/DVD Ripping Tool on Mac

HOOOOOOOOT NEWS: Mother's Day happens to be just around the corner, and we sincerely hope you've got plans to show as well as tell your mom how much you love her. If you haven't figured out a strategy, take a look at Pavtube 2013 Mother's Day Promotion. The most popular software Pavtube iMedia Converter for Mac, Video Converter Ultimate, Blu-ray Ripper and DVD Ripper is at 30% off Discount expiring on May 22, 2013Time-limited! Never Miss! 
 
Pavtube's Mother's Day Lowest Promotion- Get 30% OFF iMedia Converter for Mac

Wednesday, May 8, 2013

Premiere Pro Tutorial: Create Highly Stylized Looks in Your NLE


We've been talking quite a bit about Adobe over the past few months, as they've announced new versions of all their major desktop applications andended the Creative Suiteas we know it. Even though some folks are none too thrilled with Adobe right now due to the complete switch to the Creative Cloud, they still make what many consider to be the rising star of NLEs with Premiere Pro, and it's more packed than ever with features to make filmmaker's lives easier. Today we're going to explore two of the lesser known color effects that come with Premiere Pro, the Leave Color and Change to Color effects. While these might not be something you will use day-to-day, they're an excellent option when you need to create some highly stylized shots at a moment's notice. So without any further ado, here are the tutorials, straight from Creative COW


The most obvious example of how effects like these can be used is Robert Rodriguez's Sin City. However, they can also be used in much more subtle and sophisticated ways. For example, by layering your video tracks and putting different instances of the leave color effect (alongside another color effect such as the Three Way Color Corrector or RGB Curves) on each track, you can push various chrominance values in the image to their extremes while leaving others under-saturated. By using the Change to Color effect alongside a method such as this one, you can completely warp your color palette into something entirely different from what you shot (although your DP may never speak with you again). 

Of course, if you work with moving or handheld footage frequently, After Effects or DaVinci Resolve will be better solutions for creating these types of effects due to their advanced tracking functionality. However, being able to stay in your NLE and create these effects quickly can be an invaluable tool for the one-man-band types of filmmakers who are on tight deadlines, as well as for bigger productions where the producer or director want to see some temp effects before the picture lock is sent off to the VFX and color departments. 

Quite frankly, there are some astounding (and downright bizarre) things that you can do with color inside of Premiere Pro. By better knowing all of the color effects inside of Premiere and how they interact with one another, you can better prepare yourself for anything and everything that a director or client could ever ask of you. If you want more of these fantastic Creative Cow tutorials, hop on over to their Premiere Pro Techniques series and get to it. 

What do you guys think? Have you ever used these effects, and to what degree? Do you have any suggestions for how to creatively apply them? Let us know in the comments. 

Link: Premiere Pro Techniques (CS6 and Above) with Andrew Devis — Creative COW

Tuesday, May 7, 2013

FCP and Canon MOV transcoding- Convert Canon 1D H.264 MOV to FCP X with Apple ProRes

Canon EOS-1DX, a fantastic camera that can deliver high quality videos with the full-frame 18.1 Megapixel CMOS sensor and all-new Dual DIGIC 5+ Image Processors, features the Enhanced EOS HD Video at 1920 x 1080 in selectable frame rates of 24p, 25p, or 30p; and 720p HD or SD video recording at either 50p or 60p. In the dimmest low-light conditions it can also provide sharp, low-noise images low-noise images.


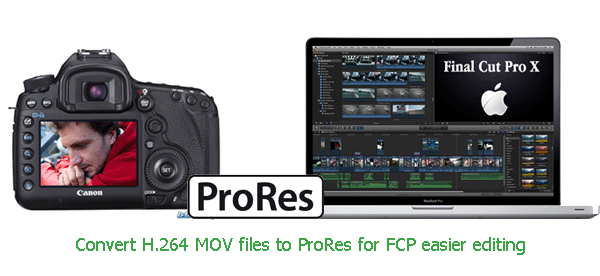
However, here comes the problem. How can we edit video files shotting by Canon EOS-1D C in FCP? We all know that Final Cut Pro provides non-linear, non-destructive editing of any QuickTime compatible video format . But frequently, we will notice that, sometimes .MOV video files taken by some DSLR camcorders could not be read by FCP directly, such as Nikon DSLR, Canon DSLR. Why? It is codec problem that MOV works as container format which can hold most codec data, but it still may contain the codec that FCP could not recognize just as Canon EOS-1D C MOV files. If you want to import Canon EOS-1D C MOV to FCP for better video enjoyment, you will have to use a practical Mac MOV to FCP converter.

Final Cut Pro supported best video format is Apple ProRes 422 Codec MOV format, so in a word, you need to convert EOS 1D MOV to ProRes 422 codec MOV format . You can follow the steps below to edit EOS 1D video well in FCP on Mac.

The preparation you need to do is that to find a best MOV to FCP converter for mac.

Step by step for you to convert Canon EOS-1D C MOV to FCP compatible format.

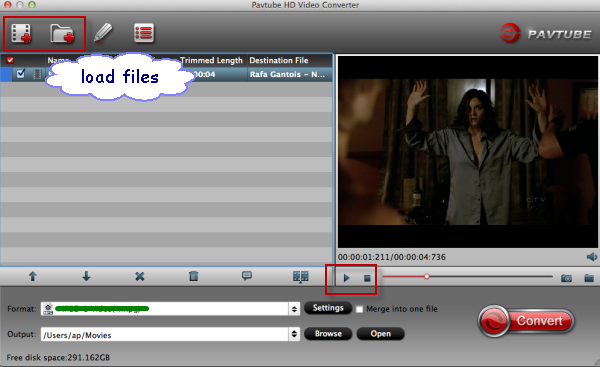
Step 1. Load Canon EOS 6D mov files.

After install, open up the professinal Canon 6D MOV to Final Cut Pro Converter. Click "Add video" or "Add from folder" tag to browse and load source MOV files from your Canon 6D camera directly or from an archived folder saved on your HDD. You are allowed to add multiple files to convert at a time.

Tip: If you have multiple MOV files, you can select the "Merge into one" box to join your MOV files into one single file.


Step 2. Select output format for Final Cut Pro 6/7/X.

Click "Format" column to choose the "Final Cut Pro -> Apple ProRes 422 (*.mov)" Apple ProRes 422 MOV as best output format for editing in FCP 6/7/X.


Step 3. You can click settings button to adjust the output video and audio’s parameters, such as resolution, bitrate, codec and frame rate, etc.


Step 4. Edit function is useful and convenient for you to use. You can trim, crop, adjust effects or add watermark to the video. such as "how to trim and maintain a certain section of a Canon 6D MOV clip?"

Click "Edit", when the "Video Editor" interface appears, switch to "Trim" tab, on which you are allowed to trim your wanted section by setting Start and End time. When finished, click "OK" to confirm.


Step 5. Convert Canon EOS 6D MOV to ProRes 422 MOV for FCP 6/7 or FCP X.

Click "Convert" button to start convert Canon EOS 6D H.264 MOV videos to ProRes 422 MOV for working within Final Cut Pro (or FCP 6/7, FCP X). When the conversion is done, click "Open" button to get the generated ProRes 422 files for using in FCP 6/7/X.

After converting Canon EOS 6D MOV files, just according to the following tutorial 
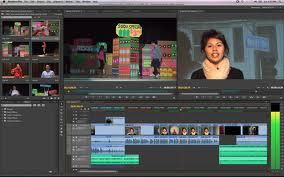
import the output Apple PreRes 422 .mov files to Final Cut Pro (X), Final Cut Pro 7 or Final Cut Pro 6 for editing the video. Optimize your workflow and save time with the Apple ProRes compression for Final Cut Pro X. You can also import the output videos to Final Cut Express 4 (FCE 4) for editing in full HD.

Additional Contents

Pavtube HD Video Converter for Mac can also help you convert Canon EOS 6D MOV files to Mac Compatible Formats like ProRes 422(*.mov), Apple Intermediate Codec (AIC)(*.mov), Avid DNxHD, XDCAM MOV, HDV, DVCPRO, MOV(AVC), H.264 MOV for editing software FCP (X), iMovie, FCE, Avid Media Composer, Adobe Premiere Pro, Apple Aperture 3, Kendlive, etc or convert to other common formats such as MP4, WMV, MPG, MPEG, 3GP, AVI, and even H.264 MOV for other usages. Only need to change the "step 2″:

- choose "Avid DNxHD (*.mov)" for Avid Media Composer
- choose "Apple InterMediate Codec (AIC) (*.mov)" for iMovie or Final Cut Express
- choose "MOV (AVC) (*.mov)" for Adobe Premiere Pro

Good-fellowship clew: Here is a Free DVD Creator for Mac, it can help you free burn Canon 1D MOV video to DVD disc on Mac (include Mac Mountain Lion 10.8).

The last step you need to do is to imput the created file from Canon EOS-1D C MOV Converter to FCP.

Read Related Articles:

Monday, May 6, 2013

Deinterlace and Convert Canon VIXIA HF G20 1080 60i AVCHD recordings to FCP X

This article will show the best way to convert Canon AVCHD to ProRes 422, so that you can import Canon Vixia HF G20 1080 60i .MTS files into Final Cut Pro X for smooth editing work.
Canon VIXIA HF G20 Full HD camcorder, as the Canon's VIXIA family's a new member, has come to us along with the HF R-series. According to the camera maker, the G20 is designed to rival pro-level camcorders in image quality. It captures Full HD 1920x1080p videos in MPEG4 or AVCHD format. Intended for professionals, the G20 features nine Cinema-Look Filters to create video with a variety of professional cinematic look and Professional Shooting Assist functions.

As a Mac and FCP user, I like to edit 1080p AVCHD video with FCP X. Final Cut Pro X users always have the headache since they find the problem editing Canon VIXIA HF G20 AVCHD 1080i files in FCP X on Mac. How to solve the incompatibility is the key to make Canon HF G20 more convenient for shooting and editing. And as far as we know Apple ProRes is perfectly compatible with Final Cut Pro.

So the problem becomes easier to solve. Just find out a converter, which can transocde Canon HF G20 AVCHD recordings to ProRes on Mac and keep the quality as original. Plus, 1080i videos are not perfectly readable for these video edit programs including FCP, iMovie, FCE, Avid Media Composer, etc. Thus, deinterlacing Canon 1080/60i MTS on Mac is imperative to be considered.

If you haven't found out a decent AVCHD convert tool yet, you may try the top AVCHD to FCP X Converter we recommend here. It can not only convert HF G20 AVCHD files to ProRes 422 with the original high definition, but also deinterlace 1080i files to make the converted files more smoothly in FCP X.

Here we show you the guide on how to deinterlace and convert Canon VIXIA HF G20 1080/60i MTS to FCP X

1. Download Pavtube HD Video Converter for Mac, it’s a professional Canon AVCHD converter for FCP X  which can convert G20 AVCHD files to ProRes 422, AVI, etc.


2. Install and launch this Canon MTS converter for FCP. Import the footages to the converter.

3. Click format bar to choose output format, you can click and choose Final Cut Pro -> Apple ProRes 422 (*.mov).


4. If you want to customize the output parameters, you can click "Settings" button and enter "Profile Settings" panel to adjust the resolution and other A/V settings as you need.


5. Click convert button to start the Canon G20 AVCHD to ProRes 422 conversion.

With Canon AVCHD converter for FCP, you can easily not olny transcode Canon G20 AVCHD to Prores 422 for FCP, but also convert Canon XA10 AVCHD files to Final Cut Pro, convert VIXIA HF M500 AVCHD to FCP, convert Vixia HF M300 to FCP, convert Vixia HF S10/S100 to FCP, etc. Just try and have a good time.

Read Related Articles:

Sunday, May 5, 2013

Olympus PEN E-P5 shot in the wild, Wi-Fi and 16-megapixel sensor rumoured


Olympus, is about to add another branch to your camera-buying decision tree judging by new images and specs that leaked out showing a new PEN E-P5 model. The classically shaped Micro Four Thirds flagship was shown in leaked photos along with specs pointing to a 16-megapixel sensor, WiFi, a 1.04 million dot tilt screen, 5-axis stabilization, 5fps burst shooting and a 1/8000 shutter speed -- if accurate. While an earlier from Olympus suggests it'll launch around May 11th in China, none of the tea-leaf readers have divined a price yet -- though a look at the company's last mirrorless flagship, the PEN E-P3 might give a clue. You can catch several more photos after the break.