Showing posts with label XAVC. Show all posts

Wednesday, September 11, 2013

Easy way to edit Sony F55/F5 XAVC files in Sony Vegas, After Effects, Pinnacle,Cyberlink, Windows Movie Maker


Summary: Do you've got or have you ever heard about Sony PMW-F55/PMW-F5 CineAlta 4K digital cinema camera? Now just follow the article to convert Sony F55/F5 XAVC on Windows for editing in Sony Vegas, After Effects, Pinnacle,Cyberlink, Windows Movie Maker, etc.


After the successful sale of PMW-F55 and PMW-F5 all over the world, Sony keeps on developing more new models so as to gain more market share and to solidify its position in the already-full HD cameras market. XAVC is a video format introduced by Sony on October 30, 2012 and records by F55 & F5 camcorder. It supports resolution (4096 * 2160 and 3840 * 2160) at up to 60 fps. To record videos, XAVC is among the most advanced formats.

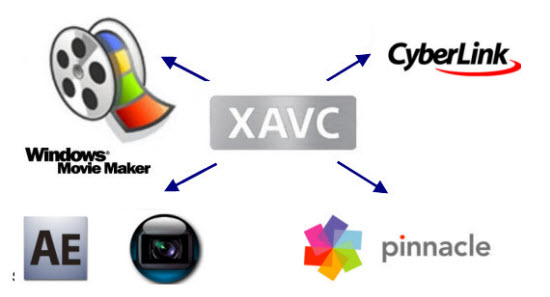
With every new camera, come many new questions about workflow. The term "workflow" can be fairly broad, but today I am looking at the helpful tips for importing Sony F55/F5 XAVC footage into various non-linear editing systems (NLEs) on Windows plantform like Sony Vegas, After Effects, Pinnacle,Cyberlink, Windows Movie Maker, etc.

If you're working with XAVC on Windows, you will find the Sony F55/F5 XAVC files are not supported well by Windows PC.  In order to import Sony XAVC footage into Sony Vegas, After Effects, Pinnacle,Cyberlink, and windows Movie Maker for smoothly editing, we can render to the third-party software to help convert XAVC to AVI/MOV/WMV/MPG–Windows native format. This is the best way to assist XAVC users with Sony F55/F5 XAVC Windows editing workflow.

To achieve our goal, the quickest and easiest way is to use the easy-to-use yet professional software called Pavtube HD Video Converter (currently on sale with 20% off), with which, we can effortlessly and flawlessly transcode Sony F55/F5 XAVC footage to AVI/MOV/WMV/MPG for Sony Vegas, After Effects, Pinnacle,Cyberlink, and windows Movie Maker editing. It is safe to install and easy to use. And you can enjoy the powerful edit function, like trim, crop, watermark for text, image and video, 3D effect, subtitles and so on. Now free download and follow below step to convert Sony XAVC files on Windows for editing in Sony Vegas, After Effects, Pinnacle,Cyberlink, Windows Movie Maker.

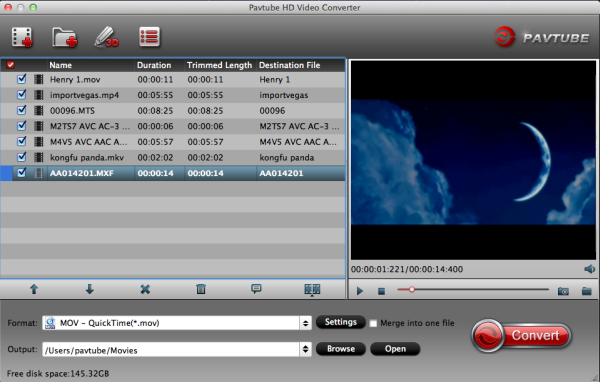
Step 1. Load Sony F55/F5 XAVC files.

You can choose "add video" directly or "load files" to add the whole folder.


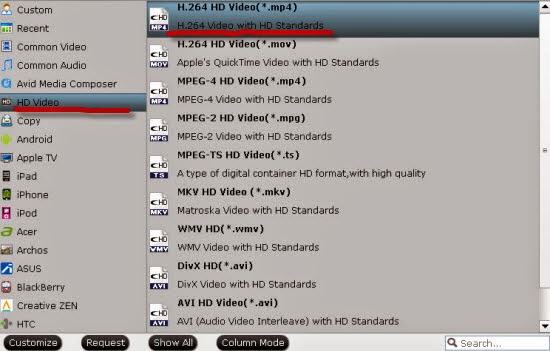
Step 2. Select output format for video editing software.

Click "Format" menu and choose "Adobe Premiere/Sony Vegas -> MPEG-2 HD Video (*.mpg)",or select WMV/MOV/MPEG-2, you can also choose "HD Video -> AVI HD Video (*.avi)". Finally, click the file icon beside output bar, and choose a destination folder for saving output files.


Step 3. Edit loaded Sony XAVC files.

Click "Edit" button and you are allowed to trim, crop, add text/image/video watermark or some effect to your output video for making it perfect. Here the function of adding subtitles to output files will contribute to make your own videos. You can use free software Subtitle Edit to edit your subtitle content then add it to output videos.


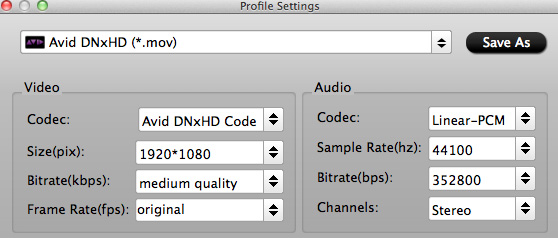
Tips: Click "Settings" on the interface and you can adjust the parameters including size, bitrate, frame rate, etc. to get a high quality of output files. And keep the settings the same as original video recordings will provide you the least loss of video quality.

Step 4. Start conversion.

Click the "Convert" button to start transcoding Sony F55/F5 XAVC footage for editing in Sony Vegas, After Effects, Pinnacle,Cyberlink, and windows Movie Maker. When it completed, click the "Open" button to get the generated videos for your editing software.

More features about this Sony Ultimate XAVC Video Converter:

1. Rip and convert Blu-ray and DVD including 1:1 backup Blu-ray/DVD movies to PC hard device for future needs.

2. Directly Copy feature will save 100% intact .M2TS main movie from original BD disc.

Now you can easily import and edit Sony F55/F5 XAVC Footage to Sony Vegas, After Effects, Pinnacle,Cyberlink, and windows Movie Maker. Just have a try! If you are a Mac user, you can go to the 20% off Pavtube HD Video Converter for Mac.

XAVC related articles:

Wednesday, August 7, 2013

Sony F55/F5 XAVC 4K videos and Avid Media Composer, Xpress Pro workflow

This article outlines how to ingest Sony F55/F5 XAVC footage to import into Avid Media Composer and Xpress Pro for smooth editing.

The Sony PMW-F55 CineAlta 4K Digital Cinema Camera functions an eight.9MP Super 35mm image sensor, capable of capturing 4K, 2K and HD resolution video within a wide variety of formats by way of the camera's internal recorder. The F55 is amongst the initial digital motion image cameras using a international shutter, which fully eliminates motion skew and also other "rolling" shutter distortions.

XAVC is usually a video format that was introduced by Sony and extensively exist in Sony PMW-F55 and Sony PMW-F5. It may assistance 4K resolution (4096 x 2160 and 3840 x 2160) at as much as 60 frames per second (fps). XAVC supports colour depths of 8-bits, 10-bits, and 12-bits. Chroma subsampling is usually four:two:0, four:two:two, or four:four:four.


Having a lots of clips from my Sony F5 in 4K XAVC file format and want to edit them with Avid Media Composer and Xpress Pro, but often failed. How to resolve it?

Since Avid Media Composer and Xpress Pro (especially some versions) doesn't support the lastest 4K XAVC videos, to solve the incompatible problem, I have to convert Sony F5/F55 4K XAVC video to a native format for editing in Avid Media Composer and Xpress Pro.

By Google search, I find an excellent Mac XAVC Video Converter called Pavtube iMedia Converter for Mac which is specially designed to convert Sony F5/F55 4K XAVC to Avid friendly DNxHD mov format for editing in Avid Media Composer and Xpress Pro at high fast conversion speed and excellent output quality. No matter you are an expert or novice, you could easily use it for its intuitive interface.Just take a look at the brief guide below.

1. Download Pavtube iMedia Converter for Mac, it's an excellent Mac XAVC to Avid Converter. Follow the prompts to install the program. Click "Finish" when the installation is complete, and it will launch automatically.

2. Click "Add Video" to load 4K video files or directly drag the files into file list.


3. Click "Format" bar to determine output format. 

For natively editing in  Avid Media Composer and Xpress Pro, you are recommended to choose Avid Media Composer -> Avid DNxHD (*.mov), this format is best for native editing.


4. If you would like to customize the video and audio parameters, you can click "settings", adjust the parameters as you want, like Video Codec, aspect ratio, bit rate, frame rate, Audio codec, sampling rate, bit rate, channels.


5. Click "Convert" to start.

Pavtube XAVC to Avid converter can help you to convert Sony F5/F55 4K XAVC video to Avid DNxHD MOV for Avid Media Composer and Xpress Pro natively for editing.

Editor's Recommendations

Monday, August 5, 2013

How to play XAVC video on QuickTime on Mac?

Summary: Follow this article to learn how to play Sony XAVC footage with QuickTime Player on Mac. With this Sony XAVC Mac Video Converter, you can easily convert XAVC footage to QuickTime MOV on Mac.


The Sony PMW-F55 CineAlta 4K Digital Cinema Camera functions an eight.9MP Super 35mm image sensor, capable of capturing 4K, 2K and HD resolution video within a wide variety of formats by way of the camera's internal recorder. The F55 is amongst the initial digital motion image cameras using a international shutter, which fully eliminates motion skew and also other "rolling" shutter distortions. The XAVC format is used by Sony PMW F5 or F55 camcorder.

Shoot with Sony PMW camera, you will got some files with .xavc extension. With 4K resolution (4096 × 2160 and 3840 × 2160) at up to 60 fps, we know the recording XAVC footage is not supported by most of players like QuickTime on Mac. When opening XAVC video QuickTime, you will find a pop-up windows said mistake. So the best way to watch XAVC with QT is to convert XAVC to MOV which is the most popular format for QuickTime player.

Here Pavtube XAVC HD Video Converter for Mac is usually a handy and effective video converting plan to convert XAVC video to MOV for playing on QuickTime Player. In addition, it might help you convert XAVC to other frequent formats such as XAVC to FLV , MP4,AVI,MPG,3GP,and so forth for distinctive customers.

If you are a XAVC camcorder users and troubled with how to play XAVC on QuickTime as above, you can follow simple step-by-step guide to transcode Sony XAVC video to QuickTime MOV for playback:

Step 1. Install and launch the best XAVC to QuickTime Converter for Mac, click top left two icons to load individual videos or load the entire folder.


If you want, you can merge several XAVC clips by ticking "Merge into one file" box.
If the supposed size of the input files is 1GB, then the memory space should be up to 40GB.

Step 2. Click "Format" and choose Common Video> MOV-QuickTime(*.mov) as the best video format for playing XAVC footage on QuickTime.

xavc-to-mov-quick-time


Tips: Pavtube XVAC Video Converter for Mac can also convert Sony XAVC files to FCP, iMovie, FCE, Avid Media Composer, Avid Xpress Pro, Adobe Premiere Pro, Adobe After Effects, DaVinci Resolve or Apple Aperture 3 compatible video format for editing. Just select the corresponding option.

Step 3. You can also click "Settings" to change the output video bitrate, frame rate, size, etc. all according to your needs.

Step 4. When everything is done, click the "Convert" button at the bottom-right corner to finishe the Sony XAVC to QuickTime MOV conversion. While you wait, have a coffee or take a nap and let XAVC Video Converter do the work in the background.

After conversion, you can click "Open" to find the output quicktime mov file, then you can transfer the video files to QuickTime Player for playback smoothly.

See also:


Monday, July 15, 2013

How to Burn/Write Sony PMW-400 XAVC footage to DVD on Mac

Summary: Here comes with some practical tips for buning or writing Sony PMW-400 XAVC Footages to DVD for playback

The new shoulder-mount camcorder PMW-400 is designed to acquire high quality, clean images especially in low-light environments. It is the latest addition to its XDCAM HD422 line-up. Sony PMW-400 supports multiple SD and HD codecs and XAVC ready and is an affordable 3x 2/3-inch CCD high quality sensor broadcast camcorder that, like the PMW-500, supports all SD / HD 422 broadcast workflows using .MXF and XDCAM EX workflows using .MP4 and .AVI. It is also future-proofedto support XAVC 10-bit HD422 recordings. 

XAVC enables a really wide variety of operational possibilities for content material production, notably: From Proxy to 4K pixel resolutions, intra frame and lengthy GOP schemes, and 1080 50P/60P infrastructure capability. 
  

So, is it an excellent thought to burn Sony PMW-400 XAVC to DVD for dwelling watching following shooting such an incredible good quality move ? Nevertheless, XAVC will not be however preferred extensively employed around the globe, and most devices cannot import it like DVD Player. How are you able to figure it out within this case? 

Fortunately, XAVC to DVD Maker- the best XAVC to DVD Burning Software is a nice program that could conveniently convert XAVC recordings to DVD with no issue. With it, you might be in a position to burn your breathtaking video clips to DVD. Just download and possess a attempt, it is actually entirely 100% clean! 

Step-by-step Guide - Burn XAVC video from PMW-400 to DVD for playback on TV 

1. Import Sony PMW-400 XAVC to this XAVC to DVD Burner on Mac. 

Load the footages from PMW-400 to this DVD Creator software. 
 

2. Edit XAVC Video. 

Pavtube DVD Creator for Mac enables you to crop, trim, rotate and adjust the effect of the videos. You can add watermarks to illustrate the scenes or give the video a designed music you like. 


3. Customize DVD menu and start convert to DVD. 

For a personalized DVD menu, you can change the menu buttons, thumbnails; add background music, custom background image, etc. to customize your DVD menu. Then you can preview your entire DVD movie project to ensure everything is perfect. If ok, pls insert a blank DVD disc into DVD drive, and switch to "Burn" tab. You can choose to burn NTSC or PAL, 5.1 channel is allowed, then click "burn" button to start converting Sony PMW-400 XAVC to DVD. 


As you can see, within few clicks, you can burn/write Sony PMW-400 XAVC file to DVDwith personalized DVD menus, eye-catching video effects and high quality. Just enjoy the movies on TV via players with your family. 

Related DVD burning guides: 
How to Burn World Cup Videos to DVDs for Free?
Put Blu-ray movies in Windows Media Center for playing

Tuesday, June 25, 2013

Using LUT’s on set and with Resolve with the PMW-F55/F5/F3 and FS700


Sony recently released a set of 4 cube LUT’s (Look Up Tables) for use with SLog2. You can download those LUT’s here: DaVinciResolve CubeFiles. In addition there are many other LUT’s that you can use with SLog2 to help create different looks. In this article I’m going to look at how you can use these both on set and in DaVinci Resolve. Currently on set you cannot upload LUT’s to the F55/F5 or FS700, so if you want to use the LUT’s to alter your monitor output you need to use some additional hardware. One of the most affordable solutions is the Black Magic Design HDLink Pro. This box has HDSDI inputs and outputs as well as other output options including DisplayPort to which you can connect either a DVI or HDMI monitor with the appropriate adapter. 


By placing the HDLink between the cameras HDSDI out and your monitor you can apply a LUT by connecting a computer to the HDLink via USB and using the HDLink software utility to import the LUT to the Black Magic box. If you don’t have a LUT you can use the HDLink software to adjust many parameters of the picture to create your desired look live on set. There is one limitation however, without a LUT, you cannot adjust the overall saturation of the image, so when shooting with SLog2 and SGamut the pictures will not have the full saturation (colour) of your final graded output. 

To compensate for this you can always turn up the saturation on the monitor, just remember to restore the saturation control back to normal before you put the monitor away at the end of the shoot! When using a 3D LUT like the cube LUT’s linked above you do get a full correction including saturation. The computer (which can of course be a laptop) does not need to remain connected to the HDLink. Once you have uploaded the LUT to the box and are happy with your look you can disconnect the computer. The HDLink will remember the LUT and settings until you power it down, so whenever you use it, it’s always a good idea to plug a computer back in from time to time to check how it is set. 

If the plan is to use the same LUT both on set and in the grade then you must set up the camera to output correctly. Most LUT’s are designed for use with Log recording, so this means that in the majority of cases the camera will need to be set to output SLog2 (Slog with the PMW-F3). If you are shooting raw using the Sony AXS-R5 recorder then you can take the AUX out from the R5 and use that to feed the HDLink box. This output is a real-time de-bayer of the raw recording with SLog2 applied. By using this output you can still use the F5 and F55′s built in LUT’s if you needed as the built in LUT’s are not applied to the R5′s AUX output. If you do use EI Gain then this will have an impact on your LUT as the recordings (and AUX output) will most likely be exposed brighter, but the result should be similar for both the on-set view via the HDLink and in post production. For FS700 users shooting raw with the R5 the additional AUX output is the only way to feed HDSDI to the HDLink as the cameras HDSDI is used to feed the raw data to the R5. 

After the shoot, to use the LUT in DaVinci Resolve, first you must place the LUT or LUT’s, in the correct library folder before opening Resolve. The LUT’s must be saved in the .CUBE format to the Cinespace folder or a new sub directory in: 

Mac: 
System Drive/Library/Application Support/Black Magic Design/DaVinci Resolve/LUT/ 

PC: 
On a PC the folder may be hidden, if so go to windows explorer and select “organize” then ”view” and click “show hidden folders”. 

Once you have installed your LUT’s you can then open Resolve and import your SLog2 footage. If you are shooting raw with the AXS-R5 then you need to open the project settings and ensure that the raw files are being correctly displayed using SLog2 and SGamut. I do this by going to the “camera raw” page and set “Decode Using” to “Project” and then change the Gamut to “SGamut” and gamma to “SLog2″. This ensures all Sony raw clips will be treated as SLog2 even if you did use an internal camera LUT.  

Next select the clip or clips that you wish to apply the LUT to and right click on the clip and select “3D LUT” and go to the “Cinespace” folder or the folder you created. There you should see your LUT’s listed. Simply choose the LUT you wish to use. You may need to add some gain or lift adjustment to tweak your images, but they should look as they did via the HDLink box. 
 

You can also use Resolve to create a .cube LUT for use on set. Simply shoot some test Slog2 clips and grade them as you wish the final image to look. Then once your happy with your look, right click on the clip and “Export LUT”. Resolve will then create a .cube LUT that you can use with the HDLink. 

Although this is really aimed at those shooting using log, this process will work with almost any camera and any gamma curve. The key thing to remember is to always use the same camera settings with LUT’s tailored to those particular settings. So for example you could use this with a PMW-200 using a Hypergamma or a Canon C300 using C-log or a DSLR. Provided the LUT was created to work with the way the camera is set up, it should work correctly. Just don’t expect a LUT designed for Log to work with a non Log camera. 

Read more: 

Monday, June 24, 2013

XAVC to FCP-Import Sony PMW-400 XAVC footage to FCP 7/X for editing

Following Guide on Sony PMW-400 Workflow for Getting 4K XAVC Files Into Final Cut Pro.

XAVC is the newest HD recording format announced by Sony, it uses level 5.2 of H.264/MPEG-4 AVC which is the highest level supported by that video standard. XAVC can support 4K resolution (4096 × 2160 and 3840 × 2160) at up to 60 frames per second (fps). 

Final Cut Pro is a good tool to edit videos on Mac, however, for the new XAVC users, it is a big problem to loading XAVC files in FCP (including FCP 7 and FCP X), they will get some trouble for the video clips, or rather the XAVC clips, are not supported by FCP, such files will not be shown when importing.


Now comes along with the new PMW-400, which is the latest addition to Sony's XDCAM HD422 line-up. Sony PMW-400 is capable of MPEG HD422 50Mbps recording for higher picture quality, providing diverse format selection including XAVC support for HD production. So people now are all concerning about how to import Sony PMW-400 XAVC to FCP 7/X for editing?

As FCP are not workable with XAVC files natively, if you want to load Sony PMW-400 XAVC to FCP (including FCP 7 and FCP X), first you need to convert XAVC to FCP friendly codec like Apple Prores. of course, losslessly. To do so, you need a professional XAVC Video Converter to help.

Here I'd like to recommend an excellent XAVC to FCP Converter from Pavtube, which is a great Sony XAVC Converter for Mac. It can not only convert Sony PMW-400 XAVC videos to Apple ProRes codec, but also guarantee smooth editing.

Compatible OS: Mac OS X like Tiger, Leopard, Snow Leopard, Lion, Mountain Lion.

Now get it installed and let's work it out.

How to load Sony PMW-400 XAVC videos to FCP 7/X?

Step 1: click top left icons to load your footage from PMW-400 into XAVC to Prores Converter for Mac. You can load individual videos by clicking ‘add videos', or load the entire folder by clicking ‘add from folder'.


Step 2: Choose Apple ProRes 422 codec for Final Cut Pro 7/X.

Click the "Format" option, and move mouse cursor to Final Cut Pro > Apple Prores 422 (*.mov) or Apple ProRes 422 HQ (*.mov) as output format.


To get 1080 videos, we need to click the "Settings" button and choose 1920*1080 as output video resolution.

Step 3: Convert Sony PMW-400 XAVC files for FCP.

Click the read button Convert to start transcoding Sony PMW-400 XAVC files to MOV for FCP 7/X. When the conversion is completed, click "Open" button to locate the converted Apple ProRes 422 MOV files for editing with Final Cut Pro.

See more:
Convert Sony PMW-400 XAVC to iMovie/FCE

Tuesday, June 4, 2013

Sony PMW-400 XAVC camcorder Review -XAVC video format latest news

Sony gave its XAVC codec another boost at NAB in Las Vegas with the introduction of a new broadcast camcorder that supports it. It also extended XAVC downwards for prosumer and consumer users. In other news, Sony also introduced a new studio/OB camera. 
  
The new PMW-400 shoulder-mount camcorder (pictured above) is an “affordable” broadcast camera with three 2/3-inch high quality Exmor CMOS sensors – boasting good low-light sensitivity of F12 at 59.94Hz and F13 at 50Hz. 

Like the popular PMW-500, it supports all current SD and HD 4:2:2 broadcast workflows based XDCAM EX using the .MP4 and .AVI codecs (including MPEG2 HD422@50Mbps, HD420@35Mbps or 25Mbps, MPEG IMX@50Mbps and DVCAM), recording to SxS memory cards, MemoryStick, SD card or XQD card (FAT32 formatted). It can also record .MXF broadcast files can on SxS and XQD cards (UDF formatted).
The camera, which will be available from August, is also future-proofed by supporting the new XAVC codec to offer 10-bit HD422 recordings, including XAVC Intra frame 10-bit HD422 100Mbps and XAVC Long GOP 10-bit HD422 (low bit rate) – although only up to 25p or 30p in HD (naturally, 4K is not supported).

The PMW-400K comes with a 16x zoom HD lens, while the PMW-400L ships without a lens. Both feature: a high resolution 960x540 colour LCD viewfinder; 3DNR noise reduction processing (to give a typical signal to noise ratio of 60dB); an internal flash band reducer to avoid the disconcerting rolling shutter effect that shows camera flash on part of a frame (which will arrive via a firmware update); gain selection from -3dB up to +42dB maximum gain; dual SD/HD-SDI parallel outputs, HDMI out, Time Code in/out and Gen-lock input.

In a throwback to almost forgotten tech it also has an i.LINK (DV – four-pin FireWire) input and recording.

Power consumption is about 23W with LCD, viewfinder, lens and microphone.


“We’ve designed the PMW-400 to acquire high quality, clean images especially in low-light environments. It’s very ergonomically-balanced, easy to operate and includes features that make it fit seamlessly into various types of productions and workflows. This really opens up new opportunities around cost efficiency and flexible shooting to achieve the desired results,” said Fabien Pisano, Strategic Marketing Head, Sony Europe.

The camcorder can also allow live logging from a tablet or smartphone via WiFi. If you add the new CBK-WA100 wireless adapter, content can be wirelessly uploaded via ftp to a customer’s server or cloud service via the 3G/4G mobile phone network.

An optional CBK-CE01 50-pin interface converts the shoulder camcorder to a system camera (for studio/OB use), offering compatibility with CA-TX70 digital triax and CA-FB70 fibre adapters.

New XAVC S format for prosumers

Sony has announced a prosumer/consumer version of the XAVC codec. It is a Long GoP (Group of Pictures) format, and will deliver 4K at 4:2:0 (ie with less colour information) and HD at 4:2:2 (which is the broadcast standard for colour information – giving enough data for high-quality chroma keying). This high-efficiency version of the codec has been designed for the broader content production market. Besides serving the consumer market, XAVC S, which employs an MP4 (H.264) wrapping format, will also help to expand XAVC, to help encourage the growth of 4K content in the consumer market.

The XAVC S profile will encompass: 4K (3840 x 2160), HD, and Proxy resolutions; MPEG-4 AVC/H.264 compression; the MP4 wrapping format; and both Linear PCM and AAC audio. Each manufacturer signing up to support XAVC S will be able to decide which profile and operating point of XAVC they will implement in their products.

XAVC is an open format, and was designed to help promote and establish 4K content production. A license program is proposed not only for editing software manufacturers but also for hardware manufacturers. Currently, more than 60 manufacturers have filed a request to become a licensee, and 31 manufacturers’ products plan on their support for the Sony XAVC format and workflow.

The current list includes: Abekas, Adobe, Assimilate, Astrodesign, Avid, Blackmagic Design, Cinegy, Codex Digital, Colorfront, CyberLink, Digital Vision, EVS Broadcast, Fairlight, FilmLight, Final Cut Pro X, Firefly Cinema, Grass Valley, Harris Broadcast, IBEX Technology, Imagination Technologies, Matrox, MTI Film, Pegasys, Quantel, Rohde & Schwarz DVS, Rovi's MainConcept, SAKURA EIKI, Sobey Digital Technology, Sony Vegas Pro 12, YoYotta, and Zaxel Systems.

Digital triax transmission


Also at NAB, Sony unveiled the latest in its HDC-2500 range of studio/OB cameras. The HDC-2570 HD Portable Camera with three 2/3-inch Power HAD CCD sensors, has a digital triax transmission interface that allows the transmission of 1080p or 2xSloMo signals (1080i – at 100 or 120fps) over triax cables.

“From speaking to our customers we know that while the adoption of fibre optic transmission systems is growing, many existing venue infrastructures are still triax based,” said Claus Pfeifer, Strategic Marketing Manager, Sony Europe.


“We believe customers should be able to generate outstanding content, regardless of what setup is in place. Our Digital Triax Camera System uses state-of-the-art technology to deliver broadcast quality content at 1080 50p/60p through traditional triax cables, with extremely low latency. The system is also extremely flexible, a key factor in sports production, making it easy to switch from triax to fibre as required.”


The same technology is being extended to the existing HDC-2400/2500/2550 system cameras via the new HKC-TR27 digital triax adaptor side cover (pictured above).

There is also the HDFX-200 external converter box that interfaces with triax to fibre to enable the digital signals to feed into the HDC-2000/2500 Camera Control Unit (CCU) via conventional triax cable, while the HDTX-200 field converter box (available end of August) allows a quick change from fibre to triax transmission for HDC-1500 Series or HDC-2000 Series system cameras that do not have HKC-TR27 digital triax adaptor technology.

From: http://urbanfoxtv.blogspot.com/2013/04/sony-pmw-400-xavc-camcorder.html

Related guides:

XAVC and Premiere Pro workflow
Import Sony F55 XAVC to FCP
Convert XAVC to AVI/WMV/MOV/MP4/FLV
Upload XAVC for sharing
Burn XAVC to DVD

Monday, June 3, 2013

Does Adobe Premiere adds Sony F55/F5 4K XAVC support?

Following Guide on Sony F55/Sony F5 Workflow for Getting 4K XAVC Files into Premiere Pro.

Sony PMW-F55/F5 are two large-single-sensor cine cameras. Each cameras record XAVC having a colour depth of 10-bits and 4:2:2 chroma subsampling. Sony PMW-F55 can record XAVC with 4K resolution at 30 fps at 300 Mbit/s and 2K resolution at 30 fps at one hundred Mbit/s. And Sony PMW-F5 can record XAVC with 2K resolution at 30 fps at one hundred Mbits/s.


About the XAVC format, how much do you know? Well, the XAVC format is not yet widely adopted in the marketplace. After shooting HD XAVC video files with 4K resolution, you may plan to conduct post production to the PMW-F55 (or PMW-F5) XAVC footages with your editors like Adobe Premiere Pro. Are you troubled with how to edit Sony 4K XAVC with Premiere Pro as below:

Wondering if anyone can help. PLEASE HELP!!!

Trying to get 1080p XAVC footage from an F5 to work in Pr CS6 (Mac). It imports, but when I try to do anything with it, it crashes. Apparently I need a plug in. Looked at Rovi Totalcode but it's $350 and only for a PC.

Does anyone know what I can possibly do???"


Because F55/F5 records videos in XAVC format, which can be not accepted by Adobe Premiere, several users locate it tough to edit such XAVC files, so, right here I'd prefer to introduce a simple approach to do the job with importing Sony F55/F5 4K XAVC to Premiere Pro.

Required tool:

Pavtube HD Video Converter for Mac - A professional XAVC to Premiere Pro Converter


PS. If you run PC, pls download and buy XAVC  Converter

The Mac XAVC Converter for Premiere Pro provides customers with several simple editing functions, including cropping, trimming, deinterlacing, watermarking, adding special effects, and audio replacing, which help you do a fast and necessary editing on your footage before importing them to Premiere Pro Media Composer. It also supports versatile output options for iPad, Android tablets and mainstream editing software.

How to Convert Sony F55/F5 4K XAVC Videos to Premiere Pro 

Step 1. Run the Mac XAVC Converter as the perfect Pro ProRes to MPEG Converter, and add your XAVC footage into this program.


Step 2. Click on "Format" bar and select output format from drop-down list. Premiere Pro prefers AVI or MPEG format for editing.

Here I suggest you follow "Adobe Premiere Pro/Sony Vegas" to select "MPEG-2 (*.mpg)" or "WMV (VC-1) (*.wmv)" format. You can also choose "Format -> HD Video -> MPEG-2 HD Video(*.mpg)" as out format for Premiere Pro.


Step 3. You can control output video quality by setting resolution, bitrate and frame rate in "Settings". For preserving 5.1 channels surround sound, set audio channels to "5.1 channels" instead of Stereo. To keep 1080p full HD high quality, you can set video bitrate up and Size to 1920x1080.

Step 4. Click on the "Convert" button to start converting XAVC video files to Premiere Pro supported MPEG format. By ticking off the checkbox before "Merge into one file" option, you can combine all the checked videos into one file.

When conversion is completed, you can click "Open" to get the Premiere Pro MPEG files from its default output folder.

Now open up Adobe Premiere Pro and you're ready to import XAVC recordings to Premiere Pro CS4/CS5/CS6 for post-production~

See also:

Tuesday, May 21, 2013

Convert XAVC files to MOV, MKV, AVI, MPG, MP4, WMV, FLV for editing, playing or sharing

Here offers you an easy-to-use XAVC Converter which can losslessly convert Sony XAVC video to MOV, MKV, AVI, MPG, MP4, WMV, FLV for editing, playing or sharing.
 
XAVC is introduced as an open format, to serve as a driver to promote and establish 4K content production infrastructure,a video recording format that covers both of professional and consumer market it has been widely adopted in the marketplace.


As XAVC is a new video format, many new users don't know how to deal with the Sony XAVC format, like how to edit/play/share Sony XAVC files.

"Hello, I'm attempting to import XAVC files (from F5) into FCP X but i got an answer exactly where there are no files valid to become imported... iMovie/FCE can't recognize it too. Am I undertaking a thing incorrect ?"

"I have shot several video from my Sony PMW-F55 camera and want to share my camera video to YouTube,Vimeo, etc. How can I do?"

"What do I need to play the Sony XAVC with Mac QuickTime, best settings? The easiest way to play XAVC video format?

Pavtube XAVC Converter for Mac offers an easy way to convert XAVC to MOV, MKV, AVI, MPG, MP4, WMV, FLV for editing, playing or sharing XAVC on Mac. With it, you will be able to import XAVC videos to your QuickTime for playback with ease, to import Sony XAVC to FCP or edit in iMovie/FCE are going to be a piece of cake.

Besides, by converting XAVC to H.264 MP4, you can transfer XAVC files to Android, Windows 8 or IOS device like iPhone, iPad, Apple TV 3, etc to play smoothly.

If you are a Windows user, you can turn to XAVC Video Converter, which share similar functions with the Mac Version.

Convert Sony XAVC to MOV, MKV, AVI, MPG, MP4, WMV, FLV for playing and editing


Step 1. Run Pavtube Mac Sony XAVC Converter. Click "Add file" or "Add from folder" button, browse to the footages and load them to the converter.


Step 2. Select the items to be converted, and click on "Format" bar.

If you need to convert XAVC to MOV, MKV, AVI, MPG, MP4, WMV, FLV, you just need to select corresponding format. Just click format bar and choose the format you need.


Step 3. Click "Settings" button, then you will be able to adjust audio and video parameters on the popup window to customize the output file quality, these adjustable parameters include codec name, aspect ratio, bit rate, frame rate, sample rate, and audio channel.

To maintain original HD quality, you may set "original" in the fields of "Size", "Bitrate" and "Frame rate". To downsize the Sony XAVC files, just set a smaller bitrate.

Step 4. Click the "Browse" button next to the Output File Name field and select a location on your HDD for the output video file.

Step 5. Click the "Convert" button to start conversion. After conversion you can click the "Open" button to locate converted video files.

Aftere converting XAVC files to MOV, MKV, AVI, MPG, MP4, WMV, FLV, you can free transfer Sony XAVC video  for free editing, playing and sharing.

Read more

Sunday, April 28, 2013

XAVC to iMovie-Edit Sony PMW-F55/F5 XAVC files in iMovie on Mac

With the introduction of the new PMW-F5 and PMW-F55 4K cameras, Sony has started the roll-out of its new, more efficient, mid-range codec: XAVC. This has been designed for 4K, and will offer both intra frame and Long GoP options. It will also allow higher frame rate recording at 1080p.

The cameras will support four codecs: XAVC, for high frame rates and 4K, MPEG-2 at 50Mbps, MPEG4 SStP (Sony’s SR Master codec) and Raw 4K “by the switch of a button, depending on what job you want to do,” adds Olivier Bovis, Sony’s head of AV Media. XAVC is an extension of H.264, using the highest Level 5.2 of the standard, so it is very solid in terms of multi-generational support, he explains.


XAVC Converter for Mac, a powerful Sony XAVC to iMovie Converter software which is able to convert XAVC files to AIC, is not only a Sony PMW-F55/F5 XAVC to iMovie Converter, but also a various video format converter supports transcoding Sony XAVC to FCP Prores. With it, you can easily convert your footages in different formats to iMovie preferred formats smoothly. It also provides try-before-purchase service, click here to download a free trial version.

(Tip: Click Sony XAVC Converter to access a windows version if you are running Windows PC.)

How to convert Sony F55/F5 XAVC media to AIC for iMovie

Step 1. Install and launch the Pavtube Sony XAVC to AIC Converter for Mac, click "add videos" to load individual videos, or click "add from folder" to load the whole folder.


Step 2. Click "Format" preset and choose "iMovie and Final Cut Express-> Apple InterMediate Codec (AIC) (*.mov)" as best video format for editing Sony XAVC in iMovie as well as good video quality.


If you just want to convert this video for normal use and want it to be smaller in size, then Apple ProRess 422 (*.mov) is suggested.

You can also click "Settings" which is marked as step 3 to fix the frame rate, bitrate and video quality to your needs. (Refer to the page)

Step 3. now click "Convert" and let it go. The XAVC to AIC Converter for Mac supports batch conversion, so if you have lots of xavc videos to convert, check 'Shut down computer after conversion', and you can go away without keeping an eye on it.

Tips: When the conversion is finished, you can import the converted XAVC file to iMovie.

Related articles: