Received an "invalid file format error message when you're uploading to Instagram"? So what're the best formats for Instagram sharing? This is the main anxiety problem with making video published to Instagram for the people first time do with video, because Instagram video whether has strong capability to best engage audience while staying true to creator's brand depends on that, not only the video contents of whatever entertaining, educational, or inspiring, but also the better video quality of sounds, biterate, and sizes, video codec etc.
And Instagram still has some importtant limitations, for example, Instagram limits videos to 60 seconds, so make sure your video is 60 seconds or less or it will be cropped automatically. This guide is going to tell you how to edit video and encode video for uploading to Instagram perfectly.

Part 1. Best Video Audio Settings Specifications for Instagram Upload
- Video length: 3 secs - 60 secs.
- Resolution: Maximum 1920 x 1080.
- Frame rate: 30fps max.
- Bit rate: 3,500 kbps video bitrate is preferred.
- Audio codec: AAC (Advanced Audio Coding). 128kbps is the best for Instagram.
- Aspect ratio: 1.9:1 to 1:1. 1:1 videos at 1080px1080p are commonly used.
- Best video codec: H.264. Instagram accepts H.264 video compression. If your video is not encoded with H.264, use Instagram video converter to decode and encode videos to Instagram video format codec.
- Best video format: MP4 and MOV. Instagram supports MP4 and MOV container format. The best video format for Instagram upload is MP4 with H.264 codec and AAC audio, 3,500 kbps video bitrate.
- File size: 15MB max. If your video is larger than 15MB, you can compress the video file size, trim or split it to separate parts.
Part 2. How to Create Best Video Audio for Uploading to Instagram
How long can your videos be?
Instagram limits videos to 60 seconds, so make sure your video is 60 seconds or less or it will be cropped automatically. You can use Pavtube Video Converter to crop your long videos to < 60 secs.
How to Encode Best video for Instagram?
If your video is not friendly with Instagram, you can use Pavtube Video Converter to encode your video to H.264 MP4 (best video setting for Instagram) with several simple steps.
| DJI 4K video to Instagram | 4K videos to Instagram | MP4 video to Instagram | GoPro 4K videos to Instagram |
Key features of Pavtube Video Converter (Read Review)
*Convert any SD, HD, 4K video to Instagram supported H.264 MP4 video format.
*Edit your video to suitable video like < 60 secs for Instagram.
*Basic video editing functions: split, merge, trim, crop, add watermark, adjust video effect, edit audio and insert subtitles.
*Lossless Conversion: Convers any video files without the risk of losing its original quality.
*Compatible with Windows 10, Windows 8.1, Windows 8, Windows 7, Windows XP
*Mac version is Compatible with macOS Sierra, El Capitan Yosemite, Mavericks, Lion.
Free download this best software for Instagram
Part 3. How to Use Pavtube Video Converter to edit video, encode video for Instagram?
Step 1: Load video files
After installed Instagram video converter, launch it on your computer. Then click "File" button on the top menu to load your any Instagram video that you want to upload to Instagram.

Step 2: Choose MP4 Format
Click "Format" button to open drop-down list and there you can choose MP4 format. You can choose MP4 format for Instagram in "Common Video" and "HD Video" categories.

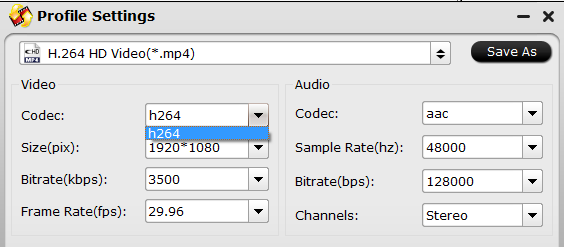
Step 3: Now, click "Settings" on the main interface to start to adjust video and audio parameters to fit in Instagram according to the below specs.
Video Size: 1080p
Video Bitrate: 3,500 kbps
Video Frame Rate: 29.96 fps
Audio Codec: AAC
Audio Bitrate: 128kbps

Step 4: Trim video to 3-60 seconds for Instagram
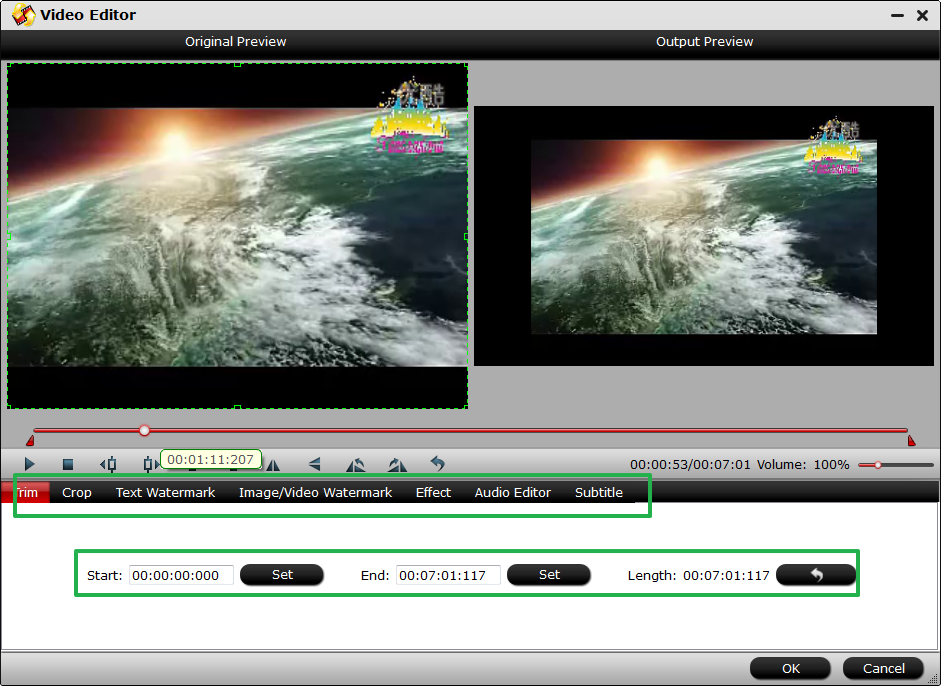
Now, click "Edit" to open video editing window. In “Video Editor” there are seven edit tabs: Trim, Crop, Text Watermark, Image/Video Watermark, Effect, Audio Editor and Subtitle.
The "Trim" feature allows users to decide where to start and where to end when converting the selected clip, so that unwanted segments will be cut out after conversion.

Step 5: Click the "Convert" button on the main interface and the software will start to convert to friendly video formats immediately. When the conversion finishes, click "Open" to find the converted video files. Then you can effortless transfer the video files to Instagram for somooth uploading.
Read More:
- Upload all 4K MP4, HD MP4, SD MP4 to Instagram smoothly
- How to Upload Unsupported Video to Instagram for Sharing?
- Upload Sony Alpha a99 II 4K video to YouTube/Instagram/Vimeo/Facebook
- Upload Phantom 4 Pro/DJI Inspire 2 4K H.264/H.265/Apple ProRes video to YouTube, Facebook, Instagram
- Apps and Tips to upload Video to Instagram with Perfect Quality

