Tuesday, October 27, 2015

Share iMovie to MPEG-2 for Watching on DVD Player on Mac OS X El Capitan

Summary: This tutorial introduces a solution of converting iMovie video to MPEG-2 video on Mac (El Capitan, Yosemite, Mavericks, Mountain Lion, Lion and Snow Leopard included).

Is it possible to convert imovie to MPEG-2 video? Had to make a movie for a project, and I edited it in iMovie 09, all the files were MOV files. I exported it as one final item and it was in M4V format. I need to convert that to a format (MPEG 2) so I can play it on a DVD player hooked up to a TV so it can be graded. Any idea? I am a Mac user."

Gonna Share iMovie to MPEG-2 on Mac for enjoying the videos on DVD player? The answer is absolutely yes. However, you'd better think carefully before working a third-party program to convert your iMovie video to MPEG-2. Otherwise, you are likely to suffer from data loss during the conversion process. Take it easy. If you work withPavtube iMedia Converter for Mac, you will successfully convert iMovie to MPEG-2 without any loss, which can be really helpful by finishing the most of work, quality preserved at the same time, so that you only need click 3 times, simply enough. It also lets you crop, split or add effects to the files before the iMovie to MPEG-2 Mac conversion.


Other Download:
- Pavtube old official address: http://www.pavtube.cn/imedia-converter-mac/
- Cnet Download: http://download.cnet.com/Pavtube-iMedia-Converter/3000-2194_4-76177788.html

4 Steps to Complete the Converting

Step 1: Add iMovie video project to the software.

Click "File" > "Add Video/Audio" to load your iMovie projects files to the program.


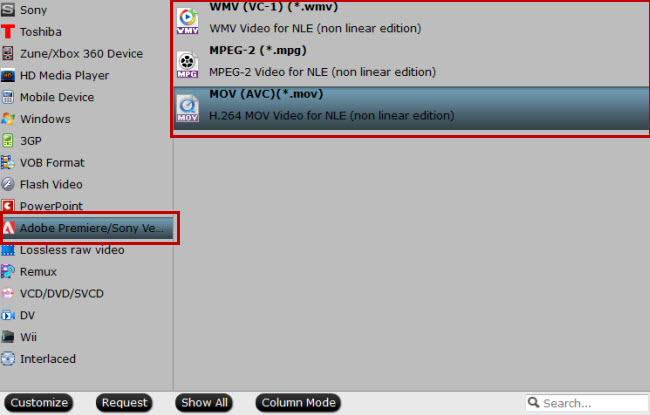
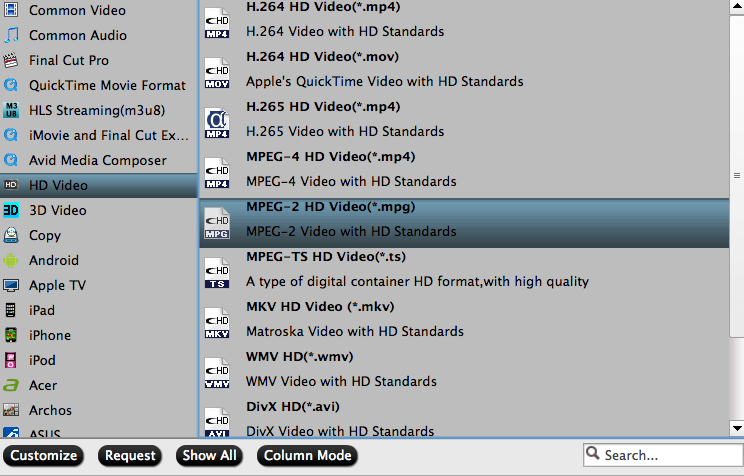
Step 2: Select MPEG-2 output format for DVD playing.

To play iMovie video with DVD player, select "HD Video" > "MPEG-2 HD Video (*.mpg)" as the output format.


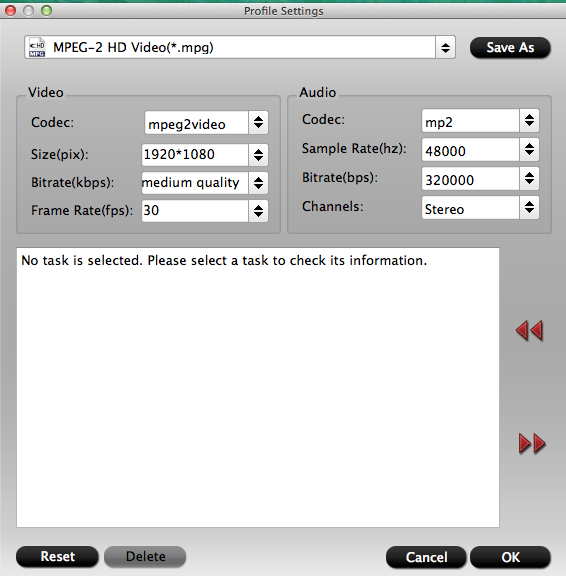
Step 3: Adjust profile parameters according to your needs.

Click "Settings" to do some adjustment. You can adjust the bit rate higher, but do remember, high bit rate equals to large file seize equals to longer conversion time.


Step 4: Start to export iMovie video to MPEG-2 on Mac.

After all settings is over, click the right-bottom convert button to start your conversion. You can find the converted files by hitting the "Open" button on the main interface.

Hot News: Happy Halloween and Hurry up!!! Pavtube's 2015 Halloweenn Promotion is on the road (Offer Valid from Oct. 23, 2015 to Nov. 6, 2015). This Time Pavtube offers up to 40% Off discount on its featured software apps. Never miss this chance to get what you need.

Read More:

Monday, October 26, 2015

Pavtube 2015 Halloween Special Offer - Up to 40% Discount


Festivals are always the best opportunities to purchase the goods you were not willing to buy or had no ability to afford in the past days. 2015 Halloween is coming. Are you ready to open your wallet? To make your Halloween celebration even greater, Pavtube Studio has prepared a great Halloween Promotion – we are offering you a generous 40% Discount on our Blu-ray & DVD Softwares (Windows 10 and El Capitan supported). 


Since Pavtube Studio offers many kinds of Blu-ray/DVD/Video softwares that you possibly don't know which one to choose, I can make a brief introduction and a recommendation to you. 

Recommendation 1: If you often do video conversion process, you can take Pavtube Video Converter Ultimate and Pavtube iMedia Converter for Mac into consideration. It can accept any Halloween movie source, like Blu-ray/DVD disc and 4K/SD/HD online/local video in any format and transform them to nearly any popular video format you have ever seen. 


Recommendation 2: For those who have plenty of Blu-ray discs, Pavtube BDMagic and Pavtube BDMagic for Mac will be the best choice. They are cheaper than the recommendation one but supply the same effect on Blu-ray/DVD Halloween movies. 


Recommendation 3: DVD owners who just need to rip and backup DVD disc or copy DVD folder, DVD ISO/IFO can focus on Pavtube DVDAid and Pavtube DVDAid for Mac. It only can deal with DVD movies but it is the cheapest item. 


Recommendation 4: Pavtube ByteCopy and Pavtube ByteCopy for Mac are for situation that your Halloween Blu-ray/DVD movies have several subtitles and audio tracks and you want to keep all the tracks and chapter markerswhile ripping and copying the discs. What's more, it enables you to extract FLAC/WAV audio from Blu-ray audio disc and extract SRT subtitle from Blu-ray movies. 


Think about which one is the best choice for you so that you can solve your video conversion problem with the least money. Don't waste the money-saving chance on Halloween. Just do it!

Thursday, October 22, 2015

Transfer and Edit Sony FDR-X1000 XAVC S with Premiere Pro CC Mac El Capitan

The Sony FDR-X1000 houses a ton of useful features for action lovers, plus it can record at 4K 100Mbps in Sony's efficient XAVC S codec. There's built-in image stabilization and the camera offers exposure compensation and white balance control. To top it all off, the X1000V records great quality 4K video.


The latest version 8.2.0 of Adobe Premiere Pro CC natively supports to decode the 4K XAVC S video captured with FDR-X1000, this also means the former version of Premiere Pro CC does not have the capability to ingest XAVC S files for editing. If you are trying to import and edit FDR-X1000 XAVC S files with Premiere Pro CC former version, you will definitely receive “importing errror” message.

To address this issue, the best solution is transocde FDR-X1000 XAVC S to Premiere Pro CC friendly editing codec such as MPEG-2, WMV or MOV. You can perform the conversion by downloading a specialist software called Pavtube HD Video Converter for Mac(support for Mac OS X El Capitan), which is capable of effortlessly decoding FDR-X1000 XAVC S to Premiere Pro CC ready-made customized formats with all the suitable settings. As a pretty ease of use application, all the conversion process can be done in just few clicks with high quality output video.

Besides Premiere Pro CC, you will also get no problem to import and edit FDR-X1000 XAVC S in other other professional editing programs such as iMovie/FCE/FCP X, Premiere Pro/Premiere Elements, Avid Media Composer, Edius Pro or played on El Capitan with QuickTime.


Other Download:
- Pavtube old official address: http://www.pavtube.com/hd-video-converter-mac/
- Amazon Store Download: http://www.amazon.com/Pavtube-Video-Converter-Mac-Download/dp/B00QI9GNZS
- AppStore Download: https://itunes.apple.com/de/app/pavtube-hd-video-converter/id502792488?mt=12
- Cnet Download: http://download.cnet.com/Pavtube-HD-Video-Converter/3000-2194_4-76177786.html

How to transfer and edit FDR-X1000 XAVC S with Adobe Premiere Pro CC El Capitan?

Step 1: Add FDR-X1000 XAVC S video to the program.

Run the program, click “File” > “Add video/audio” to add FDR-X1000 XAVC S videos to the program.


Step 2: Specify output file format.
From "Format" drop-down list, select to out "Adobe Premiere/Sony V..."> "MPEG-2 (*.mpg)" format for editing with Avid Media Composer.


Step 3: Down-converting 4K to 1080p.
For smooth workflow of FDR-X1000 video with Premiere Pro CC you are recommended to downscale 4K video to 1080p from “Size(pix)” drop-down selection.

Step 4: Carry out the conversion process.

Press right-bottom conversion button to start FDR-X1000 XAVC S to Premiere Pro CC conversion process.

When the conversion is complete, you can easily import converted videos to Premiere Pro CC for professional editing.

By the way, you can also download Pavtube other software such as Pavtube Video Converter for MacPavtube iMedia Converter for Mac to decode and import XAVC S files to iMovie/FCE/FCP on Mac OS X El Capitan.

Further Reading:
How to Import and Edit Sony XAVC S to Avid Media Composer on Mac?
Import 4K XAVC S Files from Sony RX100 IV to Premiere Pro CC/CS5/CS6
Import Alpha a7S XAVC-S to Premiere Pro/After Effects for Editing
Import Sony AX1 4K XAVC S to FCP and Burn to DVD
Open Sony WX500 XAVC S Videos in VLC on Windows/Mac

Tuesday, October 20, 2015

Import and Edit Panasonic HC-WX970 4K MP4/AVCHD to Premiere Pro CC El Capitan

With Panasonic HC-WX970, you can elevate your creativity with 4K video. Enjoy great detail, HDR exposure and improved camera control with Level Shot Function and 5-Axis HYBRID O.I.S.+. After shooting some footage with Panasonic HC-WX970, you will get both 4K MP4 and AVCHD video, there is no doubt that you will need a professional video editing application to handle all those video clips.


Adobe Premiere Pro CC, the industry-leading video production toolset now delivers a more streamlined way to help create professional productions with brilliant color, anywhere you are. From Adobe’s official website, we get the information that 2014 release of Premiere Pro CC enables you to work with the vast majority of formats natively — including 4K, 5K and 6K RED media, XAVC, ProRes, and DNxHD — without transcoding or file rewrapping. From this information, you will end up with failure if you try to import and edit 4K MP4 video captured with Panasonic HC-WX970 4K MP4 video with previous version of Premiere Pro. To make 4K MP4 video work well with old Premiere Pro CC, the best solution is downscale 4K MP4 to 1080p.

In regard to AVCHD workflow with Premiere Pro CC, most people will get no luck to import AVCHD video to Premiere Pro CC, the reason may due to codec incompatibility, large file size or other unknown reasons. How to fix this issue? Like other NLE editing tools, Adobe Premiere Pro CC has its own native editing codec, you will achieve a more fluent and fast workflow by transcoding Panasonic HC-WX970 4K MP4/AVCHD to Adobe Premiere Pro CC best compatible editing codec.

Here, you are recommended to download Pavtube MTS/M2TS Converter for Mac (Top 5 Mac MTS M2TS Converter Review) to directly output HC-WX970 4K MP4/AVCHD to Premiere Pro CC specially optimized file formats MPEG-2 or WMV on Mac OS X El Capitan.

Besides that, our application is also capable of  encoding HC-WX970 4K MP4/AVCHD to other professional editing codec such as Apple Prores Codec for FCP 6/7/X, Apple Intermediate Codec for iMovie/FCE, DNxHD mov for Avid Media Composer, Sony Vegas/Premiere Pro/Premiere Elements/After Effects optimized file formats, etc.


Other Download:
- Pavtube old official address: http://www.pavtube.com/mts-converter-mac/
- Amazon Download: http://www.amazon.com/Pavtube-MTS-M2TS-Converter-Download/dp/B00QIE3U0Y
- Cnet Download: http://download.cnet.com/Pavtube-MTS-M2TS-Converter/3000-2194_4-76177029.html

How to import and edit Panasonic HC-WX970 4K MP4/AVCHD with Adobe Premiere Premier Pro CC?

Step 1: Add HC-WX970 4K MP4/AVCHD video to the program.

Run the program, click “File” > “Add video/audio” to add HC-WX970 4K MP4/AVCHD videos to the program.


Step 2: Specify output file format.
From "Format" drop-down list, select to out "Adobe Premiere/Sony V..."> "MPEG-2 (*.mpg)" format for editing with Avid Media Composer.


Step 3: Down-converting 4K to 1080p.
For smooth workflow of WX970 video with Avid Media Composer you are recommended to downscale 4K video to 1080p from “Size(pix)” drop-down selection.

Step 4: Carry out the conversion process.
Press right-bottom conversion button to start Panasonic HC-WX970 4K MP4/AVCHD to Premiere Pro CC conversion process.

When the conversion is complete, you can easily import converted videos to Premiere Pro CC for professional editing.

Further Reading:
Sony FS700 1080 50p/60p AVCHD workflow for Avid Media Composer
How to Edit Panasonic Lumix GX8 4K AVCHD/MP4 in Premiere Elements
How to Ingest HC-X1000 4K AVCHD MTS to iMovie 11/10/9?
Tutorial of Getting Panasonic GH4 4K Footage into iMovie
Downscaling Panasonic GH4 UHD 4K to 1080p mov video for editing in iMovie

Thursday, October 15, 2015

Work Panasonic HC-WX970 4K MP4/AVCHD video with FCP El Capitan

The Panasonic HC-WX970 is a feautred-packed camcorder that’s light and comfortable to use. It is the first consumer camcorder offered by Panasonic with the capability to record 4K UHD video, which has four times the resolution than Full HD. When stepping down to Full HD resolution, the camcorder can record slow-motion video at up to 120 frames-per-second. As for media recording format, UHD 4K video is captured in MP4 format while Full HD video are captured in both AVCHD and MP4 format for video editing and sharing consideration. 

Workflow of WX970 4K MP4/AVCHD with FCP 
The newest version of Final Cut Pro X has been updated with the incomparable capability to deal with 4K videos, however, you will be out of luck to work wx970 4K video with the old version such as FCP 6 or 7. Since when 4K video footage is down-converted to Full HD, the data will have been definition and clarity than those filmed in Full-HD, therefore, it would be a good choice to downscale WX970 4K video to 1080p for smooth workflow in FCP 6/7.

In addition, although FCP has no problem to ingest both MP4 and AVCHD video, however, to realize a fast and fluid workflow of HC-WX970 MP4/AVCHD video in Final Cut Pro, you’re recommended to transcode AVCHD/MP4 to FCP best compatible editing format - Apple Prores Codec, which is specially designed for high quality and high performance post-production work in FCP 6/7/X.

To encode Apple Prores codec from Panasonic HC-WX970, you can seek help from Pavtube MTS/M2TS Converter for Mac, the recently upgraded version now support El Capitan, the program can handle 4K video in various file types, also assist you to decode WX970 4K MP4/AVCHD video to FCP preferable editing codecs with a few mouth clicks.


Other Download:
- Pavtube old official address: http://www.pavtube.com/mts-converter-mac/
- Amazon Download: http://www.amazon.com/Pavtube-MTS-M2TS-Converter-Download/dp/B00QIE3U0Y
- Cnet Download: http://download.cnet.com/Pavtube-MTS-M2TS-Converter/3000-2194_4-76177029.html

Notes:
1.When converting MXF footage using Final Cut Pro oriented format templates(e.g. Apple Prores), please ensure that your computer has Final Cut Pro installed, otherwise the converted files will have audio only without image.
2.If you are using FCP X, please make sure you have installed ProApps QuickTime Codecs, or you may get files with sound only without video.

For down-converting 4K video to 1080p, just adjust the output file resolution as “1920*1080” in “Profile Settings” window built-in with the program. For other professional NLE programs users, you can also download the program to decode Panasonic 4K MP4 video to Avid Media Composer compatible DNxHD mov codec, iMovie/FCE supported Apple Intermediate Codec or After Effects CC/Premiere Pro/Premiere Elements/Sony Vegas specially optimized file formats for best editing workflow.

Step by step to transcode Panasonic HC-WX970 4K MP4/AVCHD to FCP for best workflow

Step 1: Add HC-WX970 4K MP4/AVCHD video to the program.

Run the program, click “File” > “Add video/audio” to add HC-WX970 4K MP4/AVCHD videos to the program.


Step 3: Specify output file format.
From "Format" drop-down list, select to out "Final Cut Pro"> "Apple Prores 422(*.mov)" format for editing with Final Cut Pro X.


Step 3: Down-converting 4K to 1080p.
For smooth workflow of WX970 video with FCP, you are recommended to downscale 4K video to 1080p from “Size(pix)” drop-down selection.


Step 4: Carry out the conversion process.

Press right-bottom conversion button to start Panasonic HC-WX970 4K MP4/AVCHD to FCP 6/7/X conversion process.

When the conversion is complete, you can easily import converted videos to FCP X for professional editing.

Further Reading:
Import/Edit Sony 1080 60p AVCHD to FCP on Mac
Edit Panasonic FZ330 MP4/AVCHD in FCP X
Make Panasonic DMC-G7 4K MP4 Compatible with FCP X
Best Way to Import Panasonic HC-X900 3D AVCHD Videos to Final Cut Pro (X)
Workflow of Panasonic Lumix GX8 4K Video with iMovie/FCE/FCP

Wednesday, October 14, 2015

Pavtube Upgrade Mac Products with Support for Mac OS X El Capitan

The newly arrived Mac OS X El Capitan featuring the ability to run multiple apps is fantastic. But people are out of luck to entertain themselves with various media files on the new operating system since most Mac video conversion application are not updated with support for El Capitan. To get all those issues fixed up, Pavtube Studio has recently updated all its Mac Blu-ray/DVD/Video products with perfect support for Mac’s new operating system - Mac OS X El Capitan. Products that works compatible well with El Capitan including: Pavtube Video Converter for MacPavtube HD Video Converter for MacPavtube MTS/M2TS Converter for MacPavtube MXF Converter for Mac,Pavtube iMixMXFPavtube BDMagic for MacPavtube ByteCopy for MacPavtube DVDAid for MacPavtube iMedia Converter for Mac.


Copy/Backup Blu-ray/DVD on El Capitan
Have problem to copy/backup Blu-ray/DVD disc on Mac OS X El Capitan, never mind, with Pavtube newly upgraded Blu-ray/DVD products, you will get no difficulty to make a full disc copy or the main movie copy of the original 2D/3D Blu-ray/DVD disc on Mac OS X El Capitan. Besides that, the program also enables you to rip/convert Blu-ray/DVD disc to various different file formats on El Capitan platform for playing on iPhone/iPad/iPod, Android phone and tablets, Windows phones or tablets, game consoles, HD media players, streaming to Apple TV/Amazon Fire TV/Roku, etc.

Play and edit videos on El Capitan
Play and edit any video files on Mac OS X El Capitan can also be easily achieved with Pavtube upgraded Mac Video Converter applications. You can effectively convert virtually any file formats including AVI, WMV, MP4, MOV, FLV, VOB, MKV, MKV, MTS, M2TS, Tivo, H.265 in SD, HD, 2K, 4K videos to your desired file formats or devices and programs optimized file formats for better viewing. For camera and camcorder users, you will have a fast and fluid workflow on Mac OS X El Capitan with our program by exporting professional video editing codec such as Apple Prores Codec for Final Cut Pro 6/7/x, Apple Intermediate Codec(AIC) for iMovie/Final Cut Express, DNxHD MOV for Avid Media Composer, After Effects CC/Adobe Premiere Pro/Adobe Premiere Elements/Sony Vegas specially optimized file formats, etc.

Other downloads:

BDMagic for Mac
- Pavtube old official address: http://www.pavtube.cn/blu-ray-ripper-mac/

ByteCopy for Mac
- Pavtube old official address: http://www.pavtube.cn/bytecopy-mac/

iMedia Converter for Mac
- Pavtube old official address: http://www.pavtube.cn/imedia-converter-mac/

Video Converter for Mac
- Pavtube old official address: http://www.pavtube.com/video-converter-mac/

HD Video Converter for Mac
- Pavtube old official address: http://www.pavtube.com/hd-video-converter-mac/

MTS/M2TS Converter for Mac
- Pavtube old official address: http://www.pavtube.com/mts-converter-mac/

MXF Converter for Mac
- Pavtube old official address: http://www.pavtube.com/mxf-converter-mac/

iMixMXF
- Pavtube old official address: http://www.pavtube.com/imixmxf-mac/

Further Reading:

Tuesday, October 13, 2015

Transcode and Edit DJI Osmo 4K MP4 Video with Premiere Elements 12/13

The DJI Osmo is new handheld camera that lets you shoot 12MP photos and 4K video while being stabilized with a 3-axis brushless gimbal. With the new intelligent features, you can record hyperlapse and timelapse photography just like a pro. The Osmo will be released later this month with a price tag of $649. You can pre-order the Osmo and its accessories starting over in the DJI store.

You can take every great actions in your life with this great stabilized handheld camera when you move. After the shooting stage, you can make your videos look great with cool effects, transitions, themes, titles, etc by enhancing them with some professional video editing application such as Premiere Elements 12/13. The problem is that Premiere Pro 12/13 does not support the H.264 4K MP4 video captured with DJI Osmo very well. Since H.264 MP4 is an ideal video streaming format but not an ideal editing format for Premiere Elements.

To solve this problem, you can transcode DJI Osmo 4K MP4 video to Premiere Elements native editable MPEG-2, WMV format with a third-party program called Pavtube Video Converter for Windows/Mac. The most notable features of this program is that it enables you to directly output Premiere Elements optimized profile formats without any complex settings so that you won’t encounter any profile settings problems when importing DJI Osmo 4K video to Premiere Elements for editing.

As a powerful video conversion applications, the program also assist you to convert DJI Osmo 4K video to other professional editing codecs such as Apple Intermediate Codec for iMovie/FCE, Apple Prores Codec for Final Cut Pro, Sony Vegas/After Effects CC/Adobe Premiere Pro customized file formats for fluid editing.


Other Download:
- Pavtube old official address: http://www.pavtube.com/video_converter/
- Amazon Download: http://download.cnet.com/Pavtube-Video-Converter/3000-2194_4-75734821.html
- Cnet Download: http://download.cnet.com/Pavtube-Video-Converter/3000-2194_4-75734821.html


Other Download:
- Pavtube old official address: http://www.pavtube.com/video-converter-mac/
- Amazon Store Download: http://www.amazon.com/Pavtube-Video-Converter-Mac-Download/dp/B00QIBK0TQ
- Cnet Download: http://download.cnet.com/Pavtube-Video-Converter/3000-2194_4-76179460.html


How to transcode and edit DJI Osmo 4K MP4 video to Premiere Elements 12/13?


Step 1: Input DJI Osmo 4K source files.

Launch and start the program on the computer, import your source DJI Osmo 4K MP4 video files to the program by clicking "File"> "Add Video/Audio".


Step 2: Specify output file format.
From "Format" drop-down list, select to out "Adobe Premiere/Sony... "> "MPEG-2 (*.mpg)" format for editing with Sony Vegas.


Step 3: Start conversion from DJI Osmo 4K video to Premiere Elements.
Press right-bottom “Convert” button to start DJI Osmo 4K video to Premiere Elements 12/13 conversion process.

When the conversion is complete, you can easily import converted videos to Premiere Elements for professional editing.

Editor's Recommendations

Saturday, October 10, 2015

Transfer and Play MKV, Divx, VOB, FLV, Tivo, WMV to Amzon Fire HD 6 Kids Edition

With best-in-class parental controls, this Amazon Fire HD 6 Kids Edition allows you to manage your child's usage. More than 33 million movies, TV shows, songs, book, Android apps and games help keep your little one entertained. 


When your child is going to have a trip with his or her Fire HD 6 Kids Edition, how to prepare plenty of available content on the tablet to kill time. Perhaps the best solution is to download content from online websites to read for playing offline with the video player application attached with Fire HD 6 Kids Edition. However, like other Kids tablets, Fire HD 6 Kids Edition supports limited formats for playing as below:
audio formats: AAC, MP3, MIDI, OGG, WAV
video formats: MP4, VP8, 3GP, WebM, M4V, 3G2

There are still large amount of video file formats such as AVI, WMV, FLV, VOB, MKV, Tivo, Divx, MXF, etc are not supported by Fire HD 6 Kids Edition. How to transfer any video formats to Fire HD 6 Kids Edition for smoothly playing? All you need is a powerful video conversion program, Pavtube Video Converter for Windows/Mac is the ultimate media entertainment solution to comprehensive convert any video formats to Fire HD 6 Kids Edition with 6” HD display or Fire Kids Edition with 7” display playable MP4, 3GP, 3G2, M4V, etc formats. 

Wish to have a better video playback effect on Fire HD 6 Kids Edition, you can use the pogram’s “Profile Settings” function to change the output file size to “1280*800” which is compatible with the Fire HD 6 Kids Edition display resolution.

Transfer and play AVI, WMV, FLV, VOB, Tivo, MKV, VOB, etc on Fire HD 6 Kids Edition

Step 1: Import video files to the video converter.

Run the software on your computer, either hit on the button "Add video/audio" or directly drag & drop your source videos from computer to the app. You can import a folder that is filled with videos to add more than one video into this video converter at the same time.


Step 2: Select output Format.
Click the"Format" bar and select "Android > “Amazon Kindle Fire HD (*.mp4 )" as target format. The output videos could fit on Fire Kids Edition perfectly.


Step 3: Adjust output file resolution.
Click “Settings” to open “Profile Settings” window, under video settings panel, choose “1280*800” as the final output file resolution.

Step 4: Start video conversion.
On the main interface of this Video Converter, you hit the "Convert" icon to start converting your videos for Fire HD 6 Kids Edition. When the conversion is done, get the converted video in output folder location, now you can transfer and watch MKV, AVI, MPG Videos on your Fire HD 6 Kids Edition with 6” HD display on the move.

Further Reading:
Make Disney DVD Movies Playable on Amazon New Fire Kids Edition
Play Blu-ray Movies on Amazon Fire HD 6 Kids Edition
How to Add Movies to Your Kids Tablet?
Effective Solutions for Playing YouTube Videos on New Kindle Fire