Showing posts with label Adobe Premiere. Show all posts

Thursday, September 24, 2015

Import Zenmuse X5/X5R 4K Videos to Premiere Pro CC for editing

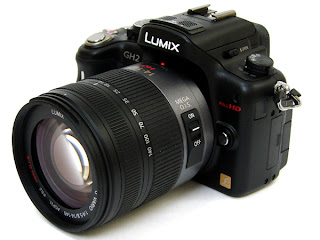
More cameras and camcorders which can recorded 4K Ultra HD videos are released this year, including the new ZENMUSE X5 series. DJI has officially launched the Zenmuse X5 and X5R, two new cameras for DJI’s Inspire One that are the world’s first commercial Micro Four Thirds (MFT) cameras designed specifically for aerial use. Featuring increased dynamic range, interchangeable lens compatibility, remote focus and aperture control, and lossless 4K RAW video recording, the ZENMUSE X5 series is ready to take on the high-performance world of aerial photography with two distinct models.


Zenmuse X5R:
  • Lossless cinema 4K RAW video
  • Record at 4096x2160 (24fps) or 3840×2160 (30/25fps)
  • Average 1.7 Gbps bitrate (2.4Gbps maximum)
  • Removable 512GB SSD
  • 16MP photographs
  • 12.8 stops of dynamic range

Zenmuse X5:
  • 4K video at up to 30fps
  • Record at 4096×2160 (24fps) or 1920x1080 (60fps)
  • 16MP photographs
  • 12.8 stops of dynamic range

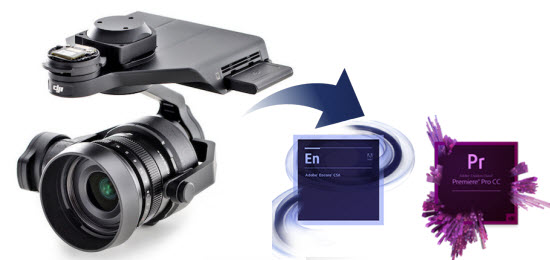
What if ZENMUSE X5R or ZENMUSE X5 owners would like to import and edit their 4K videos in editing software including Premiere Pro CC on Mac for sharing with your family and friends. But you should know 4K videos can’t be added into Premiere Pro CC or other these editing software directly, in this cases, you’d better convert your Zenmuse X5 or X5R 4K videos to Premiere Pro CC supported video format on Mac.

Pavtube HD Video Converter for Mac is a powerfull All-in-One video solution software. It can solve all video-related problems efficiently, such as editing, merging, cutting, trimming and converting your 4K Videos with great image and sound quality for editing in Adobe Premiere Pro CC, Premiere Pro CS6/CS5/CS4/CS3, Affect Effects CC/CS6, Premiere Elements 13/12, Creative Suite 6/5 as well as FCP, iMovie, Avid Media Composer, DaVinci Resolve Lite(DaVinci Resolve 11), DaVinci Resolve 9, iPhoto, Kdenlive, Keynote, Aperture 3, etc., and without audio delay issues. Especially, it support conversion of over 150 Formats Including 4K/3D, more functions below:
  1. HD/4K/3D footages generated by DJI, Sony, Samsung, Canon, Nikon, Panasonic, and JVC can also be handled easily.
  2. Convert to Over 150 Formats Including 4K/3D.
  3. Output considerable video formats supported by different devices such as Non-linear editing system, Apple/Android/Windows series, game consoles, and media players.
  4. Audio and video sync technology: The adoption of audio and video technology allows you to enjoy output videos.
  5. Inserting SRT/ASS/SSA subtitle: Load your prepared SRT/ASS/SSA subtitle on the editing interface for better enjoyment.
  6. APEXTRANS technology converts files 6x faster than competitor products.
  7. Edit, Enhance & Personalize Your Videos File.
  8. The user-friendly interface can make you use it masterly without the complicated process.
          

Other Download:

How to edit Zenmuse X5/X5R 4K video in Adobe Premiere Pro CC?

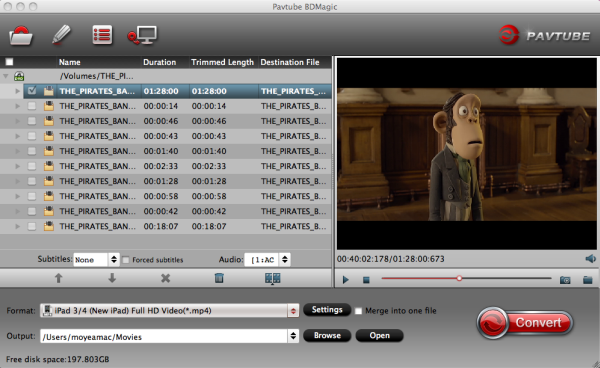
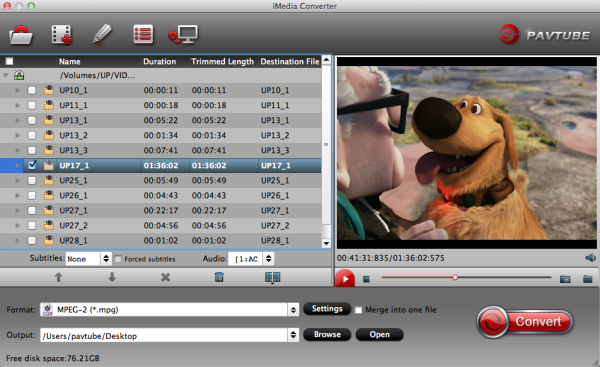
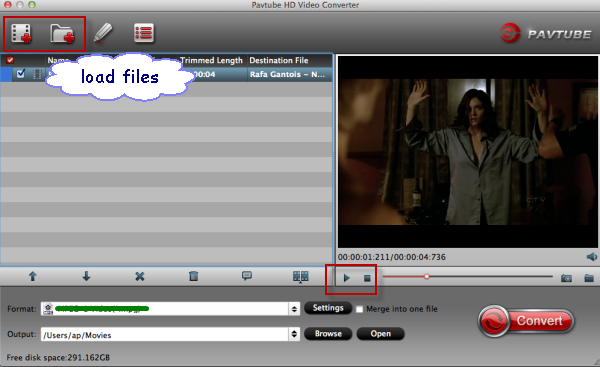
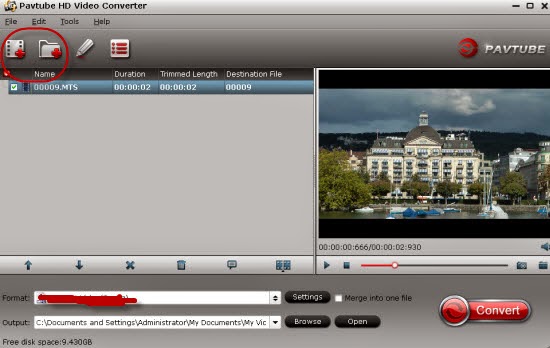
Step 1. Import Zenmuse X5/X5R 4K video. 

Click the "Add Video" button or "Add from folder" button to import source Zenmuse X5/X5R 4K video files to the program. You can add multiple video clips at one time.


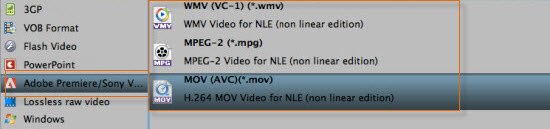
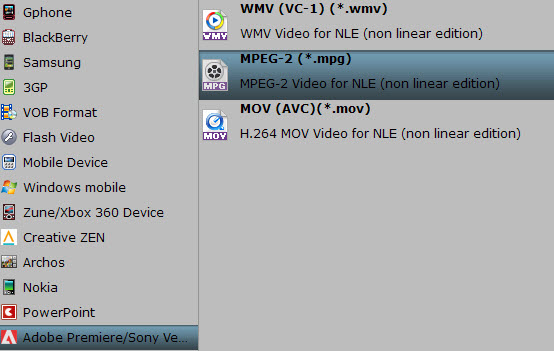
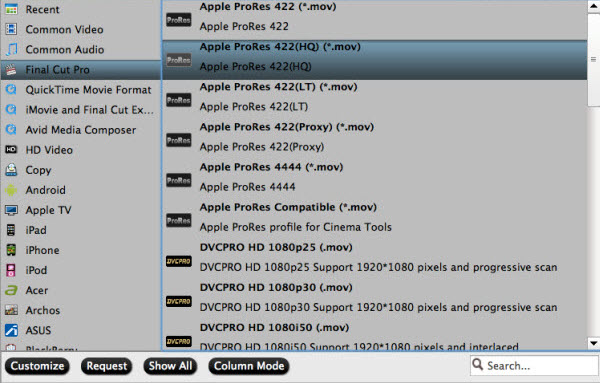
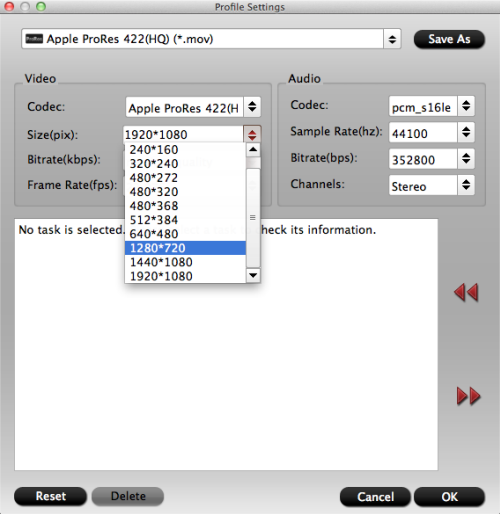
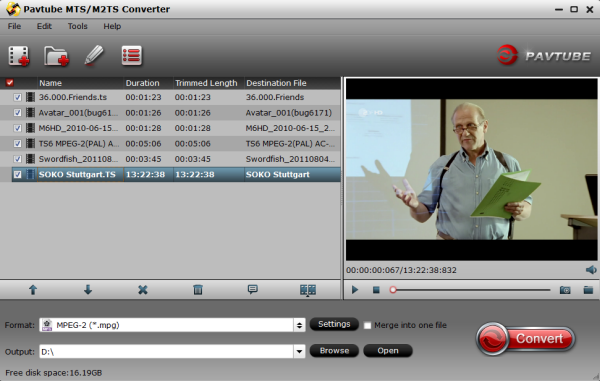
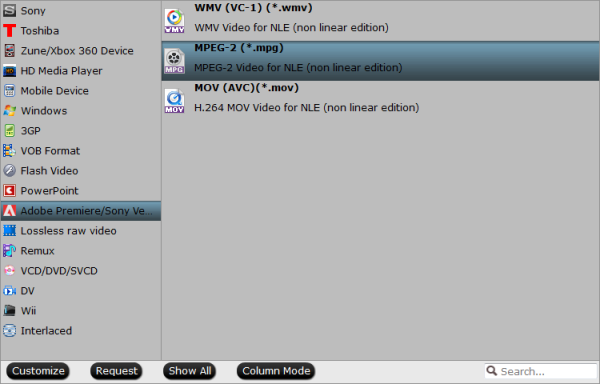
Step 2. Choose optimized video format. 

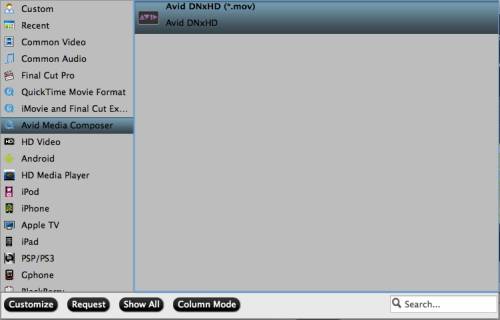
Click the "Format" bar, and you will find various video formats sorted by various programs/devices. For Adobe Premiere Pro, it should be "Adobe Premiere > MPEG-2(*.mpg)" or "MOV (AVC)(*.mov)".


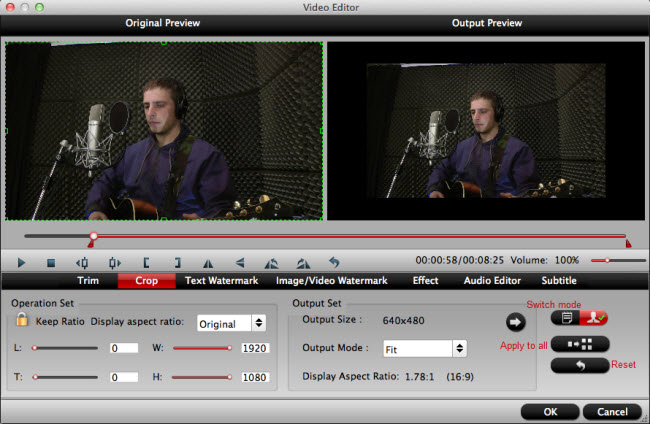
Step 3. Edit Zenmuse X5/X5R 4K video.

Open "Video Editor" window, here you can trim video length, crop video file size, apply special effect, add image or transparent text watermark, add subtitles, replace or remove original audio, etc.


Step 4. Convert Zenmuse X5/X5R 4K to Premiere Pro CC. 

Click the "Convert" icon under the preview window, it will start to convert Zenmuse X5/X5R 4K video to Adobe Premiere supported format. 

After conversion completes, you can easily import Zenmuse X5/X5R 4K video to Premiere Pro CC for smoothly editing as you want.

Further Reading:

Tuesday, August 12, 2014

Make it Possible to Put Sony A77II MTS into Premiere Pro on Mac

The following article can give you suggestions on taking MTS files from Sony A77II to Premiere Pro smoothly by Pavtube MTS/M2TS Converter for Mac.

Sony A77II, a wonderful camera that helps you remember great moments
Sony A77II

Nowadays, more and more people are interested in taking photos or videos by little cameras. Due to their convenience and little body size, Sony A77II takes advantages among most photographers. With the unique feature of offering high-speed shooting, most people are fond of taking photos on ways, trips or parties. After that, maybe they want do some decorations as treasures by editing software such as Premiere Pro.

Put Sony A77II MTS into Premiere Pro on Mac

MTS/M2TS Converter for Mac, a friendly tool to convert your videios smoothly.

Thus, someone will ask how can we put our MTS files taken by Sony A77 to Premiere Pro? Everybody knows that Premiere Pro can’t support MTS format. So we need some help to convert MTX to other formats like MOV, MPEG, WMV that Premier Pro supported, right? Maybe Pavtube MTS/M2TS Converter for Mac can help you a lot. This converter can transcode MTS to most formats you need in Premiere Pro.

download mts to mts/m2ts converter for mac                  buy mts to mts/m2ts converter for mac

Here are some specific steps you can take a reference on how to import your videos to MTS/M2TS Converter correctly, just click it: 


Steps for imporing MTS files into MTS/M2TS Converter for Mac

After successfully converting MTS to MOV, WMV or MPEG, you can edit videos in Premiere Pro freely to decorate them with your own style. If you wanna some more details about editing in Premiere Pro, please click here:

Some Tips for using with Premiere Pro


Other Guides for Reading:
Two ways to ingest Nikon D5300 MOV to Premiere Pro 
Best Way to convert Canon HF G30 AVCHD footage to Premiere Pro

Friday, April 11, 2014

Best video export settings for Blu-Ray using Premiere Pro CS6

In order to make a Blu-ray directly playable and editable in Premiere Pro CS6 program, this guide will show you how to rip convert Blu-ray movies to Premiere fully compatible format.

It's a great fun if you have a pretty large Blu-ray collection for sharing with your friends or familiars. When you have the digital copies of these movies saved on your hard drive or personal server, you may also like to edit Blu-rays in Premiere Pro CS6 on Mac.


Commercial Blu-rays bring extraordinary video quality to us for family watching and sharing for the large amount of content that can be stored. It's a great fun if you have a pretty large Blu-ray collection, or movie collection. However,it comes with the problems that Premiere Pro CS6 can’t directly ingest Blu-ray files. So, how can we rip Blu-ray movies for Premiere CS6 editing? As far as I know, Premiere Pro CS6 is not so that picky on the formats, but it prefers MOV/MPEG-2 format in editing. Is there any quick and easy way to do this? this?
OK, after lots of searching in google, finally a powerful conversion program is founded to be able to ingest Blu-ray to Premiere on Mac, an all-in-one Pavtube BDMagic for Mac program on Mac. This software does a good job in decrypting and transcoding Blu-rays so that you can easily get the files you want, no matter audio/video only, or both. And the lastest version has added 3D profiles in Format menu. (Side-by-Side, Top-Bottom, or Anaglyph 3D in MKV/MP4/MOV/WMV/AVI). So it now support converting 3D to 3D, and you can get your desired 2D/3D Blu-ray video in 3D effect.

Get this Best Mac Blu-ray Ripper for Premiere Pro installed; you can order a license directly or download a trial version for free before purchase.

How to Rip Blu-ray to Premiere Pro CS6 with Best Blu-ray Ripper for Mac?

Step 1. Load your disc.

There is a disc icon on the top left which let you load from disc, folder or ISO/IFO respectively.


Step 2. Choose your Output directory down which is marked as 2.

For editing Blu-ray movies in Premiere CS6, the AIC is preferred. Click "Format" and choose "MOV (AVC)(*.mov)" or "MPEG-2 (*.mpg)" from "Adobe Premiere/Sony Vegas" option.


PS: It has various profiles and formats so that you can rip blu-ray to various formats according to your needs.

Step 3. Set up frame rate, bitrate and other output settings.

Click Settings, you can find file details including codec, size, bitrate and frame rate. You are able to fix them according to your needs. FYI: the higher bitrate you choose, the better video quality it outputs.

Step 4. Now just press the big circular "Start Conversion" button to convert Blu-ray to MOV/MPEG-2 for Premiere CS6 and let it do its magic. Wait for moments and you will get the fresh hot converted videos for Premiere CS6.

Tips:

1. Refer to here to learn how to import video files into Premiere Pro.

2. Here are some step-by-step guides of how to import Blu-ray to FCPedit DVD in FCP, rip Blu-ray to iMovie/FCE and convert DVD to multi-track Prores for FCP X on Mac.

Monday, January 20, 2014

Why MXF files from Panasonic AJ-HPX2000 not reading in Premiere Pro CS6?

Summary: Don't know how to import Panasonic AJ-HPX2000 P2 MXF to Adobe Premiere Pro CS6 for further editing? Follow this guide, you will learn how to accomplish it within a few clicks. 

Panasonic AJ-HPX2000 is a multi-format HD production camera that records onto P2 cards. Using the same sensor as the popular VariCam and HDX900 cameras, the HPX2000 can shoot native 720p or switch to shoot 1080i with 24p, 25p & 30p capture. Standard definition NTSC or PAL recording is also available.


While, most of the users have found that the MXF format is not well-suited for some non-linear video edit software including Adobe Premiere Pro CS6. So here comes up the original question: how can we convert Panasonic AJ-HPX2000 P2 MXF recordings to Adobe Premiere Pro CS6 compatible format on Mavericks?

After lots of searching and testing among the top converting programs, this Pavtube MXF Converter for Mac is recommended for that it's capable to convert Panasonic AJ-HPX2000 P2 MXF to Premiere Pro CS6 on Mavericks efficiently and stably. Click here to download the free trial version, get it installed and let's start!


Convert Panasonic AJ-HPX2000 P2 MXF footage for Premiere Pro CS6 on Mavericks

Step 1. Add MXF files to Pavtube Mac P2 MXF Converter.

Connect you camcorder to Mac and keep it on until it show as a hard drive on desktop.

Install and run Pavtube P2 MXF Converter for Mac.

Click top left icon to load you footages. You can choose "Add videos" or "Add from folder" directly.

Step 2. Choose compatible format for Adobe Premiere Pro CS6.

Click "Format" and find Adobe Premiere Pro/Sony Vegas at left, choose "MPEG-2 (*.mov)" or "MOV(AVC)(*mov)" etc. as it's the preferred codec for Premiere Pro CS6. Or you can choose "Final Cut Pro > Apple ProRes 422 (*.mov)".

MOV, MPEG, WMV:


Apple ProRes 422:


Step 3. Set up output videos settings(Optional)

Click "Settings" which is marked as 3, you can fix the bitrate, frame rate, sample rate and video size, it's all up to you. Usually the higher bitrate you choose, higher video quality will be, and larger video size correspondingly.

Step 4. Start converting AG-AJ-HPX2000 P2 MXF for Premiere Pro CS6

Now click the big red circle at right bottom, wait for moments till the conversion complete. You can click "Open" to locate the converted video directly.
Tips:

If your MXF files have 2 audio tracks or more, here is a new program specially designed for multi-track preserving and mixing features, named iMixMXF. Featured formats include: MOV/MP4/MPG/WMV/FLV/MKV and more.

Learn More MXF related guide:

Wednesday, January 8, 2014

Two ways to ingest Nikon D5300 H.264 MOV to Adobe Premiere Pro on Mac

How to import .mov footage taken by Nikon D5300 to Adobe Premiere Pro without rendering? By converting Nikon mov to Premiere friendly format, you can easily get the smooth workflow with D5300 and Premiere Pro on Mac (Mavericks included).

Nikon D5300 makes fantastic quality images and weighs almost nothing, so it's a pleasure to carry it everywhere. Compared to the pro cameras I often haul, the D5300 feels as if it's hollow, which is a very good thing. It can record H.264/MPEG-4 stored as .MOV video files which ensures high quality.

As the H.264 codec 
is highly compressed, so can not easily and directly import and edit Nikon D5300 mov files on Mac with Adobe Premiere Pro. If you want to import  Nikon D5300 MOV video to Premiere Pro on Mac for editing, you are likely to meet all kinds of problems due to the compatibility issue. So how can we import Nikon D5300 MOV footage to Premiere Pro? Here are two solutions:

Method 1.

Right click your MOV footage; rename the .mov files with .mpg extension. This "fools" Adobe Premiere Pro into thinking it's a different codec.

It works in this way; however, your footages didn't turn into another codec so that Premiere Pro may still does something wrong during editing. And if you didn't do a backup before changing the extension, it really ruins your valuable footage.

Besides, here's another problem: what if you have hundreds of clips to be edited? Rename all of them could be such a pain!

So here comes the second way to let Nikon D5300 import to Adobe Premiere Pro smoothly.

Method 2.

To crack the obstacle, the best way is to convert the H.264 MOV from Nikon D5300 to MPEG-2 or MOV which have been designed to work especially well as high-quality, high-performance editing codecs for Premiere Pro. Come and meet this Canon MOV to Premiere Pro Converter which would be a vital part of your workflow. You can order a license directly, or free download a trial version here.

Transcode Nikon D5300 H.264 mov files on Mac to Premiere Pro for editing

Step 1. Connect your Nikon D5300 to Mac with USB cable or use card reader to transfer the MOV files to hard drive disk; do not forget to keep your camcorder on.

Step 2. Run this Nikon D5300 MOV Converter, click the "Add video" button to load individuals mov videos; or click "Add from folder" to load the entire folder.


Step 3. Choose editing program compatible format.

Click the "Profile" option, you will find various video formats sorted by various programs/devices. For Adobe Premiere Pro, it should be "Adobe Premiere > MPEG-2(*.mpg)" or "MOV (AVC)(*.mov)".


Step 3. Click "convert" button to convert Nikon D5300 H.264 MOV for Premiere Pro with this best Canon EOS Video Converter.

After conversion completes, you can easily import Nikon D5300 footage to Premiere Pro for smoothly editing as you want.

Tips:

1. Click here to learn: Basic Steps to import Media Files to Premiere Pro on Mac.

2. If you are a Windows user, follow the windows workflow with Canon MOV files in Adobe Premiere.

Friday, December 27, 2013

Import Sony F65 MXF to Premiere Pro CS6/CS5/CS4/CS3 on Mac/Windows

Can't import Sony F65 MXF video to Adobe Premiere Pro smoothly? In this article will give you the answer how to load and ingest Sony MXF footage to Adobe Premiere Pro CS6/CS5/CS4/CS3 for smooth editing. 

Sony F65 users include some of the most world's most demanding cinematographers. It's an advantage you can exploit no matter what your delivery format: true 4K, supersampled 2K or supersampled HD.


I have 4K footage shot on the Sony´s F65 I'd like to composite with in Premiere Pro. The files are saved in an MXF container.It seems that cs6 natively desn´t support this file, is there a plug-in available for Sony's SR RAW codec? Thanks in advance!
Many nonlinear editing programs including Adobe Premiere Pro (CS6/CS5/CS4/CS3) don't support importing MXF encoded files directly. So here comes up the question: how can we import Sony F65 MXF recordings to Premiere Pro without any problems?

Method 1. Sony MXF plug-in. Use the plugin to create a single MXF file of your spanned clips on the memory card and import the new file into the project.
Method 2. To solve the incompatible trouble you’d better change Sony F65 MXF a native format for importing to Premiere Pro (CS6/CS5/CS4/CS3). To get the best quality with 5.1 sound, you can MXF to MPG. If you also want to play it with QuickTime, you can reformat MXF to MOV videos. If you want to get a smaller file for quickly editing, you can encode Sony F65 MXF to WMV.

As you seen above, Pavtube MXF to Premiere Pro Converter for Mac is the best choice for you, and it is capable to convert Sony F65 P2 MXF to Premiere Pro efficiently and stably. 

With the Mac app, you not only can convert Canon XF/Panasonic P2/Sony XDCAM MXF video to MOV, MPG, WMV, you also can batch convert MXF clips to ProRes 422 for FCP (X), AIC for iMovie/FCE, etc. with included Profiles. I believe it is helpful for you. Below is a very easy guide on Sony F65 MXF to Adobe Premiere Pro’s native formats conversion.

Good News! Pavtube Release a New Site - multipelife.com with Product Migration and Name Change.

To thanks for your continued support, we are holding a 'New Site Special' in which you can get 20% off Video Converter Ultimate on Windows/Mac platform now:

Read more: http://1080p-video-tool.blogspot.com/2014/05/pavtube-new-site-release.html

PS: If you are a Windows user, please choose the Video Converter Ultimate, the workflow is the same.

Click here to download the free trial version, get it installed and let's start!
How to convert Sony F65 MXF footage for Premiere Pro CS 6/5/4/3

Step 1. Add MXF files to Pavtube iMedia Converter for Mac.

Connect you camcorder to Mac and keep it on until it show as a hard drive on desktop.

Install and run Pavtube iMedia Converter for Mac.

Click top left icon to load you footages. You can choose "Add videos" or "Add from folder" directly.


Step 2. Choose compatible format for Adobe Premiere Pro CS 6/5/4/3

Click "Format", you can choose "Final Cut Pro > Apple ProRes 422 (*.mov)". Or find Adobe Premiere Pro at left, choose "MPEG-2 (*.mov)" or "MOV(AVC)(*mov)" etc. All of them are the preferred codec for Premiere Pro (CS6/CS5/CS4/CS3)

Apple ProRes 422:


MOV, MPEG, WMV:


Step 3. Set up output videos settings for Premiere (Optional)

Click "Settings" which is marked as 3, you can fix the bitrate, frame rate, sample rate and video size, it's all up to you. Usually the higher bitrate you choose, higher video quality will be, and larger video size correspondingly.

Step 4. Start converting Sony F65 MXF for Premiere Pro (CS6/CS5/CS4/CS3)

Now click the big red circle at right bottom, wait for moments till the conversion complete. You can click "Open" to locate the converted video directly.

For beginners, here is a guide on how to import video files to Premiere Pro.

Here, Pavtube iMixMXF can exactly do this for you. It is a great MXF Mixer and Converter that enables you to convert multi-track MXF from Sony F65 to Prores for Premiere Pro preserving all the audio channels without quality loss, but also can make it easy for merging multiple video clips. The Windows users can Pavtube MXF MultiMixer.

Read More:

Tuesday, September 17, 2013

Why Premiere Pro and After Effects doesn't like Sony EX3 XDCAM files

Got Problems importing Sony PMW-EX3 xdcam mp4 footage into Premiere Pro/After Effects for further editing? Look no further, follow the easy workaround to achieve your goal smoothly.


Question:

I recently purchased two PMW-EX3 cameras for use here at my work, and I thought that I had them up and running perfectly but recently ran into a problem importing footage. When I shoot anything over around 13:40:00 long, PP CS4 will not import the entire length of the clip, only the first 13:40:00 (give or take a minute or two). When I play back the clips on the camera or in Sony's clip browser software I can play the entire duration of the clip. When I'm in PP using the Media Browser window to get to my footage, it even shows me the correct duration of the clip in the Duration column, but when I copy it over into my project bin, only that first 13 and a half minutes makes it. And a similar problem importing the files from EX3 into After Effects. AE only imports the first MP4 file of your clip and not the rest.

I've searched lots of other forums, and while I've seen various issues with importing XD EX footage into PPro and AE, I haven't seen this best solution yet

Sony PMW-EX3 can shoot XDCAM EX MP4 recording with true 1920x1080 resolution on dual SxS cards. As the XDCAM mp4 footage still cannot fully supported by some video editors like Adobe Premiere Pro and After Effects on Mac. So if you are using Premiere and AE for editing just like the above user, the best workaround for us is to convert Sony PMW-EX3 mp4 to Adobe Premiere Pro/After Effects most compatible MPEG-2 format, and it will make the editing work much smooth and easier. 

At first, you need to find a third party program to do EX3 files to MPEG-2 transcoding. As far as I konow, the best hd video converting program is Pavtube HD Video Converter for Mac, a powerful XDCAM Converter for Premiere/AE, which is use-to-use, capable of converting XDCAM video to various formats for editing with Premiere Pro, Avid Media Composer, Final Cut Pro, iMovie or FCE on Mac, and supports batch renaming painlessly. Download it here and get to konw the detailed steps as below.

Guide on transcoding Sony EX3 XDCAM to MPEG-2 for Premiere Pro and After Effects editing on Mac

Step 1: Install and run the best Sony XDCAM Converter for Mac. Click the “Add Video” or "Add from folder" button to import .mp4 files from the Sony EX3 camcorder. Join mp4 clips via checking the “Merge into one” box.


Step 2: Hit the Format box and select Adobe Premiere/Sony Vegas --> MPEG-2(*.mpg) as output format for editing EX3 XDCAM video in Premiere Pro and After Effects natively.


Step 3: Click the “Settings” icon to do some audio, video parameter settings like video bitrate, frame rate, audio sample rate, audio channel, etc. (Optional)

Step 4: Click the "Convert" button under the preview window, the Mac XDCAM Converter will start the conversion from EX3 to Adobe Premiere Pro/Adobe After Effects immediately.

After the conversion, you will be able to get the output files via clicking on “Open” button effortlessly. Afterwards, you can import Sony EX3 MP4 footages to Premiere Pro CS and After Effects for further editing easily.

XDCAM Related:

Monday, August 19, 2013

Best Way to convert Canon HF G30 AVCHD footage to Premiere Pro CS6 and After Effects CS6

Summary: With following this guide, you can smoothly import and edit Canon HF G30 50p/60p AVCHD footage in Premiere Pro CS6 and After Effects CS6 by transcoding Canon 50p/60p .mts to Premiere/AE CS6 most compatible MPEG-2 video.


The new Legria HF G30 (also known as the Vixia HF G30 in the US) from Canon has the same imaging system, but without the XLRs and is aimed at enthusiast videographers, such as hobbyists or film students. Their HD video system has been completely redesigned – from the lens through to the image sensor and processor – to improve imaging performance. There are various advanced shooting features and connectivity options to suit different types of applications, from news and documentaries to weddings.

This camera is awesome, I've had it almost a month now and was able to put it through it's paces on a Disney cruise to Alaska. It was amazing with great control in manual mode with auto exposure and worry free shooting in auto mode where all my settings were taken care of.

But now I have a question. I'm working on a documentary project using a Canon HF G30; I had problems working with AVCHD Progressive files genereted by HF G30 and I was very worried because both Premiere Pro CS6 and After Effects CS6 didn't support the 1080 50p/60p .mts files. To make this kind of file compatbile, I tried to convert the Canon HF30 AVCHD footage with various programs but the results was no more an HD progressive file.

Then I tried this amazing program, Pavtube MTS/M2TS Converter for Mac , and I'm very happy of the converted files: no loss of quality, the same high resolution, same colors and defitition.It works fast and with an incredible quality; I tried to compare the original files with the converted one and I could not find differences, I even analysed the two files with professional instrumens and compared the flow on a professional monitor, this program it's simply great! Now I have successfully converted Canon HF G30 50p/60p MTS footage to editable formats not only for  Premiere Pro CS6 and After Effects CS6 editing, the converted files work perfectly with these pofessional editing programs!!! Just follow the step-by-step guide I shared below to get the work done smoothly.

Convert Canon HF G30 50p/60p
.mts to Premiere Pro CS 6 and After Effects CS6 editable format

Step 1: Copy Canon HF G30 50p/60p .mts media on to the Storage Drive in a folder.

Step 2: Launch the best Canon AVCHD Converter for Mac. Click the "Add" button for adding to import the 50p/60p mts files from Canon HF G30 to the best Mac G30 MTS/M2TS Converter.


Step 3: Click on the dropdown menu of "Format", and then move your pointer to Adobe Premiere/Sony Vegas> MPEG-2 (*.mpg) which is the perfect video format for you to transfer MTS to Adobe Premiere Pro CS6 and After Effects CS6.


Then you can set the output folder by clicking "Browse" icon as you prefer.

Step 4: Click "Settings" icon to adjust audio and video parameter. You can change the default codec, bit rate, frame rate, sample rate and audio channel according to your needs and optimize the output file quality.

Note: To get original(best) video quality, you can keep original video size and bitrate.

Step 5: Click the "Convert" button and it will losslessly convert Canon HF G30 AVCHD 50p/60p mts files to MPEG-2 for editing in Premiere Pro CS6 and After Effects CS6 immediately.

Step 6: Once the Mac MTS to Premiere and AE CS6 conversion is done, you will be able to get the output files for Adobe Premiere Pro CS6 and After Effects CS6 via clicking on "Open" button effortlessly.

Now you can easily and correctly import the converted video in Premiere Pro CS6 and After Effects CS6 for editing keeping high quality.

Read More:

Wednesday, August 14, 2013

Canon XA20 MTS/MP4 importing workflow in Sony Vegas, Avid, Premiere, Pinnacle, Cyberlink and Windows Movie Maker

Summary: To edit Canon XA20 mts/mp4 files smoothly on your editing software including Sony Vegas, Avid, Premiere, Pinnacle, Cyberlink, Windows Movie Maker, you need to transcode mts/mp4 to AVI/MOV/WMV/MPEG-2 for Windows editing software at first. And this article will show you how.

Canon XA20 is one of the new announced Ultra-Compact Professional Camcorder which cover the needs of the professional that need compact cameras with pro feature sets.

First off, Canon heard the cries for 1080/60p from the masses and it looks like they're finding ways to please the end-users. With 1080/60p & 1080/24p in both AVCHD (28mbps) & MP4 (35mbps) codecs, everyone is covered. Plus, the 20x Optical HD Video Zoom Lens with 8-Blade Circular Aperture mounted to the 2.91 Megapixel HD CMOS Image Sensor will help make anyone's day brighter. Second, Canon has added WiFi to the cameras to enable file transfers on the go, making them perfect tools for ENG & EFP applications.


Since AVCHD/MP4 is quite complicated codec and format, currently there are not much software being able to support the AVCHD and mp4 video. Actually, you can't directly import Canon XA20 mts/mp4 footage into Windows editing software like Sony Vegas, Avid, Premiere, Pinnacle, Cyberlink, Windows Movie Maker, etc. That's why so many users asking if there are any easy solutions that can help them edit XA20 mts/mp4 files on Windows Editors.

To make Canon XA20 mp4/mts video workable with  Sony Vegas, Avid, Premiere, Pinnacle, Cyberlink and Windows Movie Maker , you only need to convert XA20 MTS/MP4 video files to AVI/WMV/MPEG-2, the most suitable video format for editing on Windows PC.

Now go to find Pavtube HD Video Converter for Windows.Lots of users are impressed by this converter since it is powerful enough to convert camcorder videos to multiple video formats for iOS/Android/Windows Tablets & Phones and HD Media Players as well as video editing software including Adobe Premiere, Sony Vegas, Avid Media Composer, and more. And you can enjoy the powerful edit function, like trim, crop, watermark for text, image and video, 3D effect, subtitles and so on.

The following guide will show you how to transcode/convert Canon XA20 MTS/MP4 files to AVI/MOV/WMV/MPEG-2 for Sony Vegas, Avid, Premiere, Pinnacle, Cyberlink, Windows Movie Maker.

Download it and follow below steps.

Step 1. Load Canon XA20 MTS/MP4 files.

You can choose "add video" directly or "load files" to add the whole folder.


Step 2. Select output format for video editing software.

Click "Format" menu you will find various video formats listed by different devices. Just choose a compatible video format for your editing software. Choosing the editing software option directly will help you to take less time to find a more preferable video format.


Step 3. Edit loaded Canon XA20 MTS/MP4 video files.

Click "Edit" button and you are allowed to trim, crop, add text/image/video watermark or some effect to your output video for making it perfect. Here the function of adding subtitles to output files will contribute to make your own videos. You can use free software Subtitle Edit to edit your subtitle content then add it to output videos.


Tips: Click "Settings" on the interface and you can adjust the parameters including size, bitrate, frame rate, etc. to get a high quality of output files. And keep the settings the same as original video recordings will provide you the least loss of video quality.

Step 4. Start conversion.

Click the "Convert" button to start conversion. When it completed, click the "Open" button to get the generated videos for your editing software.

More features about it:

1. Rip and convert Blu-ray and DVD including 1:1 backup Blu-ray/DVD movies to PC hard device for future needs.

2. Directly Copy feature will save 100% intact .M2TS main movie from original BD disc.

It is an integration of Blu-ray Ripper, DVD Ripper and Video Converter and it will meet almost all your requirements about converting videos. Good news for you that Pavtube 2013 Summer Holiday Sale Round 2 is coming and 20% discount is provided to Video Converter Ultimate and iMedia Converter for Mac during sale time. Catch the chance to try it now.

Now get ready for importing and editing Canon XA20 MTS/MP4 videos in Sony Vegas, Avid, Premiere, Pinnacle, Cyberlink and Windows Movie Maker. Enjoy your editing workflow!

Read More:

Monday, July 29, 2013

Down-convert Panasonic GH2 MTS footage from 1080p to 720p for editing in FCP/Premiere

Summary: In this article, you can learn the best way to convert Panasoni GH2 AVCHD MTS to a file that FCP/Premiere can recognize on Mac(Mavericks 10.8 included) with downsizing 1080p HD video to 720p.


Panasonic Lumix DMC-GH2 

Panasonic Lumix DMC-GH2 updates the highly acclaimed if rather pricey GH1 Micro Four Thirds system camera. As such the GH2's styling is closer to that of a baby DSLR than its sibling's, the GF2 compact camera form. While stylistically similar, its size is roughly a third of the size of Olympus' Four Thirds E-5 DSLR, and closer in fact to that of a bridge camera. Except unlike a bridge camera, the Panasonic's added appeal is the ability to swap the lens in use. Therefore it's fair to say that for those who like the feel of a DSLR but not the attendant bulk, the GH2 is potentially a very attractive proposition. It's in effect a DSLR 'lite'. 

Easiest way to convert GH2 1080p .mts to 720p?

I'm a Director, DP-Editor/Gaffer. I do commercials and corporate work. I got my Panasonic GH2 and I shot all the .mts footage myself about Teaching Practices in Public Schools in Maryland. I like One-touch HD video recording and manual controls. And now I need to down-convert GH2 MTS footage from 1080p to 720p for storage and editing in FCP&Premiere. Is there any easy way (free or nominal fee)? 

Why we need to downsize the HD video?

By google search, you can see many folks are asking about how to downsize 1080p to 720p. It is my impression that if I edit with actual 720p files, it will be less strain on the system both in editing and rendering as well has hard drive space. In fact, it really does. After reducing the big video size, we will edit more smoothly, save space and make 1080p video playable on protable device like iPad.

An easy to use 1080p to 720p Converter

As in the above case, you have the need to find a professional MTS Converter for FCP/Premiere to downsize 1080p HD video to 720p. Pavtube MTS Converter for Mac is exactly the one ease of use. I have used it on my project, it is helpful in down-converting Panasonic GH2 1080p full HD video to 720p video quickly and transoding GH2 MTS file to FCP/Premiere editable Prores codec, then I can wok well with GH2 mts file in FCP and Premiere. Overall first impression is excellent. Below I will share the step-to-step guide to you.

Simple way to downconvert GH2 1080p to 720p for editing in FCP/Premiere

Step 1. Download Pavtube MTS Converter for Mac. This professional Panasonic MTS Converter can help you convert 1080p AVCHD MTS files to rich formats for use on Mac(Mavericks 10.9 included). 

Step 2. Install and launch this 1080p to 720p MTS Converter. Import 1080p MTS footage from GH2 to it. 

Step 3. Click "Format" bar to choose format for output, you can choose Final Cut Pro > Apple ProRes 422 HQ (*.mov) for editing in FCP and Premiere Pro.


Step 4. You can click “settings” to customize the output parameters, adjust the resolution, bitrate as you want. To down-convert 1080p to 720p, you just need set Size(pix) to 1280*720. That is the exact 720P.


Step 5. Click convert button to start converting Panasonic GH2 1080p AVCHD MTS to Prores for FCP and Premiere editing with 1280*720 definition.

As long as the conversion is done, you will get the 720p mov video files in full screen from its destination folder, and then you can import the files with 720p resolution to FCP/Premiere editing
 smoothly on Mac (including Mavericks 10.9).

Read More:

Monday, July 22, 2013

Transcode Sony NX5U MTS to ProRes for Aperture 3/Premiere Pro on OS X Mavericks 10.9

Summary: In this article, you can get the info of covnerting Sony NX5U AVCHD to Aperture 3/Premiere Pro compatible Prores codec for importing and editing on OS X Mavericks 10.9.


The first in Sony's line of NXCAM solid-state camcorders, the NXCAM HXR-NX5U is also the company's first professional-level AVCHD camcorder. And while it may look similar to its HDV predecessor, the HVR-Z5U, in fact this is a very different animal. And because the NX5U can capture to media cards plus an optional flash memory unit, you can simultaneously record a different signal to each, whether HD + a backup or HD + SD. The footage is then easily downloaded to a computer or backup drive using USB 2.0.

Sony HXR-NX5U can capture HD and SD video in AVCHD and MPEG-2 formats--and save it to solid state media--is only one of its distinctive traits. Full-raster 1920 x 1080 video is another, including the option of recording 720/60p video as well as 60i, 30p and 24p. With the 1080 video recording AVCHD file from NX5U, you may face problem when trying to import/load the 1080 AVCHD MTS to Aperture 3/Premiere Pro on OS X Mavericks 10.9.

Well, as is known to us, Aperture 3 and Premiere Pro accepts Prores MOV best, so, to convert AVCHD to Prores MOV is a good choice for editing Sony NXCAM HXR-NX5U AVCHD MTS inAperture 3/Premiere Pro.

To do the job, AVCHD Converter for Mac is an ideal tool. With it, you can convert Sony NX5U 1080 AVCHD files to Apple ProRes 422 for editing with Apple Aperture 3 and Premiere Pro on OS X Mavericks 10.9 without losing quality or rendering.

Below is the step-by-step guide for you to quickly convert Sony NX5U 1080 AVCHD to Aperture 3 or Premiere Pro compatibel Prores codec on Mac Mountain Lion, Lion, Snow Leopard or Leopard, OS X Mavericks 10.9.

Step 1: Download Pavtube Mavericks AVCHD MTS/M2TS Converter and import your Sony NX5U AVCHD file. This software will solve your AVCHD to Apple Aperture 3/Premiere Pro importing problems.


Step 2: You will need to choose the output format for Aperture/Premiere. You are recommended to choose Final Cut Pro -> Apple ProRes 422 (*.mov), it's great for editing in Apple Aperture and Premiere Pro. There are more formats for output, you can pick as you need.


Step 3: Click "Settings" button to adjust the output video's parameters, such as bitrate, resolution, etc. for example, you can choose the resolution as 1920*1080 or 1280*720, that's 1080p or 720p resolution, great for editing.


Step 4: Start converting Sony NXCAM NX5U 1080 AVCHD to Prores for Apple Aperture 3/Premiere Pro.

After converting, you can load Sony NXCAM NX5U 1080 AVCHD MTS to Apple Aperture 3/Premiere Pro for editing as you want, now you can have a try.
Find more solutions on
Read More:

Wednesday, July 17, 2013

Transfer Canon HF R40/R42/R400 60p AVCHD to Avid, Premiere, Sony Vegas, Pinnacle,Movie Maker and Cyberlink

Tricks for transcoding Canon Vixia HF R40/R42/R400 60p AVCHD to Windows PC prefered codec for editing in Avid, Premiere, Sony Vegas, Pinnacle, Windows Movie Maker and Cyberlink.

Canon updates its VIXIA line of digital camcorder, introducing three new HF R-series Full HD models designed to capture and share every day moments easily. The new HF R42, HF R40 and HF R400, built for everyday shooting, delivers improved image quality, sharing capabilities and user experience. Three models share many their features but differ from each other in storage capacity and connectivity options.


Each of these new VIXIA camcorders sport a 3.28 Megapixel Full HD CMOS image sensor, a new DIGIC DV IV image processor and a 53x Advance Zoom Canon HD Video Lens to capture HD movies. They can record Full HD MP4 videos at 35Mbps and Full HD 28Mbps AVCHD Progressive 60p videos. If you shot the 1080/60p movies in AVCHD format with Canon HF R40/R42/R400, some problems would occur during the importing into Windows editing software like Avid, Premiere, Sony Vegas, Pinnacle, Windows Movie Maker and Cyberlink.

In fact, AVCHD format is not supported by many editing softwares. It is not an ideal video format for editing softwares to support owing to its special codec. So if you want to edit Canon HF R40/R42/R400 1080 60p files in Avid, Premiere, Sony Vegas, Pinnacle, Windows Movie Maker and Cyberlink smoothly, you need to convert Canon Vixia 60p AVCHD to Window PC compatible codec first.

To get the work done,  Canon Vixia MTS Converter is the best third party program to achieve your goal smoothly. The software is a great choice for converting AVCHD videos to Avid, Premiere, Sony Vegas, Pinnacle, Windows Movie Maker and Cyberlink editable formats. It works with Sony, Panasonic and Canon AVCHD .mts and .m2ts footage. There are various export format for users to choose from, including AVI, MPEG-2,MOV,WMV. It also lets users to convert AVCHD files into common video formats like MP4, MKV, M4V, etc.

(Tips: If you are mac users, you can try this Canon MTS Converter for Mac)
 
Guide: How to Convert Sony A99 MTS clips to DNxHD/AVI/WMV/MPEG-2 for Avid, Premiere, Sony Vegas, Pinnacle, Windows Movie Maker and Cyberlink 

Step 1. Connect Canon HF R40/R42/R400 camcorder to computer via USB cable, and it is easy to download videos from Canon HF R40/R42/R400 to your computer hard drive. 

Step 2. Download, install and run Pavtube MTS/M2TS Converter as the fast MTS to Windows PC Converter, click the "Add Video" button or the "Add from folder" icon to load your .MTS videos directly from your camera or a camera archive on your computer's HDD. 


Step 2. Set output video format for your video conversion.

Click the "Format" bar and choose "Adobe Premiere/Sony Vegas -> MPEG-2 HD Video (*.mpg)",or select WMV/MOV, you can also choose "HD Video -> AVI HD Video (*.avi)". Finally, click the file icon beside output bar, and choose a destination folder for saving output files. 


Tips: You can click “Settings” button in the main interface of the software to customize the output parameters, such as resolution, bitrate, etc. 

Step 3. Click “Convert” button to start converting Canon HF R40/R42/R400 1080/60p AVCHD MTS to Avid, Premiere, Sony Vegas, Pinnacle, Windows Movie Maker and Cyberlink  optimized videos. Then you could click “Open” button to find the converted video in destination folder.

In this way 
Canon HF R40/R42/R400 60p MTS/M2TS footages can be successfully loaded to  Avid, Premiere, Sony Vegas, Pinnacle, Windows Movie Maker and Cyberlink for editing and authoring. 

See also: 

Work with Canon Legria HF20/HF200 MTS Videos on Mac
Transcode Canon C100 AVCHD on Mac

Read More:

Tuesday, July 9, 2013

Sony PDW-F800 XDCAM HD422 MXF workflow in Avid Media Composer and Premiere Pro

Follow this article you will know how to solve Sony  PDW-F800 XDCAM HD422 MXF editing problems with Avid Media Composer and Premiere Pro on Mac. How to import the MXF files to Avid MC and Premiere Pro for editing has become the top point, here we could find the answers.

Sony has announced the new PDW-F800 XDCAM Camcorder, and you'll be able to get your hands on it at the Abel booth at NAB. This camera is basically a PDW-700 camera with some upgrades that many of our customers have been asking for. The list of new features that come standard with the camera include: 24p recording, variable frame rate recording (over-crank & under-crank), user gamma modes, dual-optical filters (ND and Color Correction), and SD recording modes. They have also added the ability to record proxy video data directly to a USB memory stick, so your editor can start working immediately with these files.


The PDW-F800 offers very high quality HD recording at a data rate of up to 50Mbps using the MPEG-2 4:2:2P@HL compression and the recorded video format is MXF. But for Mac users, using Sony PDW-F800 XDCAM HD 422 MXF is a big problem. The mxf files will not be handled perfectly in Mac editing software like Avid Media Composer and Premiere Pro due to the incompatible format and codec. Especially, some XDCAM HD422 MXF raw footage was shot in 50 fps, it can't be accepted by Avid MC and Premiere Pro.

So if you want to smoothly edit Sony PDW-F800 XDCAM HD422 MXF in Avid Media Composer and Premiere Pro, you first need to convert Sony PDW-F800 XDCAM HD422 MXF video to Avid and Premiere compatible mov format.

Hot Search: MXF to iMovie | Playback MXF on PC | MXF to MOV

First of all, we highly recommend the professional Sony XDCAM MXF Converter for you, which allows you to convert/transcode Sony PDW-F800 XDCAM HD422 MXF files to Avid/Premiere friendly format easily and quickly without any video and audio problemBelow, we give you the step-by-step guide. 

Convert Sony PDW-F800 XDCAM HD422 MXF to Avid Media Composer and Premiere Pro on Mac OS X 
Step 1: Add MXF video files. 

Download and run Pavtube HD Video Converter for Mac. Connect Sony PDW-F800 XDCAM camcorder to your Mac computer hard drive via USB cable. 

Click the button "Add Video" to add Sony 
PDW-F800 XDCAM HD422 MXF files, or directly drag and drop your Sony XDCAM HD MXF files. 


Step 2: Select an output format for Avid Media Composer and Premiere Pro. 

Click on the "Format" and get the dropdown menu, then move you pointer to Adobe Premiere/ Sony Vegas-> MOV(AVC)(*.mov) for output in Premiere Pro for editing.


And if you need to edit in Avid MC, choose Avid Media Composer -> Avid DNxHD (*.mov), this format is best for Avid native editing. 


Step 3: Click "Settings" icon to adjust audio and video parameters. 
Click the "Settings" icon and you will go into a new interface named "Profile Settings". You can adjust codec, bit rate, frame rate, sample rate and audio channel in the interface according to your needs and optimize the output file quality. 

Step 4: Start Converting. 

Click the "Convert" button; it will convert Sony PDW-F800 XDCAM HD422 MXF files to MOV for Avid Media Composer and Premiere Pro on Mac immediately. 

After the Sony XDCAM to MOV Conversion, you will be able to get the output files for Avid MC and Premiere Pro via clicking on "Open" button effortlessly.

Afterwards, you can import the converted Sony PDW-F800 XDCAM HD422 MXF videos to 
Avid Media Composer and Premiere Pro freely for further editing without any trouble. 

Mac Video Importing Tips

Premiere Importing: How to import video files or projects to Premiere Pro?

Editor's Recommendations

Monday, June 24, 2013

Convert AVCHD MTS/M2TS/TS to Avid, Premiere, Sony Vegas, Pinnacle Studio, Movie Maker and Cyberlink

Facing the problem importing MTS/M2TS/TS files in Avid, Premiere, Sony Vegas, Pinnacle Studio, Movie Maker and Cyberlink, you can fix the issues via transcoding AVCHD to Windows Editor compatible format.

  • AVCHD? What is it? Where is the format from?


AVCHD-
Advanced Video Coding High Definition is the new high definition video format for HD camcorder recording and playback (often with the file extension of mts, m2ts or mt2, ts). which is usually recording by professional digital Sony, Panasonic, Canon and more camcorders and cameras.
 

  •  AVCHD Importing on Win? Is that so easy?

If you have a HD camera or camcorder device, you have great chance to deal with AVCHD .mts/.m2ts/.ts Video. After you shot many enough videos, then you definitely want to edit these AVCHD file. However, it is not so easy to import/edit AVCHD MTS recordings on Win, as AVCHD is a highly compressed format just fit for viewing but not for editing, it can’t suported well by  many editing software like  Avid Media Composer , Adobe Premiere, Sony VegasPinnacle Studio, Windows Movie Maker and CyberLink PowerDirector.

Users' AVCHD MTS/M2TS/TS clips to MOV conversion need: 

Case 1: Hello, I have a Sony HDR-CX150 Camcorder which records H.264 MTS files. I need a tool which is able to convert MTS files into a file format I can use/manipulate on Adobe Premiere to make family movies on my PC computer? Thanks.

Case 2: I'm new to Avid. I am using Avid media composer 5.0. Can anyone help me with importing .mts files? I am using Panasonic HDC-TM700 to shoot the mts in AVCHD folder. When I import the MTS files into the project bin, it will take hours to import a 600MB file. Sometime it will just give me an error message to say that shot of storage. What should I do to speed the importing process?

Case 3: Hello,I'm running windows 7 and using Pinnacle Studio 15 for editing. The camera I shoot with is the Panasonic LX5. What format would you recommend I transcode to for Pinnacle Studio editing?

Case 4: Yesterday I got my new My Canon Vixia HF S200. I have tried shooting in AVCHD format. And I would like to transcode these mts files into something that Windows Movie Maker can manipulate. Is there anyone recommend one way to make the importing and editing more efficiently or suggest the best and fast workaround? I appreciated any help.

  • Convert AVCHD MTS recordings? What software to choose?

To edit or import AVCHD/MTS/M2TS/TS files in Avid, Premiere, Sony Vegas, Pinnacle Studio, Windows Movie Maker and Cyberlink smoothly, you will need to convert AVCHD MTS/M2TS/TS videos to best compatible format for Windows PC. By the way, “the AVCHD video software is not always as willing as AVCHD camcorder hardware”, so that decent AVCHD Converter software is necessary to be prepared at hand.

Pavtube MTS/M2TS Converter  is mainly used to effortlessly encode/re-encode AVCHD MTS/M2TS/TS video files from  Sony (3D), Panasonic (3D) and few Canon Cameras to for smoothly importing andediting in various Windows non-linear editing systems (NLE), including Avid, Premiere, Sony Vegas, Pinnacle Studio, Windows Movie Maker and Cyberlink. If youre using a Mac, please turn to its equivalent Mac version– iMedia Converter Mac, which can help you solve the AVCHD and Mac incompatibility.


  • Edit AVCHD Recordings on Windows PC? How to make it?

Step 1: Free download the best AVCHD to Windows PC Converter and run it to add the AVCHD MTS/M2TS/TS footages.


Step 2: Hit the Format box and select “HD Video” option on the dropdown menu and you can choose “AVI/WMV/MPEG-2” as output format for editing with Premiere, Sony Vegas, Pinnacle Studio, Windows Movie Maker, Cyberlink.


Besides, you can choose “Avid DNxHD 720p (*.mov)“ or "Avid DNxHD 1080p (*.mov) " for Avid MC editing.

Step 3: Adjust video and audio parameters, including the Bitrate of Video and Audio, the Codec of Video and Audio, Video Size, Sample Rate, Frame Rate, Audio Channels, etc., by clicking the “Settings” button on the main interface for getting the best quality.

Step 4: Click the “Convert” button on the main interface to start transcoding AVCHD footages to AVI/WMV/MPEG-2/MOV for editing inAvid, Premiere, Sony Vegas, Pinnacle Studio, Windows Movie Maker, Cyberlink.

When the conversion is completed, click “Open” in the main interface and get the converted files for importing and further editing.

Now transferring and editing AVCHD/MTS/M2TS/TS video files in Avid, Premiere, Sony Vegas, Pinnacle Studio, Windows Movie Maker, Cyberlink is smooth and without any problem.

Read More: