Summary: In order to enjoy audio files on iPod Touch 6 more easily, converting audio files to MP3 can be a great idea for you. This article here will teach you how to convert audio files to iPod Touch 6 quickly.
 Apple’s newly released and much needed update to the iPod touch has seen the much maligned music and baby iPhone receive a new lease of life, once again making it a viable alternative for those that don’t want a cellular plan but like the idea of using iOS on something smaller than an iPad. We’re not sure why it’s taken Apple so long to get an update out the door, but now it’s here the iPod touch is worth consideration once again.iPod Touch 6 audio playback:Frequency response: 20Hz to 20,000HzAudio formats supported: AAC (8 to 320 Kbps), Protected AAC (from iTunes Store), HE-AAC, MP3 (8 to 320 Kbps), MP3 VBR, Audible (formats 2, 3, 4, Audible Enhanced Audio, AAX, and AAX+), Apple Lossless, AIFF, and WAVUser-configurable maximum volume limitAs it is shown above, FLAC, CAF, OGG and etc. are not supported by iPod Touch 6. If you want to enjoy various audio files on iPod Touch 6, you’d better convert your source audio files to iPod Touch 6 best accepted audio format. Here you can depend on Pavtube Video Converter for Mac. This program can convert any audio formats as you like to iPod Touch 6 supported foramts from MP3, M4A, MP2, AAC, AC3, AIFF, AMR, AU, MKA, ALAC, FLAC, WAV, WMA, M4B, AUD, MKA, AIFC, CAF, MPC, and QCP, etc.
 Other Download:- Pavtube old official address: http://www.pavtube.com/video-converter-mac/- Amazon Store Download: http://www.amazon.com/Pavtube-Video-Converter-Mac-Download/dp/B00QIBK0TQ- Cnet Download: http://download.cnet.com/Pavtube-Video-Converter/3000-2194_4-76179460.htmlHow to convert audio files to iPod Touch 6 for enjoying?Step 1: Download, install and launch the program, you can import the video files either by dragging and dropping directly into the main interface or by clicking “Add Video” or “Add from folder” button.
 Step 2: You can choose from a number of different formats displayed in the “Format” bar at the bottom. Here you’re suggested to choose “Common Audio>>MP3- MPEG Layer-3 Audio (*.mp3)” as output format.
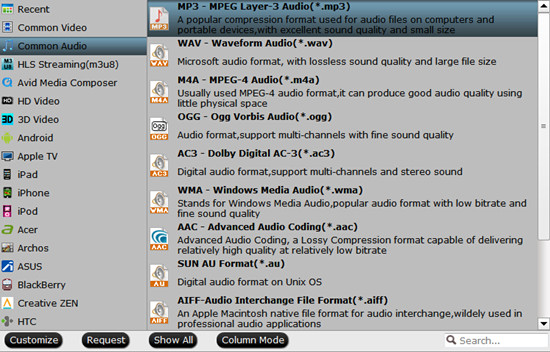 Step 3: Go back to the main interface, hit the big button “Convert” there.Conclusion: There is no need for waiting for a long time. We can receive the best output files nicely. After conversion, you can get the generated files by hitting “Open” button. Now, it’s easy to enjoy audio files on iPod Touch 6.Further Reading:
Summary: Do you have the desire to enjoy TS files on Zeiss VR One with Galaxy S4/S5/S6? This article will shed you some lights.
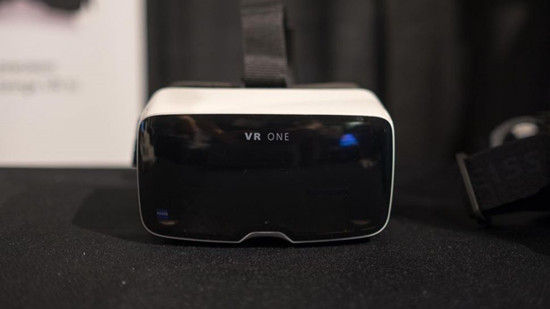 Transport Stream TS file is a container format that stores video on a DVD and compresses video data using standard MPEG-2 video compression. Its design goal is to allow multiplexing of digital video and audio and to synchronize the output. TS files are often saved as multiple files on a DVD, i.e. “moviename1.ts”, “moviename2.ts”, “moviename3.ts”, etc. They can be played back by various software DVD players and video editing tools.Awesome 3D Virtual Reality Glasses/Headsets in 2015 has a new member- Zeiss VR One. Just like Samsung Gear VR and Oculus Rift, Zeiss VR One Cinema app enables you to enjoy your movies in an immersive environment with the lights off. It’s currently compatible with Samsung Galaxy S4/S5/S6, iPhone 6, Nexus 5, and LG-G3 smartphones and supports MP4 and MOV formats.In order to watch TS on Zeiss VR One with Galaxy S4/S5/S6, you just need a right program and convert TS to 3D SBS MP4 for smoothly playing on Zeiss VR One via Galaxy S4/S5/S6. Here Pavtube Video Converter is highly recommended, you can get this job done perfectly. With the latest version 4.8.6.5, this program adds Apple ProRes as output, supports encoding to H.265 MKV and is compatible with Sony/LG/Samsung/Panasonic TVs. If you are running on Mac operating system, you can refer to the equivalent version- Pavtube Video Converter for Mac (review). It works well even on the latest Mac OS X El Capitan.
 Other Download:- Pavtube old official address: http://www.pavtube.com/video_converter/- Amazon Download: http://download.cnet.com/Pavtube-Video-Converter/3000-2194_4-75734821.html- Cnet Download: http://download.cnet.com/Pavtube-Video-Converter/3000-2194_4-75734821.htmlHow to convert TS to 3D SBS MP4 for playing on Zeiss VR One with Galaxy S4/S5/S6?Step 1: Download, install and run the corresponding program. Click “Add Video” or “Add from folder” to load your TS files.
 Step 2: Click the “Format” bar and select “3D Video>>MP4 Side-by-Side 3D Video (*.mp4)” as output format.
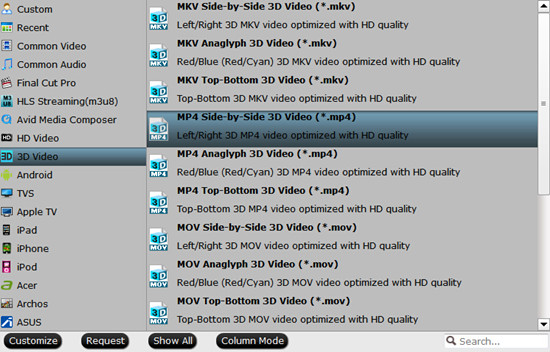 Step 3: Click “Settings” button to customize the output video and audio settings by yourself. But if you are not good at it, you’d better use the default parameters, they will ensure you a good balance between file size and image quality basically. You can change the resolution, bit rate, frame rate as you need.Step 4: Go back to the main interface, hit the big button “Convert” there.Conclusion: There is no need for waiting for a long time. We can receive the best output files nicely. After conversion, you can get the generated files by hitting “Open” button. You can simply add the keyword “SBS” to the file name of the video, and the app will automatically show the correct content for each eye.Further Reading:
Summary: To convert AVI to 3D MP4 is actually a piece of cake. This guide lets you easily enjoy playing AVI on Zeiss VR One with Galaxy S4/S5/S6.
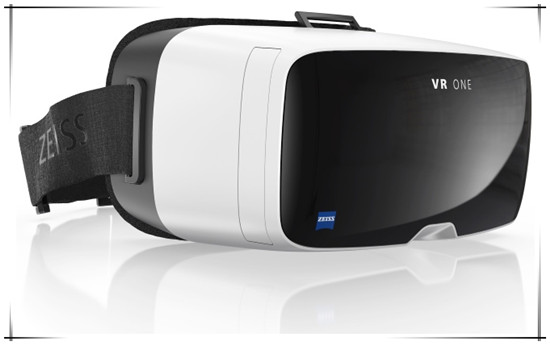 AVI, Audio Video Interleave video file format is developed by Microsoft mainly for Windows operating systems. Audio and video can be played in synchronous format without any halt in the video. AVI file format can be played with various media players like AVI media player, Media player classic, Plex and many others. If you have AVI files at hands, how can you put them to Samsung Galaxy S4/S5/S6 to watch on Zeiss VR One?Awesome 3D Virtual Reality Glasses/Headsets in 2015 has a new member- Zeiss VR One. Just like Samsung Gear VR and Oculus Rift, Zeiss VR One Cinema app enables you to enjoy your movies in an immersive environment with the lights off. It’s currently compatible with Samsung Galaxy S4/S5/S6, iPhone 6, Nexus 5, and LG-G3 smartphones and supports MP4 and MOV formats.In order to watch AVI on Zeiss VR One with Galaxy S4/S5/S6, you just need a right program and convert AVI to 3D MP4 for smoothly playing on Zeiss VR One via Galaxy S4/S5/S6. Here Pavtube Video Converter is highly recommended, you can get this job done perfectly. With the latest version 4.8.6.5, this program adds Apple ProRes as output, supports encoding to H.265 MKV and is compatible with Sony/LG/Samsung/Panasonic TVs. If you are running on Mac operating system, you can refer to the equivalent version- Pavtube Video Converter for Mac (review). It works well even on the latest Mac OS X El Capitan. Other Download:- Pavtube old official address: http://www.pavtube.com/video_converter/- Amazon Download: http://download.cnet.com/Pavtube-Video-Converter/3000-2194_4-75734821.html- Cnet Download: http://download.cnet.com/Pavtube-Video-Converter/3000-2194_4-75734821.htmlHow to convert AVI to 3D MP4 for playing on Zeiss VR One with Galaxy S4/S5/S6?Step 1: Download, install and run the corresponding program. Click “Add Video” or “Add from folder” to load your AVI files.Step 2: Click the “Format” bar and select “3D Video>>MP4 Side-by-Side 3D Video (*.mp4)” as output format.Step 3: Click “Settings” button to customize the output video and audio settings by yourself. But if you are not good at it, you’d better use the default parameters, they will ensure you a good balance between file size and image quality basically. You can change the resolution, bit rate, frame rate as you need.Step 4: Go back to the main interface, hit the big button “Convert” there.Conclusion: There is no need for waiting for a long time. We can receive the best output files nicely. After conversion, you can get the generated files by hitting “Open” button. You can simply add the keyword “SBS” to the file name of the video, and the app will automatically show the correct content for each eye.Further Reading:
Summary: Couldn’t figure out a workable way to import Sony RX100 IV 4K XAVC S to FCP 7? No worry, this post explains a workaround to convert RX100 IV 4K XAVC S to ProRes for use in FCP 7 flawlessly.
 Hot search: RX100 IV 4K XAVC S to Avid | RX100 IV to Premiere | RX100 IV 4K XAVC S to After EffectsSony’s acclaimed RX100 IV camera contains a remarkable advance in photo and movie possibilities- the world’s first memory-attached 1.0-type stacked CMOS image sensor. Use it to create stunning 4K movies, up to 40x super slow motion, spectacular still images, and more.“I recently bought Sony’s RX100 IV. I’m working with FCP 7 and it does not recognize the 4K XAVC S files from RX100 IV. I searched online and found FCP 7 will not work correctly with the XAVC S camera file. Does that mean I have to convert the file to an edit friendly format for FCP 7- by converting it to ProRes? If so, anyone know a good XAVC S converter to do this?”The previous version of FCP, is not compatible with XAVC or XAVC S. Only the latest version - Final Cut Pro 10.1 (Final Cut Pro X) adds general QuickTime support for XAVC. For fast and fluid workflow, Sony has created a special plug-in (PDZK-LT2 V.1.2), a free-of-charge software for Mac which allows you to decode XAVC S to QuickTime. The plug-in supports SxS Card but not the specific Micro SDXC media card recorded by Sony RX100 IV XAVC S video footage. Therefore, you can not use this camera Import Plug-in to preview and import XAVC S files recorded on Sony RX100 IV Micro SD card.Fortunately, Final Cut Pro works natively with Apple Prores Codec, a line of intermediate codecs, intended for using during video editing to help provide an efficient and high performance workflow with impressive image quality and reduced storage rates. To encode Sony RX100 IV 4K XAVC S to ProRes, you are recommended to use Pavtube Video Converter for Mac (review). Overall, it is a professional tool for Mac users to transcode XAVC S to FCP 7 with the best quality. Other Download:- Pavtube old official address: http://www.pavtube.com/video-converter-mac/- Amazon Store Download: http://www.amazon.com/Pavtube-Video-Converter-Mac-Download/dp/B00QIBK0TQ- Cnet Download: http://download.cnet.com/Pavtube-Video-Converter/3000-2194_4-76179460.htmlHow to convert RX100 IV 4K XAVC S to FCP 7?Step 1: Launch the Video Converter on your Mac, and then click the “Add video” button to import your 4K XAVC S videos from RX100 IV directly. In order to import several files at one time, you can click “Add from folder” button.
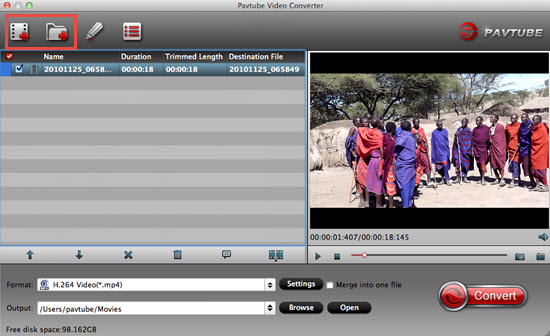 Step 2: Click the “Format” bar to get the drop-down menu and you can get “Final Cut Pro>>Apple ProRes codec”, including ProRes 422, ProRes 422 (HQ), ProRes 422 (LT), ProRes 422 (Proxy) and ProRes 4444. Choose the proper one you want.
 Step 3: Press the “Settings” icon and you’d better set the video frame rate as 30fps, video size as 1920*1080 for editing RX100 IV 4K XAVC S in FCP 7 easily.Step 4: Now, click “Convert” and let it go. The Video Converter for Mac supports batch conversion. So if you have lots of files to convert, check “Shut down computer after conversion” and you can go away without keeping an eye on it.Conclusion: Once the conversion process shows in 100%, click “Open” to get the output videos. Create a project and start editing RX100 IV 4K XAVC S in FCP 7 with light speed.Further Reading:
Pavtube Studio just announced all Pavtube Windows products, including BDMagic, ByteCopy, DVDAid, Video Converter Ultimate. Video Converter, MXF Converter, HD Video Converter, MTS Converter and MXF MultiMixer, are upgraded. PC users now can encode Blu-ray, DVD movies and all kinds of Common/HD/4K Videos to MOV with Apple ProRes codec, HEVC/H.265 MKV, and Sony/LG/Samsung/Panasonic TV formats with excellent video/audio quality and super speed. Registered users could download and install the latest version for solution to their issues.See also:
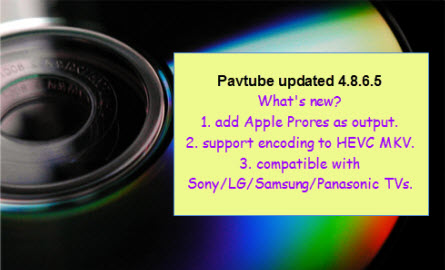 What's new in this upgrade?1. Add Apple Prores as outputPC users who are eager to create Apple ProRes video under Windows OS would love the new upgrade of Pavtube Windows programs because this has been realized in the new version. Pavtube adds Apple ProRes MOV in Format list for fluent video playback, video editing, and personal use you desire.2. Support encoding to H.265/HEVC MKVAnother new element in the new Pavtube programs is that registered users now can save Blu-ray, DVD, and video sources to HEVC/H.265 MKV. HEVC provides better video quality in same file size compared to H.264. And Pavtube members can do that in the new upgrade with fast speed.3. Compatible with Sony/LG/Samsung/Panasonic TVs.Last but not least, Pavtube software is not compatible with Sony, LG, Samsung and Panasonic TVs. Pavtube adds these TVs under Format menu, without extra operations, you can easily create movies and videos for perfect playback on any of these TVs.More information you need about the new upgrade and Pavtube products can be found on Pavtube official website.Pavtube Software Upgrade Promotion on Facebookhttp://bit.ly/1hmOn34This upgrade, Pavtube Facebook provide up to 35% Off Blu-ray/DVD Ripper & various (HD) Video Converters, the best yet easy-to-use tools to convert your Blu-ray/DVD movies, Common/HD/4K Video files into H.265 MP4/MKV, Apple Prores, various TV profiles, M3U8, MP4, MOV, MKV, AVI, M4V, WMV, VOB, MPG, FLV, SWF, Divx, Xvid, AAC, MP3, WMA, WAV, M4A, AC3, FLAC and more onto smartphone, tablet, computer, media player, stream server, TV set, game console, VR headset, hard drive, etc. with multiple wanted audio/language/chapter markers!Up to 35% OFF Discount can be shared here:35% Off Pavtube BDMagic for Windows or Mac35% Off Pavtube DVDAid for Windows or Mac30% Off Pavtube Video Converter Ultimate for Windows or Mac30% Off Pavtube Video Converter for Windows or Mac20% Off Pavtube ByteCopy Windows or Mac20% Off Pavtube MTS/M2TS Converter for Windows or Mac20% Off Pavtube Multi-track MXF Converter for Windows or MacJust like us on page and you can get it with all other free software giveaways, useful guides, and lifelong discounts.If you have any problem to buy or use Pavtube software, pls feel free to contact support@pavtube.com (for Windows user), macsupport@pavtube.com (for Mac user).
 More Topics
Summary: If your video converter doesn’t work on Mac and you need to convert Panasonic AJ-PX380 MXF to AIC MOV for iMovie editing, there is a user-friendly converter for your choice.
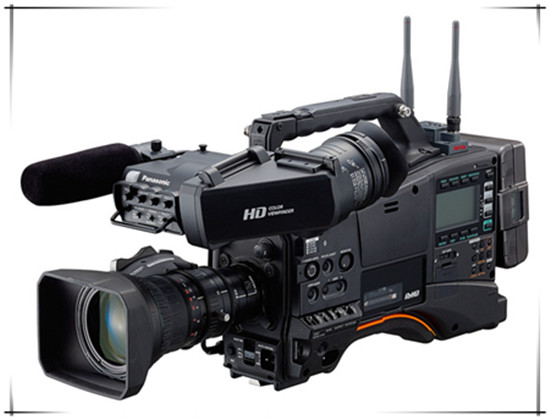 The PX380, expected to release in September 2015, will record in AVC-LongG to output on-air content direct from the shooting location and for workflows using content transferred over the Internet. The camera will capture at different AVC-LongG bit rates - AVC-LongG50/25 keeps 10 bit, 4:2:2 quality at bit rates of approximately 50/25 Mbps, and the more economical AVC-LongG12 is optimized for wireless field workflows.After got the Panasonic AJ-PX380 camcorder, many users don’t know the way how to import Panasonic AJ-PX380 recorded MXF to iMovie and edit natively. MXF is a special video format and it is often adapted by advanced camcorders, such as Panasonic 4K camcorder, Blackmagic Cinema Cameras, Canon XF series camcorders, etc. This MXF video format is not well supported by editing programs, so you can’t import Panasonic AJ-PX380 AVC Intra MXF to iMovie for editing directly. If you need to edit Panasonic AJ-PX380 MXF in iMovie flawlessly, you’d better convert Panasonic AJ-PX380 MXF to iMovie well-acknowledged video format, Apple InterMediate Codec.Well, Pavtube MXF Converter for Mac (review) is highly recommended here to help you achieve your goal. It's an easy-to-use yet professional (P2) MXF converter, player and editor. The program is capable of converting PX380 MXF to AIC, DNxHD, MPEG-2, Apple ProRes etc on Mac OS X for smoothly importing and editing in various non-linear editing systems, including iMovie/FCE, Avid Media Composer 5.5/6.0/6.5, Adobe Premiere Pro, Final Cut Pro and more.
 Other Download:- Pavtube old official address: http://www.pavtube.com/mxf-converter-mac/- AppStore Download: https://itunes.apple.com/us/app/pavtube-mxf-converter/id502807634?mt=12- Amazon Download: http://www.amazon.com/Pavtube-MXF-Converter-Mac-Download/dp/B00QID8K28- Cnet Download: http://download.cnet.com/Pavtube-MXF-Converter/3000-2194_4-76177789.htmlHow to import Panasonic AJ-PX380 MXF to iMovie for editing?Step 1: Download Mac MXF Converter, and follow the prompts to install the program. When the installation is complete, the best MXF to iMovie Converter will launch automatically.Step 2: Click “Add video” button to load Panasonic AJ-PX380 MXF files or directly drag the files into file list. By default, the files are selected. You can delete files which you don’t want to import to.
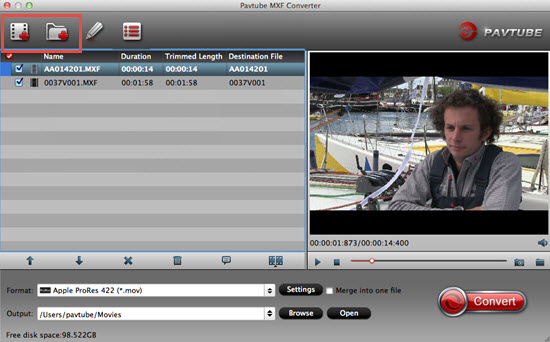 Step 3: Click “Format” bar to determine output format. For best image quality, click the format bar and choose “iMovie and Final Cut Express>>Apple InterMediate Codec (AIC) (*.mov)” as output format.
 Step 4: Click “Convert” button to start to convert Panasonic AJ-PX380 MXF to AIC MOV format. After conversion, import the converted MXF videos to iMovie for real time editing and mastering.Conclusion: You can set auto shutdown in progress window or leave it there and come back later. There is no more difficulty in editing Panasonic AJ-PX380 MXF in iMovie.Further Reading:
Summary: Fail to find a great MOV converter to convert MOV to MPEG-2 for full support on EDIUS 6? If so, you can refer to this article here to do the job.
 Hot search: MKV to EDIUS Pro 8 | GoPro MP4 to EDIUS Pro 7 | AVI to EDIUS 7/7.01 | Panasonic DVCPro HD MXF to EDIUS Pro 7EDIUS Pro provides a simple alternatives to the industry leaders, but it has all of the tools that other professional video editing software has such as powerful tools, enhanced timeline, advanced multicam support, 64-bit processing. One peculiarity that sets EDIUS Pro apart from others is that it doesn't utilize GPU acceleration for rendering, transcoding and exporting videos. And this is a big advantage over other applications that require time and processing capacity to render footage.When you import MOV files to EDIUS, you may face some errors or issues like EDIUS crashed, MOV can't be recognized and etc.-“When working with QuickTime MOV files, EDIUS 6 crashes a lot! Any suggestion for me? ”-“I’ll get some MOV files and I have to edit them with EDIUS 6. Does EDIUS 6 work fine with MOV files or I have to convert them? If I have to convert them, what is the best video tool? What file format have I to get from conversion?”EDIUS Pro supported format for file import:
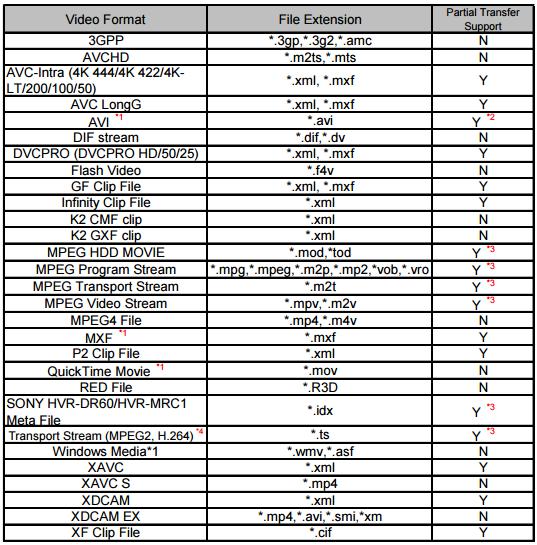 So, is there any way to fix MOV files crashed issue with EDIUS 6? From the table list above, I got some hints. What I can do with the current project is take the MOV files I have and convert it for use with EDIUS 6. And what I need is a great MOV converter. After multiple testing, I found Pavtube Video Converter is the best option for me. It is able to convert MOV files to EDIUS 6 friendly format MPEG-2 easily with the best video quality. Besides MOV, this video convert program can also help to convert between any popular video and audio formats as you need. Plus, with the built-in video editing feature of the program, you can trim, crop, add watermark and more to your video files. Other Download:- Pavtube old official address: http://www.pavtube.com/video_converter/- Amazon Download: http://download.cnet.com/Pavtube-Video-Converter/3000-2194_4-75734821.html- Cnet Download: http://download.cnet.com/Pavtube-Video-Converter/3000-2194_4-75734821.htmlHow to import MOV files to EDIUS 6 for smoothly editing?Step 1: As soon as you download and install the program, launch it and when the main interface pops up in front of us, just click the “Add Video” or “Add from Folder” to let in.
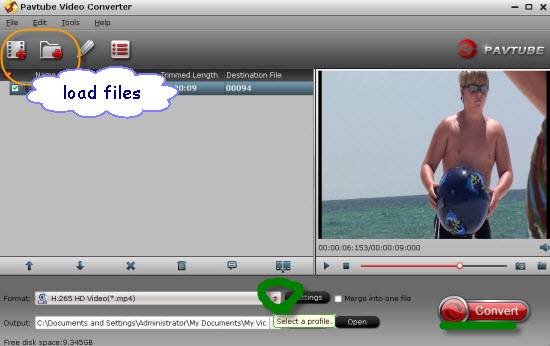 Step 2: Click the drop-down list in the format line to get the format box. Then choose “Adobe Premiere/Sony Vegas>>MPEG-2 (*.mpg)” as output format.
 Step 3: Click “Settings” button to customize the output video and audio settings by yourself. But if you are not good at it, you’d better use the default parameters, they will ensure you a good balance between file size and image quality basically. You can change the resolution, bit rate, frame rate as you need.Step 4: After that, click “Convert” to start MOV to EDIUS 6 MPEG-2 conversion.Conclusion: After conversion, you can get the generated files by clicking “Open” button. Now, you’ll get no troubles in fixing EDIUS 6 crashes with MOV files.Further Reading:
Summary: Do you have any good solutions to the problems of importing Phantom 3 4K video to Avid MC for nice editing? If not, why not be a good reader to follow the article below to know more details?
 Hot search: AJA Cion 4K Video to Avid MC | Alpha 77 Mark II MTS to Avid MC | Nikon D750 MPEG-4/H.264 to Avid MCFinally, a flying camera that packs years of experience in aerial imaging into one compact, easy to use system. With the Phantom 3 Professional, you’re shooting 4K video at up to 30 frames per second and capturing 12 megapixel photos that look crisper and cleaner than ever. A live HD view lets you truly experience flight and see everything from your camera in real time.From the DJI Phantom 3 4K camera spec, I got to know it builds 4K videos in MOV wrapper. Generally, Avid Media Composer can support MOV format. But the problem is, the DJI Phantom 3 4K is encoded with MPEG-4 AVC/H.264, which is a compressed format and not ideal for editing. Plus, Avid Media Composer like Avid MC 4/5/6/7 can’t support 4K video. To edit DJI Phantom 3 4K video in Avid MC flawlessly, an ultimate solution is to convert Phantom 3 4K video to DNxHD MOV for Avid.Then what is the best video tool to deal with Phantom 3 4K video in Avid MC? I searched on the web and find an easy-to-use yet professional software called Pavtube HD Video Converter for Mac (review), it is only straightforward 4K converter which offers the best way to help the users of Phantom 3 to edit 4K videos in Avid MC smoothly by effortlessly and flawlessly transcode 4K footage to DNxHD MOV. It is safe to install and easy to use. Other Download:- Pavtube old official address: http://www.pavtube.com/hd-video-converter-mac/- Amazon Store Download: http://www.amazon.com/Pavtube-Video-Converter-Mac-Download/dp/B00QI9GNZS- AppStore Download: https://itunes.apple.com/de/app/pavtube-hd-video-converter/id502792488?mt=12- Cnet Download: http://download.cnet.com/Pavtube-HD-Video-Converter/3000-2194_4-76177786.htmlHow to edit Phantom 3 4K video in Avid MC?Step 1: Launch the HD Video Converter on your Mac, and then click the “Add video” button to import your 4K videos from Phantom 3 directly. In order to import several files at one time, you can click “Add from folder” button.
 Step 2: Click the “Format” bar to get the drop-down menu and you can get “Avid Media Composer>>Avid DNxHD (*.mov)” as output format.
 Step 3: Click “Settings” button to customize the output video and audio settings by yourself. But if you are not good at it, you’d better use the default parameters, they will ensure you a good balance between file size and image quality basically. You can change the resolution, bit rate, frame rate as you need.
Step 4: Now, click "Convert" and let it go. It supports batch conversion. So if you have lots of 4K videos to convert, check “Shut down computer after conversion” and you can go away without keeping an eye on it.
Conclusion: Once the conversion process shows in 100%, click “Open” to get the output videos. Create a project and start Phantom 3 editing 4K videos in Avid Media Composer with light speed.Further Reading: