Showing posts with label After Effects. Show all posts

Tuesday, September 17, 2013

Why Premiere Pro and After Effects doesn't like Sony EX3 XDCAM files

Got Problems importing Sony PMW-EX3 xdcam mp4 footage into Premiere Pro/After Effects for further editing? Look no further, follow the easy workaround to achieve your goal smoothly.


Question:

I recently purchased two PMW-EX3 cameras for use here at my work, and I thought that I had them up and running perfectly but recently ran into a problem importing footage. When I shoot anything over around 13:40:00 long, PP CS4 will not import the entire length of the clip, only the first 13:40:00 (give or take a minute or two). When I play back the clips on the camera or in Sony's clip browser software I can play the entire duration of the clip. When I'm in PP using the Media Browser window to get to my footage, it even shows me the correct duration of the clip in the Duration column, but when I copy it over into my project bin, only that first 13 and a half minutes makes it. And a similar problem importing the files from EX3 into After Effects. AE only imports the first MP4 file of your clip and not the rest.

I've searched lots of other forums, and while I've seen various issues with importing XD EX footage into PPro and AE, I haven't seen this best solution yet

Sony PMW-EX3 can shoot XDCAM EX MP4 recording with true 1920x1080 resolution on dual SxS cards. As the XDCAM mp4 footage still cannot fully supported by some video editors like Adobe Premiere Pro and After Effects on Mac. So if you are using Premiere and AE for editing just like the above user, the best workaround for us is to convert Sony PMW-EX3 mp4 to Adobe Premiere Pro/After Effects most compatible MPEG-2 format, and it will make the editing work much smooth and easier. 

At first, you need to find a third party program to do EX3 files to MPEG-2 transcoding. As far as I konow, the best hd video converting program is Pavtube HD Video Converter for Mac, a powerful XDCAM Converter for Premiere/AE, which is use-to-use, capable of converting XDCAM video to various formats for editing with Premiere Pro, Avid Media Composer, Final Cut Pro, iMovie or FCE on Mac, and supports batch renaming painlessly. Download it here and get to konw the detailed steps as below.

Guide on transcoding Sony EX3 XDCAM to MPEG-2 for Premiere Pro and After Effects editing on Mac

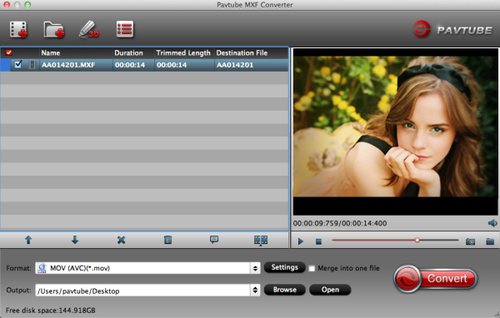
Step 1: Install and run the best Sony XDCAM Converter for Mac. Click the “Add Video” or "Add from folder" button to import .mp4 files from the Sony EX3 camcorder. Join mp4 clips via checking the “Merge into one” box.


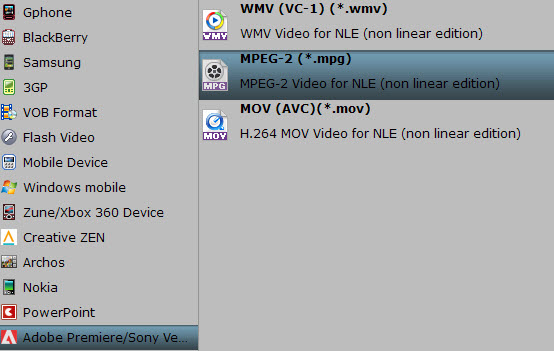
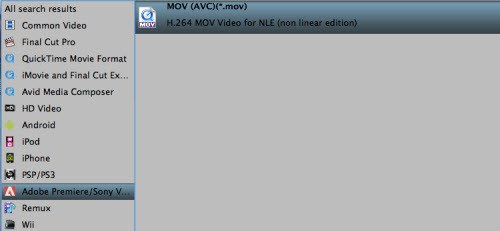
Step 2: Hit the Format box and select Adobe Premiere/Sony Vegas --> MPEG-2(*.mpg) as output format for editing EX3 XDCAM video in Premiere Pro and After Effects natively.


Step 3: Click the “Settings” icon to do some audio, video parameter settings like video bitrate, frame rate, audio sample rate, audio channel, etc. (Optional)

Step 4: Click the "Convert" button under the preview window, the Mac XDCAM Converter will start the conversion from EX3 to Adobe Premiere Pro/Adobe After Effects immediately.

After the conversion, you will be able to get the output files via clicking on “Open” button effortlessly. Afterwards, you can import Sony EX3 MP4 footages to Premiere Pro CS and After Effects for further editing easily.

XDCAM Related:

Monday, August 19, 2013

Best Way to convert Canon HF G30 AVCHD footage to Premiere Pro CS6 and After Effects CS6

Summary: With following this guide, you can smoothly import and edit Canon HF G30 50p/60p AVCHD footage in Premiere Pro CS6 and After Effects CS6 by transcoding Canon 50p/60p .mts to Premiere/AE CS6 most compatible MPEG-2 video.


The new Legria HF G30 (also known as the Vixia HF G30 in the US) from Canon has the same imaging system, but without the XLRs and is aimed at enthusiast videographers, such as hobbyists or film students. Their HD video system has been completely redesigned – from the lens through to the image sensor and processor – to improve imaging performance. There are various advanced shooting features and connectivity options to suit different types of applications, from news and documentaries to weddings.

This camera is awesome, I've had it almost a month now and was able to put it through it's paces on a Disney cruise to Alaska. It was amazing with great control in manual mode with auto exposure and worry free shooting in auto mode where all my settings were taken care of.

But now I have a question. I'm working on a documentary project using a Canon HF G30; I had problems working with AVCHD Progressive files genereted by HF G30 and I was very worried because both Premiere Pro CS6 and After Effects CS6 didn't support the 1080 50p/60p .mts files. To make this kind of file compatbile, I tried to convert the Canon HF30 AVCHD footage with various programs but the results was no more an HD progressive file.

Then I tried this amazing program, Pavtube MTS/M2TS Converter for Mac , and I'm very happy of the converted files: no loss of quality, the same high resolution, same colors and defitition.It works fast and with an incredible quality; I tried to compare the original files with the converted one and I could not find differences, I even analysed the two files with professional instrumens and compared the flow on a professional monitor, this program it's simply great! Now I have successfully converted Canon HF G30 50p/60p MTS footage to editable formats not only for  Premiere Pro CS6 and After Effects CS6 editing, the converted files work perfectly with these pofessional editing programs!!! Just follow the step-by-step guide I shared below to get the work done smoothly.

Convert Canon HF G30 50p/60p
.mts to Premiere Pro CS 6 and After Effects CS6 editable format

Step 1: Copy Canon HF G30 50p/60p .mts media on to the Storage Drive in a folder.

Step 2: Launch the best Canon AVCHD Converter for Mac. Click the "Add" button for adding to import the 50p/60p mts files from Canon HF G30 to the best Mac G30 MTS/M2TS Converter.


Step 3: Click on the dropdown menu of "Format", and then move your pointer to Adobe Premiere/Sony Vegas> MPEG-2 (*.mpg) which is the perfect video format for you to transfer MTS to Adobe Premiere Pro CS6 and After Effects CS6.


Then you can set the output folder by clicking "Browse" icon as you prefer.

Step 4: Click "Settings" icon to adjust audio and video parameter. You can change the default codec, bit rate, frame rate, sample rate and audio channel according to your needs and optimize the output file quality.

Note: To get original(best) video quality, you can keep original video size and bitrate.

Step 5: Click the "Convert" button and it will losslessly convert Canon HF G30 AVCHD 50p/60p mts files to MPEG-2 for editing in Premiere Pro CS6 and After Effects CS6 immediately.

Step 6: Once the Mac MTS to Premiere and AE CS6 conversion is done, you will be able to get the output files for Adobe Premiere Pro CS6 and After Effects CS6 via clicking on "Open" button effortlessly.

Now you can easily and correctly import the converted video in Premiere Pro CS6 and After Effects CS6 for editing keeping high quality.

Read More:

Monday, August 5, 2013

Does Canon XF MXF files works ok with After Effects CS6 on Mac?

Summary: This article will focus on talking about how to transcode Canon XF MXF files to Adobe After Effects CS6 compatible format for Canon XF MXF and AE importing workflow on Mac.


Canon's XF series camcorders like Canon XF100, XF105, XF300, XF305 record high-definition MXF video with its own XF codec. 

Does the Adobe After Effects CS6 support Canon XF MXF footage? 

Hi All.. we are considering picking up a Canon XF-100 as our acquisition camera. However I heared that these MXF files can't work with After Effects natively. Will we need to transcode via Prelude? Thanks... 

This is for .MXF files shot on a Canon XF300. Things were working fine, but suddenly I am unable to open those mxf files in AE CS6. Even projects previously created with AE CS6 now won't open, and give me the 'file damaged or unsupported' error message in AE. Why does this happen? Any help would be much appreciated. 

As above, much to the disappointment of filmmakers that are not familiar with the .mxf format, the footage created with Canon XF Camcorders can't be imported to After Effect CS6 smoothly. If you need to edit Canon XF MXF in Adobe After Effects CS6, you are suggested converting the Canon MXF clips to an AE friendly format.  

And here  the professional and powerful MXF to AE Converter can help you do the job. With it, you can easily transcode Canon XF .MXF files to Adobe After Effects accepted AVI, MOV, MPEG or other formats that After Effect can handle well. Below is a quick guide of converting Canon XF .mxf to .mov for editing in After Effects CS6.

Before processing:

1. Back up/Transfer the Canon XF MXF footage to Mac computer – copy the whole XF video folder to your computer hard drive, not just the individual .mxf files.

2. Install Pavtube MXF Converter for Mac ($29). Click here to download a free trial for test.

Step-by-step Guide: Convert Canon XF.mxf to AE CS6 supported format with best  video quality

Note: this is a Mac oriented solution. For Windows users the Pavtube Studio offers alternative MXF Converter for PC, which is very similar to the Mac MXF Converter.

Step 1. Launch the Mac Canon MXF Converter for After Effects. Click “Add Video” and browse to a Canon .mxf clip and the software will add it to file list. Repeat the operation to load multiple mxf videos. Or you may click the “Add Folder” button to import all the .mxf files in the XF file structure.

image

Step 2. Click on “Format” and choose “Click on “Format” and choose “MOV(AVC) (.mov)” from "Adobe Premiere/Sony Vegas" as the best codec for editing Canon XF MXF file in After Effects CS6.

image

Tips: You may also use AVI, MP4, MPG, QuickTime mov or any other format that AE supports.

Step 3. Click on “Settings” to redefine output quality. You can also set a different video resolution (1920×1080/1440×1080/1280×720/720×480), frame rate (24p/30p), bitrate, audio channels, etc. For users who would like to retain exactly the same settings (without any quality loss), set target settings the same to source video.

Step 4. Click “Convert” to start transcoding Canon XF MXF to MOV for After Effect CS6 editing on Mac.

After conversion click “Open” to find .mov videos and import converted .mov files to Adobe After Effect CS6 for editing.

If your MXF files have 2 audio tracks or more, here is another worth-buying software from Pavtube named iMixMXF with multi-track preserving and mixing features. You can download the trial version to have a try!

Read More:

Thursday, August 1, 2013

Adobe After Effects Renders Taking Forever? You Can Speed Them Up with Network Rendering

If you don’t have the latest and greatest system (and even if you do), there is a great way that you can actually speed up your renders in Adobe After Effects. If you’ve got another computer system or two hanging around collecting dust, you can put those machines to good use by setting up Network Rendering in AE. Check out the tutorial below from Aetuts+ to get the full scoop and get your renders flying:


It’s great that the other machines don’t need another license of After Effects to actually participate, so you can take as many systems as you want and as long as they are on your network, you can get Network Rendering up and running. Faster is faster, so even if it’s an older system, shaving off a few minutes from a render can be a big deal in the end (especially if it means you can go home early, or move on to something else sooner).

Check out this link for more information on different render setups in AE.

Who has set up Network Rendering? What would you recommend if you’ve faced any issues?

Links:

How to Set Up AE for Network Rendering on Multiple Machines — Aetuts+
Automated rendering and network rendering — After Effects Help