Summary: When you open an FLV file the player may give you a warning message saying that it doesn't recognize the file extension. This article will help you get out of that issue.As soon as one tries to play a FLV file with the help of Windows Media Player, a message will appear saying that the file can't be opened because the extension is invalid. Properly configured codecs needs to be installed to play FLV files using Windows Media Player. The formats supported by windows are .asf, .wmx, .au, .snd, .mov, .m4a, .dvr-ms, .asx, .m4v, .mp4, .wpl, .mpg, .miv, .mpa, .mp2, .mpeg, .3g2, .adts, .adt, .3gp2, .aiff, .wms, .3gp, .mp3, .m3u, .mid, .midi, .mpv2, .cda, .rmi, .wav, .wax, .aif, .wmv, .ivf, .3gpp, .wm, .mpc, .aifi, .aac, .wvx, .wma, .wm2, .m2ts, .mp4v, .avi and .wmd. Play FLV after Installing FLV codecs for Windows Media PlayerWMP uses codecs to play media files. Codecs of many formats are inbuilt in WMP to open files of that format. Yet the codec of FLV needs to be downloaded by the user to run FLV files on WMP. After successfully installing the codec, you will be able to run files with .flv extension in your WMP.If one is unable to view their files on Window Media Player because the file has .flv extension, then Pavtube Video Converter can be used to convert the videos in the format supported by the Window Media Player. In fact, this program can be used to complete conversion between various formats, including FLV, AVI, ASF, MOV, M4V, WMV, MKV, Xvid, MP4, and so on.
 Step-by-step guide to convert FLV to Windows Media Player supported formatsStep 1. Install iSkysoft Video Converter and put FLV files on the converterImport the FLV files to the video converter. You can do that in two ways:a) You can drag and drop the file directly in the application.b) You can click the "Add Files" button to browse, select and load the file in the application.windows media player flv codec
 Step 2. Choose the output formatVisit the bottom of the application and then select WMV as the output format. All the videos converted at the same time will be converted in the same output format.
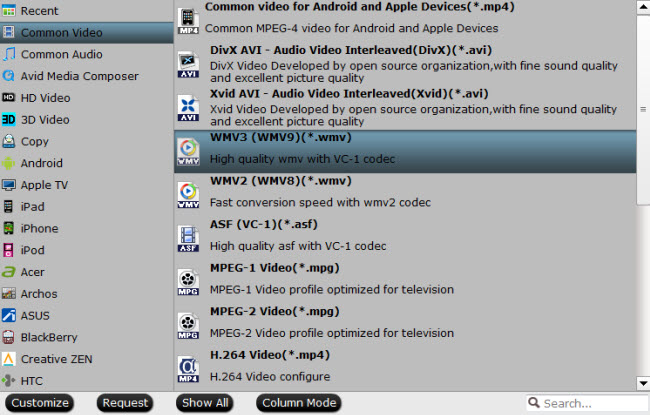 Step 3. Push convertYou just need to press the "Convert" button now. The video will be converted within seconds.Read More:
Summary: I find many Windows 10 users said they have trouble with Windows Movie Maker in the discussion board. Don’t upset. This article will show you the causes in detail and give you some tips to fix it.Microsoft provides a built-in video editor on Windows 10 – Windows Movie Maker, which is just like iMovie on Mac OS X El Capitan. Due to the openness of Windows 10, it can be installed on some devices with old hardware. Here comes the problem. The video editing work in Windows Movie Maker requires quite high hardware. So if the hardware of your Windows 10 PC is too low or old, then Windows Movie Maker won't Work. And a message like the picture below will pop up. In order to prevent this issue from happening to you, please make sure that your Windows 10 computer meets all necessary requirements before launching Windows Movie Maker. To let you edit videos in Windows Movie Maker with no problem, I would suggest you to upgrade the hardware of your Window 10 PC to meet the necessary requirements. If the issue mentioned above still persists and the solutions offered above didn't solve the problem, the best way is to look for an alternative to Windows Movie Maker, such as Pavtube Video Converter. Just like Windows Movie Maker, this video editor allows you to add videos, pictures, audio, and make a snapshot. It also enables you to add a new subtitle on the selected videos, as well as captions. In the meantime, this video converter supports for exporting videos as multiple formats or trim videos for uploading to Facbook, YouTube, etc. How to Make Windows Movie Maker Work on Windows 10Step 1. First, run this video editor. Click "Add Video" or "Add from folder" button to browse and choose your videos, or you can drag and drop files to its interface.
 Step 2. Then click “Edit” button and the video editor window will pop up. You can use the video editor to do many editing work like cutting unwanted segments, cropping annoying black edges in your videos, adding watermarks for remarks or fun, adding special effects, etc.
 Step 3. In the “Format” list, you can see a large number of preset output profiles in there. Just choose what you want according to your needs.
 Step 4. Finally, go back to main UI and click the big "Convert" button. This video converter will start to output the final videos. Once the process is done, you can find your videos by clicking "Open" button. Enjoy!Read More:
Summary: The post will discuss how to convert 4K files from Blackmagic URSA Mini to MKV/VOB/AVI/MOV/MP4/MPEG/WMV/FLV etc. for storage in NAS and play with any devices you like.Blackmagic shoots up to 60 frames per second, has a super bright 5 inch foldout viewfinder, dual RAW and ProRes recorders and more. You can select from four models of Blackmagic Mini with 4.6K or 4K image sensors and either EF or PL lens mounts.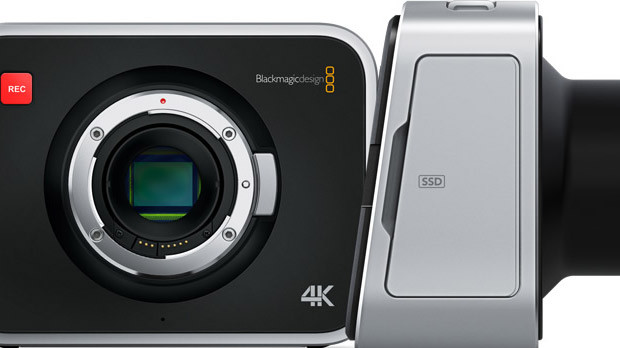 However when you enjoy the stunning videos recorded of HD image quality, you may encounter problems of playing the recorded video from Blackmagic URSA on other portable device.Pavtube Video Converter / Mac Version is the best video transcoding software for Blackmagic users. It is easy-to-use and practical 4K Video Converter Software, which can help you convert any video to 4K H.264 MP4. So that you can backup the video clips in your NAS and then play with any devices you like.Hot Search: Blackmagic HD 4K Prores to 1080p Prores | Edit Blackmagic 4K with Premiere | DNxHD MXF Files to FCPKey Features of Pavtube Video Converter
- Convert Blackmagic MXF/MOV/MP4 to any video format
- Transcode Blackmagic DNxHD and ProRes 422 video for editing software
- Encode Blackmagic DNxHD and ProRes 422 footage to 3D
- Convert Blackmagic recordings for sharing, uploading, watching, etc
- Edit Blackmagic video files on Mac and Windows via trim, crop
How to convert Blackmagic video for any devices?Step 1: Backup your Blackmagic video to hard drive. Install and launch this program. Drag and drop Blackmagic video to the software. You can import multiple files at once thanks to “Add from folder” button.  Step 2: Click the “Format” drop-down menu to choose an output format that you prefer. This Blackmagic Video Converter software can convert video to various video formats like MP4, MOV, MKV, FLV, AVI, WMV, 3GP, etc. and video presets for 150+ portable devices.
  Step 3: Before converting, you can edit the Blackmagic footage to achieve a better overall effect. Simply highlight a video clip and click the “Edit” button beside it to enter the Video Edit window. You can then crop, trim, rotate videos, adjust Blackmagic recordings effects, add text/image watermarks, etc. as you like. Step 4: When you’re ready, click the “Convert” button to convert Blackmagic videos.Conclusion: Before converting videos, you can preview the video, while the converting you can set the actions like shut down computer and open output folder when conversion is completed. When the conversion finished, you can easily transfer the converted video to the NAS and play with any device you want.Read More:
Summary: This article aim to show you a solution of how to easy convert AVCHD (.mts or .m2ts) to MP4 for playback. Just take what you are looking for.
Q: I have used a Cannon camcorder to record some AVCHD clips. Now I want to convert those AVCHD recordings to MP4 for conveniently.
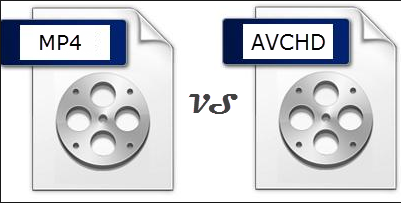 AVCHD stands for Advanced Video Codec High Definition, and the AVCHD files generally use extensions like MTS and M2TS, depending on the camera or camcorder brand and whether they are imported to a computer or Mac, when watching AVHCD files on other devices, or importing to editing systems, you need to convert AVCHD files to universal video formats like MP4.
Hot Search: Stream HD Video to PS4 | AVCHD Player | Convert AVCHD via VLC
How to Convert AVCHD to MP4?
Pavtube Video Converter / Mac Version enables to convert AVCHD files recorded by Panasonic, Sony, Cannon or other camcorders to MP4 format, so that it becomes possible to play AVCHD files on iTunes, iPhone, iPad, iPod, PS3, Android, etc or edit AVCHD in iMovie and QuickTime.
It is worth mentioning that this professional AVCHD to MP4 Converter is able to keep the Frame Rate of AVCHD files when converting AVCHD to MP4. What's more, you can also change the Frame Rate of AVCHD after converting them to MP4 as your desire.
Besides, Pavtube Video Converter also supports to convert AVCHD to almost all kinds of video formats like AVCHD to AVI, AVCHD to MOV, AVCHD to WMV, AVCHD to ASF, AVCHD to FLV, AVCHD to WebM, AVCHD to OGV, etc.
Better still, Pavtube Video Converter has the feature of extracting audio from AVCHD files like AVCHD to MP3, AVCHD to WAV, AVCHD to AAC, AVCHD to AC3, AVCHD to M4A, AVCHD to Apple Lossless ALAC, AVCHD to FLAC, AU, DTS, AIFF, MP2, OGG, RA, etc.
AVCHD stands for Advanced Video Codec High Definition, and the AVCHD files generally use extensions like MTS and M2TS, depending on the camera or camcorder brand and whether they are imported to a computer or Mac, when watching AVHCD files on other devices, or importing to editing systems, you need to convert AVCHD files to universal video formats like MP4.
Hot Search: Stream HD Video to PS4 | AVCHD Player | Convert AVCHD via VLC
How to Convert AVCHD to MP4?
Pavtube Video Converter / Mac Version enables to convert AVCHD files recorded by Panasonic, Sony, Cannon or other camcorders to MP4 format, so that it becomes possible to play AVCHD files on iTunes, iPhone, iPad, iPod, PS3, Android, etc or edit AVCHD in iMovie and QuickTime.
It is worth mentioning that this professional AVCHD to MP4 Converter is able to keep the Frame Rate of AVCHD files when converting AVCHD to MP4. What's more, you can also change the Frame Rate of AVCHD after converting them to MP4 as your desire.
Besides, Pavtube Video Converter also supports to convert AVCHD to almost all kinds of video formats like AVCHD to AVI, AVCHD to MOV, AVCHD to WMV, AVCHD to ASF, AVCHD to FLV, AVCHD to WebM, AVCHD to OGV, etc.
Better still, Pavtube Video Converter has the feature of extracting audio from AVCHD files like AVCHD to MP3, AVCHD to WAV, AVCHD to AAC, AVCHD to AC3, AVCHD to M4A, AVCHD to Apple Lossless ALAC, AVCHD to FLAC, AU, DTS, AIFF, MP2, OGG, RA, etc.
 How to Convert AVCHD to playable MP4
Step 1: Load AVCHD video files.
Click "File" menu and select "Add Video/Audio" to import source AVCHD video files to the program.
How to Convert AVCHD to playable MP4
Step 1: Load AVCHD video files.
Click "File" menu and select "Add Video/Audio" to import source AVCHD video files to the program.
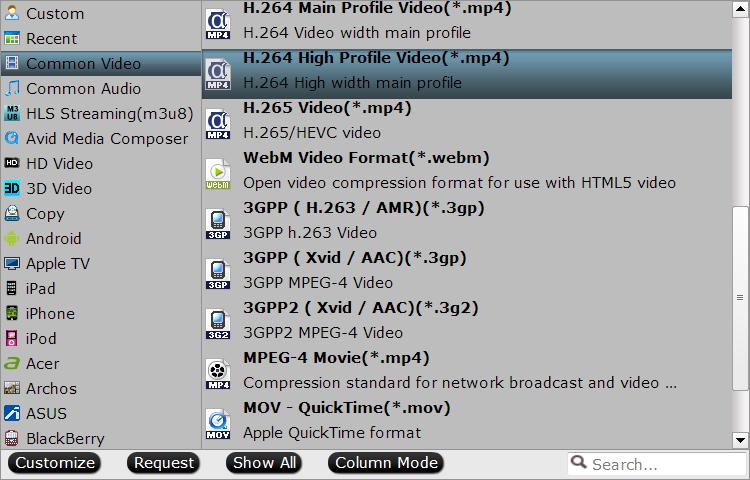
 Step 2: Select output profile format.
Click "Format" bar, from its drop-down option, select "H.264 High Profile(*.mp4)" as the output format.
Step 2: Select output profile format.
Click "Format" bar, from its drop-down option, select "H.264 High Profile(*.mp4)" as the output format.
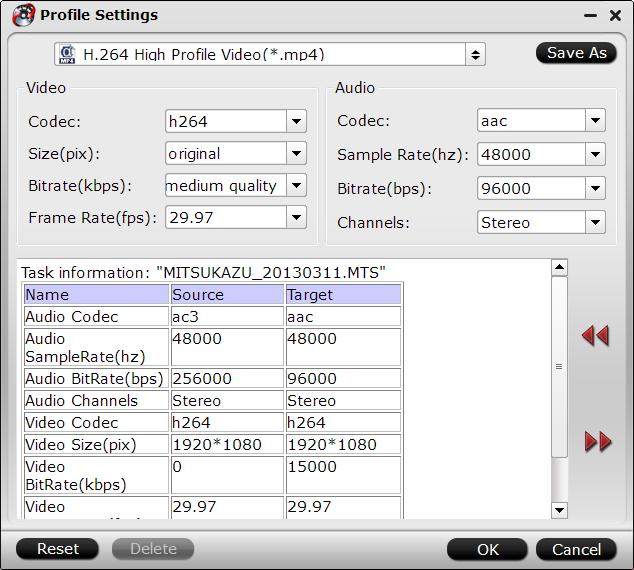
 Step 3: Adjust output profile parameters.
Click "Settings" button to pop out "Profile Settings" window, you can adjust output video codec, size, bit rate and frame rate and audio codec, sample rate, bit rate and channels.
Step 3: Adjust output profile parameters.
Click "Settings" button to pop out "Profile Settings" window, you can adjust output video codec, size, bit rate and frame rate and audio codec, sample rate, bit rate and channels.
 Step 4: Start AVCHD video to MP4 Conversion.
Hit right-bottom "Convert" button to start to convert AVCHD video to MP4 conversion.
Related program:
Pavtube HD Video Converter / Mac Version: It is designed for converting HD videos from HD camcorders or DVs (like JVC, Panasonic, Sony and Cannon), non-protected HD or movies, DVR files (*.tivo) to other file types for playback on popular media devices like Apple TV, PS3, Xobx, Xobx360, WD TV HD Player.
Read More:
Step 4: Start AVCHD video to MP4 Conversion.
Hit right-bottom "Convert" button to start to convert AVCHD video to MP4 conversion.
Related program:
Pavtube HD Video Converter / Mac Version: It is designed for converting HD videos from HD camcorders or DVs (like JVC, Panasonic, Sony and Cannon), non-protected HD or movies, DVR files (*.tivo) to other file types for playback on popular media devices like Apple TV, PS3, Xobx, Xobx360, WD TV HD Player.
Read More:
Summary: Here we got the newest information of Panasonic Lumix DMC-CM1smartphone and it’s 4K camera, and then give you the solution about how to edit it’s video in the FCP.Panasonic Lumix DMC-CM1Smartphone and It’s 4K CameraIt's been quite some time since Panasonic was a big name in the smartphone space, but the Lumix DMC-CM1, which was first announced at Photokina 2014, certainly is an appealing mobile device, especially to mobile photographers. That said, the CM1 and its spec sheet, it is quite hard to tell if this is a smartphone that puts a lot of emphasis on its camera or a digital camera with some bolted-on communication components. Focus, aperture, shutter speed, ISO and white balance can all be adjusted manually via a mechanical click-wheel around the lens 'barrel' and the CM1 is also capable of recording 4K-video and Raw images. With its impressive camera specification and unusual design the Panasonic Lumix DMC-CM1 is the closest thing we have seen to a true hybrid device and a unique product in the current marketplace.What is Final Cut Pro?Final Cut Pro on the other hand, focuses on more technical features, which clearly aim to a professional market. It once started as Macromedia's effort to create the best professional tool for video editing which later continued to be developed by Apple itself. And they have quite made it. Yes, Final Cut Pro offers a collection of video effects, titles, animations, audio presets and others like iMovie does but much wider and with a superior quality. Also, you will find the capability to extract video from your devices or media easily, only in Final Cut Pro, you will be able to import simultaneously from several of them, or even create a common video source to share with your teamwork on a server, making it the most robust software to exploit the higher-end Mac's potential.Multi-cam support for syncing up to 64 simultaneous shots from different cameras, background rendering for your project to be processed as you work rather than after hitting export, professional coding and export options, color, video and audio correction, XML metadata support and many more are exclusives on Final Cut Pro that make it the most complete solution even for a full-lenght movie.How to Edit Panasonic Lumix DMC-CM1 4K Video in FCP?The Lumix DMC-CM1 professional captured 4k video in MP4 (MPEG-4 AVC/H.264) format, which is not a native editing codec for Final Cut Pro X. In addition, the 4K video footage compressed with MPEG-4 AVC/H.264 will still have big file size, it will take a lot of time for Final Cut Pro to render those 4k videos. Hot Search: 4K Video to FCP X | 4K to FCP 6/7 | AVCHD to iMovie/FCE/FCPYou can perform Lumix DMC-CM1 4K video to FCP Apple Prores transcoding process on Mac OS X El Capitan with Pavtube HD Video Converter for Mac, the program allows you to output different types of Apple Prores Codecs, if you computer is old or slow, or you just want to do some rough editing, you can select to output "Apple Prores Proxy)(*.mov)"or "Apple Prores (LT)(*.mov)"format to save more space and bandwidth. However, if your computer are powerful enough to handle multicam and high-resolution video and you are going to do many effects editing work with FCP X, you'd better choose to output "Apple Prores 422(*.mov)"or "Apple Prores 422(HQ)(*.mov)"for better performance.
 Other Download:
Step 1: Add Lumix DMC-CM1 4K files.Click the "Add Video" button or "Add from folder" button to import source Lumix DMC-CM1 4K files to the program. You can join multiple video clips at one time.
Other Download:
Step 1: Add Lumix DMC-CM1 4K files.Click the "Add Video" button or "Add from folder" button to import source Lumix DMC-CM1 4K files to the program. You can join multiple video clips at one time. Step 2: Choose output file format.Click the "Format" bar and select "Final Cut Pro" > "Apple Prores 422 (*.mov)" as output format. If your Mac is a little old or slow, you can choose to select "Apple Prores 422 (LT) (*.mov)" or "Apple Prores 422 (Proxy)" to save your bandwidth, if your computer is fast enough or you wish to do some high performance editing work, "Apple Prores 422 (HQ) (*.mov)" or "Apple Prores 422 (*.mov)" is more preferable.
 Step 3. Compression 4K video to 1080p.On the main interface, click "Settings" to open "Profile Settings" window, from "Size(pix)" drop-down selection, choose "1920*1080" to downscale 4K video to 1080p for editing with Final Cut Pro 7 or its previous version.Step 4. Convert Lumix DMC-CM1 4K to Apple Prores.Click the "Convert" icon under the preview window, it will start to convert Lumix DMC-CM1 4K video to FCP supported 1080p Apple Prores format.After the conversion, launch Final Cut Pro, choose File > Import > Files..., locate and find the folder where you save the converted Lumix DMC-CM1 4K clips. Then start editing Lumix DMC-CM1 4K video in FCP X/7/6 with no difficulty.Read More:
Summary: DJI Inspire 1, a badass drone that shoots lovely 4K video. If you recorded some 4K footage by DJI Inspire 1 4K camera, you may like editing the 4K videos on your computer. This guide focuses on DJI Inspire 1 4K to Movie Maker workflow. If you just want to import DJI Inspire 1 4K to Movie Maker for further editing, just read the rest article.The DJI Inspire 1 is a well-built, ready-to-fly quadcopter that captures excellent 4K-resolution video. Its camera is removable, giving it the potential for future upgrades and is also compatible with a handheld mount. Option for two-controller operation with one for piloting and the other for camera control.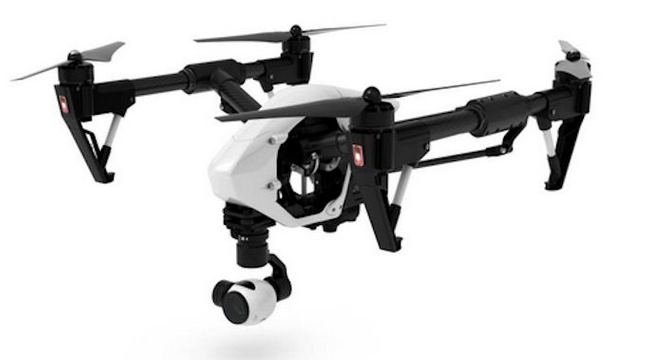 Windows Movie Maker, as a powerful video editor is widely used among Windows users. I find that Windows Movie Maker does a great job! I know it's basic, but it's very easy to use and you can do basically everything most people need. And it's free! The quality of your videos boil down to how you cut clips together, in other words your own skills as a "director" and camera man. Due to its popularity and simple operation, it is favored by more and more people.Although powerful as it is, Windows Movie Maker still troubles users for its defect on video support, which is limited to AVI, MPEG and WMV files. That means you will fail to import and edit DJI Inspire 1 4k MP4/MOV files in Windows Movie Maker.Well, since Windows Movie Maker can fully support .wmv, .mpeg, .asf, .avi, you can change the DJI Inspire 1 4k video type to one that Movie Maker can accept. Here I would recommend you a best professional video converter here for you--DJI Inspire 1 owners--Pavtube Video Converter. It supports converting DJI Inspire 1 4k MP4/MOV files to Windows Movie Maker highly compatible WMV or AVI without quality loss. Besides, it also supports the decent outputs for Avid MC, Final Cut Pro X, Adobe Premier Pro, Sony Vegas, Pinnacle Studio and more to meet different of needs. Just download it and follow the step-by-step guide to transcode DJI Inspire 1 4k MP4/MOV files for editing in Window Movie Maker smoothly. Other Download:- Pavtube old official address: http://www.pavtube.com/video_converter/- Amazon Download: http://download.cnet.com/Pavtube-Video-Converter/3000-2194_4-75734821.html- Cnet Download: http://download.cnet.com/Pavtube-Video-Converter/3000-2194_4-75734821.htmlGuide on Convert DJI 4K to HD WMV for Editing in Movie MakerStep 1. Load the 4K files of DJI.Click "Add Video" button to load your DJI Phantom 3 4K files as soon as you get into the main interface. Or you can drag & drop the files to the software directly.Step 2. Choose the output formatClick the "Profile" drop down list to select a proper video foramt as you want. Here you just need to hit the "Profile" box and select "HD Video" > "WMV HD" on the dropdown menu as output format.
  Step 3. Set Video Resolution at 1080p.Click "Settings" button; you can adjust video and audio settings, including codec, aspect ratio, bit rate, frame rate, sample rate, and audio channel. To down-convert ultra HD 4K to 1080p, do remember adjusting video size to 1920*1080. That is the exact 108p.
 Step 3. Start transcoding DJI 4K to HD WMV.When everything is OK, hit "Convert" button at the bottom of the main interface to let the 4K to 1080p conversion begin.When the conversion finished, check the generated 1080p video, you will certainly be satisfied with its final video quality. It would be easier for you to playback and edit your DJI Phantom 1 4K clips.Read More:
Summary: With Premiere CC now supports H.265 natively, you may got update and tried in time, you found it really do supported edit H.265 4K, but it is not work well. Here we tell you why and give you the solution how to edit any 4K videos in Premiere smoothly without not much quality loss.I have just tried out H.265 support in Premiere, so a brief word on this now…First a note about hardware. I am running Mac OS X on a PC with Nvidia GTX 970.H.265 is demanding on the GPU and I have not tried it on my Macbook Pro yet. I have no idea if the mediocre ATI cards in the Mac Pro have built in hardware support for H.265 like the latest Nvidia 9xx cards.So on performance I can only speak for the GTX 970 for now. This is a £250 card, so certainly not the most expensive. So if you are not trend to buy a one, is there another way to edit the 4K in Premiere CC?If you wanna edit 4K videos in Premiere CC or previous version without any problem, you'd better downscale 4K footage to 1080p and transcode the 4K stuff (formatted/encoded in R3D, XAVC, XAVC S, MP4, MOV, MXF etc.) to a more-editing friendly format, such a Premiere's MPEG-2. In the following article, we will show you how to downscale and convert 4K to 2K MPEG-2 videos so that you can edit 4K footage in Adobe Premiere CC without bogging down your computer. The process is surprisingly easy and can be done using Pavtube HD Video Converter for Mac.It is an easy-to-use yet professional 4K Video Converter truly and fully supports input and output videos at up to 4K resolution. With it, you can effortlessly transcode 4K videos to MPEG-2 with 1080p settings on Mac El Capitan - - ensuring maximum editing quality and efficiency when working with Premiere Pro CC. Besides Premiere Pro CC, the program also supports more professional encoders, ProRes, DNxHD, AIC, DVCPRO, HDV - ensuring the best results when editing with Final Cut Pro, iMovie, Avid Media Composer, etc. respectively. Plus, this 4K Video Converter is also available to customize the output resolutions to any size like 1080p, 2K, 4K as users want.Hot Search: Blu-ray/DVD to Premiere | MTS to Premiere | MXF to Premiere | MP4 to Premiere | 4K to MacFree download 4K to Premiere Pro CC Converter free trial: Other Download:- Pavtube old official address: http://www.pavtube.com/hd-video-converter-mac/- Amazon Store Download: http://www.amazon.com/Pavtube-Video-Converter-Mac-Download/dp/B00QI9GNZS- AppStore Download: https://itunes.apple.com/de/app/pavtube-hd-video-converter/id502792488?mt=12- Cnet Download: http://download.cnet.com/Pavtube-HD-Video-Converter/3000-2194_4-76177786.htmlDownscale the 4K Video to MPEG-2 for Editing in Premiere Pro CCStep 1. Load Source 4K VideoLaunch the best 4K Video Converter Mac; click "Add Video" and load your 4K UHD files to the program.Step 2. Select "Premiere Pro CC" preset as the output formatGo to the Editing Software category and click "Premiere Pro CC" to set it as the output format.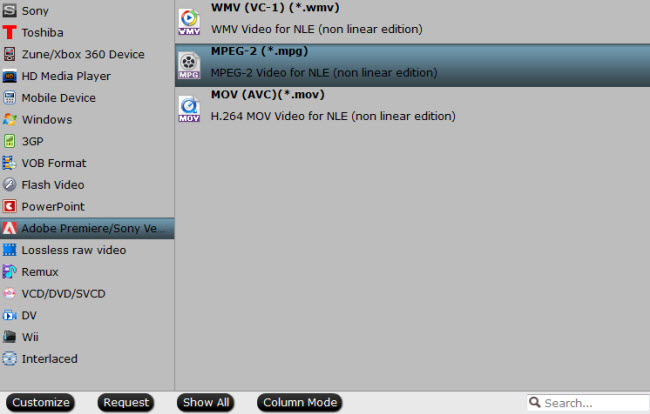 Tips: Adjust video, audio settingsClick the "Settings" button and customize proper video/audio parameters including Video size, bitrate and fame rate and mroe. Usually 1920*1080 video size and 30fps video frame rate are recommended for Premiere Pro CC editing.
 Step 3. Start 4K video to Premiere Pro CC conversionHit "Convert" button to let the 4K to MPEG-2 conversion on Mac begin. When the conversion finished, check the generated .mpg video for video importing, you will certainly be satisfied with its final video quality. It would be easier for you to edit with Premiere Pro CC.Read More:
Summary: This article keep eyes on the solution to edit the parrot bebop drone video in FCP X, if you just have the issue of import and edit this video in FCP X, you have come to the right place. You’ve graduated from your cheap beginner drone, and you want to try something new. Something that can shoot beautiful video from the sky—but doesn’t cost $1,000+ like a camera-equipped DJI Phantom. You spot the $500 Parrot Bebop Drone, and pull the trigger. It’s kind of fun, you think, between strings of obscenities.Perhaps you have know some detail of the Parrot Bebop Drone. It can capture video at 1080p full-HD resolution; the AR.Drone 2.0 is limited to 720p. Video is recorded to the Bebop's 8GB of internal storage (there's no microSD or SD card slot) in MP4 format. The reason why you are failed to import or cannot edit parrot bebop drone video in FCP X smoothly is that the mp4 format is not a friendly editing format but a container format. For FCP X, the best compatible format is Apple ProRes, if you want to edit the Parrot Bebop Drone video in FCP X smoothly, you just need to change the original video format into Apple ProResHot Search: H.265/HEVC to FCP X | DJI Phantom 3 4K Video with FCP X | 4K MXF to FCP XPavtube Video Converter for Mac(read the review) are highly recommended here, which helps to output Final Cut Pro native editable Apple ProRes MOV codec from Parrot Bebop Drone for further professional editing on Mac OS X. If your computer is old or slow, or you just want to do some rough editing, you can select to output "Apple Prores Proxy)(*.mov)"or "Apple Prores (LT)(*.mov)"format to save more space and bandwidth. However, if your computer are powerful enough to handle multicam and high-resolution video and you are going to do many effects editing work with FCP X, you'd better choose to output "Apple Prores 422(*.mov)"or "Apple Prores 422(HQ)(*.mov)"for better performance.By the way, if your are a one hundred percent Windows user, please turn to Pavtube Video Converter. It has the same ability as Mac version. Other Download:- Pavtube old official address: http://www.pavtube.com/video-converter-mac/- Amazon Store Download: http://www.amazon.com/Pavtube-Video-Converter-Mac-Download/dp/B00QIBK0TQ- Cnet Download: http://download.cnet.com/Pavtube-Video-Converter/3000-2194_4-76179460.htmlSteps for changing the original video format into Apple ProRes for FCP XStep 1: Add Parrot Bebop Drone files to the program.Launch the software on your Mac computer, click "File" menu, select "Add Video/Audio" or "Add from folder" to import Parrot Bebop Drone video to the program.Step 2: Choose output format.Click "Format" bar, from its drop-down options, move your mouse to "Final Cut Pro > Apple ProRes 422 (*.mov)" to select it as the output file format.Step 3: Customize output ProRes parameters.Open "Profile Settings" window to adjust the output video codec, size, bit rate, frame rate, audio codec, sample rate, bit rate and channels.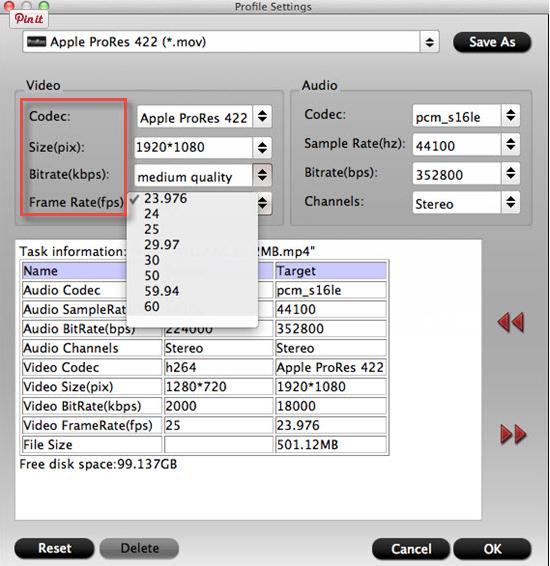 Step 4: Convert Parrot Bebop Drone Video to FCP X.Hit the convert button under the preview windows, the program will start Parrot Bebop Drone video to Apple ProRes MOV conversion for Final Cut Pro X.When the conversion is completed, run FCP and import the ProRes codec footage for post production workflow.Related program: Pavtube Media Magician / Mac Version: A nice camcorder assistant manager, lossless camcorder video joiner, MTS/ M2TS/ MXF/ MOV/ MKV/ TiVo/ WMV/ AVI/ MPG converter and editor. Meamwhile it supported upload edited video to YouTube directly.Read More:
Summary: Stream AVI to Roku 4 for play issues have solved! This article give you the solution on converting AVI to Roku More Supported MP4 on Mac or Windows.The Roku 4 Media Player channel enables you to playback personal video, music and photo files from a USB drive on your TV. However, if you try to stream AVI to Roku 4 USB channel from computer or external USB drive, you will find Roku 4 cannot read AVI video.According to Roku official website, the following USB drive formats are supported: FAT16, FAT32, NTFS and HFS+. What’s more, Roku 4 only supports H.264, H.265 MKV, MP4, MOV and VP9 video codecs. Apparently, AVI is not included here.So how to prepare your AVI files for playback on Roku 4? Luckily, there is an easy workaround-encode/re-encode AVI to Roku 4 supported MP4 videos to make your AVI movies playable on Roku 4.Hot Search: play AVI file through Plex | TiVo to AVI | AVI (DivX, XviD) to Surface ProSince Roku USB Media Player channel only plays MP4 and MKV video, in order to play all kinds of AVI files on Roku player, we had better convert AVI to Roku more compatible MP4.Pavtube Video Converter is just the right AVI to Roku Converter which has both Mac and Windows version! It helps to convert various AVI files whatever encoded with DivX, Xvid, etc to Roku more supported MP4. Besides converting AVI to Roku format, Pavtube Video Converter also can convert other video formats like VOB, TS, WMV, MOV, 3GP, RMVB, WTV, Apple ProRes, AVCHD, MXF, DV, MPEG-1, MPEG-2, ASF, FLV, WebM, and etc to Roku supported video format.It even can convert all kinds of audio format like FLAC, WMA, WAV, OGG, M4A, APE, AC3, DTS, AIFF, RA, AU and etc to Roku supported MP3 or AAC.Furthermore, this ideal AVI to Roku Converter also features editing functions like crop video black boards, merge several videos into one file, split a large video into chapters, rotate video, add subtitle/effect/watermark to video files, increase video sound volume, adjust video parameters like codec, bitrates, resolution, aspect ratio, size, frame rate and etc. Other Download:- Pavtube old official address: http://www.pavtube.com/video_converter/- Amazon Download: http://download.cnet.com/Pavtube-Video-Converter/3000-2194_4-75734821.html- Cnet Download: http://download.cnet.com/Pavtube-Video-Converter/3000-2194_4-75734821.htmlThe tutorial about how to convert AVI to Roku 4 supported file format1. Start video converter, drag and drop the AVI files to the software window to import.2. After the files are added, click Format > Common Video and set output video format as mp4. The reason mp4 is the target format is that by packing the videos in mp4, the file size will be reasonable small and the video quality remains Tip: There are also some optional tinkering you can take to make the videos look better on a HDTV screen, such as changing the aspect ratio or specifying the video resolution. Just click the Settings icon to do it.
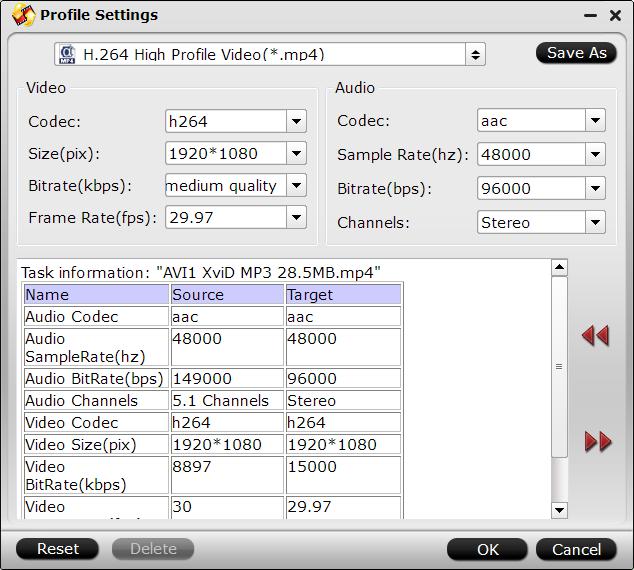 3. Finally, hit the Convert button to star converting AVI to mp4 for Roku 4 playback.After the conversion is completed, transfer the converted videos to Roku’s SD card or to a USB stick that can be attached to Roku 4 streaming player. Now you can enjoy MP4 movies with Roku 4.Read More: