Showing posts with label QuickTime Player. Show all posts

Sunday, March 9, 2014

Ripping Blu-ray/DVD to QuickTime MOV on Mac 10.9 Mavericks

In case that QuickTime Player does not support Blu-ray/DVD disc playback, if you want to watch Blu-ray/DVD movies with QuickTime on Mac 10.9 Mavericks, you have to convert Blu-ray/DVD to QuickTime MOV format at first.  


Mac users prefer QuickTime just like Windows users used to playing video with Windows Media Player. While, it's a pity for all the Mac users- the default video player app QuickTime does not support Blu-ray/DVD movies as source media. So you may have the question below:

I have Quicktime Player running on Mac Mavericks 10.9. Can I use QT to play blu-ray/dvd disks? (My system does have a blu-ray/dvd capable drive.)
Here I’d like to share a full guide on how to get Blu-ray/DVD playable with QuickTime on Mac 10.9 Mavericks. A best way to play Blu-ray/DVD movies with QuickTime is to rip the Blu-ray/DVD to QuickTime playable video format on Mac 10.9 Mavericks with third-party software.

Here, Pavtube Blu-ray Ripper for Mac is just a powerful Mac Blu-ray/DVD to QuickTime Converter which allows Mac users rip Blu-ray/DVD to QuickTime supported video formats with fast speed and high video quality. This Blu-ray Ripper for Mac also enables you convert Blu-ray/DVD to other video formats like AVI, WMV, FLV, MKV, 3GP etc. on Mac.

How to rip and burn a Blu-ray Disc to DVD? | How to make full copy of blu-ray disc in fastest and easiest way?

Tips: If you want to backup your blu-ray/dvd movies with keeping multiple audio tracks and subtitle streams, try to use Pavtube ByteCopy for Mac.

Below is a step-by-step guide to show you how to rip Blu-ray/DVD to QuickTime MOV on Mac 10.9 Mavericks with Pavtube Blu-ray Ripper for Mac.

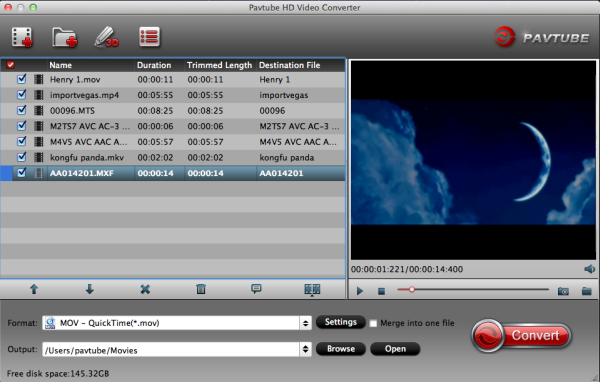
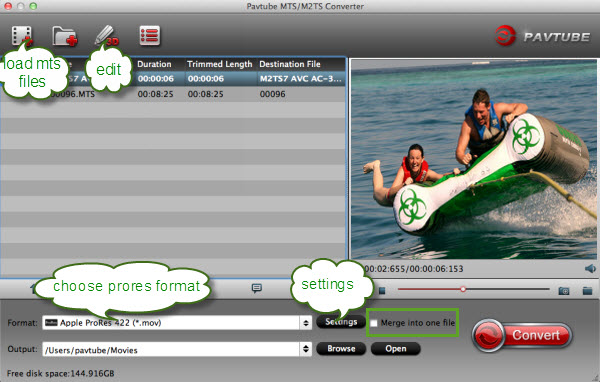
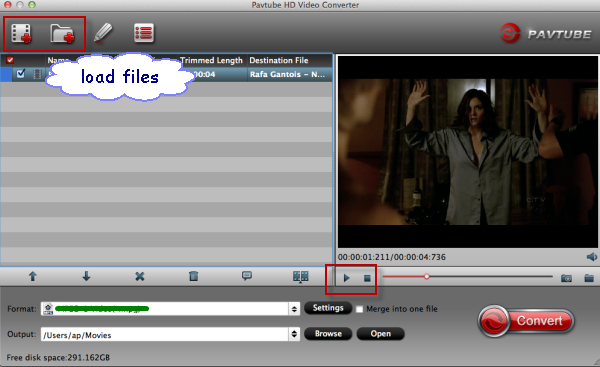
Step 1. Load Blu-ray/DVD movie.

Free download Mac Blu-ray/DVD to QuickTime Converter, run it and load Blu-ray/DVD disc from disc driver. Before that, you need an extended BD drive connected to Mac. Check the main title of the movie and then you can also click to preview the Blu-ray/DVD  movie.


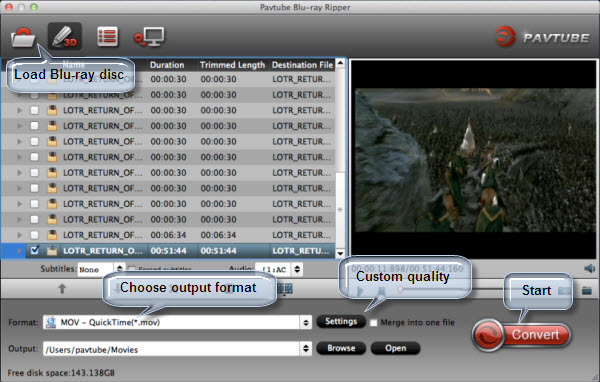
Step 2. Set output format.

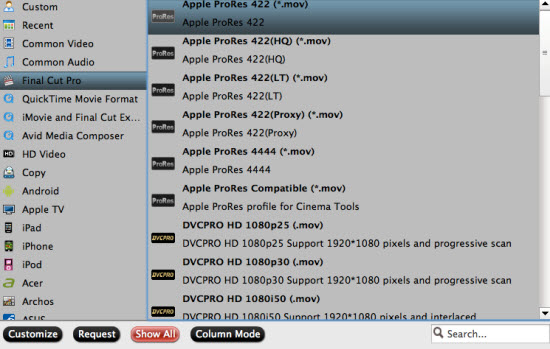
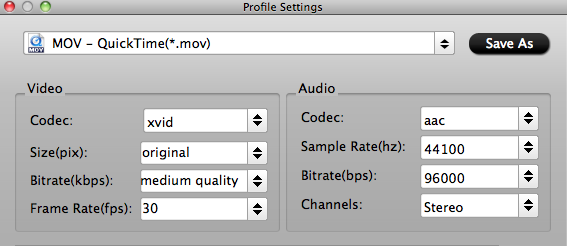
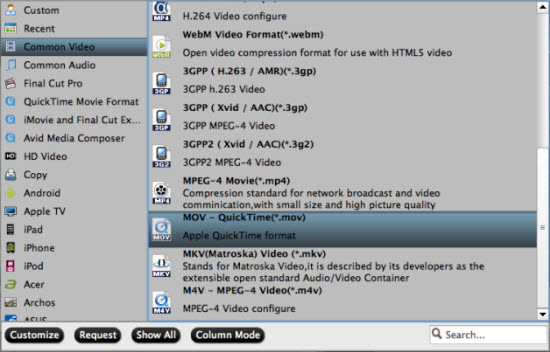
Click on “Format” bar to select an appropriate format from the profile list, here you can choose “Common Video > MOV – QuickTime (*.mov)”as output format.


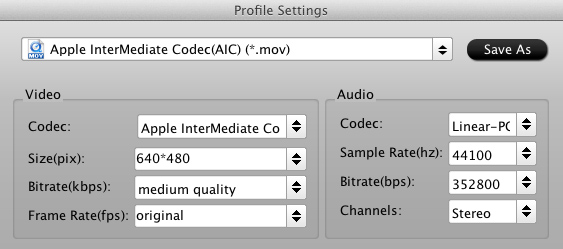
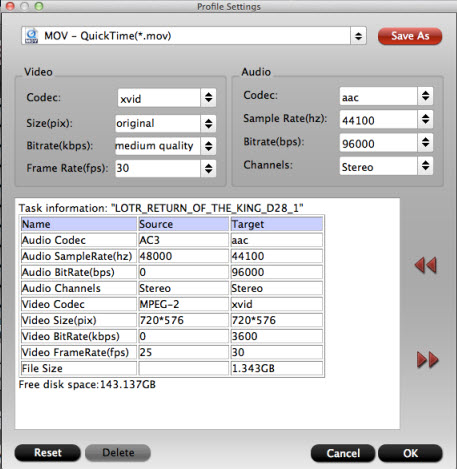
Tip: If you like, you can click “Settings" to change the video encoder, resolution, frame rate, etc. Remember bitrate higher results in big file size, and lower visible quality loss. If you want to keep 1080p Full HD resolution, set the video size as 1080*1920.


Step 3. Start ripping Blu-ray/DVD to QuickTime MOV on Mac.

After choosing the output format, just click on “Convert” button to start ripping Blu-ray/DVD to QuickTime MOV on Mac 10.9 Mavericks for playback. When the conversion is completed, click the “Open” button to get the converted MOV videos for QuickTime playing.

Related article:
Convert DVD to QuickTime MOV on Mac 10.9 Mavericks
Transfer TiVo files to QuickTime player on Mavericks
BDMV Converter: Encode BDMV to AVI, MP4, MOV(Quicktime) etc

Tuesday, September 10, 2013

Panasonic HPX250: Rewrapping MXF to Quicktime MOV on Mac

Description: It mainly introduces how to play Panasonic AG-HPX250 P2 MXF files with QuickTime player. If you are facing the problem to play P2 MXF on Mac smoothly, this article will show you a way out. 

I'm on the verge of purchasing a HPX250 camcorder in the coming days. I'll use AVC-Intra for production work, but I can't see the raw P2 mxf footage from the camera when loading into QuickTime Player on Mac. My problem is going to be getting the HPX250 MXF files translated to a format which QT will support. What is the best workflow?


From above, you can see the MXF file from Panasonic AG-HPX250 is not a friendly format for QuickTime player on Mac. In fact, without advanced tools, it was impossible to for QuickTime to distinguish Panasonic AG-HPX250 incompatible MXF footage.

To watch
Panasonic AG-HPX250 P2 MXF video on Apple QuickTime on Mac, you need to rewrap the MXF files to QuickTime compatible MOV video firstly. Here Pavtube MXF Converter for Mac is know as the best and fast MXF rewrapping tool that can help you convert any P2 MXF file to QuickTime video on Mac with super fast speed and excellent quality.  

Becides, it is capable of converting MXF files to a variety of other formats like Apple ProRes, Avid DNxHD, Apple InterMediate Codec, DVCPRO, MOV, MPG, M4V etc. You can also choose to convert to some built-in mobile devices and editing software, such as iPhone 5, iPad 4/Mini, Final Cut Pro, iMovie, FCE, Avid Media Composer, Adobe Premiere Pro, etc. Let’s go to try efficient workflow with an easy-to-use interface.

At first, download and install the MXF to MOV Converter, and then follow the guide for how to rewrap Panasonic HPX250 MXF to QuickTime MOV for playback on Mac.

1. Load MXF files

There are two ways for you to load MXF files: Load MXF video or Load the whole MXF folder .


2. Select MOV for QuickTime player

Click "Format" menu to find "QuickTime Movie Format", and then choose the format you want.


Tips: You can click "Settings" on the interface, some video and audio parameters for output can be changed like bitrate, frame rate, channels, etc. Definitely keep default settings is able to bring you a wonderful video if you are not good at settings.

3. Convert Panasonic HPX250 MXF to QuickTime MOV

Click "Convert" button to start P2 MXF to QuickTime Conversion. It will not take much for conversion. Once completed, click the "Open" button to locate the output MOV files for QuickTime player to playback smoothly on Mac.

Tips: If you want to convert to MOV file with all multiple audio tracks preservation, Pavtube iMixMXF can help you to get it done. With it you are allowed to preserve all or any audio tracks for output MOV and mix the multiple audio tracks into one if you need. 

Read More:

Monday, August 5, 2013

How to play XAVC video on QuickTime on Mac?

Summary: Follow this article to learn how to play Sony XAVC footage with QuickTime Player on Mac. With this Sony XAVC Mac Video Converter, you can easily convert XAVC footage to QuickTime MOV on Mac.


The Sony PMW-F55 CineAlta 4K Digital Cinema Camera functions an eight.9MP Super 35mm image sensor, capable of capturing 4K, 2K and HD resolution video within a wide variety of formats by way of the camera's internal recorder. The F55 is amongst the initial digital motion image cameras using a international shutter, which fully eliminates motion skew and also other "rolling" shutter distortions. The XAVC format is used by Sony PMW F5 or F55 camcorder.

Shoot with Sony PMW camera, you will got some files with .xavc extension. With 4K resolution (4096 × 2160 and 3840 × 2160) at up to 60 fps, we know the recording XAVC footage is not supported by most of players like QuickTime on Mac. When opening XAVC video QuickTime, you will find a pop-up windows said mistake. So the best way to watch XAVC with QT is to convert XAVC to MOV which is the most popular format for QuickTime player.

Here Pavtube XAVC HD Video Converter for Mac is usually a handy and effective video converting plan to convert XAVC video to MOV for playing on QuickTime Player. In addition, it might help you convert XAVC to other frequent formats such as XAVC to FLV , MP4,AVI,MPG,3GP,and so forth for distinctive customers.

If you are a XAVC camcorder users and troubled with how to play XAVC on QuickTime as above, you can follow simple step-by-step guide to transcode Sony XAVC video to QuickTime MOV for playback:

Step 1. Install and launch the best XAVC to QuickTime Converter for Mac, click top left two icons to load individual videos or load the entire folder.


If you want, you can merge several XAVC clips by ticking "Merge into one file" box.
If the supposed size of the input files is 1GB, then the memory space should be up to 40GB.

Step 2. Click "Format" and choose Common Video> MOV-QuickTime(*.mov) as the best video format for playing XAVC footage on QuickTime.

xavc-to-mov-quick-time


Tips: Pavtube XVAC Video Converter for Mac can also convert Sony XAVC files to FCP, iMovie, FCE, Avid Media Composer, Avid Xpress Pro, Adobe Premiere Pro, Adobe After Effects, DaVinci Resolve or Apple Aperture 3 compatible video format for editing. Just select the corresponding option.

Step 3. You can also click "Settings" to change the output video bitrate, frame rate, size, etc. all according to your needs.

Step 4. When everything is done, click the "Convert" button at the bottom-right corner to finishe the Sony XAVC to QuickTime MOV conversion. While you wait, have a coffee or take a nap and let XAVC Video Converter do the work in the background.

After conversion, you can click "Open" to find the output quicktime mov file, then you can transfer the video files to QuickTime Player for playback smoothly.

See also:


Wednesday, July 31, 2013

Flawlessly Convert Sony HX200V 60p MTS files for using in FCP, iMovie, QuickTime Player


Sony Cyber-shot DSC-HX200V is a fast-shooting megazoom with excellent photo and video quality for its class, and plenty of shooting options to make casual and advanced shooters happy. Recently, I take some pictures with it of birds, try to capture flight and movement and want to select individual frames. I'm satisfied with the full HD Movie Shooting capability (1920×1080/60p) and Optical SteadyShot Active Mode.

However, My HX200V camera gave me videos as AVCHD file which I have not acknowledged with. I tried with both FCP, iMovie and quicktime, but none of them could recognize it. Is there any step-by-step work flow for this? Which software can convert video taken with my Sony HX200V Cybershot camera for working with my mac? PS: the footages are on 1080 60p. 

In this case, I googled to search the solutions. I find this 60p MTS and M2TS video format is not friendly for use on Mac, Mac platform best supported format is .mov format. So I tried to seek for the best avchd converter for mac to do convertering. Now I get this MTS/M2TS Converter for Mac from Pavtube.

I have successfully convert Sony HX200V 60p AVCHD to best codec for editing on Mac. This software is top MTS converter for Mac that can transcode AVCHD files to Apple InterMediate Codec (AIC), Apple ProRes 422 codec, QuickTime codec, etc. These output formats are specially presetted, so the conversion quality is guaranteed, I can get lossless video conversion with this tool. 

Here I will share the easy steps that you can follow to transcode Sony Cyber-shot DSC-HX200V 60p AVCHD MTS to MOV for using in FCP, iMovie and QuickTime Player. 

1. Install and run the best Sony 60p MTS Converter for Mac, it's an professional AVCHD to FCP/iMovie/QuickTime Converter which can convert Sony DSC-HX200V 60p AVCHD files to different formats on Mac (including OS X Mavericks 10.9).  
Click "Add Video" to load the 60p .mts files from Sony HX200V Camcorder to the Mac Converter. 


2. Click "format" bar to choose output format:

Choose "Final Cut Pro -> Apple ProRes 422 (*.mov)" as the best output codec for importing 60p MTS files to Final Cut Pro (X) editing.


Choose "iMovie and Final Cut Express > Apple Intermediate Codec(AIC) (*.mov)" as the best video format for editing 60p AVCHD files to iMovie. 


Choose "Common video -> MOV-QuickTime (*.mov)" to play Sony 60p AVCHD mts with QuickTime Player.


Step 4. You can click “settings” to customize the output parameters, adjust the resolution, bitrate as you want. 

Tips:

If you would like to add Anaglyphic 3D effect or Subtitle for your footage, click "Edit" icon to start video editing with your 3D files, such as adding Anaglyphic 3D effect(Red-Blue, Red-Green) as well as adding watermark, trim your videos and so on.

You can also click "Subtitles" option, add srt, ass, ssa suntitle you want.

Step 5. Click convert button to start converting Sony HX200V 60p AVCHD MTS to Prores/AIC/QuickTime mov for FCP, iMovie editing and QuickTime Playere playback.

After the Mac MTS to MOV conversion, you can import the converted footages to FCP, iMovie  and QuickTime Player for editing and playing smoothly on Mac.

Monday, July 22, 2013

How to Convert QuickTime movie to iMovie on Mac OS X 10.9 Mavericks

If you don't know how to smoothly import QuickTime movie to iMovie on Mac OS X 10.9 Mavericks, just read this article, you will get the tools and steps, follow it!

QuickTime (.MOV) file format is a file extension used by the QuickTime-wrapped files. The format was created by Apple Computer to work with multimedia files. MOV is a container format and can contain video, animation, graphics, 3D and virtual reality (VR) content or text (for subtitles, for example).


However, many Mac users are still puzzled by one thing that some files from QuickTime with MOV file extension can't be imported into iMovie on Mac OS X 10.9 Mavericks as iMovie does not support the standard MOV QuickTime file format.

If you want to import a QuickTime movie file into iMovie on your Mac OS X 10.9 Mavericks, you are suggested to transocde QuickTime videos to AIC (Apple Intermediate Codec), the favorite editing codec of iMovie at first. The Apple Intermediate Codec (AIC) does not use temporal compression, so every frame can be decoded and displayed immediately without first decoding other frames. The drawback of this codec is that it requires much more bandwidth and hard drive storage space. The following are steps for you to QuickTime MOV to AIC MOV for iMovie editing.

Step 1: Run Pavtube HD Video Converter for Mac for iMovie and video clips to it. You can click either "Add Video" button to load source files.


If you want to combine the loaded MOV clips into one file, simply tick off the checkbox before "Merge into one file".

Step 2: Select "Apple InterMediate Codec (AIC) (*.mov)" as target format.

In order to convert video to AIC for use in iMovie, simply hit "Format" menu and follow "iMovie and Final Cut Express" > "Apple InterMediate Codec (AIC) (*.mov)".


Settings:


Step 3: Start QuickTime MOV to AIC Conversion.

Click the big button "Convert" to start converting QuickTime movie to iMovie on Mac OS X 10.9 Mavericks. As soon as the conversion is completed, you are able to click "Open" button to get the generated AIC MOV files for use in iMovie.

Step 4: Import converted videos to iMovie 8/9/11.

Launch iMovie, from the File menu, choose Import > Movies, navigate to the folder that output MOV videos are saved. Select the files and click "Import".

Now, start to create your masterpiece with QuickTime movie in iMovie (iMovie 11/iMovie 09/iMovie 08/iMovie HD)!

Read more solutions:

Monday, July 15, 2013

Smoothly playing AVCHD MTS files on Mac without slow motion problem

Follow the guide you can easily convert AVCHD mts files to QuickTime MOV for smoothly play AVCHD videos on Mac with A/V syncing. You won't get any issues when adding your AVCHD MTS files to Mac 
for playback.


Q: MTS playing in slow motion but sound is normal speed

Hi,
A friend took some mts video for me and gave me the SD card - I'm able to see it in several programs but it's always playing in slow motion though the sound is normal. How can I get it to play normal speed? Or covert it to normal speed? Thanks!


A: If you videos are from cameras or camcorders, it must be syncing well. So the problem may lies in the media player you choose. So at first check your computer specs, and make sure that it runs fast for work with the media player on your mac.

Then for playing mts files on mac, what is the best Mac MTS/M2TS player? You can try mplayer osx extended, or VLC to play it back. Quicktime cannot handle transport streams very well.
VLC media player is said to support AVCHD footage on Mac, and you can choose to play the files. However, there is also slow motion problem when playing .mts .m2ts files with VLC. The audio plays in normal speed, while the video time is double as what it should be. In other words, the sound is OK but the image lags behind. This might happen to computers with low configuration - CPU, video card. 

Many users do not have a powerful enough Apple computer with Intel Core i7, good graphic processors, and they may expect Apple QuickTime Player to natively support AVCHD videos, just like the WMP in Windows 7. So for smoothly playing AVCHD on Mac, they may need to convert AVCHD to QuickTime MOV on Mac.

It’s hard to find an excellent AVCHD Converter. Now, Pavtube HD Video Converter for Mac will help you convert AVCHD files to MOV for QuickTime with keeping the best quality of the original video to the output file. It's also a good software which can convert AVCHD videos to any common formats. The windows version is Pavtube HD Video Converetr for Windows.

You can follow the tips below to convert AVCHD video to QuickTime MOV format.

1. Download Pavtube MTS to QuickTime Converter, install and run, and then import the AVCHD files you want to convert.


2. Click Format bar and choose best output format for output. Click and choose common video -> MOV-QuickTime (*.mov). You can also choose other formats for output as you want.


3. You can click “settings” to adjust the output parameters, such as resolution and bitrate.


4. Edit function is very easy to use, you can trim, crop, add watermark or adjust effect before converting AVCHD videos to QuickTime MOV on Mac.

5. Click convert button to start converting AVCHD to QuickTime MOV file on Mac.

After conversion, you can use converted .mov files as you want. Now smoothly playing AVCHD file on Mac is without any problem.

Further Reading: