Thursday, February 23, 2017

Best Sony Video Editing Software: Media Magician

Sony camcorders and Sony cameras consistently rank among the best camcorder models available to consumers, achieving high marks for image quality, convenience and advanced features. Their superior performance ensures Canon's popularity, even as most smartphones include video recording options. Sony owners typically want the ability to edit, adjust and add special effects to their videos. There are a variety of Canon camcorder video editing software solutions, as well as online applications, that offer varying levels of performance and features.

One factor limiting the software or applications used to edit Sony camcorder videos is format: some models only record in like AVCHD formats, or among a limited selection of supported formats. Some Sony camcorders have poor performance in low-light situations, requiring adjustment in editing. Color accuracy may also need fixing with video editing software.

So here we talk about best Sony Video Editing Software for editing video like Sony Handycam, Sony A7 etc video for sharing, playing etc.

Best Sony Video Editing Software - Media Magician

Pavtube Media Magician is a nice Sony camcorder assistant manager, lossless camcorder video joiner, MTS/ M2TS/ MXF/ MOV/ MKV/ TiVo/ WMV/ AVI/ MPG converter and editor, and efficient camcorder video uploader for YouTube.

The smart camcorder wizard helps organize, backup and import camcorder videos including Sony, Canon, Panasonic, GoPro, DJI etc with ease. And timeline-oriented editing tools help accurately trim and cut clips frame by frame. Format presets provide you the easiest way to output the right format with the best recommended settings. The output task manager also helps create multiple tasks in different formats for Andoid/iOS/Windows tablets and phones like Galaxy Tab/ Amazon Kindle Fire HD/ iPad/ AppleTV/ Microsoft Windows Surface RT, editing software such as Adobe Premiere/ Sony Vegas/ Cyberlink PowerDirector, or upload to YouTube at the same time. It's a useful and easy tool helping you make better use of either camcorder videos, but also common videos. (Read review)

Free download this easy-to-use Sony Video Editing Software for Windows

Free download this easy-to-use Sony Video Editing Software for Mac

How to Edit Sony Videos with Media Magician easily?

Step 1: Load video files

A: Import Video from PC Hard Drive

To import video files from hard drive to Media Magician, proceed as either way follows:
a. Drag and drop source files to source area directly
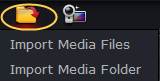
b. Click folder button to choose import media files, or import the whole folder.

B: Import Source files from Camcorder

Before importing the video files from camcorder to the program, you should connect the camcorder to computer. If you have used the camcorder to record content on a SD memory card, please insert the card in the camcorder first. Start Pavtube Media Magician, then you will get a popup window asking for the connect confirmation. Just click “Yes” to continue.You will be taken to the follow window, all the files on the camera will be checked, and if you click Start it will import all the files into Media Magician library. You can uncheck the files you do not want to import. Preview it in player on your right hand side. While you check Backup Files to Local at the same time, Media Magician will help you capture/copy camera videos to your computer.

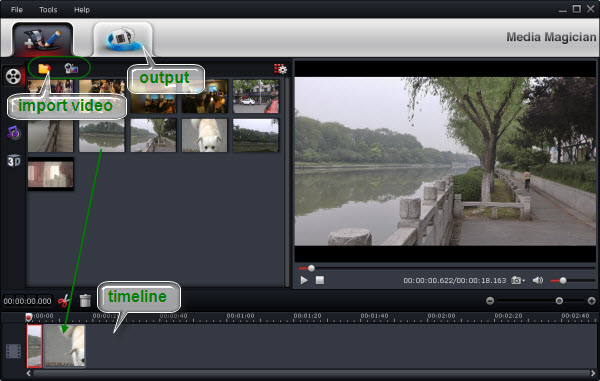
Step 2: Edit Video files

Drag and drop the video files to Timeline, then you can manage it into movie. This function makes splitting movies, merging video clips, trim video clips at just the right moment easy. Now enhanced with frame accurate seeking, you can split/cut movies at a very precise point. To learn the function of each icon.

edit video

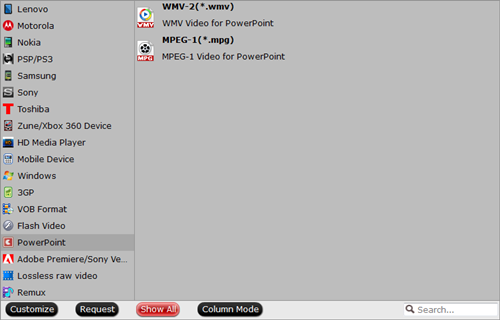
Step 3: Choose format to output

Switch to Output window, you will find task area and profile area. Click + to add a task before choose a profile. Media Magician comes up with massive output formats (AVI, WMV, MKV, MPG, H.264, TS, MOV, MP4, etc). Here we take MP4 as a instance, just follow “Common Format” and choose “MPEG-4”. There is also a lossless output. But this output only adapt to MTS, M2TS, TOD, MOD formats. And any video effect will be ignored when output lossless.

MP4 format

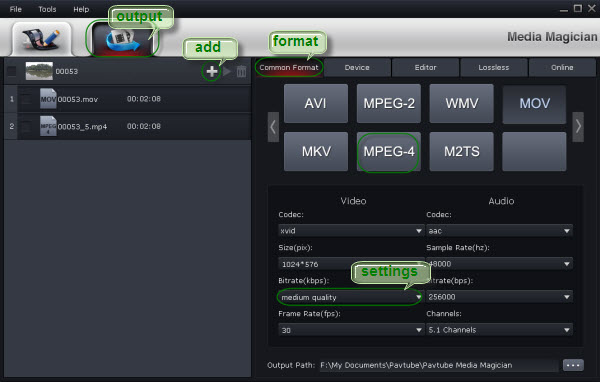
To limit the size of output file, you can set video bitrate down to desired value. Basically, the smaller bitrate you set, the smaller output file size it would be. But keep in mind there is noticeable quality degradation when you set any bitrate lower than 1500kbps.

Step 4: Start conversion

The software will specify a default folder to save converted videos. If you’d like to change the output location, please click to navigate to the folder you want to save videos to. After specifying all the settings, you can click  to start the conversion.

So a powerful Sony video editor & converter, why not have a try?

Read More:


Thursday, February 9, 2017

Load Olympus E-M1 Mark II 4K video to Pinnacle Studio

Olympus found a way to squeeze an extra 4,000,000 pixels into its Micro Four Thirds sensors, bumping the resolution from 16 to 20 megapixels. The new E-M1 also has 40 more autofocus points than its predecessor, a better battery, and a new generation of image processor. It even shoots 4K video.

Received the request that someone wanna convert 4K from Olympus E-M1 Mark II to Pinnacle Studio for editing on the latest Mac system OS X El Capitan, but Pinnacle won’t open these 4K footage correctly. So, what’s the solution?

To get rid of the issues, one possible solution is to transcode 4K-capable digital cameras or camcorders 4k format videos to a more “edit” friendly codec for Pinnacle Studio. Now I share the guide with you how to convert 4K footage to Pinnacle Studio friendly format using Pavtube Video Converter - a best 4K Video Converter on Windows (Windows 10). Also, you can get the Mac 4K Video Converter for Mac Version.

With it, you can also convert other video like MOV, MKV, H.265, FLV, MTS, M2TS, MXF, MP4 etc video in SD/HD/4K resolution to Pinnacle Studio friendly format and other popular editors like Windows Movie Maker, Premiere Pro CC, Sony Movie Studio, Sony Vegas Pro etc. Plus, it also can compress any 4K video to 1080p, 720p with high quality.

Now free download Olympus E-M1 Mark II video converter

Other Download:
- Pavtube old official address: http://www.pavtube.com/video_converter/
- Cnet Download: http://download.cnet.com/Pavtube-Video-Converter/3000-2194_4-75734821.html
- Softonic Download: http://pavtube-video-converter.en.softonic.com/

How to convert Olympus E-M1 Mark II 4K format to Pinnacle Studio compatible format

Step 1. Import Olympus E-M1 Mark II files

Click Add Video button to add the Olympus E-M1 Mark II movies. Or simply drag your videos to the left item bar for converting. Batch conversion is supported so you can add many files at a time to save the conversion time. And as you see, added files can be previewed in the right Preview window and you can take snapshots of your favorite video scenes.

Step 2. Select Pinnacle Studio friendly format as output format

Click "Format" bar to determine output format. Here we choose "HD Video" -> "AVI HD Video (*.avi)" as output, which seems to be the best one due to the great video quality but small size. Of course, MPG, WMV are also the proper formats for Pinnacle.

Step 3. Convert videos to Pinnacle Studio

Click the convert button under the preview window, the converter will start encoding Olympus E-M1 Mark II for importing to Pinnacle Studio. Soon after the conversion is finished, just click "Open" button to get the generated files for edit in Pinnacle Studio 14/15/16/17 perfectly.

Read more:

Friday, February 3, 2017

Can't Insert SD AVI, 1080P AVI to PowerPoint 2016, 2013, 2010, 2007? - Solved!

Audio Video Interleave (AVI) is a file format for storing synchronized video and audio data. Digital cameras commonly use AVI to record video. PowerPoint is a popular presentation software included in the Microsoft Office package. Converting an AVI clip into a PowerPoint file allows you to play the movie during the presentation. Use the PowerPoint program toolbar to insert the AVI file and then save it in the presentation format.

Any AVI to PowerPoint 2016 video converter?

To accomplish the task, you need to seek help from a AVI Video converter that supports the VOB video input and WMV, MPEG-1 output. Here Pavtube Video Converter is highly recommended to help you achieve your task.

The program can help you change almost any popular file format including AVI, VOB, MKV, MOV, MP4, WebM, etc. to PowerPoint compatible video format with fast encoding speed and excellent output quality. After the conversion, you can easily use your movie files in any version of PowerPoint Presentation including PowerPoint 2016, 2013, 2010, 2007, 2003, 2000, 2002, 2005 or even PowerPoint 95, 97. If you're using a Mac, please turn to Pavtube Video Converter for Mac Just get the right version and follow the guide below to convert AVI to PowerPoint supported video formats. Now just get the right version and follow the guide below to convert AVI to PowerPoint supported video formats.

Hot search: MKV video into PowerPointMP4 to PowerPointMP4 to PowerPoint 2016, MPG to PowerPoint

More features of Pavtube Video Converter
Powerful Video Converter: Converts almost every video format to or from H.265 video filess rapidly in high quality.
Wide Selection of Formats Supported: Converts any video files to MKV, AVI, MP4, MOV, 3GP, WMV, and a lot more.
Fast-Speed Video Converter: Converts videos faster than any other video convert software programs.
Lossless Conversion: Convers any video files without the risk of losing its original quality.
Compatible with Windows 10, Windows 8.1, Windows 8, Windows 7, Windows XP.

Free download the AVI to PowerPoint 2016 video converter for Windows

Free download the AVI to PowerPoint 2016 video converter for Mac (Mac version)

Step-by-step-guide to Convert AVI to PowerPoint supported video formats for Playing

Step 1. launch the AVI to PPT converter. Click the Add Files button on the main interface to import AVI files to the app. The AVI Video converter supports batch conversion, so you can add a pile of videos to enjoy the fast conversion speed.

load-files

Step 2. Click on “Format” bar, and Choose PowerPoint compatible format WMV or MPEG-1 from “PowerPoint”.

Tips: For some advances users, you can go to adjust video and audio parameters like bitrate, resolution, channels, etc. Click "Settings" button you can go to check and change them as you like.

Step 3. Press on “Convert” to start encoding AVI Videos to Microsoft PowerPoint Presentation compatible video. When conversion completes, press on “Open” to locate converted videos.

Before starting adding video to PowerPoint, you need to create a folder and put both your converted video and your PowerPoint presentation in this folder. Then open the PowerPoint in this folder to insert the converted video file which is just located in this folder.

Read More:

Source: http://mediaconverting.blogspot.com/2017/02/insert-avi-video-to-powerpoint.html