Showing posts with label iMovie. Show all posts

Tuesday, September 22, 2015

Edit Moto X Pure Edition 4K Video Files in iMovie

Motorola's flagship Moto X Pure Edition (2015) is available since September, 3. The new Moto X features a large 5.7-inch Quad HD display, 21-megapixel camera, and it is powered by a 6-core Snapdragon 808 processor and 3 GB of RAM which runs Android 5.1.1 Lollipop. Total storage will come in three variants: 16 GB, 32 GB, and 64 GB. What surprises me most is its ability of capturing 4K videos, now users can not only record videos in 1080p HD video (60 fps), they can save 4K video (30fps) on the new Moto X Pure Edition in much high video quality.
Since Moto X Pure Edition can record 4K videos, if you've got some 4K footages, you may be curious how to edit those impressed 4K videos in iMovie without hassles. Currently, most 4K movies are recorded in MXF/RAW/XAVC/XAVC-S format and they're not supported by iMovie very well. If you import Moto X Pure Edition 4K video to iMovie, you may encounter the following situation: have to wait for rendering, raw footage can't be recognized by iMovie and etc.

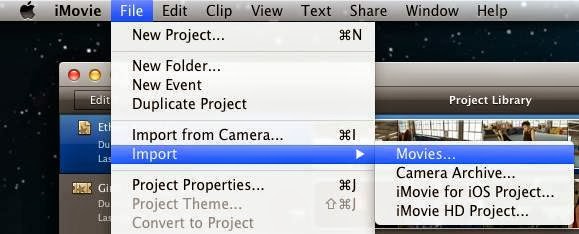
How to import Moto X Pure Edition 4K videos in iMovie?

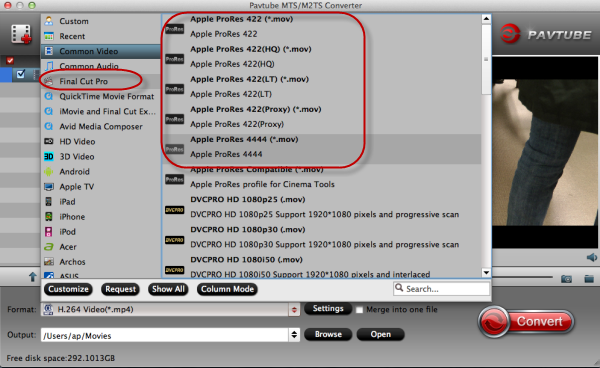
To get Moto X Pure Edition 4K videos imported in iMovie, we need Pavtube HD Video Converter for Mac. It is a profession 4K video converter to provideo users the most reliable and professional 4K solutions to all format issues including 4K XAVC/XAVC S4K MTS4K MP44K MOV4K MXF and more. Pavtube 4K Video Converter for Mac not only can help you convert Moto X Pure Edition 4K videos into AIC MOV for iMovie, but also can transcode the 4K videos into other NLEs professional codecs, like Apple ProRes to FCP, DNxHD for Avid, MPEG-2 for Premiere .etc. Moreover, it can help you freely enjoy your 4K videos/movies, 4K YouTube clips, 4K camcorder recordings wherever you like, such as watching 4K videos (in any format) on 4K TV and even on mobile devices. Besides, this Mac 4K converter is also available to customize the output resolutions to any size like 1080p, 2K, 4K as users want.

Download and install the 4K Video to iMovie Converter on your Mac or iMac:


Other Download:

Guide: Import and edit Moto X Pure Edition 4K videos in iMovie on Mac OS X

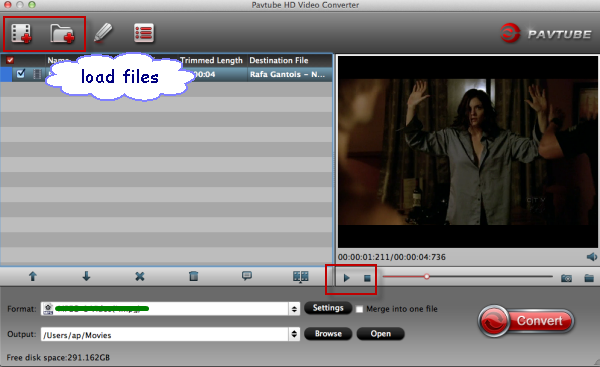
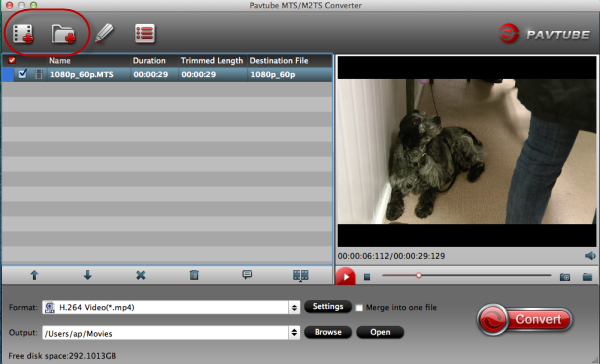
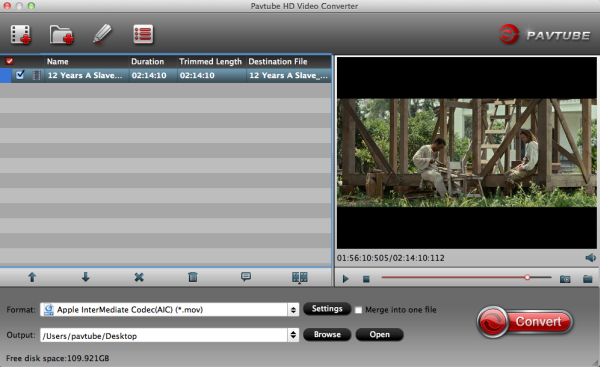
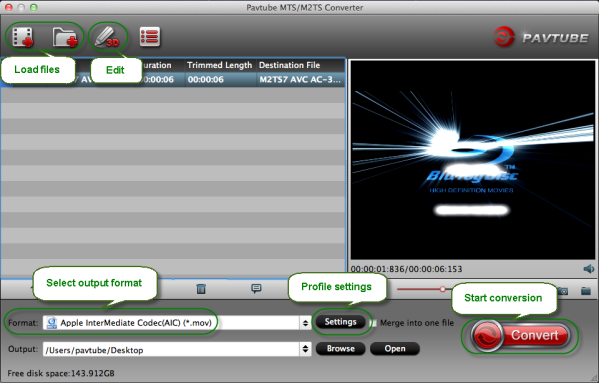
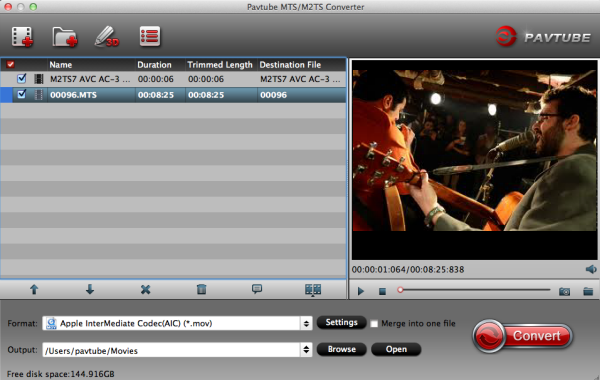
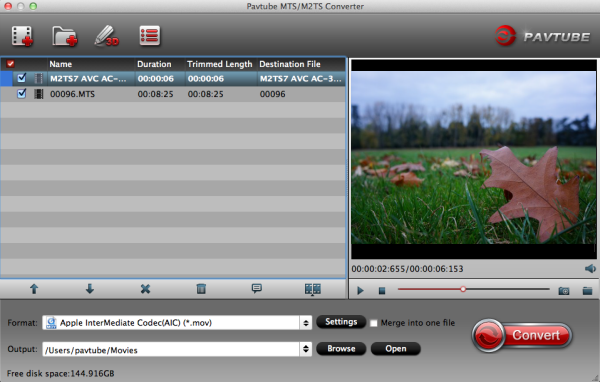
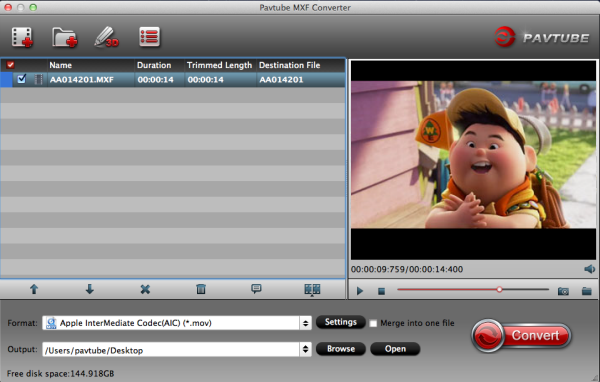
Step 1. Launch the best 4K Video to iMovie Converter on Mac. Click "Add Video" button to load source 4K video files, or directly drag & drop the files onto the main interface. You can load several files at once thanks to "Add from folder" button, note that batch conversion is supported.


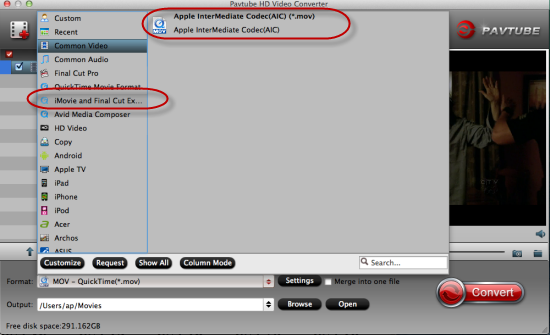
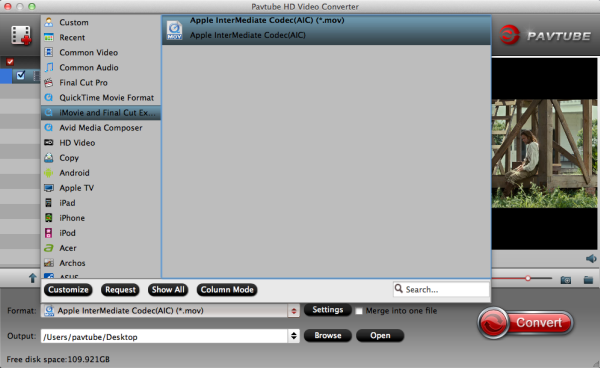
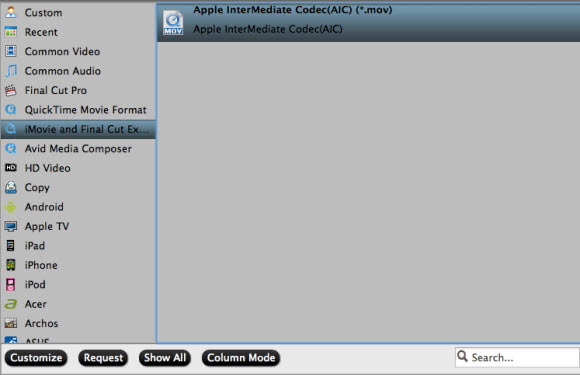
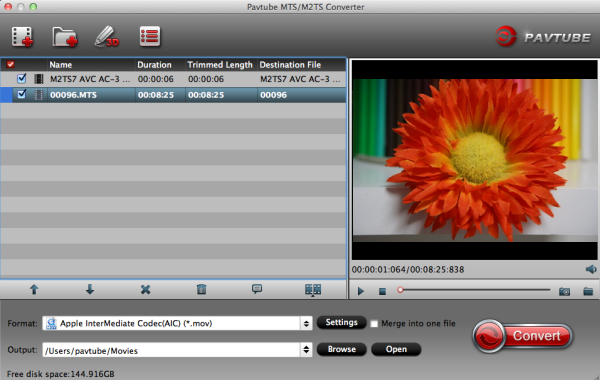
Step 2. Select the right formats for editing in iMovie. Click "Format" preset and choose "iMovie and Final Cut Express -> Apple InterMediate Codec (AIC) (*.mov)" as best video format for editing Moto X Pure Edition 4K video in iMovie as well as good video quality.


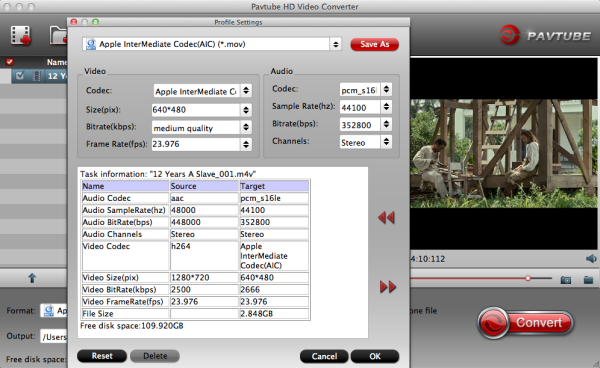
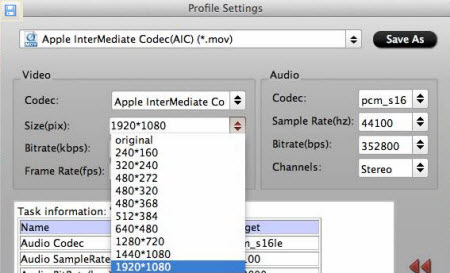
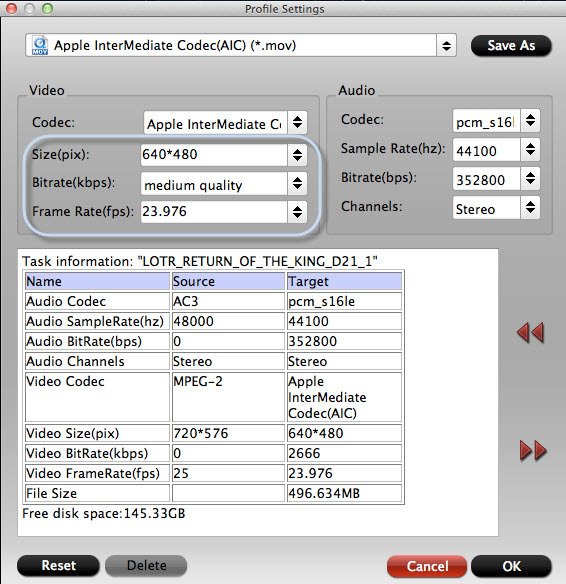
Tips: Adjust video and audio parameters, including the bit rate of video and audio, the codec of video and audio, video size, sample rate, frame rate, audio channels, etc., in the Profile Settings by hitting "Settings" button.

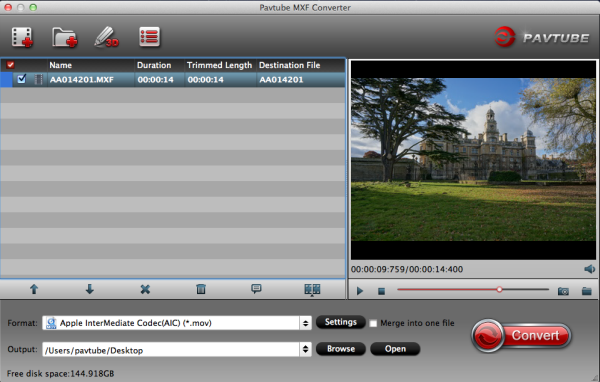
Step 3. Click "Convert" button to start Moto X Pure Edition 4K videos to AIC MOV conversion for iMovie on Mac. By using future-proof technology, the conversion will be finished with ultrafast speed and the best video quality kept. After the conversion, you can get the generated files by clicking "Open" button, then edit the Moto X Pure Edition 4K videos in iMovie smoothly. 

Note: If you don't want to wait for the entire conversion process, you can tick off "Showdown computer when conversion completed" and go away to do other things.

Further Reading:

Friday, July 18, 2014

MKV to iMovie Workflow - Convert MKV to an iMovie acceptable AIC .mov file

This article will explain why we often failed to import MKV to iMovie, and I will introduce a step by step guide on how to successfully import MKV files to iMovie.

Why We often Encounter Problem in Importing MKV to iMovie?

MKV (Matroska Video), an open and free container format able to keep diverse video, audio, and subtitle components in just one file, can let you enjoy high definition videos at home easily. Yet, if you download a swathe of videos with the file extension MKV and intend to convert MKV to iMovie for editing on Mac, then the problem pops up.
Solution:

So if your source MKV files can't be accepted by iMovie on Mac , you need to convert MKV to  iMovie compatible code AIC. I know a program that named HD Video Converter for Mac, is just the ideal MKV to  AIC  conversion software. It can easily transcode MKV video to AIC .mov for adding MKV to iMovie for editing. Below is a step by step guide to show you how to convert MKV videos to iMovie.

Preparation: 
Download and install the Mac MKV to AIC converter on your Mac computer, it works on Mac OS 10.5 or above.
Step 1. Run the program and load your MKV video files into it.


Step 2. Choose "iMovie and Final Cut Express>Apple InterMediate Codec(AIC) (*mov)" as output format for editing in iMovie.


Step 3. Start transcoding MKV to AIC .mov by clicking on "Convert" button.

Of course, the process will take some time, please wait patiently. When it's finished, you can easily import the converted media file into iMovie for editing.

Ok then launch iMovie, click "File > Import" to load these MOV videos:

Except help you handling MKV video files, this MKV to iMovie Converter can deal with Blu-ray, DVD and other video files like AVI. Meanwhile, it's able to convert them for your tablets or smartphones with optimized presets. Overall, it's really a good helper that worth having.


More guides:


Wednesday, February 12, 2014

Sony Alpha 7R and iMovie/FCE Workflow- Transcode a7R MTS files to AIC for editing

This article teaches you how to easily convert and import Sony Alpha 7R MTS footage into iMovie or Final Cut Express for further editing on Mac (OS X 10.9 Mavericks included).

Sony is well known for innovating in the camera sphere, basically because it can. The A7R Full-Frame Camera is the world's lightest interchangeable lens full-frame camera. The R in the A7R's name stands for resolution, so the emphasis here is on getting the highest possible picture quality, and it facilitates a host of features including full HD video recording and a quick auto-focus algorithm.

'Our Sony a7R arrived five days ago and we, my wife and I, have had a chance to put the camera through its paces. It is excellent for capturing memories on vacations, birthdays, sports activities. And  it can capture Full 1920 x 1080 HD uncompressed clean-screen video files.' 

However, one problem makes me headache, I cannot get the video files in .MTS (AVCHD) format from my Alpha 7R into iMovie or FCE. What's the problem? How to realize this goal for native editing Sony 1080 60p/60i mts in iMovie or FCE?

Since Apple hasn't added full supported to the 1080/60 mts recordings within iMovie/FCE, and you have to change Sony Alpha 7R MTS videos to iMovie/FCE acceptable AIC .mov format. This is the best solution to import and edit Sony Alpha 7R AVCHD mts footage in iMovie/FCE.

For this case, a professional Sony MTS to AIC application - Pavtube MTS/M2TS Converter for Mac comes to help you which is your first choice to transcode Sony Alpha 7R AVCHD footages to AIC MOV for iMovie. Here is a step-by-step tutorial for your to figure out your Sony Alpha 7R MTS/M2TS iMovie/FCE problem:

Preparations

1. Copy your MTS videos from Sony Alpha 7R to computer hard drive.

2. Free Download Pavtube Sony MTS to iMovie/FCE Converter on Mac, install and launch it.

Brief Steps

Step 1. Drag and Drop source MTS videos to Pavtube Sony MTS to AIC Converter. Or click "Add Video" to import the mts footage from Alpha 7R


Step 2. Set up output format for Sony Alpha 7R AVCHD to iMovie/FCE Conversion.

From "Format" list, choose "iMovie and Final Cut Express > Apple InterMediate Codec (*.mov)" for output.


Step 3. Press the big "Convert" button to start transcoding Sony Alpha 7R AVCHD MTS to AIC MOV for using in iMovie/FCE. The program adopted advanced audio and video sync technology; never let you troubled by the audio and video issues.

Once finished, click "Open" to get converted MOV videos.

Then you could open up iMovie/FCE, and go to "File > Import > Movies…" to import converted video files to iMovie/FCE for further editing.

More Tips:

1. If you want to merge multiple MTS files into one for easy editing, please tick the box "Merge into one file" to merge all the imported clips.

2. In case the MTS footage is taken under interlacing mode, just click "Edit" to go to Video Editor, and hit Effect to select the Deinterlacing and interlacing lines will be eliminated. (Checked by default)

3. This Sony AVCHD Converter for iMovie/FCE optimized its conversion speed with multi-thread technology, so that you can convert the MTS 1.5 or 2 times faster than other similar programs. Its built-in codec will not install any codec on your computer, so as to avoid the unexpected codec problem.

Read More:

Thursday, February 6, 2014

Transcoding Sony FDR-AX100 4K XAVC-S footage to AIC mov for iMovie or FCE

iMovie or FCE won't import XAVC S files from Sony FDR-AX100 smoothly. The easy workaround is to transcode Sony 4K XAVC S video to a more friendly AIC codec for editing. Here is how.

There are only a few consumer-level options for shooting 4K video, but Sony clearly has a plan for stepping forward and bring the goods in this department. The new AX100 camcorder not only shoots 4K, but as a host of other awesome-sounding specs to attract video shooters. The footage from AX100 will be encoded using the XAVC-S codec and record to Class 10 SDXC cards.


While, there are a few issues when it comes to ingesting, loading and editing 4K XAVC-S files recorded by Sony FDR-AX100 in your non-linear editing software, like iMovie and Final Cut Express.  Keep reading and below is a quick and easy solution for solving the problem. 

To import Sony AX100 XAVC-S files to iMovie or FCE, the best way is to convert 4K XAVC-S to iMovie/FCE compatible AIC codec. To finish this job, a professional XAVC-S to AIC Converter for iMovie/FCE is necessary, and here, Pavtube XAVC-S Video Converter for Mac is highly recommended here.  Now I share the guide with you how to convert Sony FDR-AX100 XAVC S footage to iMovie/FCE friendly format using

How to convert Sony FDR-AX100 XAVCS media to AIC for iMovie/FCE

Step 1. Install and launch the Pavtube iMedia Converter for Mac, click "Add Video" to load XAVC-S videos.


Step 2. Click "Format" preset and choose "iMovie and Final Cut Express-> Apple InterMediate Codec (AIC) (*.mov)" as best video format for editing Sony AX100 XAVC in iMovie and FCE as well as good video quality.


Step 3. Now click "Convert" and let it go. The XAVC to AIC Converter for Mac supports batch conversion, so if you have lots of xavc videos to convert, check 'Shut down computer after conversion', and you can go away without keeping an eye on it.

Tips: When the conversion is finished, you can import the converted XAVC-S file to iMovie/FCE for editing.

Now you are free to import/edit Sony FDR-AX100 XAVC-S videos in iMovie and FCE under Mac without problems.

Read More:

Wednesday, December 18, 2013

Import Panasonic HX-WA03 MP4 recordings to iMovie for free editing

Summary: This guide will show you how to ingest mp4 movies from Panasonic HX-WA03 and edit them in iMovie quickly and easily on Mac OS X 10.9 Mavericks.

Panasonic HX-WA03 Video Camera

First off...it's blue and white, very gorgeous! This compact little vid cam is also water proof, shock proof, freeze proof and records in HD! I'm a video producer, always looking to travel lightweight. I bought this camera specifically to shoot video at the LA Auto Show. The camera shoots beautiful 1080 HD video in low light and the audio is great.


Panasonic WA03 MP4 video not work with iMovie?

The video camera we are using is Panasonic HX-WA03, it gives us videos in .mp4 extension while iMovie 11 seems to not working with it. We are wondering if anything simple workflow to help with this?

Reason:

Since MP4 is created by Microsoft and it isn't compatible with most Mac software program, and iMovie is one particular. When importing a MP4 file from Panasonic HX-WA03 to iMovie, it'll goes gray, that signifies iMovie does not assistance WA03 MP4 files. Thus, we will have to do anything just before editing Panasonic HX-WA03 files with iMovie. To get iMovie willing to import MP4 files from Panasonic HX-WA03 cameras, the ideal resolution should be to convert WA03 mp4 video to iMovie compatible formats, right here, AIC .mov, the natively supported format by iMovie.

Solution:

To perform this job, a third-party software is needed. Here Pavtube HD Video Converter for Mac is highly recommended. It's a professional and powerful high-quality Mac video converter and editor. With it, you can effortlessly transcode Panasonic HX-WA03 MP4 files to AIC encoded MOV for iMovie. Meanwhile, the Mac Video Conversion tool can create files compatible with various non-linear editing systems like Avid, FCE, FCP X, and Adobe Premiere (Pro) etc. Just download it and follow the tutorials below to transfer and import Panasonic HX-WA03 footage to for smoothly editing in iMovie.

Guide: Transcoding Panasonic HX-WA03 MP4 to AIC codec for iMovie

Step 1. Download, install and run the Mac MP4 to AIC Converter, click "Add" or "Add From Folder" to load your WA03 footage.

import-files-into-hd-video-converter


Step 2. Click the format bar, and move mouse cursor to "iMovie and Final Cut Express > Apple InterMediate Codec(*.mov) as output format.

Some more helpful features of the app:

1. Settings- click to set video resolution(1920×1080/1440×1080/1280×720/720×480), bitrate(from 1Mbps to 20Mbps), frame rate (24p/30p)

2. Editor (next to "Add" icon)- click to set deinterlace, denoise, mute, volume up, trim, crop, etc.

Step 3. Click "Convert" button to start WA03 MP4 to AIC MOV conversion.

As soon as the encoding process finished, you can get the final output aic .mov files via clicking "Open" button effortlessly. The transcoded files now are ready for editing in iMovie.

Additional Tips:
1. If you want to edit Panasonic HX-WA03 MP4 video in Final Cut Pro X or FCP 7/6, you just need to choose the "Final Cut Pro > Apple ProRes 422 (*.mov)" as output format in the second step; For Avid Media Composer, choose "Avid Media Composer > Avid DNxHD(*.mov)" as output; For Adobe Premiere Pro or Vegas Pro, choose Adobe Premiere/Sony Vegas> MPEG-2(*.mpg) as output.

2. Need to convert more various formats besides MP4, or convert DVD and blu-ray movies for backup or further playback? Pavtube iMedia Converter for Mac can help you to accomplish both of them. It is integrated software for converting different videos, DVDs and blu-ray discs. Good news to you that you can get 20% discount at Pavtube Christmas Giveaway. Go to get it now.

Read More:

Thursday, December 12, 2013

MXF to AIC -Convert MXF to AIC MOV for iMovie editing without no audio problem

Summary: As iMovie won't import MXF clips, the easy workaround is to convert MXF to AIC codec for iMovie editing smoothly and solve the no audio. Below is how.

I purcased a camcorder which shoot MXF footage, but I find my iMovie can't handle the video with ease. I know I need do converting, but I have no audio problem when transcoding. Strangely enough...the demo version (with watermark) with audio and video also plays with audio through Hamburg MXF Mac Player. I am at wits end here as to how to convert the files with audio.

Anyway, don't be anxious. As we know, MXF is a self-container format which is unacceptable by various non-linear editing systems (NLE), like iMovie. In order to import the MXF clips to iMovie, the easy workaround is to transcode MXF files to iMovie native formats (AIC encoded .mov is highly recommended). Along with some help from a top MXF Converter for Mac, it can be done quickly and easily. To help those who wanna edit MXF files in iMovie without problems, here I share with you a simple guide on how to convert MXF files to AIC.mov for iMovie editing flawlessly and learn how to solve no audio issues.

If you MXF recordings are from Panasonic P2 camcorder, while importing MXF clips to Pavtube MXF to ProRes converter for conversion, please make sure you have the entire MXF file structure as it saved on your camcorder’s P2 card. If you only have some loose .MXF clips, your files will have image only without audio. See MXF file structure on Panasonic’s P2 card as below.


The above screenshot clearly shows .MXF clips are all saved in ‘VIDEO’ folder, while audio files are all stored in ‘AUDIO’ folder. When you importing .MXF clips from the correct file structure, Pavtube MXF to iMovie Converter is able to recognize audio tracks from ‘AUDIO’ folder automatically, which ensures the generated AIC MOV files have both image and sound correctly.

Guide: Convert MXF files to iMovie for editing on Mac without no audio issues

Step 1: Add MXF video files.

Download and run Pavtube MXF Converter for Mac. Click the button "Add video" or "Add from folder" to add MXF recordings, or directly drag and drop your MXF files.


mxf-to-imovie-converter


Step 2: Select an output format for iMovie X and set the output folder.

Click on the "Format" and get the dropdown menu, then move you pointer to iMovie -> Apple InterMediate Codec(AIC) (*.mov), it’s the best format for editing in iMovie.

best-video-codec-for-imovie

Step 3: Click "Settings" icon to adjust audio and video parameters.

Click the "Settings" icon and you will go into a new interface named "Profile Settings". You can adjust codec, bit rate, frame rate, sample rate and audio channel in the interface according to your needs and optimize the output file quality.

Tips: If your default audio track is in mute when recording, you may get only video without audio. So you can switch to the audio stream ID option to choose the right audio track

Step 4: Start Converting.

Click the "Convert" button; it will convert MXF files to AIC for iMovie on Mac immediately.

After the MXF to AIC conversion, you will be able to get the output files for iMovie via clicking on "Open" button effortlessly. Afterwards, you can import the converted videos to iMovie freely for further editing without any trouble.

Futhermore, if your MXF files have 2 audio tracks or more, here is a new program named iMixMXF with multi-track preserving and mixing features. You can download the trial version for evaluation!

Related guides:

Tuesday, November 19, 2013

How to import video from Canon 70D to iMovie/FCE

The article shows you the best workaround for editing Canon 70D videos in iMovie by transcoding Canon H.264 .mov to iMovie/FCE native editing format - Apple Intermediate Codec.

The Canon 70D is Canon's least-expensive full-performance DSLR. I can't think of anything significant missing on the 70D for a normal person not made of money. The 70D is a fantastic camera at any price. If you think you want one, just get it. The 70D shoots fast and it's always right on-target. Everything about the 70D just goes!

If you have got the Canon 70D and often use it to record full HD video in H.264 MOV format, you may have the need to import Canon H.264 .mov files to iMovie/FCE on Mac, but iMovie best native supported video format is Apple Intermediate Codec MOV format, so iMovie/FCE doesn’t support Canon 70D mov footages well, you may encountered many problems, like import it slowly, and couldn’t edit videos smoothly.


To load Canon 70D H.264 MOV to iMovie or FCE, you need to convert them into iMovie/FCE preferred video format firstly. Besides, it's a pity if you don't keep the original file structure, but it's not unfixable – come and meet this Canon MOV Converter for Mac.

This H.264 MOV to AIC Converter is not only able to convert organized videos files, but also able to deal with various videos and audios in batch. No need to install third party plug-in, no need to fix the settings manually; just import, choose iMovie/FCE preset, and click Convert. It's just as simple as that. The software does a good job in editing H.264 .mov files directly in iMovie/FCE and also easily convert Canon MOV video to FCP, Avid Media Composer and Premiere Pro etc. You can also remux, Trim, cut, split, mix videos, overlays the 1080p H.264 mov footages. Now mac Mavericks 10.9 is supported, feel free to have a try!

Now get Pavutube HD Video Convertr for Mac installed; you can order a license directly or download a trial version here. Ok let's move on!

How to Convert Canon 70D H.264 MOV to iMovie/FCE with AIC MOV

Step 1. Connect your Canon 70D camera to Mac with USB cable or use card reader to transfer the MOV files to Apple hard drive disk.

Step 2. Add Canon 70D 1080p H.264 MOV videos to Mac Canon Video Converter.

Run this HD Video Converter for Mac, and click the "Add Files" button to load individuals mov videos; or you can click "Add from folder"to load the entire folder.


Step 3. Choose editing program compatible format.

Click the "Format "option, to get high video quality with least quality loss, you can choose iMovie and Final Cut Express>Apple InterMediate Codec(*.mov).


Click Settings, you can fix the size to 1920*1080 to get better video quality; also you can fix the bitrate, frame rate as what you need.


Step 4. Now click the big red "Convert" and wait for a while to get the fresh hot converted video.

Click Browse to locate them directly. Ok now the transcoded files now are ready for editing Canon 70D MOV in iMovie or FCE.

Read More:

Sunday, November 10, 2013

Make Sony NEX-VG10/VG20/VG30 MTS files editable in iMovie

Description: If you want to edit AVCHD .mts files shot by Sony NEX-VG10/VG20/VG30 smoothly in iMovie, here is right for you. Go to following article to get the instruction.

Sony NEX-VG10/VG20/VG30, which offer excellent image and video quality with interchangeable-lens systems, capture footages in both AVCHD format high definition video and MPEG-2 format standard definition video. Most users prefer to choose AVCHD format in order to get high quality videos. However, many users will face the similar issue about editing in iMovie on Mac OS X as below:

"I'm strictly an amateur hobbyist hoping to make some good videos for a hugely popular blog. I wanted to covert the AVCHD 60p clips from my recently purchased Sony NEX-VG10 to a mac friendly format for editing in imovie."


That is probably because the AVCHD .mts files cannot be recognized by iMovie. In this case, we can count on third-party software to transcode them to a compatible format for iMovie. Here comes Pavtube MTS/M2TS Converter for Mac, a professional MTS to iMovie Converter tool for converting MTS/M2TS/M2T/TS files to a variety of video formats. It will help to transcode Sony NEX-VG10/VG20/VG30 AVCHD .mts files to iMovie friendly AIC codec MOV format, which is intermediate format that features high performance and quality, being less processor-intensive to work with on Mac OS X. With it you are able to edit AVCHD .mts files in iMovie smoothly and then share a better video with friends or post the edited videos to blog. Now follow me to learn how to convert AVCHD .mts files to iMovie on Mac OS X Mavericks.


You are free to download the MTS to iMovie Converter and install on your Mac. Then go to the guide here:

1. Load AVCHD .mts files to the MTS to iMovie Converter.


Tips: You can joint multiple AVCHD files on to one output file by checking Merge into one file on the interface.

2. Select AIC MOV format for iMovie.

Many output format here and you are recommended to select "AIC .mov" files under "iMovie and Final Cut Express" because it best compatible format for iMovie.


3. Adjust output settings and edit the video. (Optional)

Settings: You are allowed to change the parameters of video and audio, such as Size, Bitrate, Frame Rate, etc.


Edit: Here you are able to edit the video before conversion. You can cut off the unnecessary part of the video in Trim, crop the video, add watermark or 3D effect, attach subtitle and so on.


4. Convert AVCHD MTS to iMovie.

Click "Convert" button to start conversion and then click "Open" button to locate the generated files for iMovie.

If you want to convert more videos in different formats, you could try HD Video Converter for Mac, which is capable of converting both various HD videos and latest DVD/Blu-ray. You are also allowed to 1:1 backup the whole discs for further playback or editing. 20% discount will be provided if you get it during the time of Thanksgiving Promotion 2013.

Good news! In this promotion page, if you get MTS/M2TS Converter for Mac, you can get FLV/F4V Converter for Macfree which can help you to edit and play flash video (flv, f4v) on Mac with ease. Take a look now and grasp this opportunity! Never miss!

More related:

Friday, October 4, 2013

AVI to iMovie: Easily and Successflly import AVI files to iMovie on Mac

This article will explain why we often failed to import AVI to iMovie, and I will introduce a step by step guide on how to successfully import all kinds of AVI files to iMovie on Mac.


Question: I shot video footage and then captured using Scenalyser to an avi file. A friend would like to import the footage into iMovie (he also has Final Cut Express but doesn't use it much). iMovie will not import my avi files. Is there a way to do this?

Best answer:

In fact, the iMovie can only support MP4, M4V, MOV files and some types of AVI files. You may know that AVI file can be associated with three coedcs like AVI, XviD and DivX. Supposed that your handy .avi can't be recognized by iMovie, it's because of the AVI codec used to .avi file isn't compatible with iMovie.

As a result, importing an AVI file to iMovie directly always end up stuck in the copying process. Even an AVI video is successfully imported to iMovie, it is either without sound or video, or with jarring images.

So, how to import AVI to iMovie and achieve the perfect result?

In order to edit AVI videos in iMovie, you can try converting AVI to iMovie acceptable file format like AIC .mov on Mac, then you can get the generated file to be imported into iMovie for further editing in iMovie.

Pavtube AVI to iMovie Converter can give you easy but effective solution for importing AVI footages into iMovie for editing on Mac. With the assistance of the HD Video Converter for Mac, you can effortlessly transcode AVI to AIC for iMovie editing. As it has presets for iMovie, so the output video quality can be optimized. More than that, it can do other video like Prores, DNxHD, MPEG-2, etc to a specific programs like FCP, Avid MC, Adobe etc. Also, you can extract audio from the source video with it.

The easy guide on how to convert AVI for importing to imovie for editing on Mac 

Preparation:

1. Install and launch Pavtube HD Video Converter for Mac. You can directly drag and drop .avi video files to this software. 


2. Click Format bar to choose the output format. Click and choose iMovie and Final Cut Express>Apple Intermediate Codec(AIC) (*.mov). 


3. (Optional) You can click "Settings" to customize the output parameters, adjust the resolution, bitrate as you want. 


4.Start convert AVI to AIC for iMovie editing on Mac OS X. 

Click the "Convert" button to start transcoding AVI to AIC .MOV videos to be compatible with iMovie. 

After the AVI to AIC conversion finished, you can easily import video files and projects into iMovie for further editing without any trouble. Congratulations! You have successfully taken the first step to make your own masterpiece. 

With this AVI to AIC Converter, you can easily change AVI files to iMovie for editing. This software runs fast, so you can convert your AVI video to iMovie in less time. video and audio synchronization are perfectly guaranteed. 

Read More:

Tuesday, October 1, 2013

Best solution for importing Sony DSC-RX100 mts video in iMovie


Summary: Have got a Sony Cybershot DSC-RX100 and have issues with importing movies from RX100 into iMovie. Is there any solution? Just convert MTS video to AIC .mov for iMovie for editing on Mac.


If you are planning to buy a mid-range HD camera, RX100 could be a smart choice. It is an enthusiast compact camera features with 1080 60p or 1080i video capture in AVCHD format. However, AVCHD is not friendly with iMovie, many users encounter the problem when transferring RX100 AVCHD MTS files to iMovie.

Q1: 
iMovie cannot import movies from the RX100. Anyone has a work around?

Q2: I'm using iMovie, and I'm trying to import the video from my camcorder (Sony RX100). But when I clicked the camera button, iMovie crashes. Why I can not import the clips to iMovie directly? Am I missing something? Pls help me!

Q3: I have a Macbook with Mac OS X installed. I have installed iLife 09. I have just bought a sony rx100. I can download the photos but I am unable to open mts in iMovie. They are in MTS format (AVCHD). Is there any software which I can import mts files to imovie? 

What's the problem? And then how to realize this goal for native editing RX100 1080/60p mts in iMovie? Since Apple hasn't added full supported to the 1080/60p mts recordings within iMovie, and you have to change MTS videos to iMovie acceptable AIC .mov format. This is the best Sony RX100 1080/60p AVCHD to iMovie Solution.

Hot Search: Canon MTS to iMovie | VOB to iMovie | H.264 to iMovie

For this case, a professional Sony MTS to iMovie application - Pavtube MTS/M2TS Converter for Mac comes to help you which is your first choice to transcode Sony RX100 1080/60p AVCHD footages to AIC MOV for iMovie. Here is a step-by-step tutorial for your to figure out your Sony RX100 MTS/M2TS iMovie problem:

Notes: Free MTS/M2TS Converter for Mac you can also have a try!

Preparations

1. Copy your MTS videos from Sony RX100 to Apple hard drive.

2. Free Download the best MTS to iMovie Converter on Mac, install and launch it.

Brief Steps

Step 1. Drag and Drop source MTS videos to Sony MTS to iMovie Converter. Or click "Add Video" to import the mts footage from RX100.


Step 2. Set up output format for AVCHD to iMovie Conversion.

From "Format" list, choose "iMovie and Final Cut Express > Apple InterMediate Codec (*.mov)" for editing in iMovie smoothly.


Step 3. Press the big "Convert" button to start transcoding Sony RX100 AVCHD MTS to AIC MOV for using in iMovie. The program adopted advanced audio and video sync technology; never let you troubled by the audio and video issues.

Once finished, click "Open" to get converted MOV videos. Then you could open up iMovie, and go to "File > Import > Movies…" to import converted video files to iMovie.


More Tips:
1. If you want to merge multiple MTS files into one for easy editing, please tick the box "Merge into one file" to merge all the imported clips.

2. In case the MTS footage is taken under interlacing mode, just click "Edit" to go to Video Editor, and hit Effect to select the Deinterlacing and interlacing lines will be eliminated. (Checked by default)

Read More:

Sunday, September 22, 2013

Does iMovie 9 recognise 1080p MTS video from Panasonic HC-X920?


Summary: How to get iMovie 9 to work with 1080p mts footage from Panasonic HC-X920 perfectly? The is easy workaround to convert Panasonic MTS to AIC Codec for natively using AVCHD file in iMovie.


The 2013 collection is no different, and what better place to start than the new Panasonic consumer flagship, the HC-X920.  With the WiFi-enabled X920, you can enjoy professional grade HD video you can share from anywhere. X920 records video with [AVCHD] AVCHD 3D / Progressive / [iFrame] MP4 format. If you use Panasonic HC-X920 for the 1080p 60fps mts recording and want to edit the 1080p mts files in iMovie 09. You will got problems as below: 

I also purchased X920 for the better clock rate and the newer AVCHD codec. My editing software iMovie 09 doesn't yet support the top recording standard 1080/60p. It is a easy to use camcorder, you won't go wrong with this model. So is it possible make it into reality to edit them in iMovie 09?

X920 is what I expected, have taken it to the beach, snow and have not had any issues, my children love the menu, easy for anybody to operated, no need of the viewfinder, best investment for your money. What's more, HC-X920 also supports the optional 3D lens, will recommend it to friends and family. Any suggestions for the X920 3D mts and iMovie 09 workflow?

I have a MacBook Pro Vs.10.6.8, which came with iMovie '09. I just bought a new X920 HD Camcorder 1080 it puts files in .MTS format. My iMovie does not support the files. It can't even pick them up. Do I need to upgrade to IMovie '11 to be able to edit my HD camcorder files (.MTS)? If so, that's a problem, becuase I got an error that said I can't upgrade because my Mac is too old (which it's only two years old). Or, should I just get another camera? 
iMovie 09 won't import the 1080p AVCHD (2D/3D) Videos. So, how to deal with Panasonic HC-X920 1080p AVCHD in iMovie 9? Well, as we know, iMovie native format is AIC .mov, so the best method to import 2D/3D AVCHD from Panasonic HC-920 to iMovie 9 smoothly is to convert the Panasonic AVCHD to AIC for editing along with some help from a 3rd-party Mac Pansonic AVCHD Converter. 

Fortunately, Pavtube MTS to iMovie Converter for Mac can exactly do favor for you. With it, you can convert Panasonic HC-X920 AVCHD to iMovie compatible AIC codec MOV format. There will be no problem to import AVCHD footage into iMovie 9 keeping audio and video synchronization on Mac.

With the Mac program, you can transcode AVCHD MTS/M2TS/M2T/TS files at 1080i, 1080p, and 720p to proper format for:

  • Editing on FCP, iMovie, FCE, Avid, Premiere, iPhoto and more;
  • Playing on portable devices(iPad, iPhone, iPod, Nexus 4, Nexus 7, Galaxy S4, S3, Tab 3, Tab 2, HTC One and so on);
  • Burning on Mac OS X
     
  • Uploading to YouTube, Vimeo, Facebook and more uses. 

What's more, the MTS/M2TS Converter for Mac supports adding .srt, .ass, .ssa subtitle to your videos or movies.  Aslo, it has added 3D profiles in Format menu. (Side-by-Side, Top-Bottom, or Anaglyph 3D in MKV/MP4/MOV/WMV/AVI)

In summary, it works very well in converting Panasonic HC-X920 1080p MTS files to AIC for editing in iMovie 9. You can download a free trail version: Pavtube MTS/M2TS Converter for Mac and follow the guide below:

Step 1. Add .mts files to the Mac MTS to iMovie Converter.

Launch the Mac MTS/M2TS to iMovie Converter. Click "Add Video" or "Add from folder" button to load your source .mts or .m2ts files from Panaonic HC-X920.


Tip: If you want lossless merge multiple MTS, M2TS files, pleas check the "Merge into one file" box.

Step 2. Choose iMovie native foramt as output.

To convert X920 MTS files to iMovie native foramt, please click "Format > iMovie and Final Cut Express", choose "Apple Intermediate Codec(AIC) .mov" as the best output format.


Tip: If you wanna edit the video/audio parameters, you need to go to "Settings" window.

Step 3. Start MTS to iMovie native foramt conversion.

Click the "Convert" button under the preview window, and the best Mac MTS to iMovie Converter will start converting Panasonic HC-X920 MTS clips to iMovie friendly AIC mov format on Mac OS X.

When the conversion is done, you will be directed to open the folder where you saved the converted files, and then you can import output video files to iMovie to edit.

Tips: 
1. If you want to import Panasonic MTS footage in FCP, only need to change step 2, choose "Format > Final Cut Pro > Apple ProRes 422 (*.mov)" as output format, or you can also refer to the guide.

2. If you want to edit Panasonic HC-X920 MTS footage in Avid Media Composer, only need to change step 2, choose "Format > Avid Media Composer > Avid DNxHD (*.mov)" as output format, or you can also refer to the guide

3. If you want to share Panasonic HC-X920 60p AVCHD video on Youtube, you can refer to this guide.

Editor's Recommendations

Sunday, September 1, 2013

Convert .mts files from Sony NEX-7 to work with iMovie on Mac

Summary: Follow this article you will know how to convert and import Sony NEX-7 AVCHD MTS to iMovie compatible format with the best MTS to iMovie Converter on Mac.


In the middle ground between DSLRs and point-and-shoot lies a vast plain filled with all manner of tweener cameras, in all variants of shape, size, price, and quality. Until now, no one has nailed the whole package, but so far the smartest middle ground — smaller body and price, but without losing too much quality or manual control — has been Sony's NEX line.

The NEX-5N and NEX-C3 are excellent cameras, with big sensors in small bodies, but the NEX-7 is the flagship member of the line. The $1,349 shooter has a DSLR-sized, 24.3-megapixel APS-C sensor, a built-in electronic viewfinder, a tilting LCD, 1080p video recording, and a solid set of manual controls. It's built to run with the big dogs, and priced like it too — can it keep up? And could you actually buy the NEX-7 instead of a DSLR?

For many experienced Mac users, what they are concerned most is how does the Sony NEX-7 mts files work with Mac. As for NEX-7, you will get all kinds of options when shooting video: it can record in 1080p and 1080i at 60 frames per second, or 1080p at 24fps. You can shoot in AVCHD or MP4, though MP4 video is an odd 1440 x 1080 resolution. You can also shoot video in a variety of different manual modes, meaning you can change shutter speed, aperture, and the like both before and during video recording.


But AVCHD format is not well supported by iMovie, Final Cut and other software on Mac, you may encounter many problems when you try to import and edit them in FCE, iMovie and FCP. If you want to import and edit Sony NEX-7 MTS in iMovie, you need to convert Sony MTS to iMovie best supported video format, like Apple InterMediate Codec(AIC) MOV format, you can follow the steps below and learn how to convert Sony NEX-7 MTS videos to AIC codec for iMovie editing smoothly.

1. Free Download Pavtube MTS/M2TS Converter for Mac. This software can convert Sony AVCHD MTS video to iMovie compatible formats or other common formats.


2. Install and run this MTS to iMovie Converter. Click "Add Video" to load the .mts files from Sony NEX-7 to the Mac Converter.


3. Click format column to choose the output format for iMovie. Click and choose "iMovie and Final Cut Express -> Apple InterMediate Codec (AIC) (*.mov)", it's the best format for iMovie - to import Sony NEX-7 MTS to iMovie.


4. You can click "settings" button to adjust output parameters, such as resolution and bitrate. 

Tips: To get 1080p full hd video qualtiy, you can click to set video resolution to1920×1080.


5. Click convert button to start.

The Mac MTS to AIC Converter will convert Sony MTS footage for iMovie quickly. It can also help you to convert Sony Alpha NEX-7 mts for importing into FCP. After conversion, you can successfully work with Sony NEX-7 MTS video in iMovie as you want.

Learn More:

Thursday, August 15, 2013

Why can't I open Sony PMW-200 XDCAM MXF files in iMovie on Mac?

Summary: Follow this article below, you will learn how to use Sony XDCAM Converter to convert Sony PMW-200 XDCAM MXF video to iMovie for editing with best optimized codec. 


Hi, I filmed using Sony PMW-200 camcorder and want to edit in iMovie. Somehow iMovie could not recognize my MXF footage. How can I solve this? Any reliable workflow recommended?

Designed to meet the needs of broadcast productions, Sony PMW-200 records on to solid state media using 50 Mbit/s 4:2:2 XDCAM HD, also record using the same 35 Mbit/s 4:2:0 codec as the original EX cameras as well as standard definition DV. 

As the PMW-200 records MPEG HD422 codec MXF format, you will meet the incompatiblity problem when importing Sony PMW-200 MXF into iMovie as above. So how to get Sony PMW-200 XDCAM MXF files be editable in iMovie with the lossless quality?

It is easy--- a quicker and easier way is to convert Sony PMW-200 XDCAM MXF to iMovie compatible AIC MOV format. Thus, the third party component is vital in achieving your goal. 

The best tool for you is the Pavtube MXF Converter for Mac, the powerful Sony XDCAM MXF Converter for Mac. It can convert all the .mxf files, no matter where and how you get them, to ProRes, AIC or DNxHD with the original quality. 

Here listed the three-step guide on how to transcode Sony PMW-200 MXF files to AIC for iMovie.

Step 1: Install Pavtube XDCAM Converter for Mac. Click "add video" button to import the mxf files from Sony PMW-200, click "add from folder" button to add MXF folder, or you can also directly drag and drog mxf clips to the program.


Step 2: Click on the "Format" and get the dropdown menu, then move you pointer to "iMovie and Final Cut Express -> Apple Intermediate Codec (*.mov)" to choose it as best codec and format for iMovie editing.


Step 3: You can customize the output settings as you want, such as resolution, bitrate, frame rate and video/audio codecs.


Step 4: Start to convert Sony PMW-200 XDCAM MXF files to iMovie.

Click the "Convert" button, the MXF to AIC Converter for Mac will start to transcode Sony PMW-200 XDCAM HD422 MXF to AIC .mov for iMovie.

After the XDCAM MXF to AIC conversion, you can easily add the Sony PMW-200 MXF files to iMovie and edit them by clicking on "import" button. And now, you can get rid of the worries about the incompatibility problem of Sony PMW-200 MXF and iMovie.

Tips:
If your MXF files have 2 audio tracks or more, here is a new program specially designed for multi-track preserving and mixing features, named iMixMXF. Featured formats include: MOV/MP4/MPG/WMV/FLV/MKV and more.

Read More:

Thursday, August 8, 2013

Easy Solution to import Panasonic HVX200 MXF to iMovie 8,9,11 on Mac OS X Mavericks

Summary: If you cannot use iMovie 8, iMovie 9, iMovie 11 on Mac OS X Mavericks to edit Panasonic HVX200 MXF file, do not be upset, below article will show you the solution about how to transcode Panasonic HVX200 P2 MXF to iMovie compatible format.


Panasonic AG-HVX200 answers the demands of the professional HDTV photographer with a compact and feature packed acquisition tool. This versatile prosumer High Definition camcorder packs an array of features into a handheld design. For recording video, the HVX200 includes a Mini DV tape mechanism along with two P2 (Professional Plug-in) card slots. The P2 cards allow for true variable frame rates and recording options that Mini DV tape can't offer. These include DVCPRO HD 1080/24p and 720/60p, along with normal interlaced video.

My work with the prototype camera I used over a period of six weeks started with what I know, which is 720p/24p. The P2 card of AG-HVX200 is capable of storing large amounts of video and audio data in MXF-format files. I prefer iMovie for editing with AG-HVX200, but I failed to open the MXF files with iMovie many times. (iMovie 11, Mac Mavericks). I am looking for the easy-to-use and reasonably priced converter to make my MXF files from AG-HVX200 to be readable in iMovie. I have more than 200 MXF files, I need to batch process them. Can anyone help regarding this conversion?

As far as I know, in order to edit Panasonic AG-HVX200 MXF files in iMovie 8,9,11 flawlessly, the best best method is to convert Panasonic MXF to Apple InterMediate Codec (AIC) which is a best editing codec for iMovie 8,9,11.

At first, you need 3rd-party tool- Pavtube MXF Converter for Mac

It is a professional MXF to iMovie Converter which can not only convert Panasonic AG-HVX200 recorded MXF files to AIC for iMovie 8,9,11 editing on Mac OS X Mavericks, but also provide simple video editing functions for you. This Mac MXF Converter is especially designed for converting Panasonic P2 MXF, Sony XDCAM MXF, Canon XF MXF files for editing in Final Cut Pro, Final Cut Pro X, Final Cut Express, iMovie, Avid, Adobe Premiere etc. Below is how.

Guide - Encode Panasonic AG-HVX200 MXF to AIC for iMovie 8, 9, 11 editing on Mavericks

Step 1. Import MXF files from Panasonic AG-HVX200 to the top MXF to iMovie Converter for Mac.


(Note: Before conversion, you need to transfer MXF files from your Panasonic AG-HVX200 to Mac Hard Drive, then click the "add" button to browse to import MXF videos. This MXF Converter for Mac support batch conversion)

Step 2. Click the Format bar, and move mouse cursor to "iMovie and Final Cut Express -> Apple InterMediate Codec (AIC) (*.mov)", it's the best format for editing in iMovie 8,9,11.


Step 3. Click "Convert" button to start transcoding Panasonic AG-HVX200 MXF files to AIC Codec for iMovie 8,9,11 under Mac OS X 10.9 Mavericks.

Some more helpful features of the app:

1. Settings- click to set video resolution(1920×1080/1440×1080/1280×720/720×480), bitrate(from 1Mbps to 20Mbps), frame rate (24p/30p)


2. Editor (next to "Add" icon)- click to set deinterlace, denoise, mute, volume up, trim, crop, etc.

So there you have it. Pretty simple. After the workflow, you can go to the output folder to find the converted video files. Now you are free to start importing/editing Panasonic AG-HVX200 MXF files in iMovie 8,9,11 under Maveircks without problems.

Read More: