Showing posts with label MTS. Show all posts

Monday, May 27, 2013

Import/Edit/Play Canon C100 MTS on Mountain Lion/Lion/Snow

Summary: Want to find the best way to transcode Canon C100 AVCHD video for importing/editing/playing on Mac Mountain Lion/Lion/Snow? Read this article below and you will know it.
 
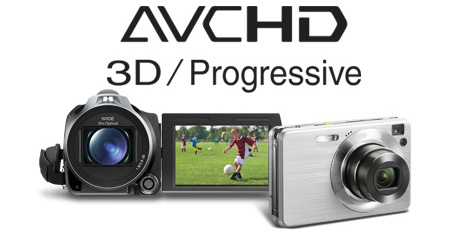
The Canon EOS C100 Digital Video Camera is the latest addition to the Cinema EOS family. It is the little brother of Canon's popular C300; employing the same Super 35mm Canon CMOS Sensor and Canon DIGIC DV III Image Processor, the C100 records full HD at 24Mbps to SDHC/SDXC cards using an AVCHD codec. Dual memory card slots allow users the advanced option of recording to two memory cards simultaneously, or recording HD footage to one slot while at the same time recording SD footage to the other. Other features include uncompressed HDMI output (with time code), impressive low light sensitivity and built in ND filters.
                   
To transfer Canon EOS C100 AVCHD videos to Apple hard drive, you can use the Apple iMovie, Final Cut Pro, Adobe Premiere and Avid Media Composer, or work with QuickTime. But you shall make sure that you at least have iMove 8 or iMovie 9, FCP 6 on your Mac with Intel processor. However, if you have iMovie 6 or first copy AVCHD files from camera by looking for PRIVATE -> AVCHD -> BDMV -> STREAM on SDHC/Micro SDHC card, or copy MTS file from AVCHD -> BDMV -> STREAM on built-in HDD, however you may find it difficult to import to Mac Mountain Lion/Lion/Snow for editing or playing.

To edit, play,import Canon C100 MTS videos on Mac, you will need to convert Canon C100 videos to best compatible format for Mac OS. Only by converting can you avoid video playback, editing and importing problems due to the recorded AVCHD format. Here we recommend a decent Canon Video Converter on Mac platform - Pavtube HD Video Converter for Mac, to help you get it done.


Convert Canon C100 MTS videos for importing, playback, editing on Mountain Lion/Lion/Snow
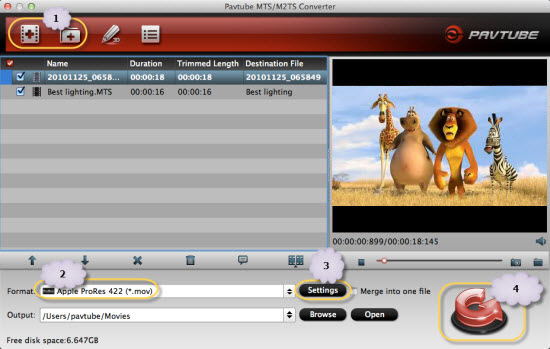
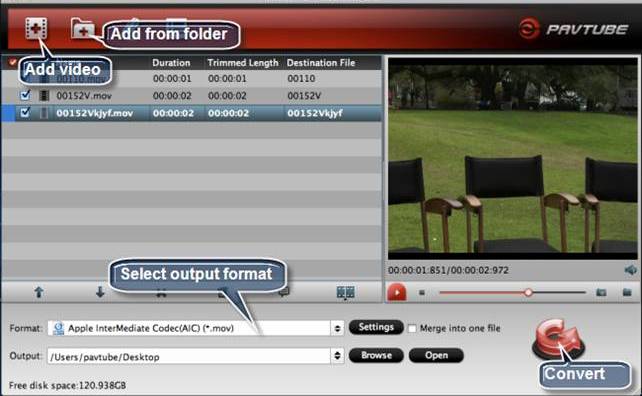
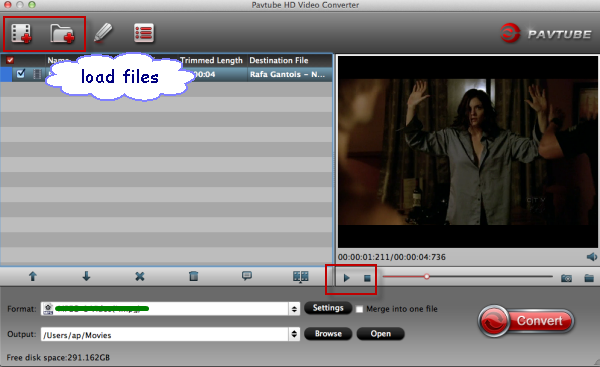
1.Load AVCHD files.

After install and launch the Pavtube Canon AVCHD Converter for Mac, drag and drop Canon C100 AVCHD MTS file. You can drag several files to the program directly.


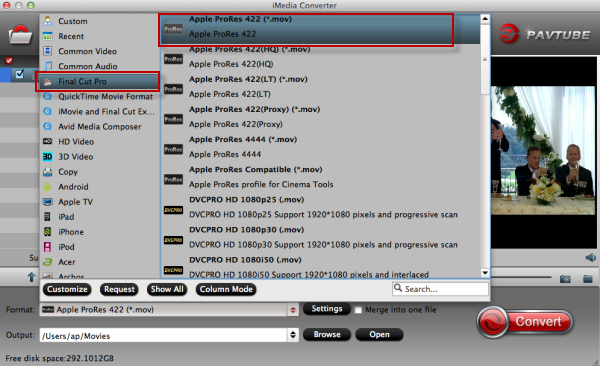
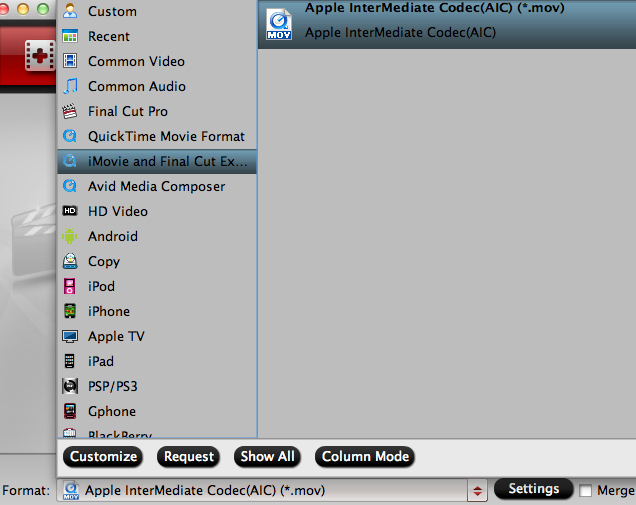
2. Click format column and choose the output format.

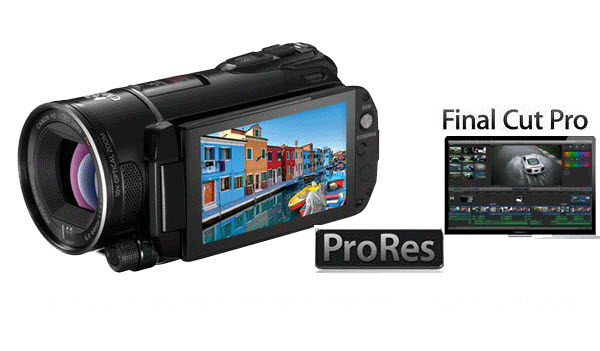
You can choose Final Cut Pro -> Apple ProRes 422 (*.mov), this codec is optimized for FCP editing;


You can also choose Avid Media Composer -> Avid DNxHD (*.mov), it's for Avid editing;

For playback, you can choose HD Video -> QuickTime MOV;

For sharing on website like YouTube, you can choose MP4 format for output.

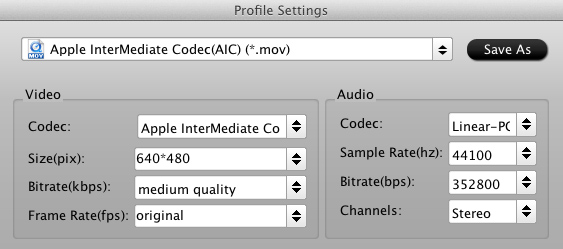
3. Do some settings as you want. 


Tip:
You can edit the Canon C100 AVCHD files in this program before converting to other formats on Mac Mountain Lion/Lion/Snow. Trim, crop, add watermark or adjust effect as you want.

4. Start converting Canon C100 AVCHD video on Mac.

At last, hit the "Convert" button to transcode Canon C100 AVCHD MTS to Mac.

This best Mac Canon AVCHD converter will convert Canon C100 recorded videos on Mac at top speed, you can choose rich formats for output on Mac, and then you can use C100 recorded MTS footages for importing, playback or editing on Mountain Lion/Lion/Snow.

If you need to edit C100 AVCHD on Windows platform, you can try Video Converter Ultimate. Please take a try now, it will do a great favor for you.

Read More:

Sunday, May 19, 2013

Panasonic ZS30 and Final Cut -Edit Lumix DMC-ZS30 MTS in FCP 6/7

Panasonic Lumix DMC-ZS30 (TZ40 in Europe) is the latest version of the company's hugely popular travel zoom camera. Announced in January 2013, it comes exactly one year after its predecessor, the best-selling ZS20/TZ30, and like that model the ZS30/TZ40 becomes the first of the new crop of pocket super-zooms to reach the market. 


The most important specification of any super-zoom is of course the optical range, and for the new ZS30. Panasonic has however improved the image stabilization with a new five-axis correction system that claims to particularly benefit movie shooting. The compact camera DMC-ZS30 can shoot 1080p60 AVCHD/MPEG-4 video. Besides it is packed with a whole range of features that provide outstanding performance in every environment. No matter what time of the day or night, the camera guarantees outstanding results due to the 24mm Ultra Wide Angle LEICA DC lens and 20x Optical Zoom.

If you have got this WiFi enabled compact long zoom camera, you can use it to record 1080 60p AVCHD and MP4 videos. When the capturing process is over, you may want to do some post workflow with the video to make them more delicate and amusing to share with your friends. Here we share the solution to transfer Panasonic DMC-ZS30 AVCHD to FCP 6/7 on Mac with you.

Take the Lumix DMC-ZS30 and Mac compatibility into account, we find the common Mac tool Final Cut Pro 6/7 can’t ingest the 1080 60p footage from Panasonic DMC-ZS30. The best workaround is to transcode the 1080 60p AVCHD to ProRes for FCP 6. You can get the best and yet professional MTS Converter for Mac to fast convert Panasonic Lumix DMC-ZS30 video to ProRes 422 without losing quality. This tool is also can be applied for Lumix DMC-ZS25 users. Now let’s start the AVCHD to ProRes conversion on Mac OS X.

Now please follow the steps below to convert Panasonic ZS30 AVCHD to Prores .mov for  FCP 6/7 editing on Mac.

1. Go to download and install the best Mac Panasonic MTS Converter to make the transcoding task without quality loss, which offers you particular Apple ProRes profiles for Final Cut Pro. It also provides AIC codec for iMovie/FCE and DNxHD for Avid. Then launch the software to import your AVCHD clips to it.


2. Click on the Format box to select Final Cut Pro > Apple ProRes 422(*.mov) as the output format for editing ZS30 MTS in FCP. 

3. You can click the Settings icon to do some audio/video settings. We recommend 1920*1080 as video size and 30fps as video bitrate for easier editing on Mac. If you are in PAL(50p) area, you are recommended 25fps as video bitrate.


4. Hit the Convert button; it will convert Panasonic ZS30 1080p AVCHD to FCP 6/7 on Mac immediately.

When the conversion process shows in 100% with the top AVCHD to MOV Converter Mac, you can get the resulted videos from output folder easily for importing and editing in FCP.
 More related articles: 


Monday, May 6, 2013

Deinterlace and Convert Canon VIXIA HF G20 1080 60i AVCHD recordings to FCP X

This article will show the best way to convert Canon AVCHD to ProRes 422, so that you can import Canon Vixia HF G20 1080 60i .MTS files into Final Cut Pro X for smooth editing work.
Canon VIXIA HF G20 Full HD camcorder, as the Canon's VIXIA family's a new member, has come to us along with the HF R-series. According to the camera maker, the G20 is designed to rival pro-level camcorders in image quality. It captures Full HD 1920x1080p videos in MPEG4 or AVCHD format. Intended for professionals, the G20 features nine Cinema-Look Filters to create video with a variety of professional cinematic look and Professional Shooting Assist functions.

As a Mac and FCP user, I like to edit 1080p AVCHD video with FCP X. Final Cut Pro X users always have the headache since they find the problem editing Canon VIXIA HF G20 AVCHD 1080i files in FCP X on Mac. How to solve the incompatibility is the key to make Canon HF G20 more convenient for shooting and editing. And as far as we know Apple ProRes is perfectly compatible with Final Cut Pro.

So the problem becomes easier to solve. Just find out a converter, which can transocde Canon HF G20 AVCHD recordings to ProRes on Mac and keep the quality as original. Plus, 1080i videos are not perfectly readable for these video edit programs including FCP, iMovie, FCE, Avid Media Composer, etc. Thus, deinterlacing Canon 1080/60i MTS on Mac is imperative to be considered.

If you haven't found out a decent AVCHD convert tool yet, you may try the top AVCHD to FCP X Converter we recommend here. It can not only convert HF G20 AVCHD files to ProRes 422 with the original high definition, but also deinterlace 1080i files to make the converted files more smoothly in FCP X.

Here we show you the guide on how to deinterlace and convert Canon VIXIA HF G20 1080/60i MTS to FCP X

1. Download Pavtube HD Video Converter for Mac, it’s a professional Canon AVCHD converter for FCP X  which can convert G20 AVCHD files to ProRes 422, AVI, etc.


2. Install and launch this Canon MTS converter for FCP. Import the footages to the converter.

3. Click format bar to choose output format, you can click and choose Final Cut Pro -> Apple ProRes 422 (*.mov).


4. If you want to customize the output parameters, you can click "Settings" button and enter "Profile Settings" panel to adjust the resolution and other A/V settings as you need.


5. Click convert button to start the Canon G20 AVCHD to ProRes 422 conversion.

With Canon AVCHD converter for FCP, you can easily not olny transcode Canon G20 AVCHD to Prores 422 for FCP, but also convert Canon XA10 AVCHD files to Final Cut Pro, convert VIXIA HF M500 AVCHD to FCP, convert Vixia HF M300 to FCP, convert Vixia HF S10/S100 to FCP, etc. Just try and have a good time.

Read Related Articles:

Tuesday, April 23, 2013

Solving problem with importing Sony XR500 MTS files in Final Cut Pro 7


Summary: Tutorial for Beginners, this article will tell you how to Make Sony HDR-XR500 AVCHD footages compatible with Final Cut Pro 7. You can transcode Sony NR-500AVCHD to ProRes MOV via AVCHD to ProRes Converter, then import the covnerted AVCHD files to Final Cut Pro 7 for editing on Mac.

Sony HDR-XR500 provides HD recording with 120GB HDD and 6-megapixel CMOS sensor. The HD videos are stored as AVCHD .mts, which is not the preferred compression for editing on FCP. The Apple Final Cut format is Pro Res footage.
After searching solutions for MTS to ProRes, I got the workaround with Pavtube MTS/M2TS Converter for Mac and the Apple Compressor, which comes with Final Cut. I convert the MTS files from Sony HDR-XR500 to the highest quality codec at same frame rate and size as the raw footage, and then output Pro Res with Apple Compressor. If you would also like to go further with detailed explanation, just keep reading.

Even though the above methods work for AVCHD videos,you may find 1080p .mts videos are not recognized/imported to FCP 7. At present, the most efficient way to play and edit your Sony HDR-XR500 AVCHD MTS files is re-encoding them to Mac friendly video format, like MOV for further playing and editing in FCP, FCE and iMovie. While looking for solutions to import Sony HDR-XR500 MTS/M2TS to Final Cut Pro 7 on Mac, I downloaded and tried several converters and found the Sony AVCHD to FCP 7 Converter works better for me.

Guide: Transcode Sony XR500 AVCHD to ProRes 422 MOV for smoothly editing in Final Cut Pro 7 on Mac Lion 10.8?

The best way is to convert Sony XR500 MTS/M2TS to FCP 7 best supported Apple RroRes codec. Now I will start with the step-by-step guide on how to convert Sony XR500 AVCHD to MOV and then import the converted videos for editing in Final Cut Pro 7.

Step 1: Download Sony AVCHD to Prores Converter, import your Sony XR500 AVCHD file.


Step 2: Click format column and choose the output format. You are recommended to choose Final Cut Pro -> Apple ProRes 422 (*.mov)


Tips: If you want the files to be in smaller size, you can follow Final Cut Pro > Apple ProRes 422(LT) (*mov)/Apple ProRes 422(*mov) option. If your files size is at SD levels, you are advised to choose "Final Cut Pro > Apple ProRes 422(Proxy)(*mov)".

Step 3: Setting the best video profile for Final Cut Pro 7.


Click "settings" button to adjust the output video's parameters, such as bitrate, resolution, etc.


Step 4: Hit "Convert" icon, start transcoding XR500 1080p AVCHD to ProRes 422 MOV for Final Cut Pro 6/7/X editing on Mac.

After the Sony AVCHD to FCP 7 conversion, import the converted MOV files to Final Cut Pro 7, then you can edit Sony XR500 AVCHD in FCP smoothly without rendering.

Read more: 

Monday, April 15, 2013

Best solution to ingesting Sony NEX-F3 AVCHD files to iMovie on Mac


Sony's Alpha NEX-F3 is Sony's entry-level mirrorless interchangeable lens camera, it's the replacement to the NEX-C3, with the most significant change being a new 3-inch LCD that can flip upward 180 degrees and face your subject. Have you ever tried to edit the 1080/60p AVCHD videos, shot by Sony Alpha NEX-F3 Digital Camera, in iMovie? If so, you may have found that when you try to ingest 1080p Sony MTS to iMovie, you will get many AVCHD importing problems there and the reason is that 1080p AVCHD format can not be recognized by iMovie.

If you want to edit Sony NEX-F3 AVCHD in iMovie, you need to convert Sony NEX-F3 AVCHD MTS/M2TS to iMovie best supported video format, iMovie best supported video format is Apple InterMediate Codec(AIC) MOV format, you can follow the steps below then you can edit Sony NEX-F3 MTS/M2TS video in iMovie smoothly.

1. Download Pavtube MTS/M2TS Converter for Mac.This software can convert Sony NEX-F3 AVCHD video to iMovie or other common formats.


2. Install and run this Sony NEX-F3 AVCHD to AIC Converter.

3. Click format column to choose the output format for iMovie. Click and choose iMovie and Final Cut Express -> Apple InterMediate Codec (AIC) (*.mov), it's the best format for editing Sony NEX-F3 in iMovie.


4. You can click settings button to adjust output parameters, such as resolution and bitrate.

5. Click convert button to start.

The Sony NEX-F3 AVCHD Converter will convert MTS/M2TS for iMovie quickly. After conversion, you can edit Sony NEX-F3 AVCHD video in iMovie as you want.

With this Sony AVCHD to MOV Converter, you can also edit Sony NEX-F3 video in FCP

Read More:

Wednesday, April 10, 2013

Transcode/Edit Sony Alpha A57/A65/A77 AVCHD video to mov for Final Cut Pro on Mac

In this tutorial you are going to learn how to convert AVCHD Video from Sony Alpha A57/A65/A77 to FCP compatible formats for editing.
 
Nowdays, more and more cameras can record full HD 1080 60p AVCHD files. If you'eve recorded your ideas or memory into HD videos with Sony A57/A65/A77, you may also want to edit those AVCHD mts files in Adobe Premiere. But you may encounter some problems when you want to import Sony A57/A65 footages to FCP for editing, like import it slowly, and couldn't edit videos smoothly.

The reason you can't edit Sony AVCHD MTS files in FCP smoothly is that AVCHD MTS/M2TS files are not well supported by FCP on Mac due to the unfriendly codec, you can't edit the videos smoothly in Final Cut Pro. The best solution is to convert Sony A57/A65/A77 AVCHD MTS/M2TS to FCP best supported Apple RroRes codec.
Now I will start with the step-by-step guide on how to convert Sony A57/A65/A77 AVCHD 1080/60p MTS/M2TS to ProRes 422 and then import the converted videos for editing in Final Cut Pro.

Step1: Download Pavtube HD Video Converter for Mac and import your Sony A57/A65/A77 AVCHD file.


Step2: Click format column and choose the output format. You are recommended to choose Final Cut Pro -> Apple ProRes 422 (*.mov)

Tips: If you want the files to be in smaller size, you can follow Final Cut Pro > Apple ProRes 422(LT) (*mov)/Apple ProRes 422(*mov) option. If your files size is at SD levels, you are advised to choose Final Cut Pro>Apple ProRes 422(Proxy)(*mov).

Step3: Click settings button to adjust the output video's parameters, such as bitrate, resolution, etc.


Step4: Start converting Sony A57/A65/A77 1080/60p MTS/M2TS videos to Apple ProRes for Final Cut Pro 6/7/X

After the Sony A57/A65/A77 AVCHD to FCP conversion, import the converted MOV files to Final Cut Pro, then you can edit Sony A57/A65/A77 videos in FCP smoothly.

You can also convert Sony A57/A65/A77 AVCHD to best editing codec for iMovie/Premiere Pro on Mac. Just enjoy your HD videos from Sony A57/A65/A77 in your FCP now! Good luck to you!

Editor's Recommendations

Sunday, April 7, 2013

Make incompatible Canon Vixia AVCHD MTS files work with FCP on Mac

Canon Vixia AVCHD Camcorders use AVCHD to record video as the following Vixia models: Canon Vixia HF S30, Vixia HF S21, Vixia HF S20, Vixia HF S200, HF M31, Vixia HF M30, Vixia HF M300, HF R11, Vixia HF R10, Vixia HF R100 (SDHC), Vixia HF S10, Vixia HF S100, Vixia HF20, Vixia HF200, Vixia HF S1,Canon VIXIA HF10.


These camcorders only record in high definition format using a special codec (compression/decompression) called AVCHD. This new codec is revolutionary for it's ability to compress very high quality HD video in a relatively very small space. Final Cut Pro (FCP) has gained the favor of many professional users including Hollywood film makers. But it only takes QuickTime and iMovie compatible video formats such as QuickTime MOV, QuickTime MP4, DV, HDV etc. Therefore, you are unable to transfer Canon Vixia AVCHD into Final Cut Pro and edit Canon Vixia video with FCP.

Now please follow the steps below to convert incompatible Canon Vixia AVCHD videos to FCP workable Apple ProRes files keeping the original video quality.

Step 1. Run the perfect Mac Canon MTS Converter , and click the "Add file" button to load the Canon Vixia videos to it.


2. Step 2. Click on Format > Final Cut Pro > Apple ProRes 422(HD) (*.mov) as the export to keep HD video for Final Cut Pro. Afterwards, you can set the output profile as you want.


3. You can click the Settings icon to do some audio/video settings. We recommend 1920*1080 as video size and 30fps as video bitrate for easier editing on Mac. If you are in PAL(50p) area, you are recommended 25fps as video bitrate.


Tip: Deinterlace Canon Vixia 1080i AVCHD

Click the "Editor" button, go to the Effect tab, and make sure the checkbox for Deinterlacing is ticked. The converter will remove interlacing artifacts from 1080i AVCHD videos perfectly.

4. Step 4. Click the "convert" button, and the Mac AVCHD to ProRes Converter will start transcoding Canon Vixia AVCHD to ProRes for FCP on Mac OS X immediately. Then you can get the resulted videos from output folder easily for importing and editing in FCP.

Tips: 

This Mac AVCHD MTS Converter is also compatible with other Mac Non-linear editing system like Final Cut Express, Avid Media Composer, iMovie, Roxio Toast, etc to import the AVCHD footages on Mac without incompatibility problems. You can get more info about how to edit Canon Vixia AVCHD MTS in iMovie.

Read More:

Saturday, April 6, 2013

The way watching and enjoying 3D AVCHD on PC and Mac


Nowadays 3D camcorders are becoming cheap and popular, many people take a Sony or Panasonic camcorder to record beautiful moments which in 3D. It gives us wonderful enjoyment. But for most of us, 3D camcorders record unusual AVCHD 3D videos may be new to us.


You may have got a 3D camcorder which record AVCHD videos, because Sony and Panasonic camcorders mainly use AVCHD as the recording video format. After recording, you may want to convert 3D AVCHD to MP4 or AVI format for playback or editing, at this time, you need a 3D AVCHD to MP4/AVI converter, or a anaglyphic 3D converter to convert recorded 3D files, Pavtube MTS Converter can help you, it has added 3D conversion feature, below is a brief guide for you to convert 3D AVCHD video to AVI/MP4 format.

1. Download and install Pavtube MTS Converter for Mac, it's an excellent 3D AVCHD converter for any player watch 3D.


2. Run this 3D AVCHD to MP4/AVI converter, import the 3D AVCHD files to the software.

3. Click format bar to choose output format, just click and choose HD Video -> H.264 HD Video (*.mp4).


4. You can click settings button to adjust the output parameters as you want, adjust the video codec, resolution or audio parameters.


5. Click convert button to start.

After converting the 3D AVCHD videos to MP4/AVI format, you can watch 3D AVCHD on PC with red and blue anaglyph glasses. The software supports many 3D camcorders, for example, it can convert Sony AVCHD video, convert JVC 3D video, convert Panasonic 3D video, etc. Now just download this 3D AVCHD to MP4/AVI converter and have a try, hope it can help you get better video enjoyment.
  • About AVCHD 3D:

AVCHD now supports a true 3D mode. Panasonic started shipping 3D cameras using 'side by side' encoding in 2010 and Sony joined the 3D race in March 2011 with Full HD 3D which means two video channels are used. The Sony approach uses a 50i or 60i video stream capturing 25 or 30 interlaced frames per second, per side.

Related Articles: