Wednesday, June 14, 2017

Convert Cyberlink PowerDirector Video to MP4, MKV, MOV, AVI

Cyberlink PowerDirector video editing software provides easy-to-use and powerful tools for high quality video productions. Once you have finished editing your video production, you can save it as a video file so that you can conveniently upload and share your great editing work on social networking web sites, transfer and play on portable devices, stream to TV via home media servers or burn to a disc. Cyberlink PowerDirector allows you to export video in both 2D or 3D in various different file formats listed below.

Supported exported file formats by Cyberlink PowerDirector

Video Formats

2D Video: 3GPP2, AVI, MPEG-2, H.264 AVC, Windows Media Video (WMV), MPEG-4, QuickTime(MOV), Matroska (MKV), XAVC-S (MP4), H.265/HEVC (MP4/MKV/M2TS)
3D Video: Windows Media Video (WMV), MPEG-4, MPEG-2, H.264 AVC,QuickTime(MOV), Matroska (MKV)

Audio Formats

WMA, WAV, M4A

From above lists, we can see that the exported file formats by Cyberlink PowerDirector is limited to few container file formats or file codec. If you wish to export other popular video file formats such as MPEG-1, FLV, M4V, ASF, etc or audio file formats like MP3, AAC, AC3, AIFF, FLAC, MKA, etc, for YouTube sharing, iTunes playback or music players listening, then you will need the assistance of a third-party Cyberlink PowerDirector video converter.

Convert Cyberlink PowerDirector video to more digital formats

Export Cyberlink PowerDirector projector to digital video

Before converting Cyberlink PowerDirector projector to other digital file formats, you will first need to export Cyberlink PowerDirector projector to a digital video with the following steps:
1. In PowerDirector, navigate to the Produce Tab.
2. Select your preferred video format, and then select the Profile name/ Quality for the created video file.
3. Click the ellipsis button (marked in red) to set the output folder, i.e. where the created 2D video will be located.
4. Enter a file name and then click Save.
5. Click the start button to output your video production.

Then feel free to download Pavtube Video Converter, which can assist you to batch load multiple Cyberlink PowerDirector video and then convert any of your desired SD/HD/2K/SD file formats with the container file format of AVI/WMV/MP4/MOV/MKV/FLV/3GP/3GPP/3GPP2/ASF or codec like H.264, H.265, Xvid, Divx, DV, Apple Prores, MPEG-1, MPEG-2, MPEG-4, MPEG-TS, etc.

Besides the plain digital file formats, you can also use this program to convert Cyberlink PowerDirector video to hot devices and program preset profile formats or other editing program like Vegas Pro, Movie Studio Platinum, Premiere Pro, After Effects, Davinci Resolve, Avid Media Composer specially optimized editing codec.

Pavtube Video Converter is available on both Windows 10/8.1/8/7, it is also accompanied by an up-to-date Mac version - Pavtube Video Converter for Mac for macOS Sierra or macOS Sierra. The program is very easy to use, no matter experienced user or fresh could handle it very well. What's more, the results produced by the program are pretty high quality, you can't tell the difference between the converted video and the original Cyberlink PowerDirector video.

Get Pavtube Video Converter with 20% off discount, coupon codec: 45K2D47GJH

Step by Step to Cyberlink PowerDirector Video to MP4, MKV, MOV, AVI

Step 1: Load Cyberlink PowerDirector Video.

Download the free trial version of the program. Launch it on your computer. Click "File" menu and select "Add Video/Audio" or click the "Add Video" button on the top tool bar to import Cyberlink PowerDirector video into the program.

Load Cyberlink PowerDirector Video

Step 2: Define the output format.

Clicking the Format bar, from its drop-down list, select one of your desired digital file format or devices and program preset profile formats that can't be exported from Cyberlink PowerDirector.
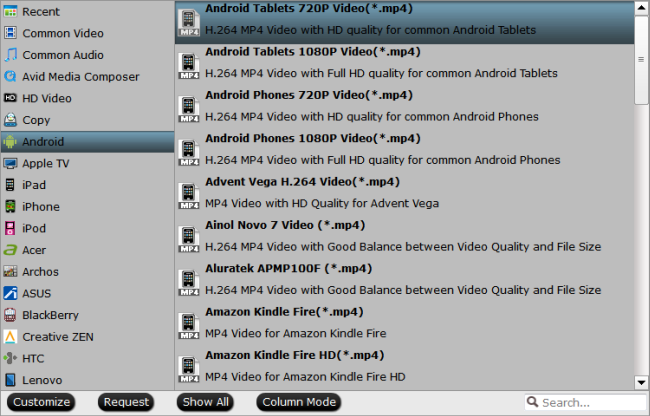
Output Android tablet preset profile format

Step 3: Start the conversion process.

Clicking the Convert button on main interface to pop out a PowerDirect video to MP4, AVI, MOV Conversion window with conversion information such as Time elapsed, Time left, Generated size, and Estimated size.

After the conversion, you can click "Open output folder" to popup output directory with the converted files. Then feel free to play, share and edit the PowerDirector video as you like.

Wednesday, June 7, 2017

Free Convert MP4 to WAV on Windows 10/8.1/8/7

MP4 is the most popular video file formats that has widely compatibility with various media player apps, portable devices, game consoles, TVs, etc. While WAV is a Waveform Audio file format that's mainly used on Windows computer. Sometimes, you may come the need to extract a WAV file from MP4 file for viewing on Windows Media Player, VLC, iTunes, QuickTime, etc. The following article will show you a free workaroud to convert MP4 to WAV.

Free convert MP4 to WAV with Pavtube Free DVDAid

Although there are many free online video sites that can assist you to get the job completed. However, you may find them almost all of them have the file size uploading limitation, in addition, the slow uploading and downloading speed will run out of your patience. What's more, some may even fail to upload your MP4 files if is encoded with some uncommon codec. If you are looking for a free, powerful yet fast program with no file size importing limitation, then we highly recommend Pavtube Free Video DVD Converter Ultimate to you.

The program has full support for MP4 files with various different video and audio codec, you can easily and efficiently extract WAV from all MP4 files with perfect quality. Besides WAV, you can also save MP4 files to other audio file formats such as MP3, WMA, AAC, AC3, M4A, OGG, AIFF, FLAC, MKA according to your own needs.

Trim/Merge output WAV audio

If you don't want to extract the whole audio out from mp4 video, you can use the trim function to cut off unwanted audio clips. The "Merge" function can assist you to combine separate WAV audio clips into one single file.

How to Free Convert MP4 to WAV with Pavtube Free DVDAid?

Step 1: Load MP4 video.

Download the free trial version of the program. Launch it on your computer. Click "File" menu and select "Add Video/Audio" or click the "Add Video" button on the top tool bar to import source MP4 video files into the program.

Load MP4 video

Tips: If you want to batch load multiple files, make sure to store all your files in the same folder, then click "File" > "Add from folder" or press the "Add from Folder" button on the top tool bar to batch importing them into the program.

Step 2: Define the output format.

Clicking the Format bar, from its drop-down list, you can output "WAV - Waveform Audio(*.wav)" under "Common Audio" main category.

Define the output format

Step 3: Trim or merge output audio files.

Trim off unwanted audio clips

In the video editor window, choose the "Trim" tab and this tab is selected by default when the editing window appears. You can use the trim function to cut off unwanted parts from start and end. You can either drag pointers on the process bar or set exact time point in Start and End boxes to set to leave only your wanted audio parts.

Merge audio files

By ticking off "Merge into one file" option behind "Settings" button, you can merge the ticked audio files in list into one single file.

Step 4: Begin the conversion process.

After all setting is completed, hit the "Convert" button at the right bottom of the main interface to begin the conversion process from MP4 to WAV.

When the conversion is finished, click "Open Output Folder" icon on the main interface to open the folder with generated files. Then feel free to play the extracted WAV files from MP4 on Windows Media Player, VLC, iTunes, QuickTime, etc.

Wednesday, May 31, 2017

Downscale Canon 5D Mark IV 4K to 1080p on Mac

Have shot some MXF files with your Sony XDCAM, Panasonic P2, Canon XF camera, but find it is pretty difficult to play the MXF files on your Mac computer with media player software, load into popular NLE editing software like Final Cut Pro, Premiere Pro, Davinci Resolve, etc or upload and share on popular video sharing sites like YouTube, Vimeo, Facebook, etc. Fortunately, here comes Mac MXF Converter, which can assist you to fix all the MXF file playing, editing and sharing issues. The following article has picked 4 best MXF Converter for Mac for you as a reference.

Best 4 MXF Converter for Mac

Top 1: Pavtube Video Converter for Mac

Pavtube Video Converter for Mac is a professional professional that's specially designed for handling MXF files conversion, editing work. With the program, you can batch load 4K/HD MXF files shot with Sony XDCAM, Panasonic P2, Canon XF camera or export from some professional editing program such as Avid Media Composer, Blackmagic Design, etc for conversion at one time. Apart from letting your converting MXF files to some plain digital file formats such as H.264/MPEG-4, MKV, MP4, AVI, MPEG, WMV, FLV, SWF, F4V, MOV, VOB, etc, you can also use this program to produce hot devices like iPhone, iPad, Android phone/tablet, Windows phone/tablet, game consoles, TVs, etc preset profile formats with the optimal playback settings.

For people who wish to complete some editing work on the MXF files, you can use our program to directly output popular Mac NLE editing software best compatible editing codec such as Apple Intermediate Codec for iMovie/Final Cut Express, Apple Prores for Final Cut Pro, DNxHD for Avid Media Composer or Davinci Resolve or Premiere Pro/Premiere Elements/After Effect Preset optimized MPEG-2 editing codec. If you just want to do some simple editing task, the program's built-in editing functions can assist you to trim MXF files to cut off unwanted parts or segments, crop MXF to remove the blackbars or unwanted area, deinterlace interlaced MXF into progressive form, add video/image/text watermark, apply special rendering effect, add external SRT/ASS/SSA subtitle to MXF files.

Besides MXF files, you can also use this program to handle other HD file formats such as AVCHD (MTS/M2TS), XAVC/XAVC S, H.264, H.265, etc. Pavtube Video Converter for Mac is available on macOS Sierra and previous Mac OS version. In addition, it also keeps constant update with perfect support for the new Mac OS. The program is quire simple to use, any one can learn to use it in minutes. Moreover, it produces high quality conversion results with better video/audio quality

Top 2: Pavtube MXF Converter for Mac

Different from Pavtube Video Converter for Mac, Pavtube MXF Converter for Mac is developed for handing MXF files exclusively. It assists you to convert MXF video files generated by Canon/Sony/Panasonic camcorders to various video formats such as H.264/MPEG-4, MKV, MP4, AVI, MPEG, WMV, FLV, SWF, F4V, MOV, VOB, etc or hot devices preset profile formats.

In addition to outputting video formats suitable for popular devices, Pavtube MXF Converter for Mac can also convert MXF video files to compatible video formats for editing programs like iMovie, FCP(6/7/X), FCE, Avid MC, Premiere Pro, DaVinci Resolve, etc.

Top 3: Pavtube iMixMXF

Pavtube iMixMXF has almost the same function as Pavtube MXF Converter for Mac. What distinguishes it from MXF Converter for Mac is that it enables you to convert MXF files with multi-track preserving. You can use the program to convert MXF files to popular Multi-track MKV/MP4/MOV formats for playing with all your desire audio tracks keep to output MXF to Multi-track Apple Prores mov format for Final Cut Pro editing. What's more, it also enables you to mix multi tracks into one track. This feature help you mix the audios of interviewer, interviewee, surroundings, or editors'/directors' comments into one.

Top 4. MXF4Mac Player

MXF4mac Player can open most MXF variations. It supports, XDCAM HD, AVC-Intra, JPEG2000 (optional with J2K Codec) , DNxHD, HDV, Uncompressed SD/HD, Uncompressed Avid 10 bit, DVC-Pro HD, IMX-D10,DV, Meridien, Sony Proxy and more.The MXF4mac Player is also able to play Panasonic P2 XML documents like movie files with video and audio linked together. Of course it is compatible to QuickTime movies and more (e.g. .mp4, .avi, .m4v, .wav, .aif, .aiff). Open or just drag nearly any flavour of MXF files into the MXF4mac Player to watch it, even in full screen.

To better distinguish those 4 MXF Converter for Mac for you, the following article will show you a comparison chart with detailed comparison parameters:

Software Pavtube Video Converter for Mac Pavtube MXF Converter for Mac Pavtube iMixMXF MXF4Mac Player
Price
$35
$29
$45
Free
Import Files Formats
AVI/WMV/MP4/MOV/FLV/3GP/MKV/H.264/H.265/Prores
-
-
-
Panasonic P2

Sony XDCAM

Canon XF

-
Avid MXF      
Blackmagic MXF

Output MXF
AVI/WMV/MP4/MOV/FLV/MKV/3GP
-
HD AVI/WMV/MP4/MOV/MKV/MPEG-2
-
QuickTime Player X & 7
-
iMovie/FCE Preset Profile Formats
-
FCP 7 & X
-
Multi-track Apple ProRes MOV for Final Cut Pro (X)
-
-
-
After Effects CS5.0.3 & 5.5 & 6.0 & CC & CC2014
-
Premiere Pro CS5.0.3 & 5.5 & 6.0 & CC & CC2014
-
Avid Media Composer Preset Profile Formats
-
Device Preset Profile Formats
-
Create 3D Movies
-
Advanced Features
Preserving MXF Multi-tracks/channels
-
-
-
Mix multiple audio tracks/channels MXF into one
-
-
-
Trim/Crop/Merge/Split/Watermark/Subtitle
-
Adjust Video/Audio Parameters
-
Batch Converting MXF Files
-

Conclusion:

From above reviews and comparisons, we highly recommend Pavtube Video Converter for Mac as the best MXF Converter for Mac thanks to its high MXF files handling capability, various output format options, fast conversion speed, perfect output quality and constant Mac OS compatibility.

Thursday, May 25, 2017

How to Convert Snagit videos to MP4, WMV, AVI, MOV, MKV

Snagit is a screenshot program that captures video display and audio output. Originally for the Microsoft Windows operating systems, recent versions have also been available for macOS, but with fewer features. It is very popular when it comes to video editing specifically conversion. For more assured experience, you can convert your Snagit File to MP4, WMV, AVI, MOV, MKV. There is guaranteed compatibility because MP4, WMV, AVI, MOV, MKV are widely used file format and known to be highly compatible for better playing on devices, players, TV or editing with editors and more.

Best Tool to Convert Snagit Videos to WMV, AVI, MOV, MKV

Pavtube Video Converter Ultimate is recommended to convert your Snagit videos to MP4, WMV, AVI, MOV, MKV and other formats you need. Ever since this powerful tool was introduced on the Internet, converting video files into the formats that they are needed to be in became easier and more seamless. This is a converter that has proven to be quite effective in converting both audio and video media files to almost any format that is there.

This program will perform the task just like that. It converts your files at a higher speed. After conversion,the original quality is preserved so you don't have to worry about that your video quality will be compromised. The converting process is so simple that even beginners can convert their without difficulty. Besides, using this converter you can also convert any videos, audios, DVD, Blu-ray to any formats you need for iPhone, iPad, Samsung, Game Console, VR, TV, video editors, etc. You can also use it to edit your video with some popular video editing functions. If you are using the Mac computer, you can get the Mac version - Pavtube iMedia Converter for Mac.

Free download the Snagit video converter

Step-by-step Guide to Convert Snagit videos to MP4, WMV, AVI, MOV, MKV

Step 1. Add Snagit files

You can directly drag and drop the videos on your Windows to the app. This Snagit Video Converter supports batch conversion, so you can add several files at one time. It saves your time and energy.

load torrent video

Step 2. Select your desire format from format list

In the format column, choose “Common Video”, “HD Video” and others. MP4, MOV. WMV, AVI, MKV, H.265 etc formats are all supported.

Step 3. Ready to convert

After setting the output format, you can click the "Convert" button to convert your Snagitvideos to popular formats now. If necessary, you can edit your videos before converting them.

Thursday, May 18, 2017

How to Edit Blu-ray in Premiere Pro CC 2017

Premiere Pro CC is non-linear editing system. The program allows you for film editing, uncompressed standard definition (SD) video and high definition (HD) editing and finishing. There are some occassions that you would like to get some Blu-ray HD contents into Premiere Pro CC 2017 to make your own film. However, the latest Premiere Pro CC 2017 added many new features, it still can't support Blu-ray video files. When transferring Blu-ray to Premiere Pro CC 2017, you will encounter importing and editing problems from time to time. In this case, you'll need to convert Blu-ray to Premiere Pro CC 2017 supported video formats first.

See also 4K to Premiere Pro CC 2017 H.265 to Premiere Pro CC 2017
M4V to Premiere Pro CC 2017 MP4 to Premiere Pro CC 2017 MTS to Premiere Pro CC 2017

How to Convert Blu-ray to Premiere Pro CC 2017?

Based on my experience, the easy-to-use and smart Pavtube ByteCopy for Mac (Read review) is a nice choice to get the footage from Blu-ray to Premiere Pro CC 2017 for editing. It can backup Blu-ray to Premiere Pro CC 2017 most compatible MPEG-2 format without quality loss. By runing it, you don’t need to reset the codec yourself, the program has an optimized preset for Premiere Pro CC 2017. What’s more, it also can add DVD to Premiere Pro CC 2017 by eliminating DVD copy protection and changing the format. This Converter is outstanding in converting video and audio in all popular formats with ultra fast conversion speed and loss-less output file quality.

You can also use Pavtube ByteCopy for Mac to copy Blu-ray, copy DVD, rip Blu-ray, rip DVD. It supports converting Blu-rays and DVDs to any formats like popular MP4, MOV, FLV, WMV, MPEG, MKV, AVI and 100+ formats as you need. It also provides you the suitable formats for many devices like iPhone, iPad, Apple TV, QuickTime, FCP X, Premiere Pro, Sony vegas Pro, Avid MC, Davinci Resolve etc. If you are also intrested in editing movies ans videos, you can also use this program to edit with some popular video editing functions: split, merge, trim, crop, add watermark, adjust video effect, edit audio and insert subtitles.

If you are using Windows, please get the Pavtube Video Converter Ultimate to convert Blu-ray to PPC 2017 supported video on Windows quickly.

Tutorial on How to Convert Blu-ray to Premiere Pro CC 2017 Editable video on Mac

Step 1: Load Blu-ray disc into the program

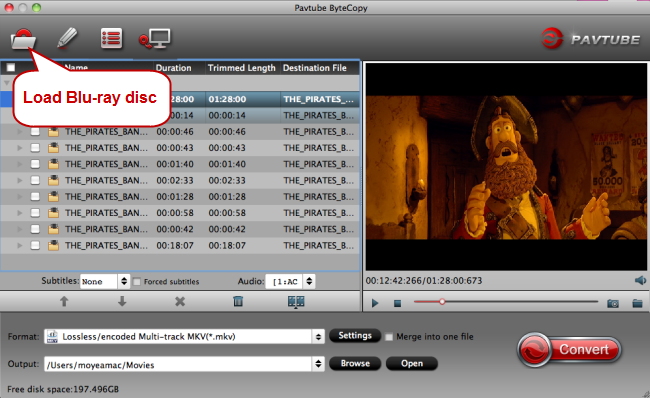
Insert Blu-ray into an internal or exnternal optical drive. Launch the progrm, on the main interface, click "File" > "Load Disc" button to browse to disc drive and import source movie into this app.

Step 2: Choose a format for PPC

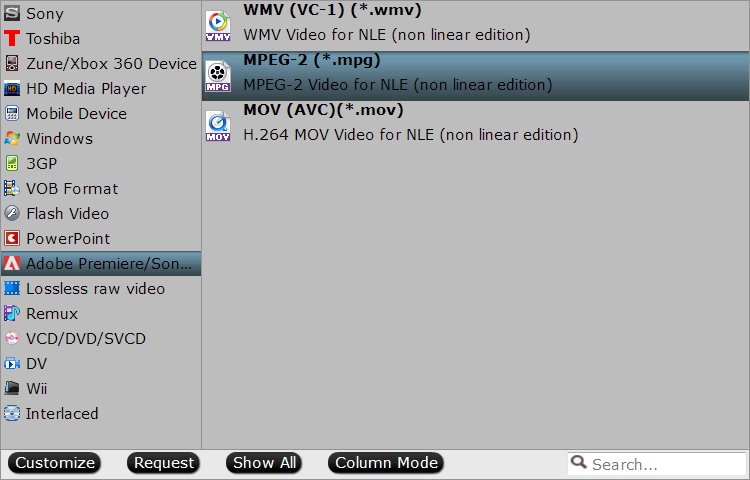
Here in “Format” list, you can choose “MPEG-2 (*.mpg)” from “Adobe Premiere/Sony Vegas”.

Tips: Edit Blu-ray chapters.

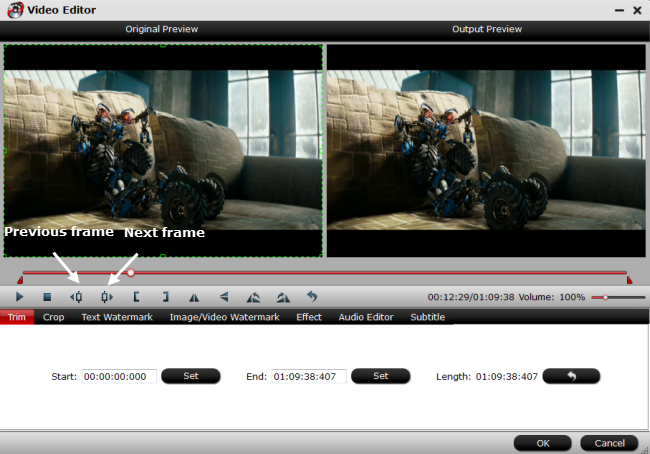
On the top tool bar on the main interface, click the pencial like icon to open "Video Editor" window, you can trim Blu-ray movies to remove the unwanted parts by setting the start and end time, crop to remove the black borders or unwanted area by dragging the dash line around the video frame, flip video, add text/image/video watermark, change video picture effect, replace/remove audio in video, add external subtitles, etc.

Step 3: Begin the conversion.

Click the "Convert" button to start commercial Blu-ray to Premiere Pro CC 2017 best editing codec conversion process. When the conversion is completed, you will have no problem to import video to Premiere Pro CC 2017 for high quality and high performance post video editing.

Thursday, May 11, 2017

Only $32.5 Get Best Pavtube Video Converter Ultimate on 2017 Mother’s Day

Have ideals celebrating the coming Mother’s Day with your Mum? You can rip your DVD, Blu-ray and convert any videos, movies to any formats for playing on TV, portable devices etc with your mother. That’s great. Pavtube Video Converter Ultimate, the industry leader in the field of DVD, Blu-ray and video backup solutions, today kicks off its Mother’s Day Promotion, offering the bigest 50% discounts. You can also get the Pavtube Video Converter Ultimate 50% OFF on 2017 Mother’s Day from Pavtubes facebook website.

Save 50 percent off on Pavtube Video Converter Ultimate for DVD/Blu-ray/Video Conversions

Part 1. What is Pavtube Video Converter Ultimate?

Pavtube Video Converter Ultimate

Pavtube Video Converter Ultimate is a popular video conveter, DVD ripper, Blu-ray ripper. It can convert videos, rip DVD to formats, rip Blu-ray to formats on Windows. It is a popular product from Pavtube Studio. You can free download it and buy it with only $32.5 on 2017 Mother’s Day promotion.

Part 2. What Pavtube Video Converter Ultimate Can Help Us?

1. Convert to Various Format Files
Input for more than 200+ format videos Converting a variety of media formats including AVI, WMV, MP4, MOV, FLV, MPEG, 3GP, VOB, Xvid to your desired format files.
Convert HD videos and 4K videos Perfectly convert HD Video including Tivo, MXF, MTS, etc and even 4K video and 4K source files to various common video formats.
Perfectly support for H.265 video Encode video with H.265/HEVC codec, then you can stream media files in perfect quality with small file size and less bandwidth.
Convert DVD Blu-ray to any formats Pavtube Video Converter Ultimate also can rip your DVDs, Blu-rays to any formats like MP4, MOV, MKV, MPEG etc.

2. Enjoy Media Files Anywhere Anytime

Output videos for all popular devices: optimized file for all your desired devices including iPad, iPhone, Android, Xbox, PSP, PS3, Nexus, Kindle Fire, etc.

3. Make 3D Movies for Grand Visual Experience

Convert 2D/3D resources to 3D movies in 3D MKV, 3D MP4, 3D MOV, 3D WMV and 3D AVI format to watch on 3D devices with Side by Side, Red/Blue and Top/Bottom 3D effects.

4. Enhance and personalize your media files

Professional editing functions are provided to you: split, merge, trim, crop, add watermark, adjust video effect, edit audio and insert subtitles.

5. Customize video and audio parameters

Change output video codec, size, frame rate, bitrate and audio codec, sample rate, bitrates and channels for better display quality.

6. Super faster conversion speed

Do not want to wait an eternity to convert a single clip? Pavtube Video Converter Ultimate surpasses other tradition video conversion application with 6x faster conversion speed. It is capable of accelerating the video encoding and decoding speed with the advanced NVIDIA CUDA technology and AMD Accelerated Parallel Processing (APP). Now it has Improve H.265, H.264 Encoding Speed With NVIDIA GPU Acceleration. Just save your precious time and energy for most important and amusing things in life.

Note:

For Mac user, please get its Mac version - Pavtube iMedia Converter for Mac to convert video/DVD/Blu-ray on Mac (macOS Sierra, El Capitan Yosemite, Mavericks, Lion included). You can free download it or buy it with only $32.5.

2017 Mother's Day Pavtube Other Products Big Promotion

A. 50% ~ 55% Discount Products

Windows Products Mac products
Pavtube ByteCopy
Pavtube BDMagic
Pavtube DVDAid
Pavtube Media Magician
Pavtube ByteCopy for Mac
Pavtube BDMagic for Mac
Pavtube DVDAid for Mac
Pavtube Media Magician for Mac

B. Only $9.9 Crazy Promotion Products

Windows Products Mac Products
DVD Creator
Video Converter
MXF Converter
MKV Converter
MTS/M2TS Converter
HD Video Converter
MXF MultiMixer
FLV/F4V Converter
DVD Creator for Mac
Video Converter for Mac
MXF Converter for Mac
MKV Converter for Mac
MTS/M2TS Converter for Mac
HD Video Converter for Mac
iMixMXF for Mac
FLV/F4V Converter for Mac

OK, I guess you will master this fast. And get started to give your motherr a big surprise on Mother’s Day 2017. And wish you a happy time!!!

Source: http://i-freepedia.com/pavtube-video-converter-ultimate-mothers-day-deals/

How to Upload Snagit videos to Youtube?

Snagit has one of the most compact and intuitive interfaces of the applications we reviewed. There are three modules to choose from: All-in-One, Image and Video. All-in-One allows you to capture what's going on your screen and take screenshots without interrupting your recording. Image and Video are self-explanatory: They both give you expanded options for capturing screen shots and videos. After recording videos, you can upload them to YouTube for sharing. But if you have problems uploading compress Snagit videos to Youtube, you can find a solution for that.

Why Failed to Upload Snagit videos to Youtube?

Because some Snagit videos are not friendly with Youtube. YouTube recommended file container: MP4 which overlaps all the advantages with small file size, high compression rate (for high quality) and popularity. MP4 includes two video Codecs, namely, MPEG4 and H.264, which are both widely supported, together with AAC (2 Channel - 8 Channel) and MP3 as audio Codec. So in that case, you can convert your Snagit videos to Youtube supported MP4 video.

Best Snagit Video Converter for Youtube

Pavtube Video Converter Ultimate just meets your needs. It specializes in converting Snagit videos to YouTube supported video. It also can convert many other videos like MOV, MXF, MTS, M2TS, MPG, H.265, MP4, AVI etc to YouTube supported video and other videos you need. Besides, before converting your Snagit videos, you can use the built-in video editor to trim the Snagit videos into multiple segments with short duration and personalize the videos to achieve a better overall effect. (Read review)

Hot search

4K to YouTube MP4 to YouTube H.265 to YouTube Powerdirector video to YouTube

If you want to upload Snagit video files to YouTube on Mac, please turn to Pavtube iMedia Converter for Mac. Now just download the program and check out the steps below.

Step-by-step Guide to Convert Snagit videos to Youtube Supported Format

Step 1. Import Snagit video files

Lunch the converter; drag & drop Snagitfiles to it. Or click the Add video button to locate the files you want to add. Note that batch conversion is supported so you can add as many files as you like at one time.

Step 2. Select output format

Click "Format" bar, and select .mp4 from "Common video" or "HD video" to fit YouTube. You can also press the Settings button to adjust the video size, bitrate, frame rate, audio sample rate, etc to optimize the quality.

Step 3. Trim/Split Snagit video

YouTube has limitations about the uploading video size and length. Here we should highlight the trim function on this software. Just click "Edit" to trim the Snagit videos to get the very part you want. Besides trimming, cropping, adding watermark, adjusting special effect, are well supported as well.

Tip: If the video clips you've trimmed are still longer than 15 minutes, you can choose to split the long Snagit video into smaller parts so as to share on YouTube without limit. Click the Split icon in the main interface, and you can cut your files according to time length and file size.

Step 4. Start the conversion

Click "Convert" button to start converting Snagit video for uploading to YouTube. After the conversion, click "Open" button to get the exported files and then upload the converted video files into YouTube for sharing with your friends, families, and fans.