Thursday, April 11, 2013

Canon C300 Workflow- Import/Load Canon C300 MXF to FCP 6/7 or FCP X

Which one is the most popular and hotly-received professional camcorder last year in 2012? It is no doubt that the Canon EOS C300 will on the top of the list. The new Cinema EOS camera, together with 5D Mark III, has successfully attract attention with its far more compact and less cluttered design, although not the price. Its new supper 35mm CMOS, DIGIC DV III Image Processor and Fully Compatible with New & Existing EF-mount Lenses make it meet the demanding needs of cinema industry professionals.

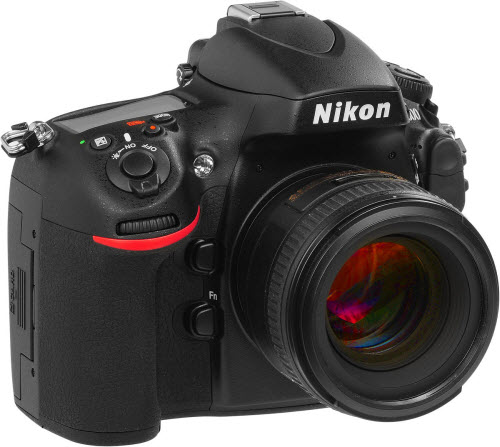
You may have got this camcorder, but you may find it is difficult to use canon C300 MXF files when you want to edit MXF in FCP X on Mac, or just want to put C300 MXF on tablet for playback. MXF format is not a common video format, and it is not supported by many editing software like FCP X and iMovie on Mac, or Premiere on Windows. Below is a guide for you to convert C300 MXF to FCP X for editing.

1.  Download Pavtube MXF Converter for Mac, it's a good MXF converter on Mac/transfer MXF on Mac.


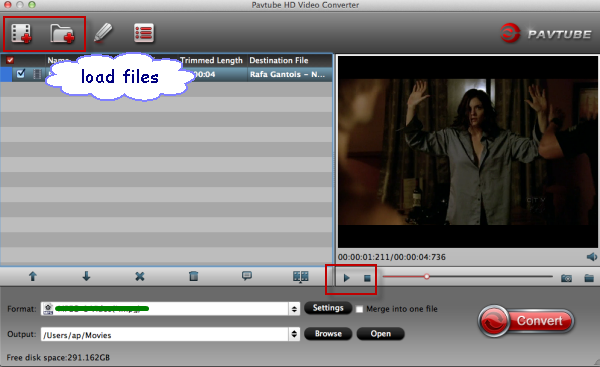
2. Install this C300 MXF to FCP X converter. Import the MXF files to the converter you want to convert.


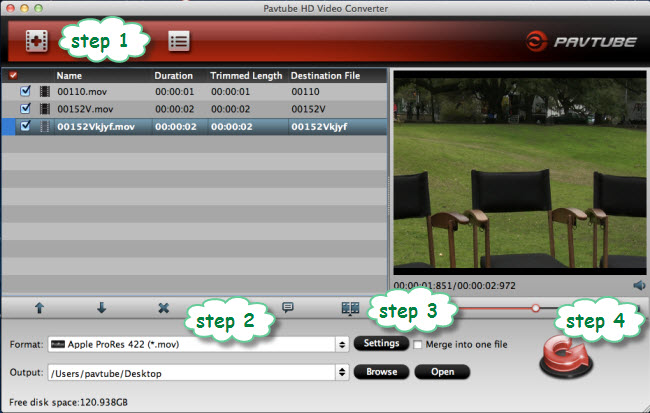
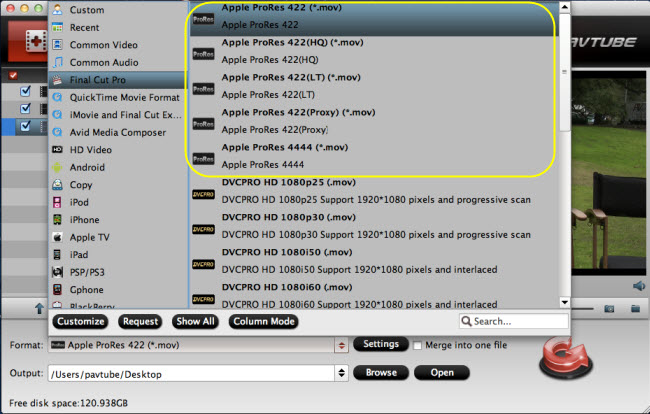
3. Click format bar to choose output format. Click and choose Final Cut Pro -> Apple ProRes 422 (*.mov), it's the best format for editing in FCP X.

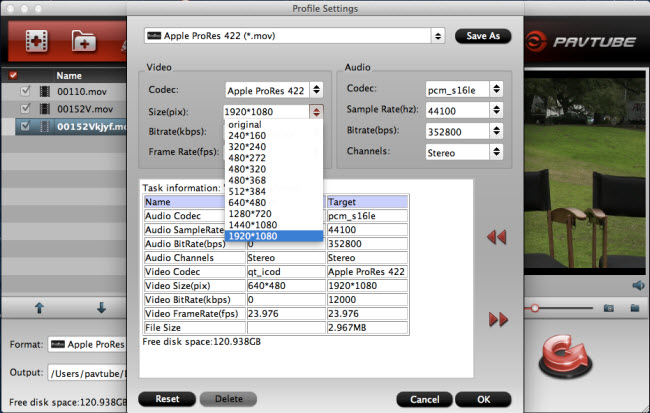
4. If you want to customize the output settings, you can click "settings" button to adjust the resolution, bitrate, etc.

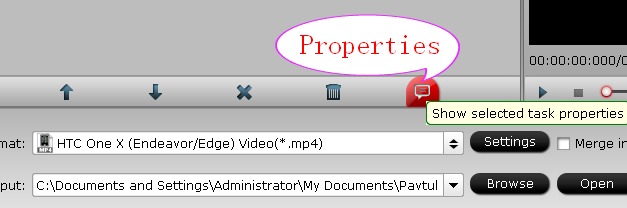
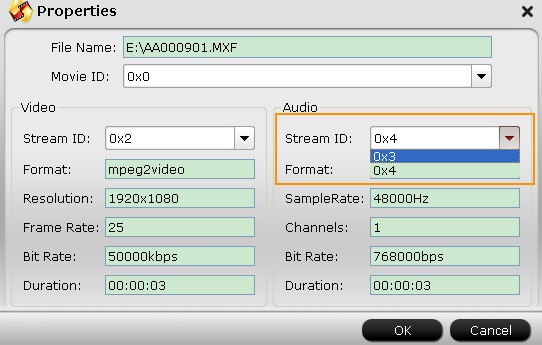
5. You can click properties to adjust the audio stream ID if you find the C300 MXF no sound. Besides, you can click settings button to adjust the resolution, bitrate, etc. Just customize the parameters to meet your need.


5. Click convert button to start convert C300 MXF to FCP X.

With the excellent C300 MXF to FCP converter, you can use MXF files in FCP X on Mac as you want.

Read More:

Wednesday, April 10, 2013

Transcode/Edit Sony Alpha A57/A65/A77 AVCHD video to mov for Final Cut Pro on Mac

In this tutorial you are going to learn how to convert AVCHD Video from Sony Alpha A57/A65/A77 to FCP compatible formats for editing.
 
Nowdays, more and more cameras can record full HD 1080 60p AVCHD files. If you'eve recorded your ideas or memory into HD videos with Sony A57/A65/A77, you may also want to edit those AVCHD mts files in Adobe Premiere. But you may encounter some problems when you want to import Sony A57/A65 footages to FCP for editing, like import it slowly, and couldn't edit videos smoothly.

The reason you can't edit Sony AVCHD MTS files in FCP smoothly is that AVCHD MTS/M2TS files are not well supported by FCP on Mac due to the unfriendly codec, you can't edit the videos smoothly in Final Cut Pro. The best solution is to convert Sony A57/A65/A77 AVCHD MTS/M2TS to FCP best supported Apple RroRes codec.
Now I will start with the step-by-step guide on how to convert Sony A57/A65/A77 AVCHD 1080/60p MTS/M2TS to ProRes 422 and then import the converted videos for editing in Final Cut Pro.

Step1: Download Pavtube HD Video Converter for Mac and import your Sony A57/A65/A77 AVCHD file.


Step2: Click format column and choose the output format. You are recommended to choose Final Cut Pro -> Apple ProRes 422 (*.mov)

Tips: If you want the files to be in smaller size, you can follow Final Cut Pro > Apple ProRes 422(LT) (*mov)/Apple ProRes 422(*mov) option. If your files size is at SD levels, you are advised to choose Final Cut Pro>Apple ProRes 422(Proxy)(*mov).

Step3: Click settings button to adjust the output video's parameters, such as bitrate, resolution, etc.


Step4: Start converting Sony A57/A65/A77 1080/60p MTS/M2TS videos to Apple ProRes for Final Cut Pro 6/7/X

After the Sony A57/A65/A77 AVCHD to FCP conversion, import the converted MOV files to Final Cut Pro, then you can edit Sony A57/A65/A77 videos in FCP smoothly.

You can also convert Sony A57/A65/A77 AVCHD to best editing codec for iMovie/Premiere Pro on Mac. Just enjoy your HD videos from Sony A57/A65/A77 in your FCP now! Good luck to you!

Editor's Recommendations

Tuesday, April 9, 2013

Nikon D800E to FCP Importing Tips-Smoothly edit Nikon D800 h.264 videos in Final Cut Pro


The D800E is designed to stimulate cinematographers to explore different moods and perspectives by enabling Full HD and HD video recording in two frame formats; Nikon FX- and DX-based movie formats in just one camera. By using the B frame data compression method, you can record 1080p Full HD video at 30p in H.264/MPEG-4 AVC format with unmatched moving image integrity for up to 29 min. 59 seconds of recording in a single clip.

"Just shot some footage with the Nikon D800E, I haven’t shot or edited HD before now, so need some help setting up the project, understanding about transcoding, exporting etc. This is also my first time shooting with a DSLR camera. The footage itself looks great. Problem is editing a sequence in FCP. I've read different things online regarding importing the D800E directly into FCP. Do I need to transcode the D800E files using ProRes or something else? And if so, how?"


This question is asked by a Nikon user, if you have used nikon D800E camera recorded many 1080P footages, you may want to import Nikon D800E video to FCP X/6/7 for editing. If you have got the D800E and often use it to record 1080P video, you may have the need to edit D800E MOV in Final Cut Pro on Mac, but FCP X best supported video format is Apple ProRes 422 codec MOV format, so FCP X doesn't support Nikon D800E MOV footages well. The best method to solve this problem is to convert D800E MOV footage to ProRes for editing in Final Cut Pro X, you can follow the steps below to transcode D800E MOV to FCP X for editing.

1. Download Pavtube Mac Nikon h.264 MOV Converter. This professional HD Video Converter can help you convert D800E MOV files to ProRes 422 MOV format for Final Cut Pro, more output formats are also supported.

2. Install and launch this D800E MOV Converter. Import Nikon D800E footage to the converter.


3. Click format bar to choose the output format. Click and choose Final Cut Pro -> Apple ProRes 422 (*.mov).


4. You can click "settings" to customize the output parameters, adjust the resolution, bitrate as you want.


5. Click convert button to start.

With this D800E MOV to Apple ProRes 422 converter, you can easily change D800E files to FCP X for editing, this software runs fast, so you can convert your D800E footages to FCP in less time.
Tips:

Before you try to do the conversion, if you are also a FCP X user, please make sure that you have installed the Apple ProRes Codec manually since the FCP X asks users to install it by themselves.

This Mac Nikon MOV Video Converter can alson convert videos to iMovie, Premiere Pro,FCE and Avid with good quality.

And you can get more info about how to import video to FCP (x) on pavtube website.

Editor's Recommendations

Monday, April 8, 2013

Fast Convert/import Canon XF100 1080p MXF to AIC MOV for iMovie


Canon XF100 makes use of Canon's XF codec-a file-based MPEG-2 compression with MXF file wrapper. It can record content with 1080/60i/30p/24p or 720/60p/30p/24p at a constant bitrate of 50Mbps for high color resolution of HDV. You can capture many interesting videos with Canon XF100.

Everything goes perfect until you try to edit Canon XF100 .mxf file in iMovie. Fail in import the MXF file into iMovie, though you can see the disk on the desktop and can play the files in the Canon plug-in after connecting the XF100 to Mac. Why does it happen? The answer is MXF file format incompatibility with iMovie (even iMovie'11).

To import XF100 MXF files into iMovie for editing, the best way is converting MXF to iMovie recongnized video formats like AIC .mov. Mac Canon MXF Converter is your best choice to convert MXF to iMovie on Mac.

With Mac XF100 MXF to AIC MOV Converter, you can keep the highest video quality for editing. In addition, you can also convert MXF to Prores for FCP, DNxHD MOV for Avid,AVC MOV for Premiere Pro or other popular video formats like WMV, AVI, MKV, FLV, 3GP, MPG, etc on Mac and edit videos like cropping videos, adding watermark, trimming videos, merging videos.

Step 1. After downloading, install and run this best Canon MXF to iMovie Converter for Mac, just copy the MXF files from the CF cards right to your hard drive, import the files to the software.


Step 2. Click "Format" bar to choose the output format.

Click format bar to choose the output format, for editing Canon MXF files on iMovie, you can choose iMovie-> Apple InterMediate Codec (AIC) (*.mov).


Step 3. You can click Settings button to adjust the output parameters such as resolution and bitrate, you can also keep it as original.


Step 4. Click convert button to start converting Canon XF100 MXF to AIC for iMovie.

Pavtube MXF to iMovie converter can convert Canon MXF footages quickly, after conversion, you can use converted files in iMovie smoothly, just have a try.

Sunday, April 7, 2013

Make incompatible Canon Vixia AVCHD MTS files work with FCP on Mac

Canon Vixia AVCHD Camcorders use AVCHD to record video as the following Vixia models: Canon Vixia HF S30, Vixia HF S21, Vixia HF S20, Vixia HF S200, HF M31, Vixia HF M30, Vixia HF M300, HF R11, Vixia HF R10, Vixia HF R100 (SDHC), Vixia HF S10, Vixia HF S100, Vixia HF20, Vixia HF200, Vixia HF S1,Canon VIXIA HF10.


These camcorders only record in high definition format using a special codec (compression/decompression) called AVCHD. This new codec is revolutionary for it's ability to compress very high quality HD video in a relatively very small space. Final Cut Pro (FCP) has gained the favor of many professional users including Hollywood film makers. But it only takes QuickTime and iMovie compatible video formats such as QuickTime MOV, QuickTime MP4, DV, HDV etc. Therefore, you are unable to transfer Canon Vixia AVCHD into Final Cut Pro and edit Canon Vixia video with FCP.

Now please follow the steps below to convert incompatible Canon Vixia AVCHD videos to FCP workable Apple ProRes files keeping the original video quality.

Step 1. Run the perfect Mac Canon MTS Converter , and click the "Add file" button to load the Canon Vixia videos to it.


2. Step 2. Click on Format > Final Cut Pro > Apple ProRes 422(HD) (*.mov) as the export to keep HD video for Final Cut Pro. Afterwards, you can set the output profile as you want.


3. You can click the Settings icon to do some audio/video settings. We recommend 1920*1080 as video size and 30fps as video bitrate for easier editing on Mac. If you are in PAL(50p) area, you are recommended 25fps as video bitrate.


Tip: Deinterlace Canon Vixia 1080i AVCHD

Click the "Editor" button, go to the Effect tab, and make sure the checkbox for Deinterlacing is ticked. The converter will remove interlacing artifacts from 1080i AVCHD videos perfectly.

4. Step 4. Click the "convert" button, and the Mac AVCHD to ProRes Converter will start transcoding Canon Vixia AVCHD to ProRes for FCP on Mac OS X immediately. Then you can get the resulted videos from output folder easily for importing and editing in FCP.

Tips: 

This Mac AVCHD MTS Converter is also compatible with other Mac Non-linear editing system like Final Cut Express, Avid Media Composer, iMovie, Roxio Toast, etc to import the AVCHD footages on Mac without incompatibility problems. You can get more info about how to edit Canon Vixia AVCHD MTS in iMovie.

Read More:

Saturday, April 6, 2013

The way watching and enjoying 3D AVCHD on PC and Mac


Nowadays 3D camcorders are becoming cheap and popular, many people take a Sony or Panasonic camcorder to record beautiful moments which in 3D. It gives us wonderful enjoyment. But for most of us, 3D camcorders record unusual AVCHD 3D videos may be new to us.


You may have got a 3D camcorder which record AVCHD videos, because Sony and Panasonic camcorders mainly use AVCHD as the recording video format. After recording, you may want to convert 3D AVCHD to MP4 or AVI format for playback or editing, at this time, you need a 3D AVCHD to MP4/AVI converter, or a anaglyphic 3D converter to convert recorded 3D files, Pavtube MTS Converter can help you, it has added 3D conversion feature, below is a brief guide for you to convert 3D AVCHD video to AVI/MP4 format.

1. Download and install Pavtube MTS Converter for Mac, it's an excellent 3D AVCHD converter for any player watch 3D.


2. Run this 3D AVCHD to MP4/AVI converter, import the 3D AVCHD files to the software.

3. Click format bar to choose output format, just click and choose HD Video -> H.264 HD Video (*.mp4).


4. You can click settings button to adjust the output parameters as you want, adjust the video codec, resolution or audio parameters.


5. Click convert button to start.

After converting the 3D AVCHD videos to MP4/AVI format, you can watch 3D AVCHD on PC with red and blue anaglyph glasses. The software supports many 3D camcorders, for example, it can convert Sony AVCHD video, convert JVC 3D video, convert Panasonic 3D video, etc. Now just download this 3D AVCHD to MP4/AVI converter and have a try, hope it can help you get better video enjoyment.
  • About AVCHD 3D:

AVCHD now supports a true 3D mode. Panasonic started shipping 3D cameras using 'side by side' encoding in 2010 and Sony joined the 3D race in March 2011 with Full HD 3D which means two video channels are used. The Sony approach uses a 50i or 60i video stream capturing 25 or 30 interlaced frames per second, per side.

Related Articles: