Tuesday, October 22, 2013

Convert AAC MKV/MP4 movies to AC3 with 5.1 Channels

Summary: Looking for an easy way to encode AAC 5.1 MKV/MP4 video to AC3 5.1? Here we will provide you an easy-to-use AAC to AC3 Converter to make the damn MKV/MP4 AAC video to AC3 so as to get it work with your home theatre system.

“I have a lot of MKV and MP4 movies with AAC 5.1 sound. I need to change the 5.1 AAC audio in my mp4 and mkv movies to AC3 5.1 channels as the AAC won’t work with my media player. I don’t want to touch the video or change its container and I just want to convert the audio to AC3. I have googled a lot around and tried various programs but they all seemed complicated or very slow. Which program can I use to do this? My most concern is the ease of use.”

Pavtube Video Converter for Mac probably would be the best answer to the question mentioned above. It is simple to use and features fast conversion speed. The advanced encoding technology accelerates its conversion speed to great extent. With this AAC to AC3 Converter for Mac, you can convert videos (including DVDs, Blu-rays) much faster than other similar tools. The Windows version is Pavtube Video Converter for Windows.

Related article for converting MKV audios? Such as MKV FLAC to AC3 5.1? Or you can learn more related details on this ssituation.

Here is how to encode AAC 5.1 MKV/MP4 video to AC3 5.1 on Mac

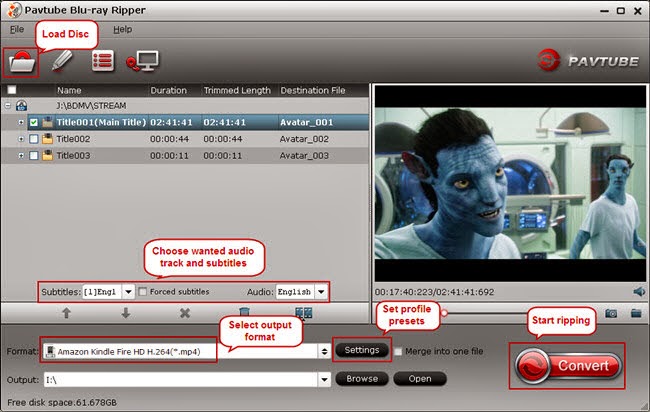
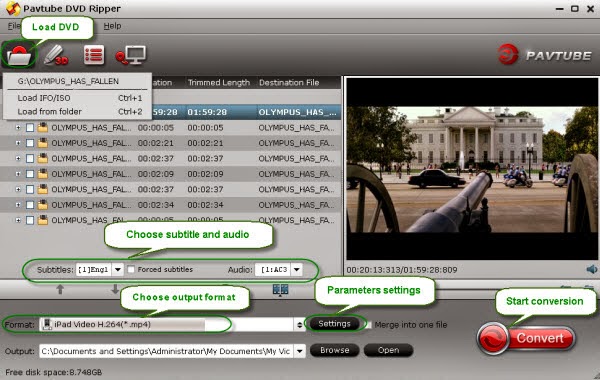
1. Import source media files
Download and install and run Pavtube Video Converter for Mac. Click “Add video” button to load your source MKV/MP4 files into the program. The iMedia Converter for Mac is multi-task based and supports batch conversion, this means you can load in multiple video files to convert at one time.


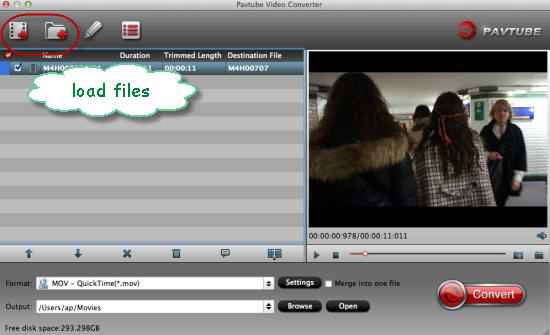
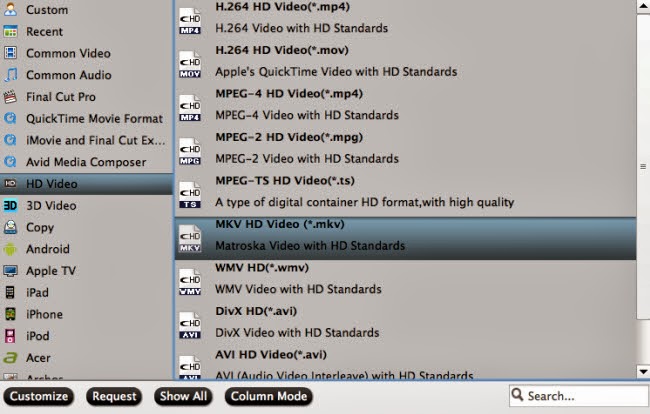
2. Select output format
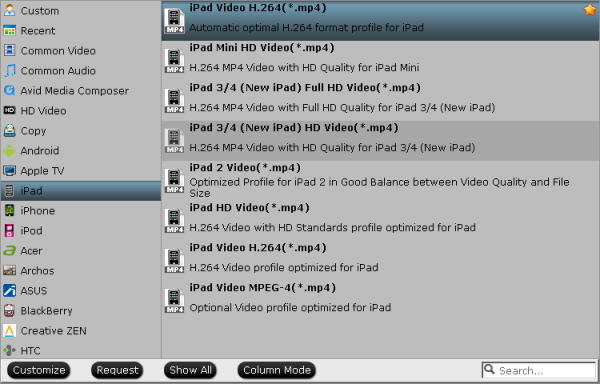
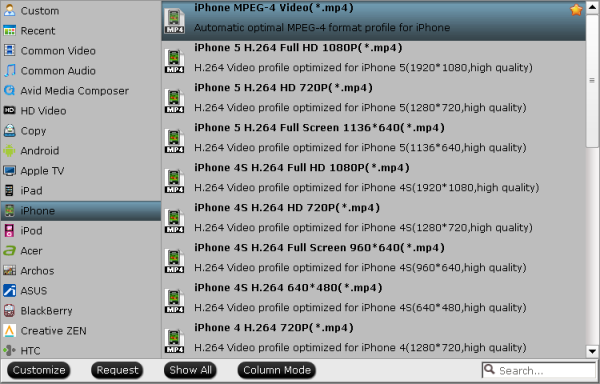
From the Format bar, navigate to “HD Video” catalogue, and choose either “MKV HD Video (*.mkv)” or “H.264 HD Video (*.mp4)” as output depending on your requirement. More than MKV to MKV and MP4 to MP4 output, high-definition videos can be re-coded into other formats retaining HD quality as well.


3. Change AAC to AC3
Click “Settings” button, the “Profile Settings” windows pops up, on which you need to set the audio codec to ac3. This ensures your output videos to be encoded with ac3 codec.


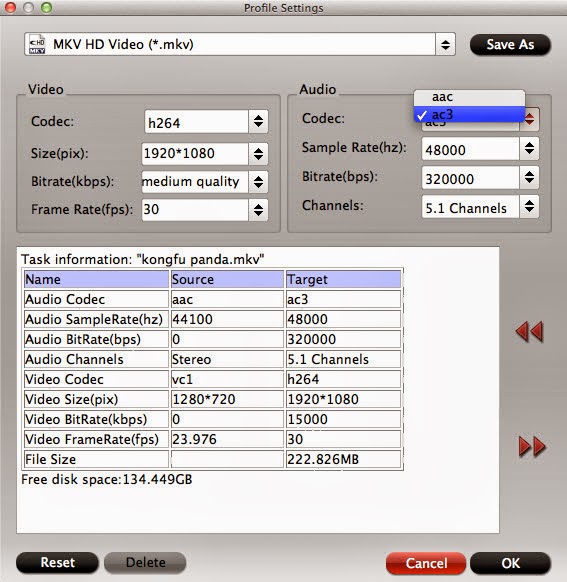
Apart from changing audio codec, you are also allowed to reset video resolution, video bit rate, frame rate, audio bit rate and sample rate on this window.

4. Start conversion
Click “Convert” button to start converting AAC in MKV/MP4 to AC3 with 5.1 Channels. As soon as the conversion finished, you can click “Open” button to get the generated files with ease.

Another good thing about Pavtube Video Converter for Mac is, it offers a “Shut down computer after conversion” option, so if you don’t want to wait around in front of your computer for the entire conversion process, you can tick off it and go away to do other things.

Read More:

Monday, October 21, 2013

Watch Blu-ray movie on Kindle Fire HDX 8.9 with perfect video quality?

Description: This article guides you to rip Blu-ray movies to Kindle Fire HDX 8.9 supported format so you could easily watch your Blu-ray movies on Kindle Fire HDX 8.9’s widescreen display.


By most measures, Amazon Kindle Fires are the most successful Android tablets on the market. Recently Amazon revealed the latest generation of Kindle Fires: the Kindle Fire HDX 8.9-inch, the Kindle Fire HDX 7-inch and the latest Kindle Fire HD.Of the three, the two HDX models certainly raise the bar for pure power and screen resolution. The Kindle HDX tablets also have screen resolutions that are starting to make “Retina Display” look quaint. Under the Fire HDX 8.9-inch's Gorilla Glass screen is a 2560 x 1600 display with 339 pixels per inch. In comparison, the iPad Retina, which also has a larger, 9.7-inch screen, offers 264 ppi.Even the tinier Fire HDX 7-inch has a whopping 323 ppi in its 1920 x 1200 display. The iPad Mini with standard display only has 163 ppi.

"I ordered an 8.9" hdx which I think I'll get mid Nov. I just need a bigger screen for email, internet, and watching my favorite movies etc. I liked the specs on the hdx and it's decent price. But I wanna to put my Blu-ray to Kindle Fire HDX 8.9; while, the only problem is the Kindle Fire HDX has no Blu-ray drive. So is there any way to play Blu-ray on Kindle Fire HDX 8.9 tablet?”

According to my experience, H.264 MP4 format is the best format for Kindle Fire HD 8.9. So to transfer Blu-ray movies to Kindle Fire HDX 8.9 for playback, you will need to convert Blu-ray to Kindle Fire HDX 8.9 supported MP4 format. Here, you are recommended to use Pavtube Blu-ray Ripper. With this easy-to-use Blu-ray ripping tool, I fast ripped and converted Blu-ray movies to Kindle Fire HDX 8.9 playable format MP4 and all files work perfectly on my Kindle Fire HDX. Awesome! Now I can play Blu-ray movies on Kindle Fire HDX 8.9 freely. In below article you would learn the easiest way to rip Blu-ray movies to Kindle Fire HDX 8.9 with lossless quality.


How to Rip Blu-ray movies to Kindle Fire HDX 8.9 with best quality?

1. Download, install and launch the best Blu-ray to Kindle Fire HDX Converter.

(If you are Mac users, try Pavtube Blu-ray Ripper for Mac)

2. Load source Blu-ray movie.

Click this "Load Disc" button to browser to your disc drive and import your source disc.


3. Choose Kindle Fire HDX 8.9 suitable format.

First of all, choose the wanted audio track from "Audio" drop-down list and desired subtitles from "Subtitle" tab.

Then hit the "Format" menu you could choose the Kindle Fire HDX 8.9 optimized format. Choose "Android > Amazon Kindle Fire HD(*.mp4)" (Download a patch here to get the Kindle Fire HD preset). The preset is specially designed for Kindle Fire HD, but can could fit on the Kindle Fire HDX 7/8.9 perfectly.


4. Set profile presets (Optional)

Click the "Settings" icon on program interface, you are allowed to set presets to get better video and audio performance on your Kindle Fire HDX 8.9. You could adjust video and audio parameters including Frame Rate, Resolution, Aspect Ratio, Video Bitrate, Sample Rate, Channels and Audio Bitrate.

5. Start ripping.

Hit the "Convert" icon and start ripping Blu-ray movies to Kindle Fire HDX 8.9. After it finishes, you would get a created MP4 file in output destination. Now you are ready to transfer your Blu-ray movies to Kindle Fire HDX 8.9 and watch them anytime and anywhere you like.

Learn How to Transfer Media Contents to Your Kindle Fire HD

Related Articles:

Friday, October 18, 2013

Another Weekend Special Offer- Get 30% discount for ByteCopy on Pavtube Facebook

Now it is time for another Facebook Weekend Special Offer! Good news for Blu-ray/DVD fans, on this weekend (2013, Oct 12~13th), only these two days! Pavtube Studio put 30% discount for its ByteCopy and Byte Copy for Mac. Hurry up! Like us on our facebook and get the Coupon Code! Never miss to get it!

Now click the links below to get 30% off to backup BD/ DVD with subtitle and multi audio tracks in lossless MKV. And rip BD/ DVD to any format for iOS/Android tablets & phones.

Pavtube Bytecopy for Windows or Mac (Both Only $29.4! You can save $12.6)

Get ByteCopy for Windows 30% off

Get ByteCopy for Mac 30% off
Key features:

- Backup BD/DVD with subtitle and multi audio tracks in lossless MKV
- Watch 3D movies in various 3D effect.
Side by side(left/right), top-bottom and anaglyph(red/blue) effect
- Rip Blu-ray/DVD movies retaining multiple audio and subtitle tracks in .mkv/.mp4/.mov. output format
- Retain chapter marker in lossless .mkv&.mp4
- Rip Blu-ray and DVD movies to a proper format for playing on your Android/Apple/Windows 8 tablets & smartphones, HD Media Players, etc.
- Extract subtitle files in separate .srt

Learn more about the product:

http://www.pavtube.com/bytecopy/

http://www.pavtube.com/bytecopy-mac/

Sounds great?

Come on and tell you friends as well!

Only 2 days left and to be expired on Oct 12, 2013

If you have any problem to buy or use Pavtube, pls feel free to contact support@pavtube.com (for Windows user), macsupport@pavtube.com (for Mac users).

Thursday, October 17, 2013

Convert MXF to MKV with multiple audio channels on Windows/Mac

Summary: How to convert MXF to MKV with keeping multiple audio channesl? Pavtube MXF MultiMixer and iMixMXF can be you ideal tools, which can convert MXF to multi-track MKV with fast speed and fabulous output quality.


If you often shoot with Canon/Panasonic/Sony cameras or camcorders, you may be familiar with MXF video format. MXF format is used by professional camcorders for recording high-definition video footages. Meanwhile, Matroska Multimedia Container (MKV) is an open standard free container format, a file format that can hold an unlimited number of video, audio, picture or subtitle tracks inside a single file. It is intended to serve as a universal format for storing common multimedia content, like movies or TV shows, which is similar in concept to other containers like AVI, MP4 or ASF, etc.

To backup your recorded MXF files or get MXF footage playbak on your media player, you need an excellent MXF Converter to help you convert MXF to MKV format. What's more, if you have some multi-track MXF and wanna retain the original multiple audio, here we will introduce iMixMXF- a top multi-track MXF to MKV Converter to you which enables you to convert MXF to MKV on Mac easily and quickly. Becides, it has editing functions and unique multi-track preserving feature. (If you are running on Windows PC, try Pavtube MXF MultiMixer.)

How to convert MXF files to MKV video keeping multiple audio channels

Step 1. Run MXF Audio Mixer. Click "Add Video" button to load your source MXF clips or drag and drop the MXF files to the converter. You are allowed to add multiple files to convert at a time.


Step 2. Click the Format button, and you would see lots of profiles listed. To keep multiple audio and subtitle tracks from Blu-ray Disc, you are recommended to choose "Multi-track Video" > "Lossless/encoded Multi-track MKV (*.mkv)" for output.

Step 3. Adjust video and audio parameters. (Optional)

Click "Settings" button to customize the output video and audio settings by yourself. But if you are not good at it, you'd better use the default parameters, they will ensure you a good balance between file size and image quality basically. You can change the resolution, bitrate, frame rate as you need.

Step 4. When above steps finished, you can click "Convert" button to start transcoding MXF to multi-track MKV for playback with a super fast speed.

With the excellent multi-track MXF to MKV Converter, you can enjoy and play MXF files with multi audio tracks MKV format in best video and audio quality as you want.

Additional Contents

If you don't want to get multi-track videos or your videos has less that two audio track, you can try Pavtube MXF Converter for Mac, a profession MXF Converter and a good partner with your simple and efficient MXF conversion workflow on Mac. It also does a great job in converting MXF to MKV format.

Read more:

Convert Canon MXF files to Prores/Multi-track Prores for importing to FCP X
Seamlessly transcode MXF to MP4 with multiple audio tracks
What are the best quality settings for converting mxf to mov files

Wednesday, October 16, 2013

Watch my DVD's on my new Kindle Fire HD

Wanna play your DVD movies on Kindle Fire HD? It is really difficult for us to find an effective player to resolve all our DVD videos. Actually, with the help of Pavtube DVDAid, we can easily deal with DVD playback issues.


The Kindle Fire HD is the second generation of Amazon's Kindle Fire line of color touchscreen tablet computers. It features a new 1280×800 high definition LCD display that brings greater experience on movie watching. Recetly I got my Kindle for watching films or backing up my DVD Collection.

However, 
as we know, Kindle Fire HD can't play DVD directly because it can't have a DVD drive. Kindle Fire HD supports MPEG4, VP8, H.263 videos. To watch DVDs on my new Kindle Fire HD, I think I need to use a DVD ripping software to help you convert DVD to Kindle Fire HD supported video files such as MP4 format. 

After trying a few DVD converters, finallly I find Pavtube DVDAid, (Alternative Mac version) and purchased it so I can watch my DVD's on my new Kindle Fire HD. I chose Pavtube because the interface was very clear and the whole process seemed very straight- forward. It does a great job in ripping my DVD movies no matter from DVD discs, DVD movie folders, or DVD IFO/ISO image files to a common video for my Kindle Fire HD and a HTC cell phone too. 

How to convert DVD  to Kindle Fire HD compatible videos files 

The below guide uses DVD Converter Windows (Windows 8.1 compatible) screenshots. The way to rip DVD files to your Kindle Fire HD on Mac is almost the same. Just make sure you ge the right version. 

1. Add DVD files to the program
 

Insert DVD movies into your DVD drive, then click "Load file" button to navigate to DVD movies you want to convert. As you can see, added files can be previewed on the right viewing window. You can adjust the video volume and take snapshots of your favorite movie scenes. 


2. Set output options for Kindle Fire HD 

Now choose the output format for playback on your Kindle Fire HD. You can get optimized videos for Kindle Fire HD under Format > Android > Amazon Kindle Fire HD H.264(*.mp4). The output videos could fit on your device perfectly. And choose the destination folder to save the converted videos. 


Tips:
1. If you want to keep multiple audio tracks and subtitle streams when ripping DVD to MKV, MP4 and MOV, you can try to use Pavtube ByteCopy for Windows or Mac.)

2. You can click “Settings” to tweak the detailed video and audio encoding settings. Or click “Edit” button to trim video into several segments by setting a specific output file size, append special effects, crop video screen area, add text/picture watermark. 


3. Start DVD to Kindle Fire HD conversion 

After all the above settings, simply click “Convert” button to start converting DVD files to Kindle Fire HD video. Just wait for the converting process to be done. After that, find the converted videos in your output folder and transfer them to your Kindle Fire HD. In this way, you can play DVD files on Kindle Fire HD and enjoy them on the go. 

P.S. If you have no idea about Kindle Fire HD file transfer, you can check out the post 
Synchronizing Your Content files (Videos, Pictures, Music) to Kindle Fire HD to learn more. 

Read More:

Monday, October 14, 2013

Windows Movie Maker .tivo files will not load

Summary: This guide will tell you how to use Pavtube Video Converter Ultimate to transcode Tivo to WMV for Windows Movie Maker editing without codec problems.


I am just an individual doing a little video editing. And my source videos vary from interviews to history programs I am converting and editing to include in our family history. I'm trying to upload my tivo files onto windows movie maker and it's not working. So I checked the automatically download codecs, still didn't work. Went into the compatibility where it says to check the box, but there is no box to check what do I do so that I can use tivo files on Windows Movie Maker.

My main goal here is to be able to import TiVo files into Windows Movie Maker smoothly. Looking for the ways. Now I aske this question in forums and find the problem only lies in the video codec of tivo files. But where to download the so-called "right codec" for Windows Movie Maker? Do you have to crack your brain to find the codec? The answer is negative.

At last, I turn to a more directly and easy way, that's convert Tivo to Windows Movie Maker compatible and editable WMV format. And Pavtube Video Converter Ultimate help me out successfully. It can be used as the winner to transcode Tivo to WMV format for Windows Movie Maker. Works well, do tivo conversion easily and converts flawlessly. I have no trouble now, and I still use it for my WMM editing.

Meanwhile, I find t
his Video Conversion tool can create files compatible with various non-linear editing systems like Avid, After Effects and Adobe Premiere (Pro),Windows Movie Maker etc. Below is the step by step guide to convert Tivo to Windows Movie Maker.

Step One. Transfer the Tivo files to PC.

Although the TiVo Desktop software for the Mac (supplied by TiVo) does not allow user to transfer TiVo recordings to Mac, you can transfer TiVo to Mac MacBook with specific software as long as your TiVo box is connected to your home network. Once you've recorded your favorite shows on your TiVo box, freeware like the TiVoDecode Manager can accomplish this task for you.

Step Two. Launch this Tivo Video Converter Ultimate.

Click the top left icon to import your tivo files.


It will pop up a window to remind you submit the tivo key. Click Ok and enter your tivo media key.

Here is a easy way to trim out commercial ads in tivo click the pencil-like icon on the top, switch to "Trim", you will be able to set up and start and end point easily. 

Step Three. Choose “Adobe Premiere/Sony Vegas -> WMV (VC-1) (*.wmv)” as the best intermediate video format for editing tivo in Windows Movie Maker.


Step 4. Now click the big “Convert” to start this easy conversion. Wait for a few moments; you can click “Open” to locate the converted video directly. OK, let’s import tivo video files into Windows Movie Maker for freely editing.

More Related:

Sunday, October 13, 2013

How to get my DVDs on to my iPad & iPhone

Summary: The guide shows you an easy way to rip and convert DVDs to Apple Device playable MP4 format for watching on iPad and iPhone.


I have bought some DVD's which I would like to transfer them to the iPad & iPhone so I can watch my favorites on my iPad & iPhone while travelling. Now I'm looking for ways to get the DVD movies onto iTunes, and then sync to my iPad & iPhone.

It is really great to enjoy favorite DVD movies on  iPad & iPhone. However, it is reported that DVD image files can't be played on iPad or iPhone directly due to the disc protection and format problems. So I search this question by googling, then I was suggested to get this best DVD to iPhone/iPad Converter to remove thing protection, then things become more easy.

After many trials, we select this DVD Ripper from Pavtube and it work great with removing DVD protection quickly (a few minutes during the importing) and smoothly converting them to MP4 which is preferred by IOS devices without any quality and sync issues. Very easy to use.  So I purchased the software. LOL~  Here I will share the easy workflow to rip DVD movie to  iPad & iPhone with high video quality. 

Download a free trial version here:

(For Mac OS X 10.5 Leopard users: download the .dmg file)

Step 1. Get this DVD Ripper for iPad & iPhone installed and import DVD.

Click "Import DVD" to load disc from ROM, IFO/ISO or DVD folder. Pavtube DVD Ripper will detect and check the main title automatically; keep it as default unless you also want to convert the tidbits.


Step 2. Choose iPad & iPhone video format.

This app contains an optimzed presetting for iPad & iPhone.  To get the output files fully compatible with your  iPad & iPhone, you can select the corresponding format.

For iPad, you just need to go to Format -> iPad -> iPad Video H.264 (*.mp4).


For iPhone , choose Format -> iPhone -> iPhone MPEG-4 Video (*.mp4).

Tips:

If you want to convert videos to iPhone 5 with best settings, you can download profile patch for the software. The profile"iPhone 5 H.264 Full HD 1080P(*.mp4)", "iPhone 5 H.264 HD 720P(*.mp4)" and "iPhone 5 H.264 Full Screen 1136*640(*.mp4)" are all available in Patch.

Step 3. Customize outputting video specs. (Optional)

You can click Settings bottom to adjust the output parameters including video codec, size, bitrate, framerate and sample rate(Hz).

Step 4. Start converting DVD to iPad & iPhone.

Click the red "Convert" to start converting DVD to MP4 for iPad & iPhone. After conversion, you can click "Open output folder" to quick location converted videos.

How to sync video, photo, music to iTunes on Windows/Mac?
How to sync media contents from iTunes to iPhone/iPad/iPod?

Related Articles:

Rip Blu-ray to iPhone 5S/5C with best quality
How to view MKV with DTS audio on iPhone 5C
Convert Tivo for transferring to iPhone 5C
Play DVD ISO/IFO on iPhone 5S/5C