Wednesday, November 6, 2013

Mac OS X: Copy Blu-ray ISO image file to Xperia Z1, Xperia Z Ultra

Description: This step-by-step guide reveals how to transfer Blu-ray ISO image file to Xperia Z1, Xperia Z Ultra for playback via Blu-ray to Xperia Converter for Mac.

Blu-ray, DVD and kinds of video files boost your multimedia life, if you have a large Blu-ray ISO files collection, it should be such a cool thing to enjoy them on your Sony Xperia series smartphones including Xperia Z1, Xperia Z Ultra anytime and anywhere. But how to make it happen? What should we do to transfer Blu-ray ISO image files to Xperia Z1, Xperia Z Ultra for playback?

Best Selling Blu-ray/DVD movies for October, 2013


This professional Mac Blu-ray ISO to Xperia Converter (30% off) is just designed to help you convert Blu-ray ISO image files to Xperia Z1, Xperia Z Ultra MP4 for playback and you don't even need to run virtual drive to mount the ISO file, just simply import. With its clean interface, fast converting speed and good video quality, converting Blu-ray ISO to Xperia Z1, Xperia Z Ultra will be simply finished within a few clicks. Now download it and follow the guide below.

FYI: If you want to keep all the audio tracks (language) and soft subtitles, here's another choice for you: Blu-ray ISO Converter Pro.


3 Steps to Rip Blu-ray ISO image files to Xperia Z1, Xperia Z Ultra support video format on Mac

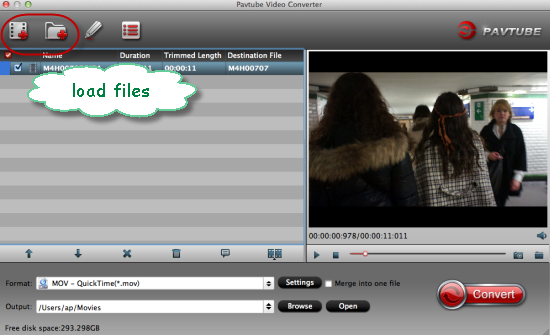
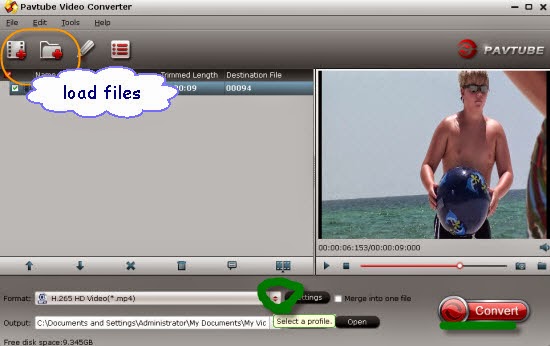
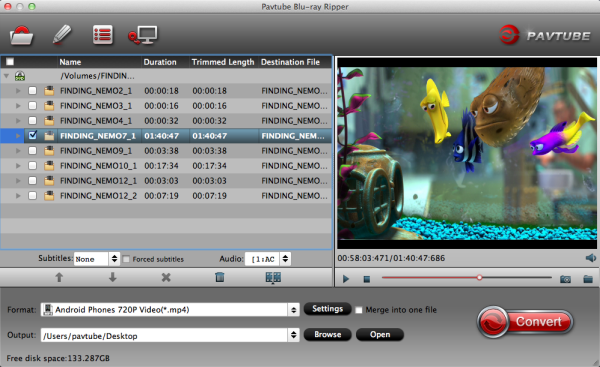
Step 1. Run this Top Blu-ray Ripperfor Mac, as the Blu-ray ISO to Sony Xperia Converter.

Click "Load file" to choose Load IFO/ISO file. It will recognize the ISO image file automatically so that you will not have to run virtual drive to mount the ISO any more.


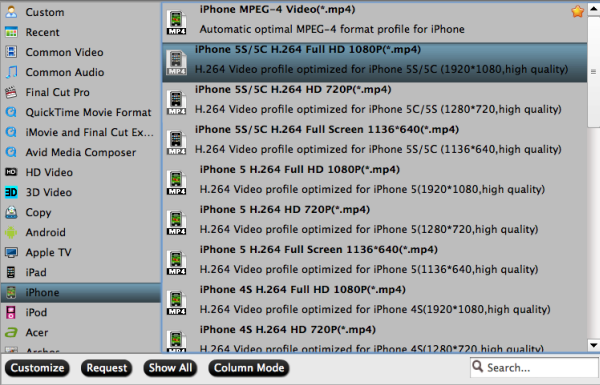
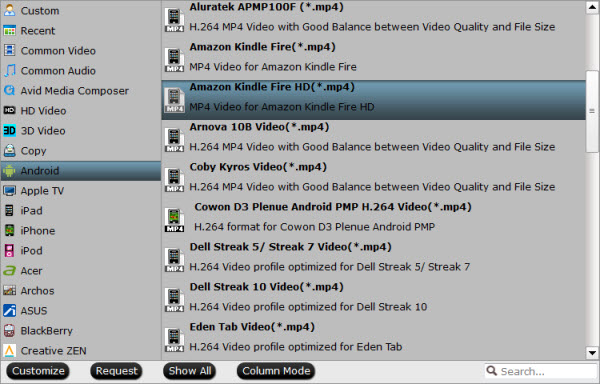
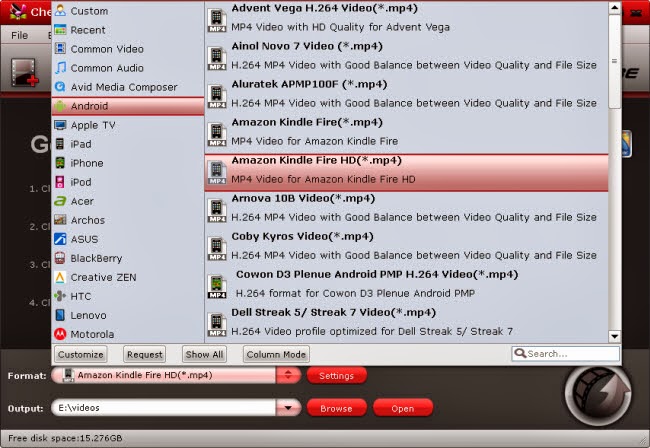
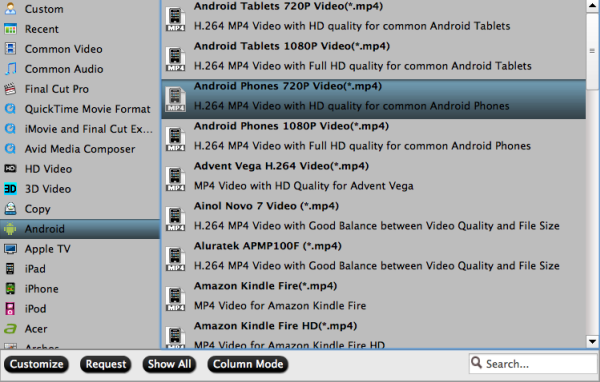
Step 2. Select Xperia Z1, Xperia Z Ultra compatible format.

Hit the "Format" menu you could choose the suitable profile for Sony Xperia Z1/Xperia Z Ultra/Xperia Z. When you cannot find the particular profile for your device from Pavtube Blu-ray Ripper for Mac, don't worry, it includes several general presets which are compatible for most Android phones and tablets.


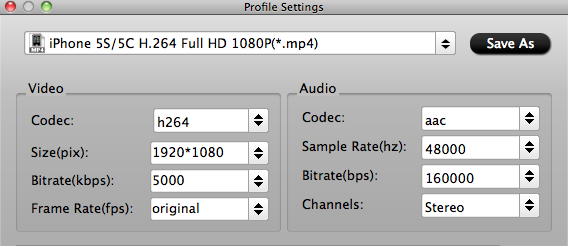
Tips: Customize video specs. (Optional)

Click the "Settings" icon on program interface, you are allowed to set presets to get better video and audio performance on your Sony Xperia Z1, Xperia Z Ultra.

Video
Codec: h.264
Size: 1280*720/1920*1080
Bitrate: 1500~2500
Frame rate: 24

Audio
Codec: aac
Sample rate: 48000
Bitrate: 128000
Channels: Stereo

Note: Higher Bitrate leads to better video quality in saved file, but it also creates larger video size. Don't forget the balance between video quality and size.

Step 3. Start the Blu-ray ISO to MP4 conversion.

When everything is OK, just press the "Convert" button to start the Blu-ray ISO to Xperia Z1, Xperia Z Ultra MP4 conversion. It will not take much time. Just wait for the conversion process to get done.

Note: Keep in mind that some of the settings can be tweaked to improve the video quality but it's a balance between quality and size. Using the settings we suggested, a 120-minute Blu-ray encoded to about a 1.3GB MP4 file.

After the conversion, you can click "Open output folder" to quick locate the converted video.

Additional Tips:

If you are looking for a powerful all-in-one ultimate video converter software to convert various 1080p/720p videos, Blu-ray and DVDs to your tablet or phone for enjoying, simultaneously saving time and effort, the 20% off Video Converter Ultimate program will be a nice choice for you. If you are running a Mac OS X computer, iMedia Converter Mac is the alternative, also 20% off now, never miss!

Related Articles:


Put and play Blu-ray and DVD movies to Sony Xperia Z1
Can Sony Xperia Z1 play MKV, AVI, VOB, WMV, Tivo, MPG, Flash videos
Record iTunes videos to Sony Xperia Z1/Xperia Z Ultra
Transcode Blu-ray/DVD Digital Copy movies to Sony Xperia Z1
How to Free Rip a Blu-Ray Disc?

Saturday, November 2, 2013

Play DVD ISO/IFO on Kindle Fire HDX, Kindle Fire HD with preferred subtitles

Want to transfer your favorite DVD ISO/IFO images onto Kindle Fire HDX and Kindle Fire HD?Well, this article will share you the solution.

Jeff Bezos posted yet another “Dear Customers” letter to the front page of Amazon.com announcing the new Kindle Fire lineup – that’s great advertising right there. The lineup consists of three tablets – the 8.9″ Fire HDX, the 7″ Fire HDX and the 7″ Fire HD. The Kindle Fire HDX, in 7- and 8.9-inch models, has improved the screen, processor, RAM, software, and body of last year's Fire HD.


If you have owned one, no matter Kindle Fire HDX or Kindle Fire HD, it is amazing for you to enjoy movies on the flight of business trip, on the railway of travel or wherever you are.

Well, have a quick glance of Amazon Kindle Fire HDX or Kindle Fire HD video format list, I got know Kindle Fire HDX or Kindle Fire HD can fully support MP4 video, but not the ISO files or IFO files. In other words, if I want to play DVD ISO/IFO on Kindle Fire HDX or Kindle Fire HD, I need to convert them in advance. Now, I’ve a big success converting DVD ISO/IFO movies to Kindle Fire HDX or Kindle Fire HD optimized MP4 format by using Pavtube DVD to Kindle Ripper.

This program is specialized in ripping DVD including commercial DVD with protections like BD+, region code. What’s more, you do not need to worry about the ripping and converting speed. It is excellent for it and it supports CUDA acceleration technology, which will provide you 6 x faster speeds. Apart from it, it will provide the high quality output files for Kindle Fire HDX, Kindle Fire HD and many other videos formats. Becides, you can freely add srt, ass, ssa subtitles you need to the converted video files. Go to get it and freely enjoy your favorite DVD movies on Kindle Fire HDX, Kindle Fire HD. If you are a Mac user, please turn to Pavtube DVDAid for Mac.

Note: If you still have a variety of Blu-ray movies waiting for transferring to Kindle Fire HDX, Kindle Fire HD for playback, or want to output 3D video, you’d better turn to Pavtube BDMagic. It can rip and convert both DVD and blu-ray disc.

How to convert DVD ISO/IFO to Kindle Fire HDX, Kindle Fire HD?

Firstly get your DVD in your DVD drive and then launch the software to get things ready.

1. Load DVD ISO/IFO image file to Pavtube DVD to Fire HDX/Fire HD Ripper.

Click "Load ISO/IFO" button on the top left to load the DVD IFO/IFO images, you can also "Import DVD" or "Load from folder". It will only take few seconds for ripping and importing DVD ISO/IFO and you will be kept informed of timely state with a progress dialogue box.

When it has been imported successfully, you can preview the whole movie and select the subtitle and audio you want.

DVD to Fire HDX/Fire HD Ripper

2. Choose Kindle Fire HDX, Kindle Fire HD friendly format.

Click "Format" menu to find the "Android" option in the dropdown list, choose "Amazon Kindle Fire HD H.264(*.mp4)" for output. It is the most compatible format, which is especially made for   Kindle Fire HDX and Kindle Fire HD.

Kindle Fire HDX, Kindle Fire HD friendly format

Tip 1. Click "Settings" button on the interface, you will be able to check and adjust the video and audio parameters like bitrate, size, channels, etc. Just do it when you need.

Tip 2. In order to get customized videos, you can add srt, ass, ssa subtitles to your own videos.

The free Subtitle Edit will help you to edit your own subtitles then put it into videos.
3. Convert DVD ISO/IFO image file to Kindle Fire HDX, Kindle Fire HD MP4.

You can "Browse" your computer to choose a new folder for output file before conversion. When everything is ready, click "Convert" button to start converting DVD ISO/IFO image file to MP4 Kindle Fire HDX, Kindle Fire HD, then "Open" button will show you the location of output files.
Pavtube DVDAid More Features:
  • Edit the videos before conversion, such as trim, crop, add subtitles, video effect, etc.
  • Convert DVD to many other mobile devices and editing software like iPad 3, iPad mini, ATV 3, Nexus 10, Galaxy Tab 3, S4, Note 2, Sony Vegas and more.
  • Backup DVD main movie to VOB format with original quality.

Now you can watch DVD ISO/IFO movies on Kindle Fire HDX, Kindle Fire HD anytime and anywhere. Hope it will help you.

Related Articles:

Wednesday, October 30, 2013

Move and Play DVD movies on Surface RT, Surface Pro

Summary: This simple tutorial mainly shows you how to convert and rip DVDs to Microsoft Surface Tablet supported video formats so that you can play DVD movies on Microsoft Surface RT & Surface Pro Tablet anytime, anywhere. 

Microsoft has announced its new Surface tablets, touting some noticeable enhancements over last year's models. Microsoft's more "productive" tablet device, the Surface Pro 2, will launch with the full version of Windows 8.1 Pro, featuring compatibility with all Windows desktop software. The Surface 2, meanwhile -- the sequel to Microsoft's Surface RT, which is meant to compete with Apple's iPad -- is being given an even more noticeable specs bump and a new silver colored casing.


If you have some DVD movie collections and want to play DVD movies on the Surface RT&Pro Tablets, you need to convert DVD to Surface Tablet accepted videos on computer as your first move along with some help from third-party softwares. To help those who wanna get DVD movies off of DVDs and onto Microsoft Surface RT or Surface Windows 8 Pro Tablet for playback, below, I would throw a quick tutorial up.

At first, I recommend you try the 20% off Pavtube DVD Ripper (Alternative Mac Version). It is easy to use for editing and conversion and makes great quality copies of my DVDs.

To be honest, the DVD to Microsoft Surface Converter can help you rip and convert all the DVD discs even DVD ISO/IFO image files to Surface RT/Pro compatible MP4 format. Besides, the audio/video synchronization is very good, the size of the subtitles too.

Convert DVD movies to Surface RT, Surface Pro compatible video formats

Note: The quick start guide below uses DVD Ripper Windows screenshots. The way to rip DVD movies to Windows 8 Tablet on Mac is almost the same. Just make sure you get the right version according to your computer operating system.

Step 1. Install, download and run the Pavtube DVD to Surface Converter. Load your DVD files to the program.


Step 2.
Click "Format" bar, follow "Windows > Microsoft Surface Windows RT H.264 Video (*.mp4)". You can click "Settings" to change the video encoder, resolution, frame rate, etc. as you wish (Remember: bitrate higher results in big file size, and lower visible quality loss).


Note: If you also want to enjoy Blu-ray/DVD movies to 3D videos for playback, trying Pavtube Bytecopy (Win/Mac), which can help you to backup your BD/DVD keeping original subtitle streams and convert latest Blu-ray and DVD movies to any other formats like MP4/MOV with multi-track audios , refer to Reviews of ByteCopy for Mac

Step 3.
Start to rip DVD movies to h.264 MP4 videos for playback with Microsoft Surface Windows RT and Surface Pro.

Step 4. Transfer the result videos to Microsoft Surface Tablet thru cables.

So there you have it. Pretty simple. In this way, you can realize viewing DVD movies on Microsoft Surface Windows RT and Windows Pro Tablet and enjoy DVD movies on the go!

Related posts:

Related Articles:

Monday, October 28, 2013

Can iPhone 5S/5C play 1080p/720p HD Videos (MKV, AVI, VOB, Tivo, WMV, MPG, M4V, FLV, F4V, etc.)

Description: This article shows brief instruction about how to play 1080p/720p MKV, AVI, VOB, Tivo, WMV, MPG, M4V, FLV, F4V, videos on iPhone 5S/5C supported video formats on Mac.

iPhone 5S/5C is the 7th generation iPhone with iOS 7 which brings super-fast wireless internet, comes with Verizon in the USA. The iPhone 5S features a famous fingerprint sensor, and contains an A7 chip which more powerful than any of the current iPhones. Its budget version – iPhone 5C carries a 4-inch Retina display and A6 processor as the iPhone 5. Well, both of iPhone 5S and iPhone 5C features Retina display and have more powerful chip in graphics processing, this makes better enjoyment if we copy 1080p/720p videos to Kindle Fire HDX for watching.


Tips for Showing Best Video Formats Supported by iPhone 5S/5C:

Video Format: .m4v, .mp4, .mov, MPEG-4, H.264, M-JPEG

Audio Format: AAC, Protected AAC, HE-AAC, MP3, AAX, AAX+m, Apple Lossless AIFF, WAV

If you want to trasfer MKV, AVI, VOB, Tivo, WMV, MPG, M4V, FLV, F4V, etc. videos to your new iPhone 5S/5C for freely watching, you need to convert videos to iPhone 5S/5C compatible and widely used video format. Now let's follow this article to learn how to quick convert all 1080/720p videos to iPhone 5S/5C supported MP4 format on Mac.

Here we recommend Pavtube Video Converter for Mac (Windows version: Video Converter ), a professional video converting program which is able to outputting 720p/1080p videos with the simplest workflow and reliable video quality.
Guide: Soultions for playing movies or videos (MKV, AVI, VOB, Tivo, WMV, MPG, M4V, FLV, F4V, etc) to iPhone 5S/5C with High Quality on Mac

Preparation: Before learning how to convert movies or videos to iPhone 5S/5C, please make sure the video to Mac iPhone 5S/5C Converter installed.

Download a free trial version here:

Step One. Add videos to iPhone 5S/5C Video Converter Ultimate for Mac.
Click the top left icon to add your source videos, or drag-and-drop them directly.

Pls note that if you import a Tivo file, you will be asked to submit Tivo key in the pop-up window.


Step Two. Choose target video format.
Click the drop-down list on the bottom, we can see various presets for iPhone, iPad, iPod, Android phones/tablets, editing programs, Xbox360, etc. Let's click "iPhone" on the left, and then we will find all the presets for different models of iPhone.

To get best video quality on iPhone 5C/5S, you are suggested to choose "iPhone 5S/iPhone 5C H.264 Full HD 1080P (*.mp4)" or "iPhone 5S/5C H.264 HD 720P(*.mp4)" as the target video format at your needs.


Step Three. Customize video specs. (Optional)
Click "Settings" to open profiles settings window. Here you are able to customize video size, bitrate, frame rate, sample rate(Hz)…all the specs can be fixed manually. A personal tip: the higher bitrate you choose, the better video quality will be; and you will get videos in larger size.


Step Four. Start Conversion.
Go ahead and hit the "Convert". It will pop up a conversion window with detailed prorecess. Wait for moments, you can click "Open output folder" to locate the converted video directly. Or you can check "shut down computer after conversion" and just leave it running.
Related Articles:


Thursday, October 24, 2013

Get Kindle Fire HDX 7 to Play all 1080p/720p MKV HD movies

Summary: If you are troubled in playing 1080p/720p MKV HD videos on Kindle Fire HDX 7, here's the Windows solution to convert MKV to MP4 videos for your Amazon tablets. 

 
User's Reviews:

This evening when arriving home from work, I anxiously opened the packaging on my brand new Kindle Fire HDX 7". After spending only a few moments, from setup to navigating through various apps (books, web, videos, etc...), I must say that the device is near flawless. 

Kindle Fire HD 7" is great media player for watching movies, however, just like other Android os tablets, the Android os tablets can only play limited video formats. So sometimes, you will find you can not play MKV files on Kindle Fire HDX 7 properly or missing audio when enjoying MKV videos on your Kindle Fire HDX 7. So how if you want get these MKV HD videos work normally on Kindle Fire HDX 7? Get frustrated? Here you will find the best solution.

MKV is a container format which has many different codecs, so it's hard to handle it. The reason you cannot play MKV videos on Kindle Fire HDX 7 is simple: the default or downloaded video player on your tablet cannot find a suitable decoder for the codec in the MKV file. For example: MKV to After Effects? MKV to iTunes?

To solve these problems, a great method is to convert MKV to Kindle Fire HDX 7 supported video formats (H.264 MP4 is highly recommended) with some help from third-party tools. To get the work done, below I will take Pavtube Video Converter as example to show you how to encode MKV to MP4 videos under Windows 8/XP/7/Vista  for viewing on Kindle Fire HDX 7 without problems.

The equivalent Mac version is the VideoConverter for Mac, which can help you successfully convert MKV to Kindle Fire HDX 7 on Mac OS X. Just download it and follow the step-by-step guide to transfer and play your 1080p/720p MKV files on Kindle Fire HDX 7 smoothly.

Convert MKV to Kindle Fire HDX 7 supported video formats
The below guide uses Video Converter Windows screenshots. The way to encode MKV files to your Kindle Fire HDX 7 on Mac is almost the same. Just make sure you get the right version.

1. Download, install and launch the best MKV to Kindle Fire HDX Converter. And then click "Add Video" or "Add from folder" to import your source materials in .mkv format. Besides MKV, you can also load FLV, AVI, WMV, VOB, TiVo, MPG, MOV, etc. files to the program. Batch conversion is supported so that you can add multiple files.


2. Choose the output video format and output folder. Click "Format" bar and move mouse to "Android" column, you can easily find the profile of Amazon Kindle Fire HD H.264(*.mp4). The output videos could also fit on your Kindle Fire HDX 7 perfectly. And choose the destination folder to save the converted videos. If you like, you can click "Settings" to change the video encoder, resolution, frame rate, etc. as you wish.

kindle fire hdx video format Put and Play 1080p/720p Videos, Blu ray and DVD Movies on Kindle Fire HDX

3. After above settings, you can start the MKV to MP4 Conversion for Kindle Fire HDX 7.
Once the process completes, download and transfer the converted MP4 videos to your Kindle Fire HDX 7 from your Mac via USB cable. Then you are free to enjoy and play 1080p/720p MKV videos on Kindle Fire HDX 7 as you like.

(The workflow also fit your Kindle Fire HDX 8.9 of course)

See Also:


Wednesday, October 23, 2013

Free and Up to 30% Coupon for BD/DVD/Video to Tablets Converter at Pavtube Halloween Promotion 2013

Description: Pavtube is offering Halloween huge discount for everyone who would like to own a piece of BD/DVD copying program or video converter.

Good news for Android, Apple, Windows 8 users - Pavtube Studio has just launched Software Coupon Code for Halloween 2013, in which you can g get FREE Pavtube DVD Ripper and Pavtube Video DVD Converter Ultimate. Up to 30% off discount for Pavtube best sellers! This offer is available arriving any day over the Halloween mid term break period between the 23nd October and the 6th November.


Take advantage of the Pavtube 2013 Halloween Special Offer Now - Rush to Buy!

Free products:

(Like Pavtube Facebook Page to Get Free software programs)

Free DVD Ripper - Help you convert any DVDs to MOV, MKV, AVI, MPG, VOB, WMV, FLV, etc with fast speed. It also helps edit DVD and add SRT/ASS/SSA subtitles to DVD movies

Free Video DVD Converter Ultimate
- Convert any video (including TiVo) and DVD to MOV, MKV, MPG, AVI without problem. Same editing as retail version.

30% off discount:

Blu-ray Ripper – only $34.3, Save $14.7

Pavtube’s best seller Blu-ray Ripper which rips Blu-ray and DVD to PC, iPad, Android tablets and more devices.

DVD Ripper - $24.5, Save &10.5

User-friendly DVD converter to copy and rip DVD to multiple video and audio formats for different usage.

20% off discount:
Video Converter Ultimate - $52, Save $13

Spent on this all-in-one program to help you backup Blu-ray/DVD with original structure and convert Blu-ray, DVD and regular videos for hot tablets and smartphones.

Video Converter - $28, Save $7

Available for everyone to transcode virtually all video and audio types, camcorder HD footages and TiVo recordings to desired video/audio format.

More information about Pavtube software is available at Pavtube official site (www.pavtube.com) and you can get more coupon codes at 2013 Pavtube Halloween Giveaway.

More money saving tips at Special Offer Page:

ByteCopy($42) + Blu-ray Video Converter Ultimate($65) = Only $80, Save $27
ByteCopy for Mac($42) + iMedia Converter for Mac($65) = Only $80, Save $27
ChewTune ($29) + Blu-ray Video Converter Ultimate($65) = Only $75, Save $19
ChewTune for Mac($29) + iMedia Converter for Mac($65) = Only $75, Save $19
Blu-ray Video Converter Ultimate($65) + DVD Creator($35) = Only 65$, Save $35

......

How to get a Digital Copy of a Blu-ray/DVD onto Kindle Fire HDX 7/8.9

If you have issues about copy a Digital Copy movie to your Kindle Fire HDX 7/8.9, read this article to find an effective way to achieve your goal smoothly.

After weeks of speculation and leaks, Amazon has finally pulled the curtains off its next-generation Kindle Fire tablets, the Kindle Fire HDX tablet line-up. The Kindle Fire HDX line-up comprises two tablets: a 7-inch and an 8.9-inch variant, much like the Kindle Fire HD unveiled last year.


As we all known, it can do many things like listen to music, surf on the internet, watch the latest movies and more. You probably have transferred some Digital Copy movies to your PC, and expect to get them ported over to your Kindle Fire HDX for playback. However, you can't easily put Digital Copies to Kindle Fire HD as they are restricted by DRM protection. So what can we do?

No worries, it couldn't be simpler once if you find this DRM Video Recorder for Kindle (Learn why choose it)! Actually we could not find any other program more powerful because it's able to unlock all the DRM videos as long as your video is authorized and it's able to playback on this computer.

Note: Before conversion you need first to transfer Digital Copy to computer in Windows Media (.wmv) or iTunes video format (.m4v). If you have no idea about how, check the post "Blu-ray/DVD Digital Copy: Transfer, Play and Backup" to learn details.

Step 1: Download and install ChewTune or ChewTune for Mac.

When converting protected Digital Copy WMV or M4V files, please make sure you videos play well in Windows Media Player or iTunes (Windows Media Player or iTunes is required for the conversion). Otherwise, the conversion may fail.

Step 2: Click "Add Video" or "Add from folder" button to import your Digital Copy movies or just drag and drop the movies to the software. Batch conversion is supported so that you can add multiple files to convert at a time.

Chewtune Windows Interface

Step 3: Click "Format" bar and move mouse to "Android" column, you can easily find the profile of "Amazon Kindle Fire HD (*.mp4)". The output videos could also fit on Kindle Fire HDX 7/8.9 perfectly. If you like, you can click "Settings" to change the video encoder, resolution, frame rate, etc. as you wish.


Step 4: Click the big "Convert" button to begin removing DRM from Digital Copy and convert DRM-free Digital Copy movie to Kindle Fire HDX playable video format - MP4.

Once the encoding task completes, you can transfer the result videos to your SD card for your  Kindle Fire HDX. There now you know how to get Digital Copy movies onto your Kindle Fire HDX 7/8.9 so you can watch them on that gorgeous screen!

This workaround works with other Android Tablets as well, of course.

Additional Tips:

About ChewTune - An easy-to-use yet intuitive and stable DRM converter which can help you strip DRM protection from iTunes, Blu-ray/DVD Digital Copy movies Amazon, Zune, BBC iPlayer, Napster, Blockbuster, etc. and convert and record videos to all popular video formats like MP4, MOV, MKV, WMV, AVI, FLV, etc. for playing and sharing anywhere you like. The audio/video synchronization is very good and the quality of the converted videos too. It's completely free for protected Audio files.

Related Articles: