Tuesday, November 11, 2014

Make Sony PXW-X500 Footage Work Well with Kdenlive

As a professional photographer, you must wanna know how to smoothly make Sony PXW-X500 files work well with Kdenlive.


No matter you are a professional or amateurish shutterbug, you may have a dream of owning a nice camera that can record everything you see and experience. For the latest high-end camcorder--- Sony PXW-X500 was released not long ago. This kind of powerful camcorder is equipped with three 2/3-inch type Full HD CCD sensors, which can help users to record low noise and high sensitivity videos. 

While as we received this program and took some recordings, we were asked to stop because of the output XAVC files, which are not so suitable for almost all popular editing tools, also Kdenlive is included. Unfortunately, there is no effective third-party apps can do this well so what we need here is a professional XAVC to Kdenlive Converter for Mac

Kdenlive, as a free open-source video editor for Mac OS X, it is an intuitive and powerful multi-track video editor. So we especially here recommend you the Mac Version for you, surely you can get the Windows version here. Do you know how does it work? You will be surprised with its easy operation and concise design.

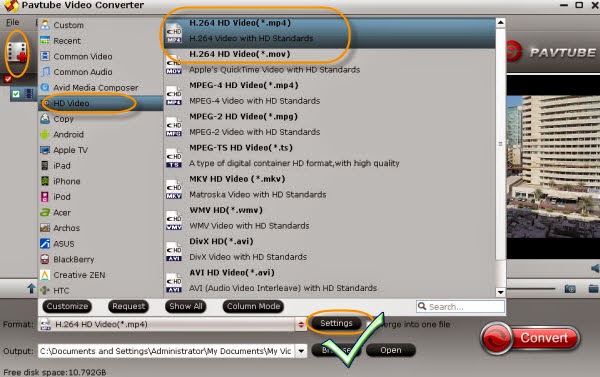
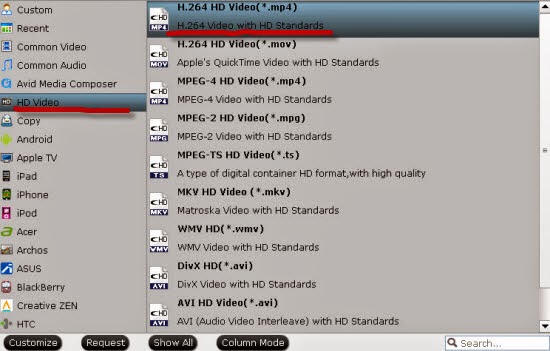
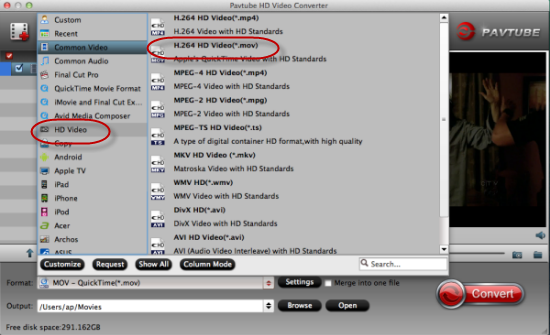
When you free download the Mac XAVC Video Converter, if you have already store your files on your computer you can directly drag them in your program or ‘Add Video’ and ‘Add from folder’ can do you a big favor. Next, what we should choose as the best output? Here we go: ‘HD Video’>>’H.264 HD Video (*.mov) as the following screenshot showed.


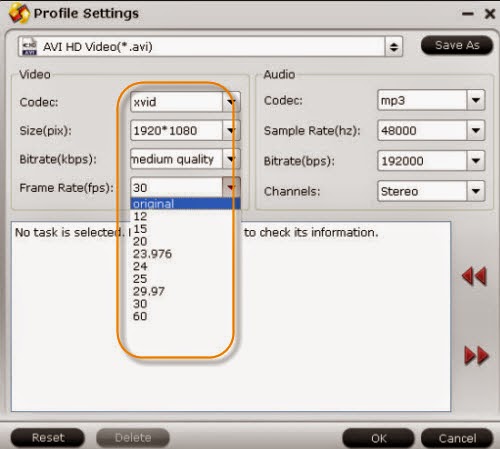
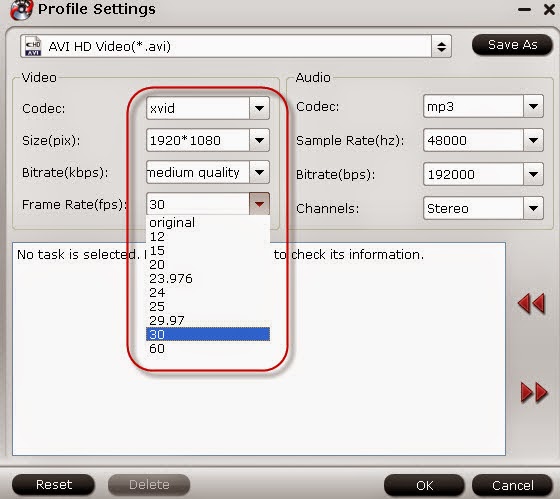
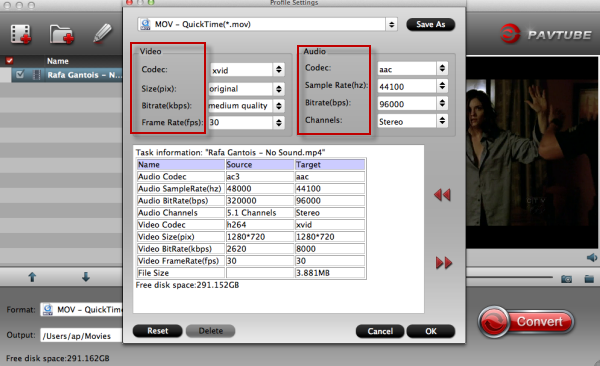
Additionally, ‘Settings’ for additional design on output videos if you like. Codec h.264, Size, Bitrates or Frame Rate. In Audio list, you can also change your channels, Mono, stereo or 5.1 channels.


Make all your preparation work done? If you guys got any other questions or useful tips, please leave us below as comments. Or you can take the following related guides as reference.

Thursday, November 6, 2014

Convert and Play 1080p HD Videos on Newest Operation Windows 10

Have you ungraded to the latest Windows 10? So what do you feel about watching 1080p HD videos? Let’s together read the paper here!


Isn’t it a big surprise that Windows 10 has been released not long ago for those Windows fans? How do you feel about the Windows 10 strong capacity if you already upgraded. For newer experience and best high definition enjoyment, you must not be disappointed with this one. At the same time, Windows 10 also has the domes, such as not still be compatible with some HD video formats.

As usual, although some fans have got the latest operation, they meet some trouble of playing 1080p HD videos on Windows 10 which encoded as MTS, MKV, MXF, etc. To solve all the trouble above, we recommend you a 1080p HD Video Converter here to make your videos suitable for the operation on Windows.

Tip: Expires on Nov 10th, if you get in on this Discount Promotion Page, you will receive a big surprise!


Easy operations of this conversion you can take the reference here, download the program with right instructions and load your files with ‘Add video’ or ‘Add from folder’. How can we choose formats with original video quality? On the output list, ‘HD Video>>H.264 HD Video (*mp4)’ should be your best choice.


To suit for the screen and also own the high definition, we should adjust our videos in ‘Settings’ button. It’s so necessary to set the ‘video size’ as 1920*1080. More requirements of audio, on the right items, you can get more. 

Finally, tap the item ‘Convert’ to get your work started. If you need other programs, why not go to the ‘Halloween Topic page for a further exploration? More guides you can also read below:

Wednesday, November 5, 2014

Again Celebration of Halloween Converters Promotion by Pavtube Studio!

This paper mainly tells us the introduction of several popular video converters on Pavtube studio which also has the Halloween discount!


Searched online, you guys may know so many popular videos converters that can especially meet most photographers or video editor’s requirements. With different functions or prices, it is hesitating for us to make some decisions, right? Follow the 2014 Halloween which past only several days, here we introduce some Pavtube Video Converters with special Halloween discounts. More details on 
Halloween Topic Page?

Pavtube MTS/M2TS Converter for Windows/Mac, especially for converting MTS/M2TS/M2T/TS/AVCHD/MOD/TOD footage to almost all video formats. What’s more, so many popular editing tools or media devices you can find listed on output items in this program. What else we also call it as a simple editor because you can adjust your files in ‘Editor’, like trim, crop, subtitles, etc. Let’s just make our MTS/M2TS compatible with everything.

Pavtube Video Converter for Windows/Mac, which is a functional assistant that can handle almost all HD/SD audio/video formats. For another way, it’s the best one for Tivo/DVR recordings. So other items you can have a try on main interface such as ‘Settings’, ‘Editor’, ‘Merge into one’, etc. All Windows operation it can work well. Also, GPU acceleration technology is available. For example,  iPad Air 2, iPad Mini 3, iPhone 6 plus, iPhone 6, Galaxy Note 4, Galaxy Note Edge, Nexus 6, Nexus 9, Kindle Fire HDX, Surface Pro 3, etc are offered there.


Pavtube HD Video Converter for Windows/Mac, the biggest highlight this one can handle HD digital camcorder footages such as AVCHD (MTS, M2TS), MXF, MOV, etc. Others? Deinterlace to get the better video, advanced adjustments for some professional video editors, wide range of outputs and supported devices, etc.

Pavtube MXF Converter for Windows/Mac, especially designed for MXF footages which shot by MXF cameras. For example, it can convert MXF files for free playback on iDevices, Android devices and media players. Furthermore, MXF files batch conversion can be also supported. Is that cool?

Pavtube MXF MultiMixer/iMixMXF, do you know the biggest characteristic of this program? Keep multiple audio tracks/channels in multi-track MKV/MP4/MOV formats, surely with rich editing functions. On the output list, you can find the item ‘Multi-track Video’ that other products don’t have. Others for example, batch conversion, merging and splitting. 
For Blu-ray or DVD rippers, you can also see here. Pavtube DVDAid for Windows/Mac or BDMagic for Windows/Mac. I’m sure it can meet your needs such as ‘Copy’ files, rip DVDs or Blu-rays, etc.


Whatever video formats shot by cameras you wanna edit for a nice enjoyment or upload on websites, the programs we mentioned above can do you a big favor. For now, I have to mention here is to celebrate the 2014 Halloween, such a big discount on this paper! 50% OFF on all BD/DVD or Video tools! Only 5 days left! What are you waiting for?

Tuesday, November 4, 2014

Upload Footage to YouTube and Vimeo from GoPro Hero3+ Black Edition

This paper below can tell you how to upload videos from GoPro Hero3+ Black Edition to YouTube and Vimeo.


Hey, guys! How did you celebrate the 2014 Halloween several days ago? According to traditional activity ‘Trick or Treat’, have you got yourself played and made some tricks on others at the Halloween night? Some people told me they have shot some funny videos during the Halloween days and uploaded them on YouTube and Vimeo for watching.

However, it’s a pity that someone reflected that they can’t freely upload their Halloween videos on website because of the compatible formats. For example, when you got the footages from Vimeo from GoPro Hero3, you must be failed in uploading to YouTube or Vimeo---which two video websites that is popular among our audience. Maybe here we need the GoPro Hero3+ Video Converter for Windows/Mac as an assistant.

It is not necessary to cost you a lot of time but can indeed solve a lot of trouble for you. Why not here to see the main steps together? From the official website you can free download it to have a try. When you open the program, just click the ‘Add Video’ or ‘Add from folder’ to load your files in. Different output choices for YouTube and Vimeo. Firstly for YoutTube:


Secondly for Vimeo, take the steps showed in following screenshot:


Surely, you can now back to the main interface to click the ‘Convert’ to get your work started or you may get some advanced settings in ‘Settings’ button. Adjust your video size, bitrates, or frame rates.


Surprise! Expires on November 10, you are all so lucky to get the big promotion on Halloween Topic page to take part in the ‘Buy one Get one Free’! With only one offer, you can get the GoPro Hero3+ Video Converter and another for free. Just come here to enjoy yourself.

More:

Saturday, November 1, 2014

Batch Convert Multiple H.264 Videos to Apple ProRes for Editing on Mac

Looking for the effective way of converting multiple H.264 videos to Apple ProRes for editing on Mac? Here we go.


Recently, from the website or forums, we have found that there are some friends reflected they were confused with all the multiple H.264 video clips. Though as we all know that H.264 videos could bring us the high quality enjoyment, with the trouble of the big quantity, it is still hard for us to edit on Mac, such with Final Cut Pro.

‘Hello there, I’m now professionally working for some customers who cannot edit their recordings. Sometimes, it costs me a lot of time to edit the batch multiple H.264 Videos, I’m using the Final Cut Pro 7, so I’m now looking for a converter that can work all the video clips together in one single file’

Does that mean you need a H.264 to Apple ProRes Converter that can hold the videos in batch, also be available with FCP? Pavtube HD Video Converter for Mac may be your best choice. Merge your file clips into one? With the specific items for FCP? It can do this job well.

Several concise steps you only need to do, just follow my steps. When you install the program according to the options, open the main interface to let your clips in. ‘Add video’ or ‘Add from folder’, you may ask them for a help. Then drop the ‘Format’ list down, easily you can find the ‘Final Cut Pro’>>’Apple ProRes Codec 422’


Tips: Several kinds of Apple codec you may find here, choose one you think the best.

If you back to the main interface, you will find the ‘Settings’ or the ‘Editor’ items, why not get there to adjust your files only with your personal style? 

Big News here! Have you heard the ‘Buy one Get one Free’? Expires on November10, 2014, Pavtube Studio has held the promotion discount especially for Halloween. You can also get another DVD Creator for free if you bought the product we mentioned above, on Halloween Topic Page you may find more.

Related Guides:

Tuesday, October 28, 2014

Only $65! for Pavtube iMedia Converter and ByteCopy for Mac in Halloween

Pavtube studio are holding the Halloween promotion with some big discounts on website! Just come and have a look!


November 10, 2014, we are soon welcome this year’s Halloween! No matter how did you celebrate it in the past, this year, do you wanna make a change? To make this year’s Halloween as a special commemoration, maybe you can take part in the Halloween Topic which held by Pavtube.

Buy One Get One Free? Discount here is bigger than bigger! For example, if you buy the Pavtube iMedia Converter for Mac, you can get the ByteCopy for Mac for free. That means just only one offer, you can get two programs! Only $65 for two!

How can these guys do?
Pavtube iMedia Converter for Mac, it is just more than a common video converter, also supported for DVD or Blu-rays. This guy can hold the 2D and 3D freely, as a professional one, it can output any video and audio format for iPhone, iPad, Apple TV, Android, Windows Phones, PSP, PS3, and other devices, etc. Someone called it as the ‘Tiny Editor’ because it can offer us some simple editing items before starting the conversion.

While for Pavtube ByteCopy for Mac, especially for DVD and Blu-ray movies, it is always hot in DVD/BD fans’ hearts. I have to mention here you can rip your original footage with multi-tracks which is not so popular in other similar ones. Much more functions you can get in this one. Why not free download it to have a try by yourself?

Additionally Tips: Halloween Topic Promotion only expires on November 10,2014, so you must hurry to catch on!

Friday, October 24, 2014

Convert and Upload 1080p or 720p SD/HD Videos to Vimeo

This article here totally tells you how to convert and upload 1080p or 720p SD/HD videos to Vimeo in a general eay.

For those who really love watching videos online or uploading your recording on the web, you may know the Vimeo--- a high quality home for ad-free HD videos, we can play recordings or share videos with net friends. But unfortunately, not all the video formats can be accepted by Vimeo, such as MTS, MXF, etc.

A: Best way of converting videos available for Vimeo.
Before we upload 1080p or 720p SD/HD videos to Vimeo, some incompatible recordings we should do some conversion dispose. We here recommend you a professional HD Video Converter for Windows to make your original videos available for Vimeo with the 1080p or 720p quality. 

Download and launch the program for a first step,  just ‘Add video’ or ‘Add from folder’ to load them on the list. For Vimeo, go to ‘HD Video’ and find the item ‘AVI HD Video (*.avi)’ as output format. For other platforms like YouTube with MP4, on the format list, you can find them either. 


Also, we can customize the detailed output video parameters in the “Settings” menu, such as changing the video resolution. My recommendation is to size your files to 720p. This allows you to improve image quality with a higher bit rate, without creating the massively bigger files of 1080p. That’s the requirements you want. Finally, click the ‘Convert’ button to finish it.


B: Step-by-steps of uploading your videos to Vimeo
Sign into the Vimeo accout recommended by your instructor and click the ‘Upload a video’ button, which should appear at the top left.


Click the Choose a video to upload button and navigate to and select the file or files you want to upload as the screenshot allowed here:


The file(s) should appear as depicted below. Click Upload selected videos.


Now your video will begin uploading. You must leave this page open until it finishes. Once it is done, enter a title, description, tags, etc. and click Save.


Until here, we wish you a nice enjoyment to watch the HD video on Vimeo! Asking for other help or got some comments, you can leave some message below.

Related guides: