Wednesday, March 4, 2015

Add MKV, AVI, VOB, Tivo, FLV, WMV to iPad Air 2

Are you all Apple fans? Are you all fond of enjoying movies on iPad tablets? In order to make al various videos play well on iPad Air 2, we are here talking on how to add the MKV, AVI, VOB, Tivo, FLV, or WMV movies to iPad Air 2 for playback. In this way, a strong functional iPad Air 2 Video Converter is offered for you guys.

‘I have collected rich movies on my computer’s HDD with various formats like MKV, AVI, VOB, etc. what I want is to copy movies onto iPad Air 2 and then play at anytime, anywhere. I found the iPad Air 2 can’t support all my video files, so I need iPad Air 2 video converter to convert the movies. Any good suggestions?’


Why we need to do some extra video transcodings for playing on iPad Air 2?

iPad Air 2 is the latest tablet from Apple, it is one of the most popular tablets on the market, it has equipped with better hardware and software compared to its previous version. But recently a few of iPad Air 2 users have encountered problems when they play videos on iPad Air 2, for example, they can’t play MKV on iPad Air 2 directly, many video formats are not supported by iPad Air 2. From Apple iPad Air 2 product page you will find that iPad Air 2 can only play H.264/MPEG-4 codec MP4, MOV and M4V formats, the other video formats like MKV, AVI, WMV, FLV, VOB, MTS, etc. 

Hot Search:  4K to Xperia Tablet 2 | Vidoes to Yoga Tablet 2 | 3D to Galaxy Note 4

Solutions to play MKV, AVI, VOB, FLV, Tivo files on iPad Air 2
This task can be easily accomplished with a qualified iPad Air 2 video converter. For mac users, among the top of multifunctional and reliable video converters, here Pavtube Video Converter for Mac/Windows stands out. You will thumb up for its wide support of video input and output formats. This Mac Video to iPad Air 2 converter is able to convert any videos like MKV, AVI, Xvid, FLV, VOB, WMV, etc to iPad Air 2 and transfer these videos to make them playable on any platform. 

Detailed conversion steps on importing MKV/AVI/VOB/FLV to iPad Air 2:
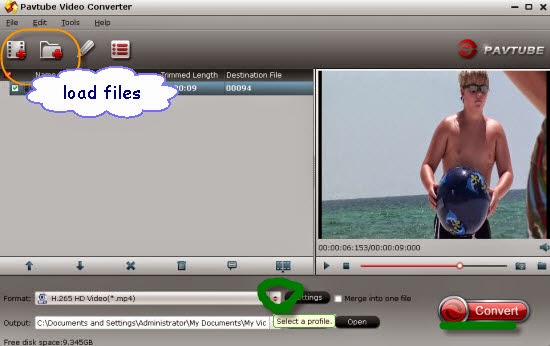
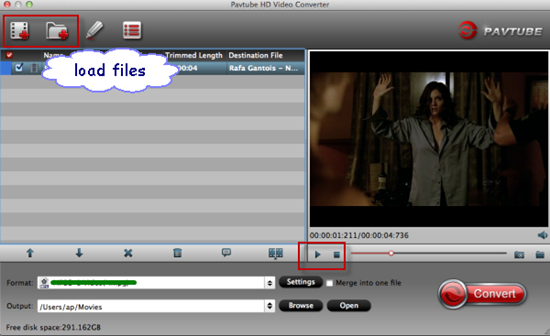
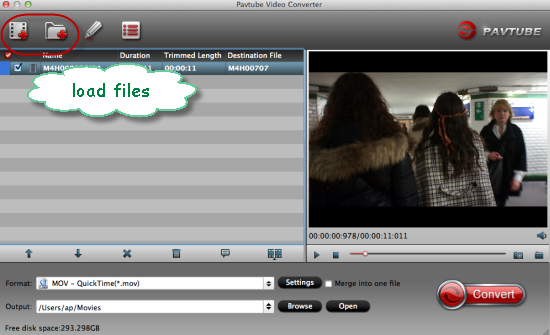
1.Free download video converter for iPad Air 2, you can download Windows version or Mac version according to your computer. Then with the ‘Add videos’ or ‘Add from folder’ buttons, we can add the original files in.


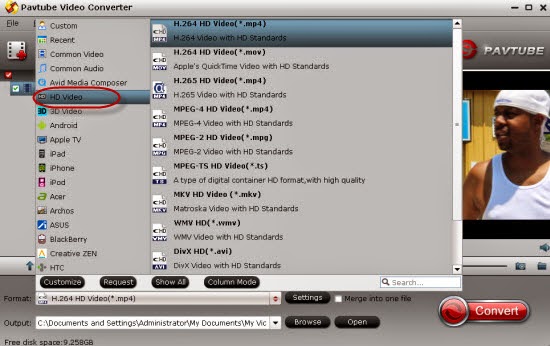
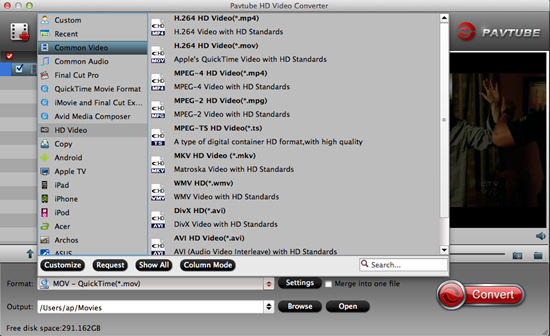
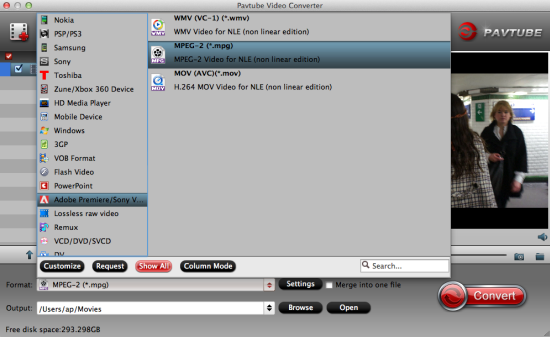
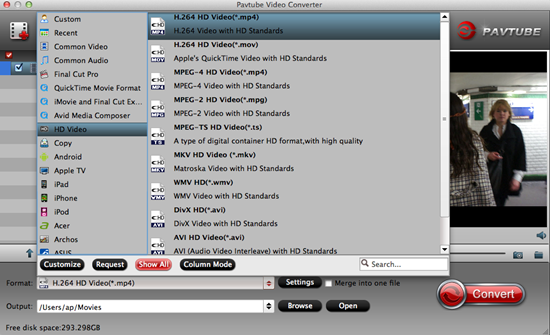
2. Click ‘Format’ bar and choose best format for iPad Air 2. MP4 format is the typical one of the best supported formats of iPad Air 2, so we recommend you to choose MP4 format. ‘HD Video’>>’H.264 HD Video(*.mp4)’ can be the nice one.


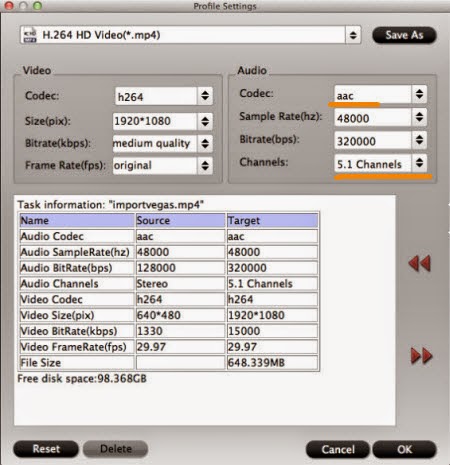
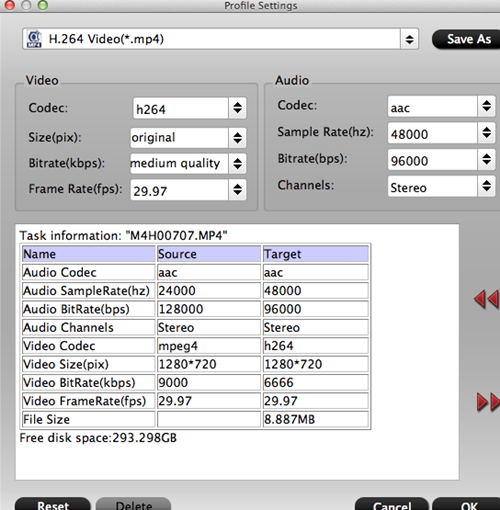
3. Tip: If you like, you can click “Settings” to change the video encoder, resolution, frame rate, etc. as you wish. According to my experience, the file size and video quality is based more on bitrates than resolution which means bitrates higher results in big file size, and lower visible quality loss, and vice versa.


Finally, as soon as you have chosen the right output format for iPad Air 2 and adjust the video/audio parameters as you want, just go back to the main interface and hit the ‘Convert’ button we can wait for the output result. Next, transfer the files to iPad Air 2 as you like, it’s time to enjoy ourselves!

More:

Tuesday, March 3, 2015

Put TiVo Shows on Samsung LED/LCD/3D TV via USB?

According to the faster and faster living rhythm, more and more people are confused with the time of watching movies on TV via USB. What they expect is how to freely enjoy the favorite files downloaded online. For example in this guide below, we are offering the best solutions to help you play Tivo files on Samsung LED/LCD/3D TV via USB.


Why we are interested in playing Tivo movies on Samsung TV?

Tivo is the professional digital video recorder, provides us with marvelous videos, TV shows, and movies. However, we often meet the issue that TiVo videos cannot be played on Windows/Mac, media players, Samsung TV is also included. The recorded videos saved as TiVo then you can play the recorded videos when you have the enough time and enjoy them. But the recorded videos has a limit that you can’t play them on all the devices, Samsung TV is the one that you can’t play TiVo on it.

How to convert Tivo files for playback on Samsung LED/LCD/3D TV smoothly?
To convert TiVo to Samsung TV, you must need the help of the third software called Pavtube Video Converter for Windows/Mac, which you can look as the best Tivo to Samsung TV converter to help us output the issues. Not only for Samsung TV, but also for other media players or playback Tivo on tablets

Steps on how to easily convert Tivo to MP4 for playback on Samsung TV:
Step 1.Download and launch the Windows Tivo Converter, click on the ‘Option’ button on the main interface, input your ‘Tivo Media Access Key’ to let your files in as the screen shot follows.


Tips: How to find your Tivo Media Access key? Just go to the ‘Tivo Cetral ‘menu>>’Message and Set up’ Account and system information’, your Media Access Key would be there.

Step 2. Choose the best output for Samsung TV. Come to the output list by clicking the ‘Format’ bar there. Drop the list down, here we suggest you to select the ‘HD Video’>>’H.264 HD Video(*.mp4)’ as the suitable one for Samsung TVs.


Notes: I have to mention that this program has the new function of encoding or decoding H.265/HEVC videos after it updated to the latest version. With the higher quality and smaller size, it is deserved to have a try!

Hit on the big "Convert" button, and this TiVo to Samsung TV converter will start to convert TiVo to MP4 files there. Once the conversion completes, you are free to import TiVo videos to Samsung TV for playback. Freely control your leisure time, what are you waiting for?

More:

Saturday, February 28, 2015

Play FLV/F4V Files on Xbox One with No Difficulties

Troubled in watching FLV/F4V videos or movies on Xbox One and now looking for the best solutions to solve the incompatible difficulties? Fortunately, today in this page, let me take you walk closer to the FLV format and Xbox one player to know how to play FLV/F4V movies well on Xbox One.


More information of FLV files and Xbox One player:

FLV is a video format defined by Adobe Systems. Many online sites, like YouTube, Hulu, take FLV as their default video formats. It is a popular video formats that can be viewed on most operating systems. While for Google Chromecastand iTunes, etc, we may need some good third-party tools to import them well. While for Xbox One, it has become the common entertainment equipment among many family. Games and movies can all be enjoyed on your TV through this tool. You can watch your videos from USB or DLNA. Most incredible is that lots of formats are compatible with this tool, like DivX, XviD, MKV, and GIF. What a pity, not including the FLV/F4V files as same as the MKV or some 4K videos.

Preparation for converting FLV/F4V movies for playing on Xbox One:
Since we cannot directly import the FLV/F4V videos to Xbox one, why not look for some third-party tools for help? Pavtube Video Converter for Windows we think could be a best choice. In this way, with the easy operation and fast conversion speed, we can convert the FLV/F4V to WMV as the best suitable one for Xbox One. More details?

Step 1. Launch the program and open the main interface you can see some buttons also with a preview window on the right. ’Add Videos’ to import your 4K files and take a preview on right window. You must wait a little longer if you got large files.


Step 2. Go to the format bar to select the “Zune/Xbox 360 Device”>”Xbox 360 HD Video (*.wmv)”as your output format.


Optional: Click the “Settings” beside the format bar to adjust your parameters is allow you to enjoy a better viewing quality.  Before go to the conversion, you can click this “Edit” to do some personal edits on your raw videos. This saves you from the troubles which you have to reload them to editors.

Tips: There are the good news for all Windows users. Due to the latest version of this program, it can support the H.265/HEVC codec videos to encode and decode. Do you wanna a try?

Conversion: Press the "Convert" button on the bottom-right corner of this FLV to Xbox One Video Converter to start performing video conversion. Now, you can see the conversion progress. And the conversion speed is mainly affected by the size of files that you're converting and your computer's performance. 

More:

Thursday, February 26, 2015

Create Smaller Video Packages for Playing on the Web and Social Media.

Recently, no matter for commercial purpose or private usage, more and more users would like to create smaller video packages in order to play on Web or social media players conveniently, right? It seems become more and more popular activity to suit for our modern daily life. In some ways, after editing in some NLEs like FCP, most audience would like to enjoy the better effects there.


‘I work for a charity working in relief and development, so I always need to create smaller video packages for using on the web and social media. However as you all know that different video media has the limitation for different video formats, so in order to find the best codec for editing and playing, I found that Pavtube could do this job well.’

Why and how can this Pavtube HD Video Converter for Mac handle the converting job well?
In a word, if you have reading this HD Video Converter review as details, you must know well for the functions. With the ability of converting various videos with high quality preserved and the easy to use operation, you won’t get any troubles in playing video packages on webs and social media. So let’s together to see the main conversion steps.

Step 1. Add your files. When you get into the main interface, we would like to suggest you to choose the ‘Add videos’ and ‘Add from folder’ to load your files individually.


Step 2. Choose the suitable formats as output. For editing in some NLEs, there are so many output editing tools you can take as reference on the output list, such as the FCP, Premiere, iMovie, etc. Or for other usual formats for watching? You can come to the ‘Common Video’ or ‘HD Video’ to find more. Just look the screen shot below.


Tips: There is also a button called ‘merge into one file’ which can combine all our files together as a complete one. It is deserved to have a try.

Finally, before we go back to the main interface to start our conversion, we would like invite you to get into the ‘Settings’ interface to have fun. Or then go back to the main interface, it’s time to tap the ‘Convert’ button to end our job! With such as easy workflow, there will be no needs for creating video packages and sharing on webs and social media!

More:

Monday, February 23, 2015

How to Stream 1080p/720p MKV Movies to Apple TV with with Dolby Digital 5.1?

‘Hi guys! Ineed some help! I got some 1080p MKV recordings and now I wanna play them on my Apple TV and then edit for sharing them with my working partners, but it seems Apple TV cannot work it well. For more, I also wanna preserve the Dolby Digital 5.1. Any good suggestions there?


MKV is similar in conception to other multimedia containers like AVI, MP4 or MOV. It's more flexible in compression and usually renders in a smaller size with same quality video/audio output, especially for HD videos. Nicely enjoy MKV 5.1 files on VLCHDTV, etc has become the hottest avtivity for us to take part in, right? Great-quality movies are increasingly seen being  delivered over the internet via MKV format. However, it's a pity that many popular devices have no sight for providing support for this format, including Apple TV.

How to Stream 1080p/720p MKV files to Apple TV? 
In order to watch the MKV movies on Apple TV and also with the Dolby Digital 5.1 channels preserved, we here highly recommend the Pavtube Video Converter for Mac to you guys! Strongly supports the various output video and audio formats, it has a good reputation among our users’ hearts.

Guide on converting MKV to suitable ones for playback on Apple TV with 5.1 channels:
Step 1. As soon as we have installed the program, we need to open it and tap the ‘Add video’ and ‘Add from folder’ to load our original MKV files in.


Step 2.Choose the right output formats as next step. Just come to the output list, especially for Apple TV, we here highly introduce you the ‘HD Video’>>’H.264 HD Video’ item as the best one.


Step 3. Preserve the 5.1 channels? Go to the ‘Settings’ button on the main interface and then , we can set the ‘Audio channel’ as ‘5.1’, that’s what we want there.


Finally, after you have done all the preparation work, we need to hit the ‘Convert’ icon to start our job! Then, do you still have issues of converting MKV files for playing on Apple TV with 5.1 channels?

More:

Saturday, February 21, 2015

How Can I Import 1080p MKV File into Premiere Pro CC?

"No MKV file will open in Premiere Pro CC. Only pictures will open. I've tried to convert MKV into MP4 for importing to PP CC, but it would not open. When I drag a MKV into Adobe editing program, it says none of the items dropped in Premiere Pro CC can be opened. If I manually search for video files using the program, it says there was an unknown error."


How do you think of the issues someone has met above? Here let’s firstly have a talking on MKV format, okay? The MKV is an open standard free container format, a file format that can hold an unlimited number of audio, video, subtitle tracks or picture in one file. As the container format , it cannot easily be accepted by FCP and Sony Vegas, etc.

So how to let Premiere Pro CC read the MKV files smoothly? Let me introduce the Pavtube Video Converter for Windows/Mac for you. As the best Premiere Pro MKV Converter, which can convert MKV video to Premiere Pro CC/CS6/CS5 supported formats on Windows and Mac. In addition, you can convert MKV to popular tablets or media players.

Detailed features of this MKV to Premiere Pro CC converter:

  • Convert MKV to H.264, MPEG, DNxHD, WMV codec for Premiere Pro CC
  • Easy operation and faster conversion peed
  • Transcode MKV to MP4, MOV, WMV, FLV, 3GP, etc
  • Adjust and set the output videos by ourselves

How to convert MKV to Premiere Pro CC supported format?
Step 1.Launch the .mkv video conversion software on Mac and click Add File to load the MKV files you want to convert. Or directly drag MKV videos to the MKV to Premiere Pro Converter. After the files are loaded, you can preview them and take snapshots of your favorite video scenes.


Step 2.Click the format bar or the pull down menu of “Format” to select output format-Adobe Premiere/Sony Vegas > MPEG-2 (*.mpg) for Premiere editing easily. 


Step 3. Specify the Settings. To get the best video quality and sound effect, you are allowed to easily adjust video/audio parameters such as bitrate, sample rate, frame rate, codec, channels, etc after clicking on "Settings"

At the end, click the "Convert" button to start the MKV to MPG conversion. When the conversion is finished, you can click "Open" button to get the generated MPG files effortlessly. After transferring files into Premiere Pro CC, we are glad to tell you it’s time to enjoy editing MKV files there.

Editor's Recommendations

Monday, February 16, 2015

Import Canon EOS 7D Mark II to DaVinci Resolve Lite/11

Have you got the experience of importing Canon EOS 7D Mark II MOV files to DaVinci Resolve Lite/11? Let me show you the easiest way below.

‘Hello there, I several days ago traveled the France and I shot some videos of the beautiful scene there with my favorite Canon EOS 7D Mark II camera. Unfortunately I got the trouble like the ‘unsupported’ warning when I import my footage to Davinci Resolve 11, what did that happen? Incompatible formats or something else?’


Although  DaVinci Resolve 11 can handle much more native video formats and camera files than any other real time editing system, it doesn’t mean that you can import every piece of video into this world famous color corrector and amazing editor such as the AVCHD MTS or XAVC files. Now, we come to the most important point, how to convert Canon H.264 MOV or MP4 to the DNxHD MOV, which you may not know the best one for DaVinci Resolve Lite/11. 

An easy way here you can have a try, Pavtube HD Video Converter for Mac, it is popular among most editor’s heart, which has a strong ability of converting different video format to various ones with no quality loss. Let’s keep move on. Install and open the program, ‘Add video’ and ‘Add from folder’ could do you a favor of importing source files. Cause DaVinci Resolve and Avid Media Composer support the same format, so we here recommend you the ‘Avid Media Composer”>>’DNxHD MOV’as the best one.


For other items you can seek on the main interface, such as the ‘Settings’ or ‘Editor’, or you will be interested in the item ‘Merge into one file’ on the left of preview window? This one can help you combine your video clips into one. So cool, right?

As soon as you have done all the preparation work, why not go back to the main interface to tap the ‘Convert’ icon to start your conversion job? Here with the fast conversion speed and easy operation, just enjoy editing your EOS 7D Mark MOV mov recordings in DaVinci Resolve nicely.  

Editor's Recommendations