Monday, May 4, 2015

Canon XF Tools for FCP: Import Canon XF Videos to FCP for Editing

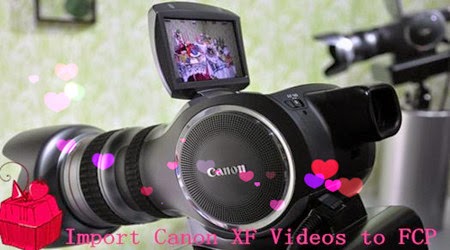
Any issues between Canon XF camera videos and FCP have you got? To smoothly import the all the Canon XF recordings to FCP for editing, several useful Canon XF plug-ins are offered here that can help us a lot. Let’s learn some more details.


Since the FCP has its’ all supported formats, it will not be suitable for you to directly import the Canon XF MXF files to FCP for editing. In this case, to solve all the troubles of Canon XF and FCP, we are going to introduce you several useful Canon XF plug-ins to help us a lot.

First One: Canon XF Plug-in for Final Cut Pro (6, 7)
This is a plug-in software for Final Cut Pro. This plug-in allows you to use the Log and Transfer function to edit movies captured with the XF camcorders. It is possible to play back movie clips in all movie formats supported by the compatible models, and to download native or Apple ProRes 422 files.

How to Install:
1. Check if FCP v6.0.3 to v7.0.3 or later is already installed on your Mac.
2. Download XPFM_1_1_0_2_8L.dmg.gz from the download page.
3.Double-click XPFM_1_1_0_2_8L.dmg.gz After decompressing the file, XPFM_1_1_0_2_8L.dmg will be created.
4. Double-click XPFM_1_1_0_2_8L.dmg. The disk image XPFM11 will be mounted.
5. Double-click the installer, XFInstaller.app in XPFM11.
6. Follow the on-screen instructions to complete the installation.

Operating system(s): Mac OS X 10.5.x, Mac OS X 10.6.x

Second One: Canon XF Plugin for Final Cut Pro X (2.1)
Canon XF Plugin for Final Cut Pro X 2.1.1 is plug-in software for importing video clips captured by compatible camcorders into Final Cut Pro X. The Canon XF Plugin for Final Cut Pro X 2.1.1 features a new installer exclusively prepared to enable the software installation to a PC running OS X 10.8; the actual version of the Canon XF Plugin for Final Cut Pro X software to be installed remains 2.1. Therefore, if you already have the Canon XF Plugin for Final Cut Pro X 2.1 installed to your PC, you do not have to install the version 2.1.1.

How to set it up smoothly?
1.Confirm that Final Cut Pro X 10.0.3 has been installed to the computer.
2. Download "xpfm-2-1-1-8-9l.dmg.gz" from the download page. 
3.Double-click "xpfm-2-1-1-8-9l.dmg.gz". After decompressing the file, "xpfm-2-1-1-8-9l.dmg" will be created.
4. Double-click "xpfm-2-1-1-8-9l.dmg". The disk image "XPFM211" will be mounted.
5. Double-click the installer, "XPFM64Installer" in "XPFM211".
6. Follow the on-screen instructions to complete the installation.

Mac OS X 10.7, OS X 10.8 
* Mac OS X 10.6 is not supported.

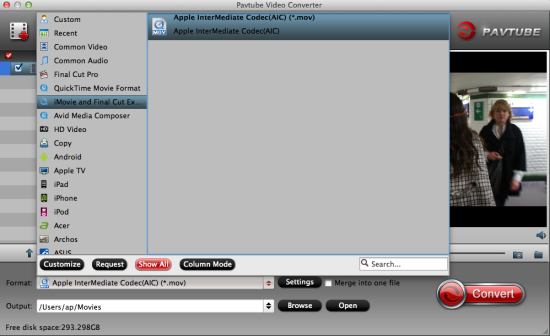
Third One: Pavtube Video Converter for Mac---Version 4.8.5.1
As you can see above, two Canon XF plug-ins we mentioned have their own limitations so we here introduce another stronger Canon XF Video Converter for FCP. With all Mac OS X systems supported well, it can convert all the Canon XF camera videos to ProRes MOV with an easy operation and faster conversion speed. Just follow the steps to know more?

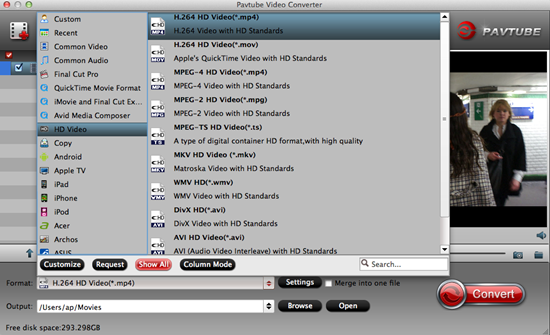
Step 1. Open up this professional Canon XF Video Converter for Mac as a professional MXF to ProRes for Mac. When its main interface comes up, click “Add File” to load your source.

load-files

Step 2. To convert Canon XF MXF video for FCP programs, from “Format” list, choose “Apple ProRes 422 (*.mov)” as output format under “Final Cut Pro” column.

format-to-hd

Functional tips:
Click the “Effect” button to open the Video Edit window to achieve editing MP4 like trim, crop, image, watermark, effect, subtitles and rotate and etc in the corresponding editing pane.
Click the “Setting…” button to open the Advanced Settings window to adjust the output video codec, resolution, bitrates, frame rate, aspect ratio, audio codec, channel, volume and etc in the advanced tab

Step 3. Hit the ‘Convert’ button of the best Canon XF Video Converter. It will start converting Canon XF recordings forimporting to FCP X. Soon after the conversion, just click “Open” button to get the generated files for natively editing Canon XF videos in FCP 6/7/X. 

After comparing with others, we can easily find the third one could be the best method for all users. Just get rid of all the related issues, we can make all Canon XF output recordings accepted by FCP series. Why not have a try?

Further Reading:

All Upgraded for Pavtube Mac Products---Version 4.8.5.1

Surprised news for everyone! The famous video studio Pavtube has announced that all its’ Mac products have been upgraded to version 4.8.5.1, which can bring us more functional items. Before that, all Windows products have been already done well. As the best H.265/HEVC decoder and encoder, Pavtube can help you a lot more.


New features of Mac version 4.8.5.1:
  • Supported to decode/encode the H.265/HEVC codec
  • Fix the XAVC MXF codec importing issues
  • Optimize coding parameters
  • Fix some bugs

Five upgraded Mac products are listed below:
1.Pavtube Video Converter for Mac
2.Pavtube HD Video Converter for Mac
3.Pavtube MTS/M2TS Converter for Mac
4.Pavtube MXF Converter for Mac
5.Pavtube iMixMXF

Download sites:
Pavtube Official website
CNET Download Site
Amazon Download Site

Big Discount! From May 4th to May 6th, all of us can enjoy 40% or 50% discount of each one from the Facebook website! What are you waiting for?

Thursday, April 30, 2015

Play H.265/HEVC Videos with Smart TV on Mac OS X Yosemite

Wanna have a try of watching the H.265 high definition movies on smart TV on Mac OS X Yosemite but with some troubles? For learning more introduction of H.265/HEVC and solve the issues of watching H.265 videos on media devices, here we can get the best H.265 decoder/encoder to smoothly enjoy the H.265 movies on smart TV nicely.


‘Hello there, you know I got some recordings of the outdoor activities which shot by my new Samsung NX1 high definition 4K camcorder. I have tried to move them to smart TV for watching at home but failed. ‘errors’ always there I cannot remove them off well. Any good solutions?’

Cause the smart TV has the big screen and high resolution that can bring us a perfect enjoyment, most user may would like to enjoy movies on smart TV at home especially for those HD movies, right? However, we cannot put all kinds of videos formats directly due to the best video formats for smart TV. Such as the MTS to smart TV, etc. So in order to import the H.265 videos to smart TV so smoothly, we are glad to tell you the good news here.  Pavtube studio currently developed the Pavtube Video Converter for Mac to solve the problems well.

What’s new in this upgraded Mac Video Converter?
1. Upgraded to decode/encode the H.265/HEVC videos
2. Fix the crash problems of XAVC.MXF
3. Optimize the codec parameters
4 .Fix some bugs

What’s more important, this H.265 to smart TV converter can also decode the original H.265 videos to others to suit for other NLEs like FCP or media devices like QuickTime, etc. With the fast conversion speed and more functional editing items, you will enjoy the H.265 movies on smart TV with a high quality. Let’s below see how this job works:

Step 1.To add source video to the HEVC Video Converter, you can directly drag and drop them into the program window or go to “File” from menu bar and then choose “Add Files”.

load-files

Step 2. Choose the right output items for smart TV? Come to the output list, you'd better choose suitable formats from "TVs".


For advanced functions?
Click the “Effect” button to open the Video Edit window to achieve editing MP4 like trim, crop, image, watermark, effect, subtitles and rotate and etc in the corresponding editing pane.
Click the “Setting…” button to open the Advanced Settings window to adjust the output video codec, resolution, bitrates, frame rate, aspect ratio, audio codec, channel, volume and etc in the advanced tab.


Finally, hit the “Convert” button to let this smart converter start encoding H.265/HEVC video to smart TV MP4. When the conversion is done, you can stream and play the converted video in smart TV without hassle. To have a smooth H.265/HEVC video playback on smart TV, this professional H.265/HEVC Video Converter is the best choice.

For more?

Monday, April 27, 2015

Decode H.265/HEVC to MKV, MP4, AVI, MOV, WMV, FLV on Mac Yosemite

Here is the right place if you are looking for the best way to convert your H.265/HEVC recordings to MKV, MP4, AVI, MOV, WMV, FLV, etc for playback on Mac. Cause we can provide a professional H.265/HEVC decoder for all Mac users, we will not worry about the troubles of importing H.265 movies to Mac. Now are you interested in decoding H.265 videos to MKV, MP4, AVI, MOV, WMV, FLV on Mac Yosemite 10.10? How?


Reasons for enjoying H.265 videos:

Higher quality, smaller size, it’s the biggest feature that H.265 brings to us, right? On the other hand, H.265 will surely become the mainstream video codec and format for Apple, or even other mobile device. In order to watch or enjoy the H.265 videos with details, we here need to convert the H.265 to other common ones which can be easily accepted on Mac. So for those who get H.265 recordings from Samsung NX1 4K camcorder, they would be glad to hear the news.

H.265 Converter: Decode H.265 to Any Video Format You Need on Mac

Pavtube Video Converter for Mac
---With the upgraded version 4.8.5.0, it can decode the H.265 to any other common ones on Mac smoothly, like HEVC to H.264, HEVC to MP4, HEVC to MOV, AVI, WMV, MPEG-4, MKV, etc. By using it, you can transcode HEVC files for using in video editing software like FCP, iMovie, Adobe Premiere Pro, or playing on portable devices like smartphones and tablets. Do you wanna more details this upgraded one?

How to decode H.265 to other formats on Mac Yosemite?

As soon as you free download and install this H.265 decoder on Mac, launch the main interface when you download the program form the official website. Load your H.265 files in with ‘Add video’ or ‘Add form folder’ for individual clips or complete folder. 


Then as you need, we suggest you to come to the output list to find the ‘HD Video’ column to get more choices. Such as the ‘H.264 HD Video (*.mp4)’, which can be a compatible one for Mac users. Or drop down the list you can find others no matter for NLEs or media devices.


For advanced functions?
Click the “Effect” button to open the Video Edit window to achieve editing MP4 like trim, crop, image, watermark, effect, subtitles and rotate and etc in the corresponding editing pane.
Click the “Setting…” button to open the Advanced Settings window to adjust the output video codec, resolution, bitrates, frame rate, aspect ratio, audio codec, channel, volume and etc in the advanced tab.

As soon as we finish the preparation work, just go back to the main interface to hit the ‘Convert’ button to get the conversion started. To easily decode H.265/HEVC to MKV, MP4, AVI, MOV, WMV, FLV on Mac Yosemite with a high speed and easy operation, this professional H.265 decoder is deserved to buy.

Good news! All of us can enjoy the 40% discount before May 1st, 2.15. Come on!

More:

Good News for Pavtube Video Converter for Mac--- Upgrade to Version 4.8.5.0!

Big news for all! Pavtube studio has announced that its hottest product Mac Video Converter has upgraded to latest version 4.8.5.0. According to the official news, this updated product can decode the H.265/HEVC video codec well. In other words, it has become the hottest and comprehensive video converter for all Mac users!


What’s new in this upgraded version?
  • Fix the bug of breakdown when importing MXF and XAVC format.
  • H.265/HEVC decode well.
  • Solve the issues well for decoding basic codec
  • Support the VPx series codec perfectly

Main features:
  • Convert various video/audios as input and output.
  • So many popular editing tools and media players are available.
  • Easy operation workflow and faster conversion speed.
  • Extra acceleration function for Windows users.
  • Strong ability of setting and editing output vides.

Outstanding highlight for H.265/HEVC supported:
If you have more touched this new H.265 codec enough, you may know well about it. For H.264/MPEG-4 and H.265/HEVC, those two codec are said to double the date compression at the same level of video quality. This H.265 can be said as the Intro Time of 4K Generation. With the H.265 codec videos, we can get the higher definition and smaller vide size.

Pavtube Video Converter for Mac---Deserved to choose as your favorite!
Now this brand new video has updated to a more powerful one, new features like adding H.265/HEVC decode which can provide much higher quality than H.264, videos shooting under XAVC mode can be loaded flawless, more output items added to consider about the compatible with old system or devices. What’s more, we will not be disappointed with its’ original fast speed and easy operation.

Notes: Upgraded Pavtube Video Converter also can be provided for all Windows users

Hot News Also: All of us can get 40% discount off before May, 1st, 2015. Come on!

Saturday, April 25, 2015

How to Import iPhoto to iMovie on Mac OS X

‘How could I easily move my videos from iPhoto to iMovie for editing on Mac OS X?’ Does this question also confuse you a lot? It really drives us mad especially when we are urgent to use iMovie to edit the videos or slideshow on iPhoto. Under this circumstance, your only choice is to find the solution to move iPhoto videos to iMovie. Here we can teach you how to convert iPhoto movies to iMovie well with its’ supported video formats.


Solution 1. Upload iPhoto Videos to iMovie when the formats are compatible
If the video that you need to import from iPhoto to iMovie are recognized by iMovie, things will be much easier. You can follow the steps below to import videos to iMovie from iPhoto

Step 1. Launch iMovie on your Mac.
Step 2. Then the prompt "iMovie needs to generate thumbnails for the videos in your iPhoto library" appears. Just click on "Later".
Step 3. Click File on the top and scroll down to "Import" and the "Movies".


Step 4. A sub window pops up and you can click iPhoto and find wanted videos. And you can add videos to existing event or create a new event. Then click on "Import".


Step 5. Then video optimizing and thumbnails generating begin. And within seconds, you can see the video in the Event Library. You can drag and drop the part of it to Project Library".

Solution 2. Convert iPhoto videos to iMovie when the formats are incompatible

How could we do with those incompatible video formats between iPhoto and iMovie? For example, just imagine that you click "File > Import > Movies > iPhoto" as the instructions above, but you still can't find your wanted videos or you are directly informed that videos can't be imported. In this way, why not free download the Pavtube Video Converter for Mac, which we can see as a professional iPhoto to iMovie converter to convert all incompatible videos to iMovie for editing on Mac OS X. With it, you can convert all types of videos to edit on iMovie, such as videos captured by camcorders, movies downloaded from websites like YouTube, etc. Or add iMovie videos to MP4 for Mac for playback is also a good idea.

Steps on converting incompatible iPhoto videos to iMovie for editing nicely:

Step1. Click "Add" button to load videos in iPhoto to iMovie. Or alternatively you can drag and drop them to the program as soon as you download and install this program on Mac OS X.


Step 2.Search the suitable formats for iMovie? When you come to the output list, we can suggest you to choose the ‘iMovie/Final Cut Express’>>’Apple Intermediate Codec (AIC) MOV ‘as the best one. You won’t miss this item, right?


For advanced functions?
Click the “Effect” button to open the Video Edit window to achieve editing MP4 like trim, crop, image, watermark, effect, subtitles and rotate and etc in the corresponding editing pane.
Click the “Setting…” button to open the Advanced Settings window to adjust the output video codec, resolution, bitrates, frame rate, aspect ratio, audio codec, channel, volume and etc in the advanced tab.

Back to the main interface, it’s time to hit the ‘Convert’ button to end the work. Then you need to easily transfer the files into iMovie as usual as before, we can enjoy editing the iPhoto files in iMovie on Mac OS X so nicely. In a word, you have two selections to decide how to import your iPhoto movies to iMovie for editing. Let’s enjoy it.

More:

Friday, April 24, 2015

Convert iMovie Files to MP4 on Mac OS X with Two Solutions

If you wanna make the iMovie exported movies save in MP4 in order to edit or playback well on Mac OS X, you come to the right place! Especially for solving the iMovie to MP4 issues, we here can offer you two efficient ways to import iMovie files to Mac in MP4 format. Just follow the steps.


Method 1.Convert iMovie to MP4 for Mac OS X QuickTime
Firstly, we are going to teach you how to transfer iMovie videos to MP4 via using the features of iMovie itself---QuickTime item. Follow the steps to learn the instructions on converting iMovie to MP4 nicely on Mac OS X.


Launch the iMovie and get into the main interface. Click "Share > Export using QuickTime" at the top menu bar.


Then a window named "Save exported file as…" pops up. Click "Export" option and find "Movie to MPEG-4" in the drop-down menu. If you need to make some settings to the file video format, you can click Settings button; if not, directly hit on "Save" button to export a mp4 file from iMovie.

Method 2. Pavtube Video Converter for Mac---Easily convert iMovie to MP4 for Mac OS X.

In this way, if the exported files still cannot recognized by your devices or are rejected by the video sharing websites, we here highly suggest you to use this professional iMovie to MP4 Converter on Mac. It can convert iMovie to MP4 in HD, as well as AVI, WMV, etc. so that you can watch them on Windows computer, android devices, and more. What’s more, this program can also works well with different videos from other NLEs like FCPPremiere Pro, etc. Let’s together see how to convert iMovie to MP4 for Mac OS X.

Steps on converting iMovie videos to MP4 on Mac OS X:
Step 1.Click on Add button and go to the folder to find the videos that you want to convert to MP4 as soon as you open the main interface. Here you can import multiple videos.


Step 2. When you come to the output list, just drop down the list and select the ‘HD Video’>>’H.264 HD Video (*.mp4)’ as the best output one with the high quality preserved. Or in the common column, you can also find the similar one.


For advanced functions?
Click the “Effect” button to open the Video Edit window to achieve editing MP4 like trim, crop, image, watermark, effect, subtitles and rotate and etc in the corresponding editing pane.
Click the “Setting…” button to open the Advanced Settings window to adjust the output video codec, resolution, bitrates, frame rate, aspect ratio, audio codec, channel, volume and etc in the advanced tab.

Finally, when specifying the output format, you can click on the ‘Convert’ button on the main interface to finish the conversion. With the high conversion speed and easy operation job, it would not be hard for us to load iMovie videos to Mac OS X in MP4 format.

Conclusion: Above are two best solutions to how to save and convert iMovie to MP4 file. In general, you can use the first way to achieve it. But if the first way can't meet your need, the software introduced in the 2nd part can help you as well. Let’s just have a try!

Further Reading: