The Canon XA20 Professional Camcorder is ideal for any type of professional content project, which has multiple recording options. It allows you to record at AVCHD video of up to 28mbps in a 1080/50P and also provides a choice of industry-standard up to 35 mbps in a 1080/50P MP4.
AVCHD - 1080: 59.94P / 59.94i / PF29.97 / 23.98P
MP4 - 1080: 59.94P / 29.97P / 23.98P; 720 and 360: 29.97P / 23.98P
Regarding to the AVCHD codec, it is very popular in both the professional and consumer market. That means most non-linear editing software should have full support for the codec, but the thing is that users still have problems one or another while trying to open the XA20 AVCHD footage in Adobe Premiere Elements for further editing. Such as there is an audio track but no audio is heard during playback of entire clip, or video is choppy or non-responsive during entire clip.
 In order to import and edit Canon XA20 AVCHD files in Adobe Premiere Elements without audio missing or video choppy issues, you'd better transcode the Canon XA20 AVCHD footages to Adobe Premiere Elements native format. Pavtube MTS/M2TS Converter / Mac Version(read the review) can help you solve the issues smoothly. It can aid you to change AVCHD files to MPEG-2/WMV/MOV for Adobe Premiere Elements with high quality. In fact, it's an all-in-one converter for fast transcoding, deinterlacing AVCHD footage from CanonXA20 camera that makes the AVCHD footage editing work much easier with Premiere. Besides the main conversion work, it is also equipped with some simple editing features, such as merging several videos into one file, deinterlacing the original footages, cropping video size, trimming video clips, adding special effects and subtitles to output videos, thus it will be on the top of your list.
Meanwhile, this video converter can create files compatible with NLEs like FCP, Avid Media Composer, iMovie, After Effects, DaVinci Resolve and etc.
Download Pavtube MTS/M2TS Converter for Edit Canon XA20 in Premiere Elements Smoothly:
In order to import and edit Canon XA20 AVCHD files in Adobe Premiere Elements without audio missing or video choppy issues, you'd better transcode the Canon XA20 AVCHD footages to Adobe Premiere Elements native format. Pavtube MTS/M2TS Converter / Mac Version(read the review) can help you solve the issues smoothly. It can aid you to change AVCHD files to MPEG-2/WMV/MOV for Adobe Premiere Elements with high quality. In fact, it's an all-in-one converter for fast transcoding, deinterlacing AVCHD footage from CanonXA20 camera that makes the AVCHD footage editing work much easier with Premiere. Besides the main conversion work, it is also equipped with some simple editing features, such as merging several videos into one file, deinterlacing the original footages, cropping video size, trimming video clips, adding special effects and subtitles to output videos, thus it will be on the top of your list.
Meanwhile, this video converter can create files compatible with NLEs like FCP, Avid Media Composer, iMovie, After Effects, DaVinci Resolve and etc.
Download Pavtube MTS/M2TS Converter for Edit Canon XA20 in Premiere Elements Smoothly:

 How to convert Canon XA20 video to MPEG-2/WMV/MOV for Adobe Premiere Elements
Step 1. Click the “File” and then choose "Add video" or "Add from folder" icon on the main UI of this software to load your Canon XA20 AVCHD footage. Of course, you can load your Canon XA20 MP4 footage to this software if you want to edit them with the more compatible MPEG-2/WMV/MOV format.
How to convert Canon XA20 video to MPEG-2/WMV/MOV for Adobe Premiere Elements
Step 1. Click the “File” and then choose "Add video" or "Add from folder" icon on the main UI of this software to load your Canon XA20 AVCHD footage. Of course, you can load your Canon XA20 MP4 footage to this software if you want to edit them with the more compatible MPEG-2/WMV/MOV format.
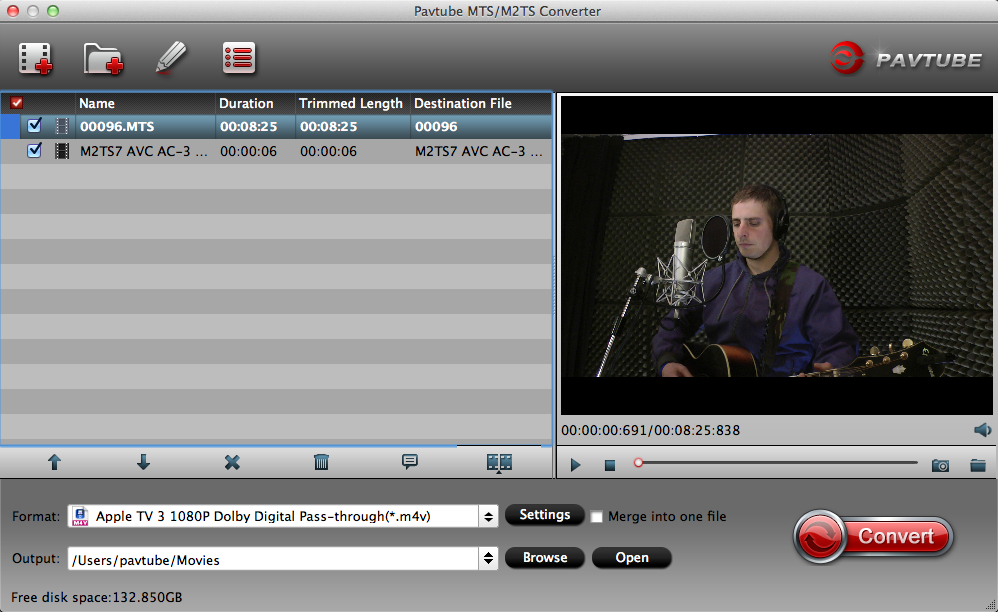 Step 2. From the "Format" drop-down list, go to select "Adobe Premiere Pro/Sony V..." >"MPEG-2"/"WMV(VC-1)"/"MOV(AVC)" as the most suitable output format for Adobe Premiere Elements.
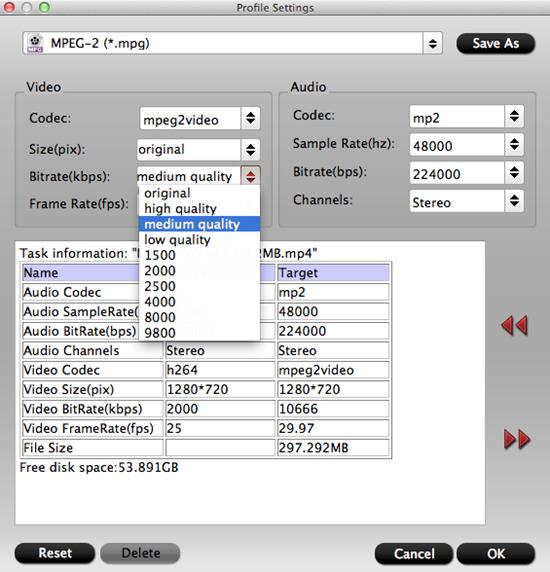
 Step 3. (optional)The Canon XA20 record footage with 1080p, but you may find that the output MPEG-2/WMV/MOV is not such high in resolution, therefore, you can type the output file size as "1920*1080" from the "Profile Settings" window to maintain the original HD video quality.
 Step 4. After all the settings is completed, go back to the main menu and start the conversion by hitting the right-bottom "Convert" button.
When the conversion is over, enjoy yourself transfer and import Canon XA20 to Adobe Premiere Elements for best editing workflow.
Read More:
Step 4. After all the settings is completed, go back to the main menu and start the conversion by hitting the right-bottom "Convert" button.
When the conversion is over, enjoy yourself transfer and import Canon XA20 to Adobe Premiere Elements for best editing workflow.
Read More:
The MOV format is a QuickTime media container format. A lot of users are still in the dark on how they could playback or watch an MOV video file on Windows(Windows Media Player) 10/8/7/Vista/XP. Why Windows(Windows Media Player) 10/8/7/Vista/XP Won’t Play QuickTime MOV Files? How to successfully play QuickTime files on Windows(Windows Media Player) 10/8/7/Vista/XP? The following article will give the answer!If the QuickTime MOV files are not corrupt, the main reason may be the QuickTime MOV video codec problem. And by installing QuickTime Player, you can get an MOV codec which allows you to play MOV on Windows(Windows Media Player) 10/8/7/Vista/XP without any problem. To point here, QuickTime player is larger in size and will also install lots of junks to your Windows computer.To open Apple QuickTime in Microsoft Windows follow the steps below.
- Click Start
- Go to Programs, QuickTime, and click QuickTime Player. If QuickTime is not found it is not installed on your computer. See the QuickTime definition for a link to where to download and install this program.
- Once open you can open the movie file through this program by clicking File, Open, and browsing to the location of the movie file or by dragging the movie file to Apple QuickTime.
Then how to Play MOVon Windows successfully?In order to solve can’t play QuickTime MOV on Windows(Windows Media Player) 10/8/7/Vista/XP issue, a recommended solution is to convert QuickTime MOV to Windows Media Player compatible QuickTime MOV, WMV, ASF, MPG. Pavtube Video Converter / Mac Version.(review) is just the ideal QuickTime MOV to Windows Media Player which can fast convert QT MOV files to WMP supported video format without quality loss. Besides, no extra system component will be installed to your Windows and would probably slow down your computer. It’s fully compatible with Windows 10, Windows 8.1, Windows 8, Windows 7, Windows Vista and Windows XP.Hot search: H.265 to Windows | MKV to Windows| YouTube to WindowsFree download it and follow the guide to convert QuickTime MOV to WMV format so you can import and play MOV files on Windows(Windows Media Player) 10/8/7/Vista/XP nicely.Step1. Drag & drop QuickTime mov files to the program directly. Or go to the “File” menu, choose “Add Video” to locate the QT mov files you want to add. You can add several files to do batch conversion. Step2. Click the Format menu, select Windows Media Player friendly format as your output video format. There, you can take WMV as your output video format. If you prefer high definition videos, move your mouse pointer to “HD Video” and then choose HD WMV.
 Step3. Press the big “Convert” button to start the QuickTime MOV video converting process. After the conversion, you can add your QuickTime (MOV) videos on Windows(Windows Media Player) 10/8/7/Vista/XP for playing at your will without hassle.Read More:
Summary: This article will illuminate how to convert MKV video to MOV format with Pavtube Video Converter for Mac, an all-in-one video converter program that provides both excellent quality and speed.MKV (Matroska Video) is a container format developed by Matroska that widely used on the Internet for high definition video. The MKV container can hold a variety of video and audio codecs and can includes multilingual subtitles as well as rich metadata. But Mac's MKV support is not that good and Mac user may suffer stuttering playback and other issues. If you have some of MKV movies or TV shows that you want to work with your Mac playing devices and applications, the most likely route to go will probably just be to convert into a mac-readable file (i.e. MKV to MOV). The solution is to convert your MKV videos to MOV, you then can play in QuickTime, edit them in iMovie and Final Cut Pro, or stream them to Apple TV, iPad, or iPhone.Without any question, a video converter for Mac can be a timely help to convert MKV files to MOV format on Mac. However, with the emergence of the latest Mactintosh operating system - El Capitan, many Mac MKV to MOV converters get stuck here due to incompatibility with the newest generation. So while you are searching for such program, the perfect compatibility with Mac El Capitan shall be also taken into consideration besides the MKV to MOV conversion ability.To smooth away barriers in converting MKV to QuickTime MOV on Mac OS X El Capitan, you can rely on Pavtube Video Converter / Mac Version since this program not only serves as the best yet free MKV to MOV converter for Mac but also makes perfect synchronization with Mac El Capitan, letting you easily and freely transfer video from MKV to MOV on your Mac El Capitan while holding the same video as original.Hot Search: YouTube to MOV | H.265 to QuickTime MOV | AVCHD/MTS/M2TS/M2T/TS to QuickTime MOVKey Features of Pavtube Video Converter.
- Convert almost all HD/SD audio/video formats: All types of audios and videos (e.g. SD/HD/Tivo/DRV/Camcorder HD/AVCHD footages, etc) to almost any audio and video formats.
- hange default settings: You can change the parameters such as video size, bitrate, frame rate, and channels for your video file according to your need to get the best output effect.
- Batch conversion: Handle multiple videos and realize batch conversion to save your time and energy.
- Merging & splitting: Merge several video clips into one bigger file and splitting one video file into several clips according to the clip quantity, duration time and file size.
- Create new output format: Adjust profile parameters, rename and save it for future use.
- Supported OS: Mac OS X 10.11 El Capitan, Mac OS X 10.10 Yosemite, 10.9 Mavericks, 10.8 Mountain Lion, 10.7 Lion, 10.6 Snow Leopard, 10.5 Leopard

 How to Convert MKV to QuickTime MOV on Mac El CapitanFirst free download and install Pavtube Video Converter on your Mac, and then launch it. Now just follow the step by step guide to make editing work more smoothly.Step 1: Run it and click “File” > “Add Video/Audio” or “Add from Folder” to import files. You can also directly drag and drop the files.Step 2: As MOV is natively supported by QuickTime player on Mac, just go to the format list by clicking the format bar and choose “Common Video” and pick “MOV - QuickTime (*.mov).”
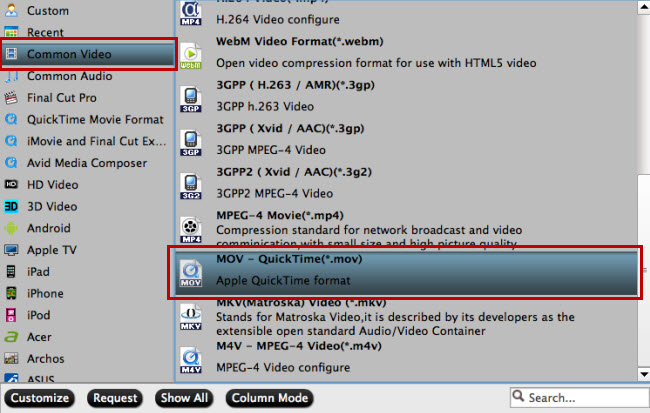 Step 3: Specify output folder on your computer to save the output files. Click the "Browse" button to choose the path where you want to save the output files in. Click the "Convert" button at the lower right corner of the interface to begin to convert MKV to MOV. After the conversion is finished, you can transfer the video to your desired output devices or editor for enjoyment.Read More:
Summary: When you open an FLV file the player may give you a warning message saying that it doesn't recognize the file extension. This article will help you get out of that issue.As soon as one tries to play a FLV file with the help of Windows Media Player, a message will appear saying that the file can't be opened because the extension is invalid. Properly configured codecs needs to be installed to play FLV files using Windows Media Player. The formats supported by windows are .asf, .wmx, .au, .snd, .mov, .m4a, .dvr-ms, .asx, .m4v, .mp4, .wpl, .mpg, .miv, .mpa, .mp2, .mpeg, .3g2, .adts, .adt, .3gp2, .aiff, .wms, .3gp, .mp3, .m3u, .mid, .midi, .mpv2, .cda, .rmi, .wav, .wax, .aif, .wmv, .ivf, .3gpp, .wm, .mpc, .aifi, .aac, .wvx, .wma, .wm2, .m2ts, .mp4v, .avi and .wmd. Play FLV after Installing FLV codecs for Windows Media PlayerWMP uses codecs to play media files. Codecs of many formats are inbuilt in WMP to open files of that format. Yet the codec of FLV needs to be downloaded by the user to run FLV files on WMP. After successfully installing the codec, you will be able to run files with .flv extension in your WMP.If one is unable to view their files on Window Media Player because the file has .flv extension, then Pavtube Video Converter can be used to convert the videos in the format supported by the Window Media Player. In fact, this program can be used to complete conversion between various formats, including FLV, AVI, ASF, MOV, M4V, WMV, MKV, Xvid, MP4, and so on.
  Step-by-step guide to convert FLV to Windows Media Player supported formatsStep 1. Install iSkysoft Video Converter and put FLV files on the converterImport the FLV files to the video converter. You can do that in two ways:a) You can drag and drop the file directly in the application.b) You can click the "Add Files" button to browse, select and load the file in the application.windows media player flv codec
 Step 2. Choose the output formatVisit the bottom of the application and then select WMV as the output format. All the videos converted at the same time will be converted in the same output format.
 Step 3. Push convertYou just need to press the "Convert" button now. The video will be converted within seconds.Read More:
Summary: I find many Windows 10 users said they have trouble with Windows Movie Maker in the discussion board. Don’t upset. This article will show you the causes in detail and give you some tips to fix it.Microsoft provides a built-in video editor on Windows 10 – Windows Movie Maker, which is just like iMovie on Mac OS X El Capitan. Due to the openness of Windows 10, it can be installed on some devices with old hardware. Here comes the problem. The video editing work in Windows Movie Maker requires quite high hardware. So if the hardware of your Windows 10 PC is too low or old, then Windows Movie Maker won't Work. And a message like the picture below will pop up. In order to prevent this issue from happening to you, please make sure that your Windows 10 computer meets all necessary requirements before launching Windows Movie Maker. To let you edit videos in Windows Movie Maker with no problem, I would suggest you to upgrade the hardware of your Window 10 PC to meet the necessary requirements. If the issue mentioned above still persists and the solutions offered above didn't solve the problem, the best way is to look for an alternative to Windows Movie Maker, such as Pavtube Video Converter. Just like Windows Movie Maker, this video editor allows you to add videos, pictures, audio, and make a snapshot. It also enables you to add a new subtitle on the selected videos, as well as captions. In the meantime, this video converter supports for exporting videos as multiple formats or trim videos for uploading to Facbook, YouTube, etc. How to Make Windows Movie Maker Work on Windows 10Step 1. First, run this video editor. Click "Add Video" or "Add from folder" button to browse and choose your videos, or you can drag and drop files to its interface.
 Step 2. Then click “Edit” button and the video editor window will pop up. You can use the video editor to do many editing work like cutting unwanted segments, cropping annoying black edges in your videos, adding watermarks for remarks or fun, adding special effects, etc.
 Step 3. In the “Format” list, you can see a large number of preset output profiles in there. Just choose what you want according to your needs.
 Step 4. Finally, go back to main UI and click the big "Convert" button. This video converter will start to output the final videos. Once the process is done, you can find your videos by clicking "Open" button. Enjoy!Read More:
Summary: The post will discuss how to convert 4K files from Blackmagic URSA Mini to MKV/VOB/AVI/MOV/MP4/MPEG/WMV/FLV etc. for storage in NAS and play with any devices you like.Blackmagic shoots up to 60 frames per second, has a super bright 5 inch foldout viewfinder, dual RAW and ProRes recorders and more. You can select from four models of Blackmagic Mini with 4.6K or 4K image sensors and either EF or PL lens mounts.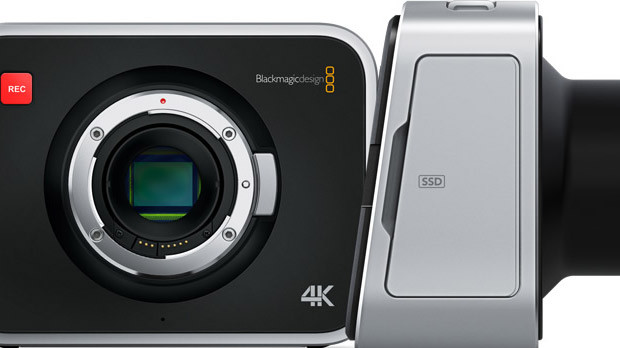 However when you enjoy the stunning videos recorded of HD image quality, you may encounter problems of playing the recorded video from Blackmagic URSA on other portable device.Pavtube Video Converter / Mac Version is the best video transcoding software for Blackmagic users. It is easy-to-use and practical 4K Video Converter Software, which can help you convert any video to 4K H.264 MP4. So that you can backup the video clips in your NAS and then play with any devices you like.Hot Search: Blackmagic HD 4K Prores to 1080p Prores | Edit Blackmagic 4K with Premiere | DNxHD MXF Files to FCPKey Features of Pavtube Video Converter
- Convert Blackmagic MXF/MOV/MP4 to any video format
- Transcode Blackmagic DNxHD and ProRes 422 video for editing software
- Encode Blackmagic DNxHD and ProRes 422 footage to 3D
- Convert Blackmagic recordings for sharing, uploading, watching, etc
- Edit Blackmagic video files on Mac and Windows via trim, crop
How to convert Blackmagic video for any devices?Step 1: Backup your Blackmagic video to hard drive. Install and launch this program. Drag and drop Blackmagic video to the software. You can import multiple files at once thanks to “Add from folder” button. Step 2: Click the “Format” drop-down menu to choose an output format that you prefer. This Blackmagic Video Converter software can convert video to various video formats like MP4, MOV, MKV, FLV, AVI, WMV, 3GP, etc. and video presets for 150+ portable devices.  Step 3: Before converting, you can edit the Blackmagic footage to achieve a better overall effect. Simply highlight a video clip and click the “Edit” button beside it to enter the Video Edit window. You can then crop, trim, rotate videos, adjust Blackmagic recordings effects, add text/image watermarks, etc. as you like. Step 4: When you’re ready, click the “Convert” button to convert Blackmagic videos.Conclusion: Before converting videos, you can preview the video, while the converting you can set the actions like shut down computer and open output folder when conversion is completed. When the conversion finished, you can easily transfer the converted video to the NAS and play with any device you want.Read More:
Summary: This article aim to show you a solution of how to easy convert AVCHD (.mts or .m2ts) to MP4 for playback. Just take what you are looking for.
Q: I have used a Cannon camcorder to record some AVCHD clips. Now I want to convert those AVCHD recordings to MP4 for conveniently.
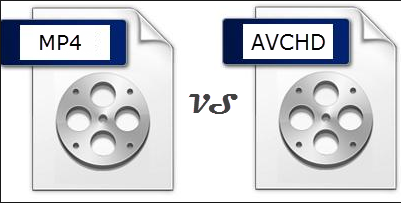 AVCHD stands for Advanced Video Codec High Definition, and the AVCHD files generally use extensions like MTS and M2TS, depending on the camera or camcorder brand and whether they are imported to a computer or Mac, when watching AVHCD files on other devices, or importing to editing systems, you need to convert AVCHD files to universal video formats like MP4.
Hot Search: Stream HD Video to PS4 | AVCHD Player | Convert AVCHD via VLC
How to Convert AVCHD to MP4?
Pavtube Video Converter / Mac Version enables to convert AVCHD files recorded by Panasonic, Sony, Cannon or other camcorders to MP4 format, so that it becomes possible to play AVCHD files on iTunes, iPhone, iPad, iPod, PS3, Android, etc or edit AVCHD in iMovie and QuickTime.
It is worth mentioning that this professional AVCHD to MP4 Converter is able to keep the Frame Rate of AVCHD files when converting AVCHD to MP4. What's more, you can also change the Frame Rate of AVCHD after converting them to MP4 as your desire.
Besides, Pavtube Video Converter also supports to convert AVCHD to almost all kinds of video formats like AVCHD to AVI, AVCHD to MOV, AVCHD to WMV, AVCHD to ASF, AVCHD to FLV, AVCHD to WebM, AVCHD to OGV, etc.
Better still, Pavtube Video Converter has the feature of extracting audio from AVCHD files like AVCHD to MP3, AVCHD to WAV, AVCHD to AAC, AVCHD to AC3, AVCHD to M4A, AVCHD to Apple Lossless ALAC, AVCHD to FLAC, AU, DTS, AIFF, MP2, OGG, RA, etc.
How to Convert AVCHD to playable MP4
Step 1: Load AVCHD video files.
Click "File" menu and select "Add Video/Audio" to import source AVCHD video files to the program.
AVCHD stands for Advanced Video Codec High Definition, and the AVCHD files generally use extensions like MTS and M2TS, depending on the camera or camcorder brand and whether they are imported to a computer or Mac, when watching AVHCD files on other devices, or importing to editing systems, you need to convert AVCHD files to universal video formats like MP4.
Hot Search: Stream HD Video to PS4 | AVCHD Player | Convert AVCHD via VLC
How to Convert AVCHD to MP4?
Pavtube Video Converter / Mac Version enables to convert AVCHD files recorded by Panasonic, Sony, Cannon or other camcorders to MP4 format, so that it becomes possible to play AVCHD files on iTunes, iPhone, iPad, iPod, PS3, Android, etc or edit AVCHD in iMovie and QuickTime.
It is worth mentioning that this professional AVCHD to MP4 Converter is able to keep the Frame Rate of AVCHD files when converting AVCHD to MP4. What's more, you can also change the Frame Rate of AVCHD after converting them to MP4 as your desire.
Besides, Pavtube Video Converter also supports to convert AVCHD to almost all kinds of video formats like AVCHD to AVI, AVCHD to MOV, AVCHD to WMV, AVCHD to ASF, AVCHD to FLV, AVCHD to WebM, AVCHD to OGV, etc.
Better still, Pavtube Video Converter has the feature of extracting audio from AVCHD files like AVCHD to MP3, AVCHD to WAV, AVCHD to AAC, AVCHD to AC3, AVCHD to M4A, AVCHD to Apple Lossless ALAC, AVCHD to FLAC, AU, DTS, AIFF, MP2, OGG, RA, etc.
How to Convert AVCHD to playable MP4
Step 1: Load AVCHD video files.
Click "File" menu and select "Add Video/Audio" to import source AVCHD video files to the program.
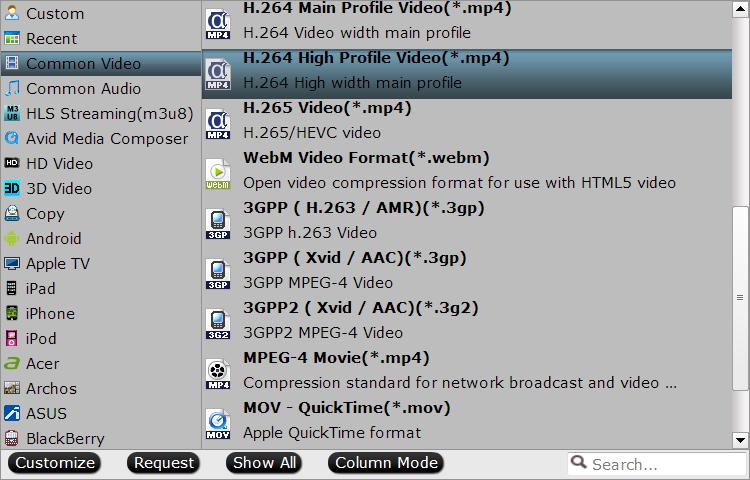
 Step 2: Select output profile format.
Click "Format" bar, from its drop-down option, select "H.264 High Profile(*.mp4)" as the output format.
Step 2: Select output profile format.
Click "Format" bar, from its drop-down option, select "H.264 High Profile(*.mp4)" as the output format.
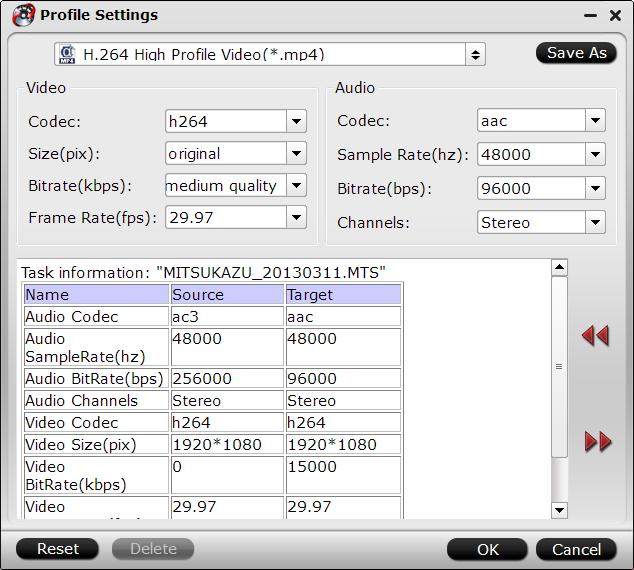
 Step 3: Adjust output profile parameters.
Click "Settings" button to pop out "Profile Settings" window, you can adjust output video codec, size, bit rate and frame rate and audio codec, sample rate, bit rate and channels.
Step 3: Adjust output profile parameters.
Click "Settings" button to pop out "Profile Settings" window, you can adjust output video codec, size, bit rate and frame rate and audio codec, sample rate, bit rate and channels.
 Step 4: Start AVCHD video to MP4 Conversion.
Hit right-bottom "Convert" button to start to convert AVCHD video to MP4 conversion.
Related program:
Pavtube HD Video Converter / Mac Version: It is designed for converting HD videos from HD camcorders or DVs (like JVC, Panasonic, Sony and Cannon), non-protected HD or movies, DVR files (*.tivo) to other file types for playback on popular media devices like Apple TV, PS3, Xobx, Xobx360, WD TV HD Player.
Read More:
Step 4: Start AVCHD video to MP4 Conversion.
Hit right-bottom "Convert" button to start to convert AVCHD video to MP4 conversion.
Related program:
Pavtube HD Video Converter / Mac Version: It is designed for converting HD videos from HD camcorders or DVs (like JVC, Panasonic, Sony and Cannon), non-protected HD or movies, DVR files (*.tivo) to other file types for playback on popular media devices like Apple TV, PS3, Xobx, Xobx360, WD TV HD Player.
Read More: