Friday, May 6, 2016

Best Allternative to VLC M2TS Converter for Windows and Mac

Perhaps you spend an noon to build up your blue ray collection in the form of m2ts files, or copy the Panasonic HD camcorder recorded the m2ts format videos with instruction into your hard drive, because of you were advised to download and run VLC media player as this will work.
well… it kinda works, but you found that the films are not watchable, they are slow, multicoloured and jerky.
Why VLC cannot play some M2TS files?
M2TS Files are high definition files, which needs good graphics and better RAM for the files to be played. Thus, in case, you are feeling difficulty while running M2TS Files on your old computer, thus the VLC Player not running some M2TC Files well.
Even you running on a powerful computer like iMac, most of the M2TS Files can easily be played on VLC Player, but still some of the M2TS Files are there, which VLC can’t play. Some of the reasons for such errors can be in the form of the “Blu-Ray error: This Blu-Ray disc needs a library for AACS decoding, and your system does not have it”, which proves that the lack of the Library for AACS Decoding is essential for the system to play M2TS Files.
Therefore, VLC Player cannot play some M2TS Files, a professional M2TS Converter you need. Here we list the Top 4 Free (4K) M2TS to VLC Converter for VLC on Windows/Mac can be easily convert M2TS Files to VLC Player supported MP4, MKV, AVI, etc without any quality loss.

Top 4 Free (4K) M2TS to VLC Converter for VLC on Windows
(4K) M2TS to VLC ConvertersPavtube MTS/M2TS ConverterPavtube Free Video DVD Converter UltimatePavtube HD Video Converter for MacPavtube iMedia Converter for Mac
Pavtube MTS/M2TS ConverterPavtube Free Video DVD Converter UltimatePavtube HD Video ConverterPavtube iMedia Converter
(4K) M2TS format to/from other formats
Sony M2TSYYYY
Canon M2TSYYYY
Panasonic M2TSYYYY
4K M2TSYYYY
3D M2TSYYYY
H.265/HEVCY-YY
XAVCY-YY
XAVC SY-YY
M4VY-YY
M3U8Y-YY
3D MP4/MKV/AVI/WMVY-YY
MP4, AVI, MOV, WMV, WebM, DivX, FLVYYYY
MXF/MTS/M2TSYYYY
DVD-Y-Y
Bluray-Y-Y
MP3, AAC, FLAC,OGGYYYY
WAV, M4A, DTSYYYY
Devices Preset format supported
iPhone preset( iPhone SE, iPhone 6S,etc.)YPARTYY
Android preset(Galaxy S7, Xperia XA, Nexus 6p,etc)YPARTYY
Windows preset(Windows Phone 8/10)YPARTYY
Gaming systems, Projectors, 3D, HDTV, etc.YPARTYY
HD Media PlayersYYYY
NLEs Preset Format Supported
Adobe PremiereY-YY
Sony VegasY-YY
Avid MCY-YY
Final Cut Pro X/7/6Y-YY
iMovie 11/10/9..Y-YY
Avid MCY-YY
Built-in Editor Functions
Trim & Crop VideoYYYY
Merge & Split VideoYYYY
Reset Audio Channel/codecYYYY
Adjust Video bitrate/sizeYYYY
Add SubtitlesYYYY
Image/Text WatermarkingYYYY
Conversion
2D to/from 3D ConversionY-YY
Batch ConversionYYYY
GPU or Multicore Acceleration(Windows only)YYYY
Supported OS
Windows 10YYYY
Windows2003 or higherYYYY
Mac OS X El CaptianY-YY
Mac OS X 10.5 or higherY-YY
Overall Rating8.588.59
Trail/Purchase
Windows Traildownloaddownloaddownloaddownload
Windows Purchasebuyupdatebuybuy
Mac Traildownload-downloaddownload
Mac Purchaseupdate-buybuy
Just follow the STEP GUIDE to convert M2TS Files to VLC Player supported formats, MTS/M2TS Converter for Mac and output MKV as example, other converters almost have the same steps and you can also choose other format if you need. Choose one of the Top 4 Free (4K) M2TS to VLC Converter for VLC and follow the steps.
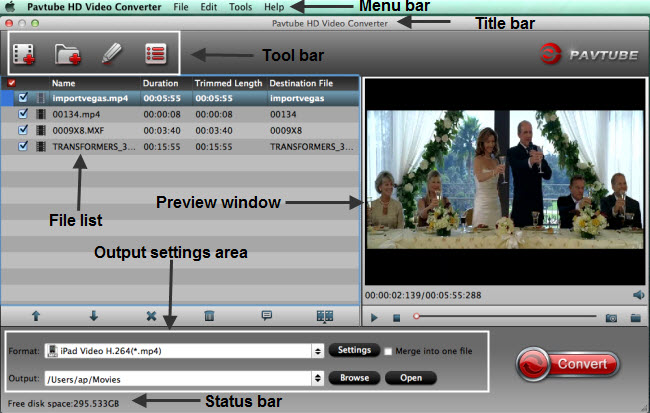
Step 1. To import videos, you may click on “Add Video” or simply drag the M2TS video files in.
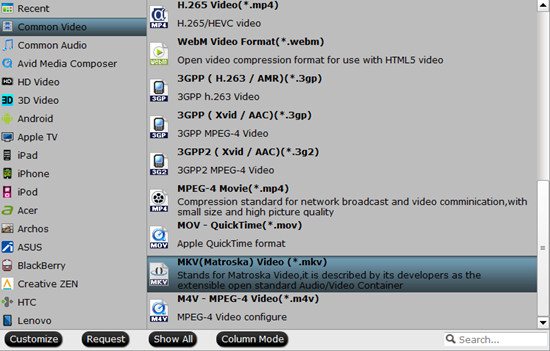
Step 2. Click on the dropdown list of “Format” to select MKV as output format. To convert M2TS to MKV for VLC with standard quality, you can select the “MKV (Matroska) Video (*.mkv)” format under “Common Video” option. To transcode M2TS to MKV with HD quality, you can choose the MKV format under “HD Video” option. Of course other format can be chosen as long as VLC Player compatible with.
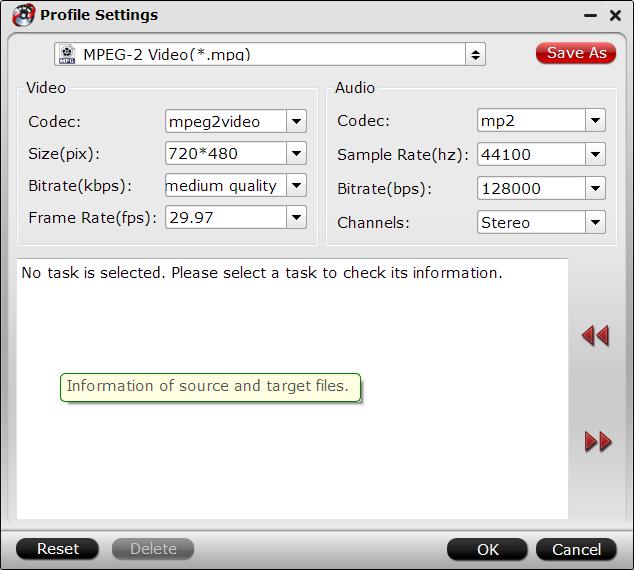
Step 3. (Optional)Select one or more files, click the pencil icon and find more editing items for M2TS videos, ‘Trim’ to when to start and when to finish, ‘Crop’ to get rid of the unwanted edges, etc. More you can get into the interface here.
Step 4. Set an output folder to store the converted files, then hit the “Convert” button to carry out the conversion for VLC.
When the conversion is over, please click on the “Open” button next to “Output” box on the main interface to view the converted files, you can play the converted M2TS files in VLC media player smoothly.
Besides convert for playing on VLC media player, you can also choose the ProRes codec for editing in Final Cut Pro, MPG for editing in Sony Vegas, ect. You can also share the converted and edited M2TS files to Youtube or Faccebook.
Read More:

Friday, April 29, 2016

Sony RX10 III XAVC S /AVCHD Video to iMovie Workflow on Mac El Capitan

Sony RX10 III is an excellent digital camera, it is able to shoot UHD 4K video up to 30 fps, and super slow-motion full HD video up to 960 fps. UHD 4K videos are recorded in XAVC S MP4 format, and 1080p videos can be recorded in AVCHD MTS format.

I have not been successful in having iMovie recognize my RX10 when connected with its USB cable. It doesn't know that the camera is attached, even though the computer knows, and thus will not import videos. I've tried all of the USB settings in the camera.

Can someone give me specific instructions for importing videos via iMovie?


As mentioned above, Sony RX10 III recorded video in 4k XAVC S MP4 format and 1080p in AVCHD MTS format, while XAVC S MP4 format is the favored format for most of its users, for it brings better quality and convenient for broadcasting. The only problem usually occurred during the editing process. 

iMovie (7, 9, 11) can't ingest videos from Sony DSC-RX10 III directly mainly because you have recorded video with the the high frame rate 'HFR' videos modes that capture footage at up to 960 fps. iMovie can’t recognize such high frame rate. The easiest workaround is to convert Sony DSC-RX10 4k XAVC S MP4 format and AVCHD MTS format to iMovie native supported Apple InterMediate Codec (AIC) (*.mov) in a low frame rate without quality loss, which is the most compatible format for iMovie and make the editing work much smooth and easier.

Pavtube HD Video Converter for Mac (review) is now providing the most reliable and professional 4K solutions to all format issues with from RX10 III including 4K XAVC/XAVC S, AVCHD format. (4K MP44K MTS4K MXF also can be handle smoothly).

With this professional 4K video converter, you an import RX10 III 4K footage into iMovie with the preset native-format Apple InterMediate Codec, compress the resolution of RX10 III 4K footage from 4096*2160P to 1920*1080P so that you can drag & drop the video clips into iMovie easier.

The trail-before-purchase is supported, just feel free to try it:


If you are a Windows user, and in need of edit the RX10 III 4K footage in Windows Movie Maker, Sony Vegas, Adobe After Effects, etc. Please turn to Pavtube HD Video Converter

How to Convert RX10 III XAVC S/ AVCHD to AIC for iMovie

Download the Pavtube HD Video Converter and install it on your Mac(compatible with Mac OS X 10.11 El Capitan, 10.10 Yosemite, 10.9 Mavericks, 10.8 Mountain Lion, 10.7 Lion, 10.6 Snow Leopard, 10.5 Leopard and lower versions).

Step 1. Add  RX10 III XAVC S/ AVCHD files

Connect RX10 III with your Mac via a USB, click "Add Video" button to load RX10 III XAVC S/ AVCHD files to the program. You can also directly drag the video files into the program directly.


Tip: if we got some single MTS clips from Sony DSC-RX10 III, the iMovie even won’t recognize the files without the intact folder structure.

Step 2. Select output format

From "Format" drop-down option, choose iMovie best video editing codec from "iMovie and Final Cut Ex..." > "Apple Intermediate Codec (AIC)(*.mov) to output.


Step 3. Compress RX10 III 4K video to 1080P

Open "Profile Settings" window, click "Size(pix)" to select 1920*1080 as the final resolution for output video. You can also adjust video and audio settings, including codec, aspect ratio, bit rate, frame rate, sample rate, and audio channel.


Step 4. Start the conversion

Finally, simply hig the big Convert button to start converting RX10 III XAVC S/ AVCHD files to Apple InterMediate Codec for iMovie. 

Within several minutes, you can find the converted file on your computer by clicking the "Open" button. And then you can import the converted files to iMovie for editing smoothly.

Not the end: Supported iMovie exported files converting, too.

Able to editing in iMovie is just the beginning of your task, isn't it? After editing the files, you'll have lots of choice with the iMovie expported files, like upload to the website sharing with your followers, stream to the your big screen TV for watching, backup into your cellphones or your Home Media Sever... 

The available options and possibilities with the iMovie exported files are too numerous and extensive to cover here. If the exported files are incompatible for your purpose, just drag and drop it to the converter again and choose your target format. It's really wonderful that will drive you crazy, isn't it?

If you happen to have some recorded files by Canon XF series camera/camcorder, and encounter the importing or editing issue with iMovie or other NLEs, there is a big discount for you!


iMixMXF/MultiMixer + Video Converter

iMixMXF/MultiMixer Key Features:

-Import/preserve/mix multi-track MXF in MKV/MP4/MOV formats. 
-Output multi-track Apple Prores MOV for further editing in Final Cut Pro (X). 
-Support DVCPRO/HDV/Avid DNxHD/AIC output 
-Convert MXF to any other formats for editing, playing, or broadcasting. 
-Merge/split/trim/crop MXF footages. 

Video Converter Key Features: 

-Convert from and to any common SD/HD video and audio format. 
-Support Apple ProRes/DVCPRO/HDV/Avid DNxHD/AIC encoding. 
-Output formats for Mac editing software, e.g. FCP, iMovie, FCE, Avid, Adobe... 
-Output formats for different playback devices.


Read More:

Friday, April 22, 2016

Transcode Canon EOS 80D H.264 *.mov Files to Sony Vegas Pro Native Supported *.mpg Codec For Editing

"I purchased a Canon EOS 80D and it recorded movies in H.264 .mov files. My editing software is Sony Vegas Pro and it doesn't recognize the .mov format from my new EOS 80D camera, how do I make it work in Sony Vegas Pro?"

Sony Vegas Pro is a video editing software package for non-linear editing systems of Sony Creative Software. It works perfectly with Sony XDCAM MXF format and DVCPRO MXF format, although Sony Vegas announced that it can deal with a wide variety of video files, but not H.264 .mov files it not work smoothly with it. 

So what's the available workflow for getting Sony Vegas Pro and EOS 80D MOV movies to work nicely? If you're confusing about this, you've come to the right place. The article tells you an easy way to fix the issue.

The easy option is to convert EOS 80D MOV video files to a compatible for Sony Vegas Pro, from Sony Creative Software we also know that the native supported format for Sony Vegas Pro is MPEG-2 (*.mpg). So, you just need to get a H.264 MOV video converter and transcode Canon 80D MOV videos to MPEG-2, which will save you both time and trouble, and all you need is to drag the result videos for prompt editing.

The recommended tool to convert EOS 80D MOV video to Sony Vegas Pro is Pavtube Video Converter, an intuitive conversion program that lets you convert over 70+ video and audio formats in your desired form effortlessly. With it, you can finish converting your EOS 80D MOV videos to Sony Vegas Pro supported MPEG-2 format at a few mouse clicks in Windows (Windows 10 included). 

As for Mac users, Pavtube Video Converter for Mac will let you convert EOS 80D MOV video files to iMovie, FCPAdobe Premiere & more on Mac OS X (10.11 El Capitan included) with ease. Download the program and follow the steps below to convert your videos. Here we choose Windows Version as example, Mac Version has the same steps.

The trail-before-purchase is supported, just feel free to try it:


Key Features:
  • Three simple clicks to convert EOS 80D MOV videos to Sony Vegas Pro compatible MPEG-2 (*.mpg)formats.
  • Aside from Sony Vegas Pro, you can directly convert EOS 80D MOV to Adobe Premiere, Avid, Sony Vegas Platinumand more video editors supported formats without additional settings.
  • Edit your EOS 80D MOV videos before converting them. With the built-in editor, you can trim or crop your videos. And you are able to add subtitles and watermarks to the videos as well.
Warm tip: The conversion speed is very fast because it supports batch conversion and NVIDIA CUDA & ATI Stream (AMD APP) acceleration technologies with Windows Version. It converts multiple video clips at the same time, moreover it can shut down computer after the process is complete, so run the app overnight and you could enjoy the created videos next morning when you are up.

Install and run it, you will see the interface. The following is a simple instruction of how to use this Pavtube Video Converter: 

How to Convert and Import EOS 80D MOV Files to Sony Vegas Pro

Step 1. Click the button “File” to add EOS 80D MOV files (or directly drag and drop your files) to the Converter.


Tips: When the EOS 80D MOV files are loaded to the Pavtube Video Converter, you can view the videos from the Preview window. Simply select an item and click the “Play” button. When the video is playing, you are allowed to take snapshoot.

Step 2. From "Format" drop-down list, select to out "Adobe Premiere/Sony... "> "MPEG-2 (*.mpg)" format for editing with Sony Vegas Pro.


Step 3. You can click “settings” to adjust the output parameters, like resolution, bitrate, etc. Don't forget the balance between video quality and size. 


Step 4. Last, click the "Convert" button to start EOS 80D MOV to Sony Vegas Pro conversion. 

That's all you are required to do. In fact, this video converter can help you do more. 

Once the conversion completes, you can click "Open" button to get the generated MPEG-2 files for Sony Vegas Pro easily. Then, it would be easy for importing and editing EOS 80D MOV files with Sony Vegas Pro.

Read More:

Tuesday, April 19, 2016

Top 3 Alternatives to Freemake Video Converter for Mac (El Capitan)

For windows users, it is easy yet excellent to convert videos freely with Freemake Video Converter; while for Mac users, you may be in a great dilemma in case of wondering to put videos on your Mac with this program as this free yet amazing video converter is only designed for Windows8/7/Vista/XP.

In this case, if you’ve dream of converting video on Mac using Freemake, you’d better download an alternative to Freemake for Mac version (El Capitan) beforehand. Anyway, to download Freemake for Mac for video conversion can be a Walkover as long as you own a video converter designed for Mac OS specifically.

SPECIAL FEATURES YOU WANT A GOOOD FREEMAKE ALTERNATIVE TO HAVE
  • Able to read and process many input and output file formats
  • Extract audio from the video source and convert to the format you require
  • Batch processing – let’s you convert several videos at once
  • Profiles to select format, codec, resolution and bitrate
  • High Definition support – able to handle at least 1080p
  • Trim head and tail of clips to select only the portions of a video
  • Crop video size and proportion
  • Make screen grabs of still images
  • Merge or join files into one
  • Adjust video brightness, contrast, color saturation, etc.
  • Preview video effects prior to conversion
  • Watermarking to insert an identification graphic or text during the video
  • Graphics Processing Unit (GPU) acceleration – e.g., NVIDIA-CUDA
  • Speed of conversion – depends greatly on your computer configuration
  • Multi-pass encoding capability to help insure a better quality conversion
  • Fixed or variable bitrate selection
  • Calculator to estimate output size
  • High quality – best video and audio, no sync problems or skipped frames
  • Easy upload to YouTube, Facebook, and other social media sites
  • Able to transfer to a wide range of mobile and other playback devices
Here I'd like to share you top 3 alternative to Freemake Video Converter for Mac computer:

Alternative to Freemake Video Converter
Rank
Top 1
Top 2
Top 3
Products
Pavtube Video Converter
pavtube hd video converter
pavtune imedia converter
Download Trial
Buy
Pricce
$35
$35
$65
Input Files
Video formats (*.avi,*.divx, *.wmv, *.wma, *.asf, *.dvr-ms, *.wav, dts in wav, *.rm, *.rmvb, *.ra, *.mov, *.qt, *.mp4, *.3gp, *.3g2, *.dv, *.m4b, *.m4v, *.m4a, *.aac, *.flv, *.f4v (YouTube, Hulu, Fox, etc.), *.dat, *.mpg, *.vob, *.mod, *.tod, *.mxf (partial), *.mov,*. xavc/*.xavc-s/*.xavc-l from JVC, Panasonic, Canon, Nikon, Sony cameras and camcorders, *.m2v, *.m2t, *.m2ts (Blu-ray), *.ts, *.tp, *.evo, *.mkv, *.dv, *.tivo); Video foramt same as the former two convertes.
Also support:Blu-ray Discs, Blu-ray Folder,
DVDs, DVD Folder, DVD IFO File,DVD ISO Image File
Output Video Formats
H.265/HEVC, H.264/MPEG-4, DivX, XviD, MKV, MP4, AVI, MPEG, WMV, FLV, SWF, F4V, MOV, 3GP, 3G2, VOB, TS, DV, MPEG-2 HD Video (*.mpg), MPEG- TS Video(*.ts), Quick Time HD Video (*.mov), WMV HD Video (*.wmv), Audio-Video Interleaved HD Video (*.avi)
Output Audio Formats
MP3, AAC, FLAC, MKA (MKA(Matroska) Audio), OGG (Ogg Vorbis Audio), WAV(Nokia WAV Audio), M4A, DTS (remux),MP2, AIFF, AMR, SUN AU Format
Output NLEs support
FCP X, FCP 6/7, FCE, iMovie, Apple Aperture 3, Avid Media Composer, Adobe Premiere Pro CC, Premiere Pro CS6/5/4/3, Adobe After Effects CC, After Effects CS6, Adobe Premiere Elements 13/12, Adobe Creative Suite 6/5, DaVinci Resolve Lite(DaVinci Resolve 11), DaVinci Resolve 9, iPhoto, Kdenlive, Keynote, etc.
Output Devices Supported
Apple devices:Apple TV 4/3/2/1, iPad Pro/Air/4/3/2, New iPad Pro, iPad , iPhone 6s plus/6s/6 plus/6/5s/5/4s/4, iPod, iTouch, etc.
Android devices:Samsung Galaxy Tab Series, Galaxy S Series, Galaxy Note Series, Amazon Kindle Fire Series, Google Series, Sony Xperia Z Series, Acer, Toshiba, HTC, LG, Lenovo, etc.
Windows devices:Microsoft Surface 4/3/2, Surface RT/Pro, HTC Windows Phone Series,
Game consoles and media players:PS4, PS3, PS Vita, Xbox 360/One, Wii, WD TV Media player, Seagate Media Player
Others:BlackBerry, Nokia, VTech InnoTab tablets, Kurio, Coby, Kobo, Alcatel, PSP, Archos, Creative Zen, iRiver, etc.
Support Website
YouTube, NAS, Networked Devices, MSN, Myspace, Facebook, Google, Yahoo, Dailymotion, FOX, NBA, Youku, NAS, PowerPoint Rresentation, HTPC, Home Theater, A/V receiver, LCD Projector, Keynote, etc.
Add SRT subtitle.
Merge & Split Video
Trim & Crop Video
Adjust Video frame rate
Adjust Video codec, bitrate
Adjust Aspect Ratio
Adjust Audio codec, channel
NVIDIA CUDA Acceleration?
4K UHD Support
Make screen grabs
Merge or join
Preview video
Watermarking
Speed of conversion
4.8
4.8
4.8
Buy

Conclusion: As the awesome Freemake Video Converter for Mac alternative, Pavtube Video Covnerter for Mac, Pavtube HD Video Converter for Mac, Pavtube iMedia Converter for Mac comes with more excellent features compared with the Freemake itself. If you are eager to find the a freemake for Mac alternative, fell free to take this 3 best Freemake Video Converter for Mac alternative into your consideration.

Freemake Problems Solutions

If you are Windows users with no need of a Freemake alternative for Mac, there are some solutions for solving Freemake problems.

1. If you converted video with Freemake Video Converter and then audio and video are out of sync. The video doesn't match the sound. How to fix it?

A: First make sure you are using the latest version of Freemake video converter and the original video has no issues. If both are OK, go to File->Options->Acceleration in the program and uncheck all accelerations, which may help.

2. Freemake not working. You use Freemake to convert the videos for DVD, but the images, when being played back, disappeared from time to time. What is the problem?

A: From feedback of some users, Freemake video converter is not well compatible with Windows XP OS or 32-bit version. It works fine in WIN 7 OS, but we are not sure if it supports Win 10 or not. To prevent such problems in the very beginning, try Freemake alternative for Windows.

Read More:

Tuesday, April 12, 2016

How to Fix VLC Player Audio Sync Problems on Windows/Mac

Many of the time when we download a video clip or a movie, we find that the audio does not sync with the lips movement of the characters or the audio and video does not match in VLC Player. This kind of video clip/movie is very frustrating to watch. However we can fix such issue and make our video clip play in sync with the audio. 

How to Fix audio out of sync and syncing issues when playing a video file in VLC:

You’ll obviously need the VLC app to do this, VLC is cross platform and available for just about everything from Mac OS X to Linux and Windows and iOS, so you’ll be good to go with whatever you use.

How to Fix vlc audio sync on Windows laptop:

– Open the downloaded Video Clip in VLC. Right click on the video clip and select Open With..Select VLC from the list. 

– If the Audio comes before Video, we need to slow the audio, so press fn+K key (On laptop). Each combi keystroke will reduce the audio speed by 50ms. So keep dong it until you see the video and audio are sync. 

– If the Audio comes after the video, we need to make the audio fast, so press fn + J (On laptop) key. When you invoke the shortkey the screen will show the delay amount as shown in the below image: 


How to Fix vlc audio sync on Windows desktop:

If you have a desktop, you can try the Ctrl + K and Ctrl + J key respectively for the same result. If the shortkey key does not work , we can change the settings from preferences as follows:

– Open VLC player and click on Tools > Preferences 
– On preferences window, click on All under Show settings, Select Audio from left. 
– On the right pane look for the option Audio desynchronization compensation 

Put a negative or positive value in the box towards right…depending upon the situation.

How to Fix vlc audio sync on MAC?

For fixing the issue on MAC, the solution is quite simple. We can use the shortcut keys on the MAC for slowing and speeding the audio track to align with the video:
  • F – Slow audio by 50ms
  • G – Speed audio by 50ms
When you press F Key, the Decrease Audio Delay in milliseconds will get in work, while the G Key will Increase Audio Delay in milliseconds. So, depending on the delay or ahead of audio with the video, all you need is to press the keys and get the work done easily. G Keys moves the Audio forward while F key will move the Audio Backward.

Once-for-All Solution to Permanently Fix VLC Audio Sync Problem

Majority of the audio and video out of sync issue are because of improper encoding format while ripping the video. The solution has been tested with downloaded video clip, so I am not sure if it will work with such issue in all videos.

Generally speaking, applying keyboard shortcut or VLC's preference can fix the usual audio not syncing with video problem in VLC. But everything happens for a surprise. Sometimes, there are also certain cases VLC can't handle, e.g., the original video itself has serious audio delay problem; the audio out of sync problem too severe to fix. 

In fact, there is simple way to solve VLC Player audio out of sync problem.

Using Pavtube Video Converter / Mac Version will be fix this problem with ease. In this app, you can choose any popular codec to avoid audio out of sync problem. And in profile settings, you can reset video and audio size, bitrate,etc to get better video quality. You can preserve 5.1 sound with it when outputting video. 

This VLC Alternative APP can easily rip all video to H.265, M3U8, AVI, MOV, MP4, etc to provide compatibility for free entertainment with various devices(iPad ProiPhone 6/6s/6 plus/6s plus, Samsung Galaxy S7/Edge), HD media players(VLC, Windows Media PlayerQuickTime), as well as free access to video editing software(FCPiMovie,PremiereAvidSony Vegas).

The trail-before-purchase Pavtube Video Converter(windows/mac version) is supported, just feel free to try it, it is 100% clean and safe:


Pavtube Video Converter is not only a video converter program, but also a simple and easy video/audio editor. In Audio Editor, you can either replace/remove original audio, or set audio fade in/out effects.


For more details on how to load files, preview & take snapshots, select output format, merge & split, edit video and start conversion. Please turn to Pavtube Video Converter Getting Started Tutorial(Win/Mac).

If you have any question or problem about our products, or get the Bundles& Deals for saving money, please feel free to contact us with the email below:
Money Saving Bundles&Deals

If you are a shutterbug and have got yourself kinds of videos or have a large collection of your favorite video, the below two tools should be take into your consideration when handle with the video clips, for playing, for editing, for sharing...


iMixMXF/MultiMixer + Video Converter

iMixMXF/MultiMixer Key Features:

-Import/preserve/mix multi-track MXF in MKV/MP4/MOV formats. 
-Output multi-track Apple Prores MOV for further editing in Final Cut Pro (X). 
-Support DVCPRO/HDV/Avid DNxHD/AIC output 
-Convert MXF to any other formats for editing, playing, or broadcasting. 
-Merge/split/trim/crop MXF footages. 

Video Converter Key Features: 

-Convert from and to any common SD/HD video and audio format. 
-Support Apple ProRes/DVCPRO/HDV/Avid DNxHD/AIC encoding. 
-Output formats for Mac editing software, e.g. FCP, iMovie, FCE, Avid, Adobe... 
-Output formats for different playback devices.


Read More: