Need tips on how to make Panasonic DMC-LX100 MTS files accepted by Premiere Pro CC? let’s read this article below.

Summary: I don’t know if you are now puzzled with the question on how to edit your Panasonic AVCHD MTS footage in the hottest editing software Premiere Pro CC. The article below mainly tells the methods of converting MTS files to MPG, which is the most suitable one for Premiere Pro CC.
Full HD Video Shot by Panasonic DMC-LX100 4K camera.
The black Panasonic LUMIX DMC-LX100 Digital Camera is an advanced point-and-shoot with manual controls designed to enable and inspire creativity. It features a large multi-aspect 16.8MP 4/3" MOS sensor to produce 12.8MP still images (4:3) and 4K Ultra HD video at 30 and 24 fps. So for AVCHD MTS files, we can see commonly from this camera, right?
What can we do to deal with MTS files for a nice editing in Premiere pro CC?
Are you a professional editing software user? If you are, you may want to edit Panasonic LX100 4K MP4 and 60P AVCHD/MTS video in Final Cut Pro, Avid, etc. Also, Premiere Pro CC is included. Pavtube MTS/M2TS Converter for Mac is a best easy-to-use and intuitive tool for Panasonic camera and camcorder users. It is focus on converting Panasonic AVCHD MTS recordings to formats compatible with your editing software like Final Cut Pro (FCP X, FCP 7, FCP 6), iMovie, Premiere Pro, FCE, Avid Media Composer, Sony Vegas, and more.
Step-by-step details of Converting Panasonic MTS to MPG on Premiere Pro CC.
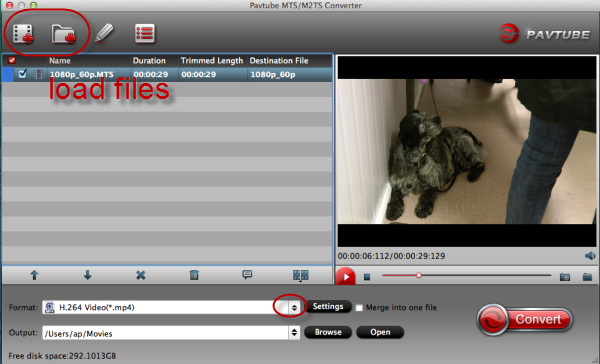
Add raw files> Run the program you just set up. Drag and drop the 4K/AVCHD video files to the converter. You can also hit ‘Add video’ button to import videos to the app. If you wanna combine several videos into one file, you can click the "Merge into one" box.
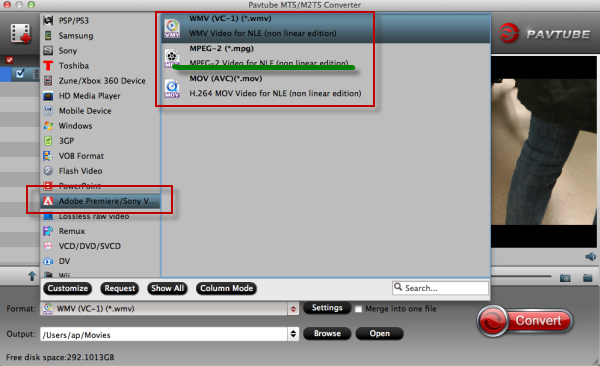
How to choose a correct output format?> Could you find the icon on the left of the preview window? Yes, click on the ‘Format’ button, choose the Adobe Premiere/Sony Vegas -> MPEG-2(*.mpg) as output format for editing raw AVCHD files in Adobe with natively supported video codec.
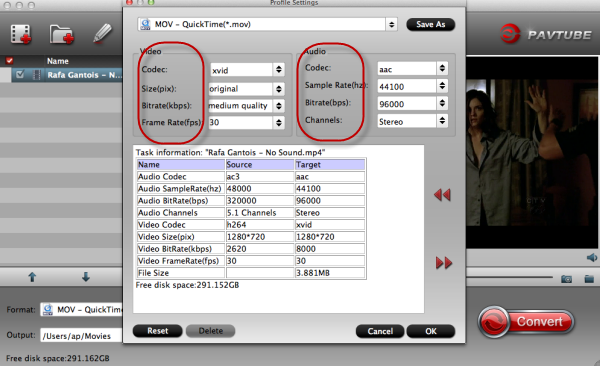
Need more advanced settings? Just click the ‘Settings’ button on the main interface, there we can customize advanced audio and video parameters like Video Codec, aspect ratio, bit rate, frame rate, Audio codec, sample rate, audio channels.
With all the preparation work done? Back to the main interface and hit the ’Convert’ button, with a 6X faster speed, it will not waste us a lot of time of waiting. For a further editing in Adobe Premiere Pro CC, this MTS converting assistant can do a big favor, right?
Editor's Recommendations
- Can Final Cut Pro X Edit DJI Phantom 4K video?
- Import and Edit Sony A6300 4K XAVC S to Avid Media Composer
- Tapeless MTS Workflow with Final Cut Pro 7
- Premiere Pro CC 2015 can’t import MPEG2 files
- Importing Typhoon-H 4K videos to FCP X for editing
- Tips for Importing and Editing Canon 5D Mark IV 4K MOV with Avid MC
- Top 5 best MXF video converter for Mac
- Import Canon XC15 4K footages to Premiere Pro CC
- Import 4K video (MOV, MP4, MXF, XAVC, MTS) to Pinnacle Studio for editing
- GoPro Hero 5 4K to FCP X - Importing GoPro Hero 5 4K footages to FCP X
- How to edit H.265/HEVC files in Adobe Premiere Pro?
- Compress and Convert Samsung NX500 4K H.265 video to 1080p video