Showing posts with label Sony. Show all posts

Tuesday, August 19, 2014

Recognize XAVC and How to Open XAVC on Windows/Mac

The following guide can give you a comprehensive understanding on XAVC and making XAVC played freely on windows or Mac.

The Definition of XAVC Files

xavc-codec


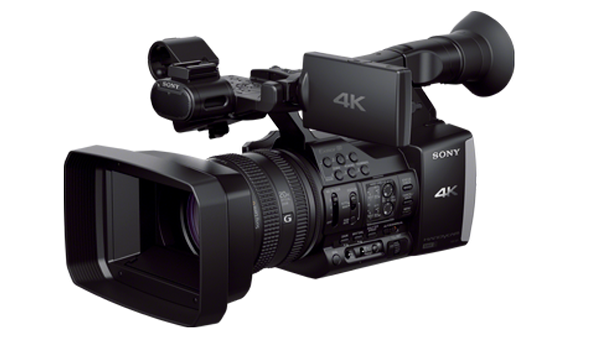
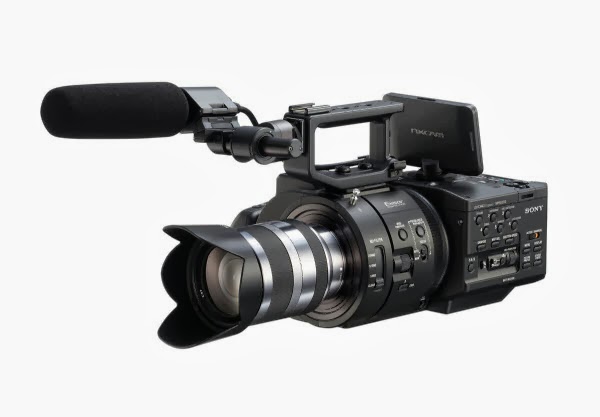
For a number of Sony fans, they are not be unfamiliar with XAVC files. Although being a new recording format introduced by Sony, XAVC has been widely adopted now. Long GOP is a high-efficiency codec to serve more widely the requirements of the professional market. Along with the popularity of Sony XAVC, it supports the following content formats like:4K, HD and Proxy resolution, MPEG-4 AVC/H.264 video compression, up to 60 frames per second(fps),etc. Except for Sony, such as Canon, Panasonic, and Leica can also have XAVC files.

Multiple Efficient Ways to transcode XAVC on Windows/Mac

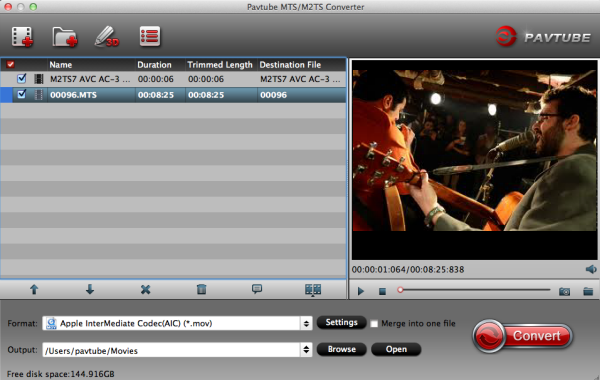
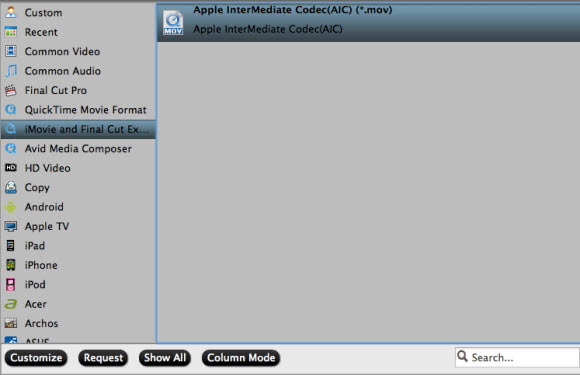
Method 1. Get a professional XAVC converter.

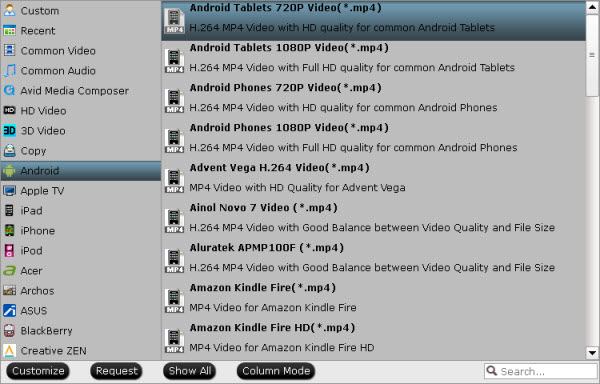
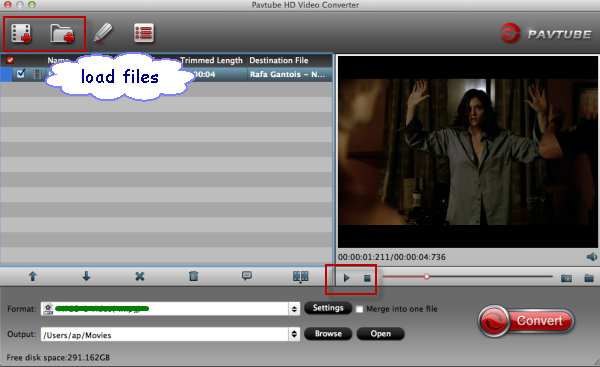
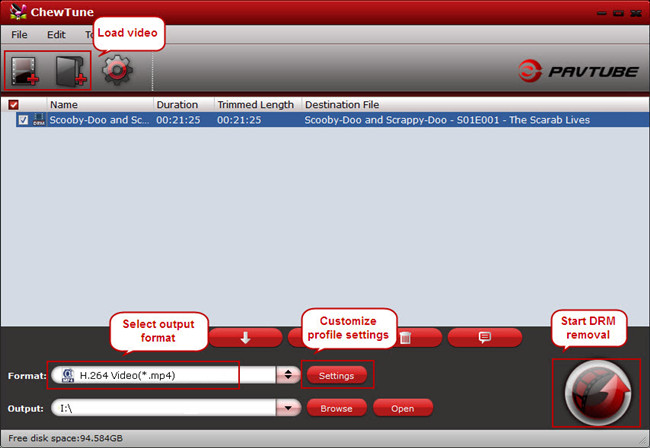
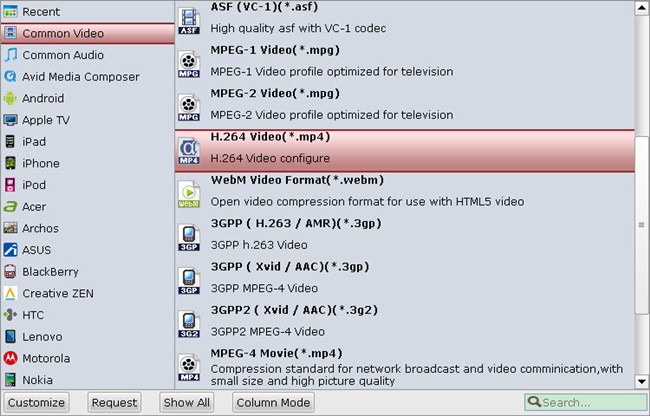
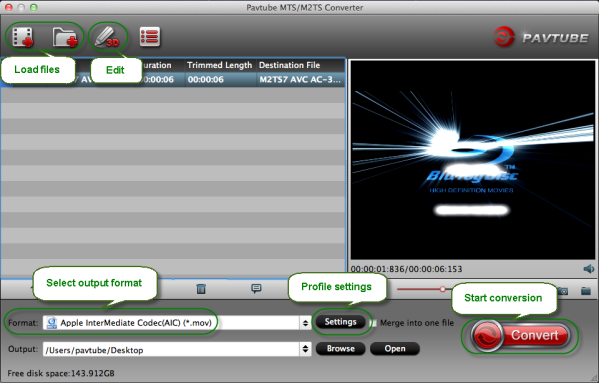
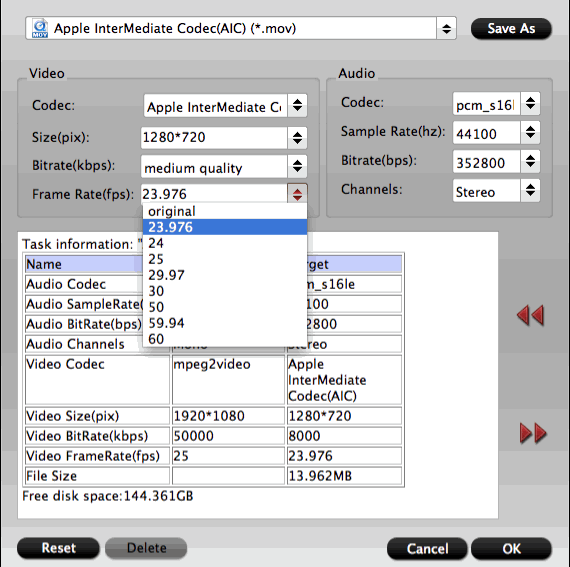
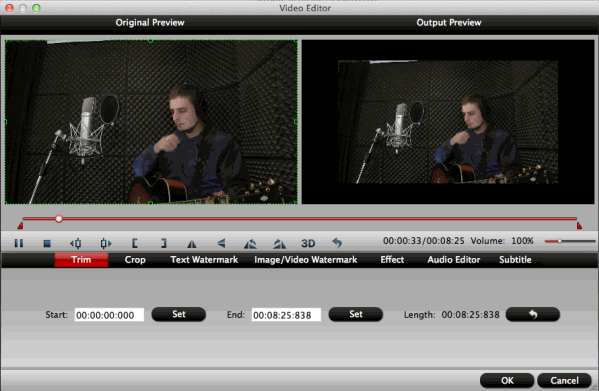
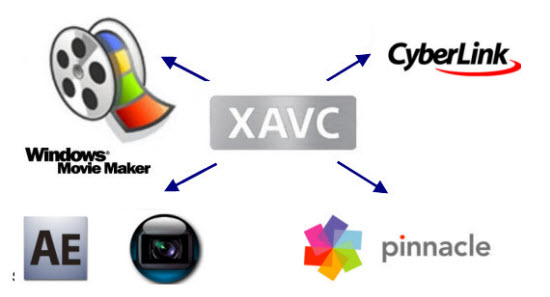
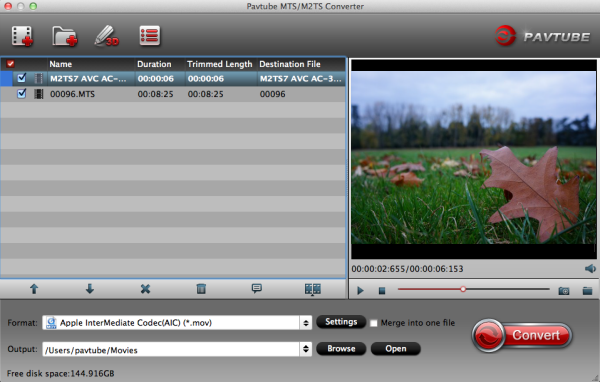
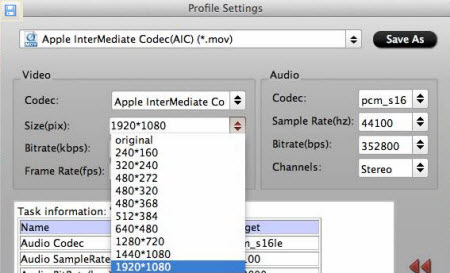
XAVC, as the latest format introduced by sony, we can’t make our XAVC files playable and open in by most portable devices and applications. We can use a decent video conversion application to convert XAVC footage to a wide range of popular videos, such as MP4, MOV, FLV, AVI, WMV, M4V, DV. But don’t be worry about it. Pavtube HD Video Converter for Windows/Mac is a nice choice for you. 


hd-video-converter-for-windows

hd-video-converter-for-Mac


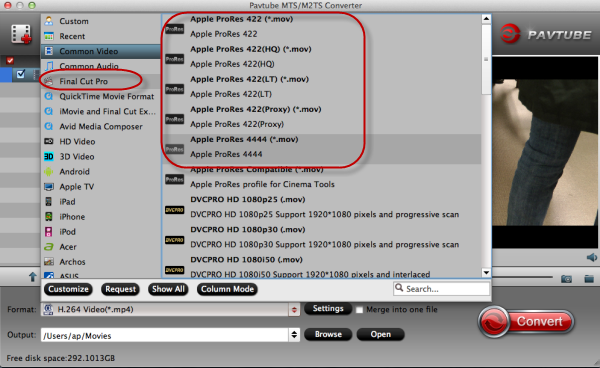
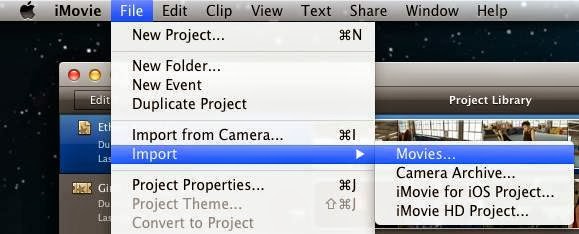
What I have to specially mention is Pavtube HD Video Converter---a friendly XAVC converter for you. With this tool, we can transform XAVC codec into any other formats that accepted by most players or editors, iOS/Android series and more. Besides, some editing software like FCP X, iMovieAvid Media Composer and more, some players likeQuicktime Player etc.

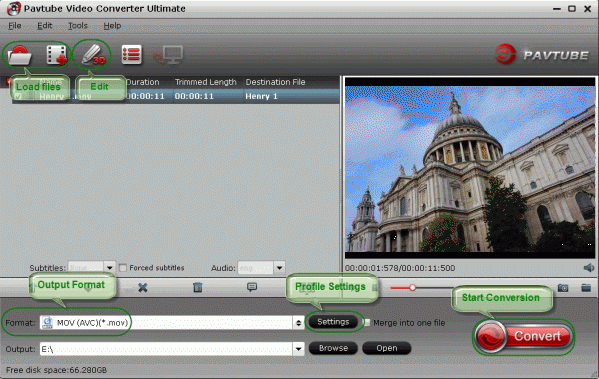
If you wanna know more the steps about using Pavtube XAVC HD Converter, the following items can help you a lot.
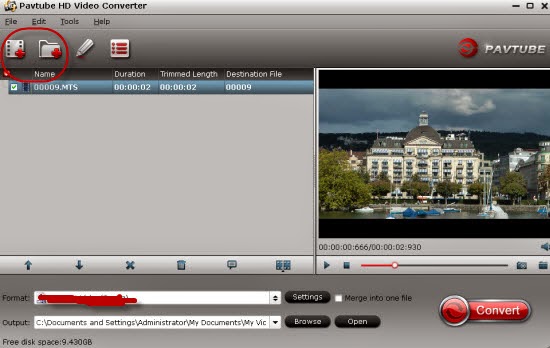
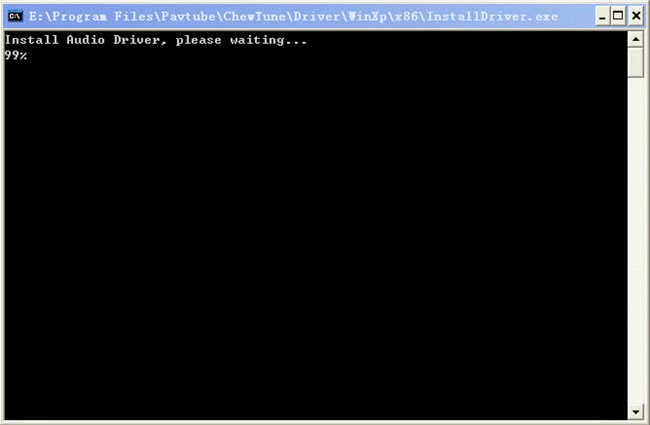
Start using Pavtube HD XAVC Converter for Windows .
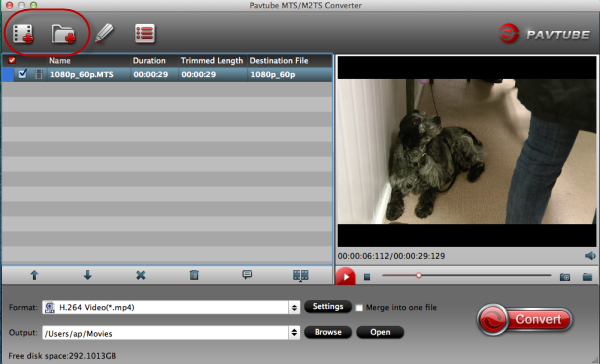
Start using Pavtube HD XAVC Converter for Mac.
Method 2. XAVC Viewer: Content Browser

It’s an all-in-one clip management application that can be used with the latest portfolio of Sony camcorders. XAVC and QFHD are added in the latest version.

Method 3. XAVC/XDCAM Plug-in for Avid (PDZK-MA2)

This plugin supports for XAVC files in Avid Media Composer or NewsCutter products with viewing and editing.

Method 4. XAVC Software Support

It supports XAVC codec, such as  Adobe CS6, Avid, Grass Vally, Final Cut Pro X, Sony Vegas Pro 12 and more.

After comparing four methods above, we find that the first method takes advantages of simple operation, convenient management and high quality image, so the Pavtube XAVC HD converter for Windows/Mac can surely be your first choice!

If you want more:

Tuesday, August 12, 2014

Make it Possible to Put Sony A77II MTS into Premiere Pro on Mac

The following article can give you suggestions on taking MTS files from Sony A77II to Premiere Pro smoothly by Pavtube MTS/M2TS Converter for Mac.

Sony A77II, a wonderful camera that helps you remember great moments
Sony A77II

Nowadays, more and more people are interested in taking photos or videos by little cameras. Due to their convenience and little body size, Sony A77II takes advantages among most photographers. With the unique feature of offering high-speed shooting, most people are fond of taking photos on ways, trips or parties. After that, maybe they want do some decorations as treasures by editing software such as Premiere Pro.

Put Sony A77II MTS into Premiere Pro on Mac

MTS/M2TS Converter for Mac, a friendly tool to convert your videios smoothly.

Thus, someone will ask how can we put our MTS files taken by Sony A77 to Premiere Pro? Everybody knows that Premiere Pro can’t support MTS format. So we need some help to convert MTX to other formats like MOV, MPEG, WMV that Premier Pro supported, right? Maybe Pavtube MTS/M2TS Converter for Mac can help you a lot. This converter can transcode MTS to most formats you need in Premiere Pro.

download mts to mts/m2ts converter for mac                  buy mts to mts/m2ts converter for mac

Here are some specific steps you can take a reference on how to import your videos to MTS/M2TS Converter correctly, just click it: 


Steps for imporing MTS files into MTS/M2TS Converter for Mac

After successfully converting MTS to MOV, WMV or MPEG, you can edit videos in Premiere Pro freely to decorate them with your own style. If you wanna some more details about editing in Premiere Pro, please click here:

Some Tips for using with Premiere Pro


Other Guides for Reading:
Two ways to ingest Nikon D5300 MOV to Premiere Pro 
Best Way to convert Canon HF G30 AVCHD footage to Premiere Pro

Thursday, February 27, 2014

Easiest solution to play MKV, AVI, VOB, WMV, Tivo, MPG, Flash videos on Sony Xperia Z2

This post will give you the easiest solution to convert MKV, AVI, VOB, WMV, Tivo, MPG, Flash movies to Sony Xperia Z2 for playing, so that they can enjoy them anywhere they like.

If you are android fan and just plan to get a android phone, now, you can pre-order 10 inch Android slate Sony Xperia Z2, which is a wonderful smartphone. As you see, Xperia Z2 has 5.2 inch 1080 x 1920 screen, which is great for watching videos. However, Due to its own formats limitation, many video files can't be played well by Xperia Z2. Such as MKV, AVI, VOB, MPG, Tivo, WMV, FLV/F4V, MOV, MOD, TOD, M2TS etc.


For this situation, a good solution is using Pavtube Xperia Z2 Video Converter, which lets you compress HD 1080p movies to Xperia Z2 optimized videos and downsize them to less than 4GB. The converter performs faster and supports more variety of source formats than over-majority competitors on market. Even TiVo recordings can be converted to Sony Xperia Z2.
In case that you run a Mac computer, download Xperia Z2 Video Converter for Mac and follow the steps above for converting MKV, AVI, VOB, WMV, Tivo, MPG, Flash video to Sony Xperia Z2 for playback.

Step 1. Drag and drop source video to the Sony Xperia Z2 Video Converter only with 'Add files' button on the main interface. Drag the files directly is also a good idea.


Step 2. Click the pull down menu at the opposite side of "Format", and then choose "Android -> Android Phones 1080p Video(*.mp4)" format.


Step 3. Click "Convert" button to start compressing MKV, AVI, VOB, WMV, Tivo, MPG, Flash videos to Xperia Z2 friendly format and size.

And you can preview and customize output file size.

To do this, click on "Settings" button. In the pop-up Profile Settings window you can find set settings and check task details. The upper parts shows you the a/v settings you're using. The lower part displays the file information.

File size depends on the bitrate you use. For instance, in this case, I use the defualt bitrate 2000kbps, and it ends up generating a 2.4 GB .mp4 file. If I set video bitrate to 1500kbps, the final file will be 1.8GB in size. If you want smaller file size, set video bit rate down.

When video to Xperia Z2 conversion completes, you can click "Open" button to find generated videos. Now you can sync movies to Sony Xperia Z2 and enjoy all kinds of video files on this 10 inch Android slate.

Read more:

Wednesday, February 12, 2014

Sony Alpha 7R and iMovie/FCE Workflow- Transcode a7R MTS files to AIC for editing

This article teaches you how to easily convert and import Sony Alpha 7R MTS footage into iMovie or Final Cut Express for further editing on Mac (OS X 10.9 Mavericks included).

Sony is well known for innovating in the camera sphere, basically because it can. The A7R Full-Frame Camera is the world's lightest interchangeable lens full-frame camera. The R in the A7R's name stands for resolution, so the emphasis here is on getting the highest possible picture quality, and it facilitates a host of features including full HD video recording and a quick auto-focus algorithm.

'Our Sony a7R arrived five days ago and we, my wife and I, have had a chance to put the camera through its paces. It is excellent for capturing memories on vacations, birthdays, sports activities. And  it can capture Full 1920 x 1080 HD uncompressed clean-screen video files.' 

However, one problem makes me headache, I cannot get the video files in .MTS (AVCHD) format from my Alpha 7R into iMovie or FCE. What's the problem? How to realize this goal for native editing Sony 1080 60p/60i mts in iMovie or FCE?

Since Apple hasn't added full supported to the 1080/60 mts recordings within iMovie/FCE, and you have to change Sony Alpha 7R MTS videos to iMovie/FCE acceptable AIC .mov format. This is the best solution to import and edit Sony Alpha 7R AVCHD mts footage in iMovie/FCE.

For this case, a professional Sony MTS to AIC application - Pavtube MTS/M2TS Converter for Mac comes to help you which is your first choice to transcode Sony Alpha 7R AVCHD footages to AIC MOV for iMovie. Here is a step-by-step tutorial for your to figure out your Sony Alpha 7R MTS/M2TS iMovie/FCE problem:

Preparations

1. Copy your MTS videos from Sony Alpha 7R to computer hard drive.

2. Free Download Pavtube Sony MTS to iMovie/FCE Converter on Mac, install and launch it.

Brief Steps

Step 1. Drag and Drop source MTS videos to Pavtube Sony MTS to AIC Converter. Or click "Add Video" to import the mts footage from Alpha 7R


Step 2. Set up output format for Sony Alpha 7R AVCHD to iMovie/FCE Conversion.

From "Format" list, choose "iMovie and Final Cut Express > Apple InterMediate Codec (*.mov)" for output.


Step 3. Press the big "Convert" button to start transcoding Sony Alpha 7R AVCHD MTS to AIC MOV for using in iMovie/FCE. The program adopted advanced audio and video sync technology; never let you troubled by the audio and video issues.

Once finished, click "Open" to get converted MOV videos.

Then you could open up iMovie/FCE, and go to "File > Import > Movies…" to import converted video files to iMovie/FCE for further editing.

More Tips:

1. If you want to merge multiple MTS files into one for easy editing, please tick the box "Merge into one file" to merge all the imported clips.

2. In case the MTS footage is taken under interlacing mode, just click "Edit" to go to Video Editor, and hit Effect to select the Deinterlacing and interlacing lines will be eliminated. (Checked by default)

3. This Sony AVCHD Converter for iMovie/FCE optimized its conversion speed with multi-thread technology, so that you can convert the MTS 1.5 or 2 times faster than other similar programs. Its built-in codec will not install any codec on your computer, so as to avoid the unexpected codec problem.

Read More:

Thursday, February 6, 2014

Transcoding Sony FDR-AX100 4K XAVC-S footage to AIC mov for iMovie or FCE

iMovie or FCE won't import XAVC S files from Sony FDR-AX100 smoothly. The easy workaround is to transcode Sony 4K XAVC S video to a more friendly AIC codec for editing. Here is how.

There are only a few consumer-level options for shooting 4K video, but Sony clearly has a plan for stepping forward and bring the goods in this department. The new AX100 camcorder not only shoots 4K, but as a host of other awesome-sounding specs to attract video shooters. The footage from AX100 will be encoded using the XAVC-S codec and record to Class 10 SDXC cards.


While, there are a few issues when it comes to ingesting, loading and editing 4K XAVC-S files recorded by Sony FDR-AX100 in your non-linear editing software, like iMovie and Final Cut Express.  Keep reading and below is a quick and easy solution for solving the problem. 

To import Sony AX100 XAVC-S files to iMovie or FCE, the best way is to convert 4K XAVC-S to iMovie/FCE compatible AIC codec. To finish this job, a professional XAVC-S to AIC Converter for iMovie/FCE is necessary, and here, Pavtube XAVC-S Video Converter for Mac is highly recommended here.  Now I share the guide with you how to convert Sony FDR-AX100 XAVC S footage to iMovie/FCE friendly format using

How to convert Sony FDR-AX100 XAVCS media to AIC for iMovie/FCE

Step 1. Install and launch the Pavtube iMedia Converter for Mac, click "Add Video" to load XAVC-S videos.


Step 2. Click "Format" preset and choose "iMovie and Final Cut Express-> Apple InterMediate Codec (AIC) (*.mov)" as best video format for editing Sony AX100 XAVC in iMovie and FCE as well as good video quality.


Step 3. Now click "Convert" and let it go. The XAVC to AIC Converter for Mac supports batch conversion, so if you have lots of xavc videos to convert, check 'Shut down computer after conversion', and you can go away without keeping an eye on it.

Tips: When the conversion is finished, you can import the converted XAVC-S file to iMovie/FCE for editing.

Now you are free to import/edit Sony FDR-AX100 XAVC-S videos in iMovie and FCE under Mac without problems.

Read More:

Friday, December 27, 2013

Import Sony F65 MXF to Premiere Pro CS6/CS5/CS4/CS3 on Mac/Windows

Can't import Sony F65 MXF video to Adobe Premiere Pro smoothly? In this article will give you the answer how to load and ingest Sony MXF footage to Adobe Premiere Pro CS6/CS5/CS4/CS3 for smooth editing. 

Sony F65 users include some of the most world's most demanding cinematographers. It's an advantage you can exploit no matter what your delivery format: true 4K, supersampled 2K or supersampled HD.


I have 4K footage shot on the Sony´s F65 I'd like to composite with in Premiere Pro. The files are saved in an MXF container.It seems that cs6 natively desn´t support this file, is there a plug-in available for Sony's SR RAW codec? Thanks in advance!
Many nonlinear editing programs including Adobe Premiere Pro (CS6/CS5/CS4/CS3) don't support importing MXF encoded files directly. So here comes up the question: how can we import Sony F65 MXF recordings to Premiere Pro without any problems?

Method 1. Sony MXF plug-in. Use the plugin to create a single MXF file of your spanned clips on the memory card and import the new file into the project.
Method 2. To solve the incompatible trouble you’d better change Sony F65 MXF a native format for importing to Premiere Pro (CS6/CS5/CS4/CS3). To get the best quality with 5.1 sound, you can MXF to MPG. If you also want to play it with QuickTime, you can reformat MXF to MOV videos. If you want to get a smaller file for quickly editing, you can encode Sony F65 MXF to WMV.

As you seen above, Pavtube MXF to Premiere Pro Converter for Mac is the best choice for you, and it is capable to convert Sony F65 P2 MXF to Premiere Pro efficiently and stably. 

With the Mac app, you not only can convert Canon XF/Panasonic P2/Sony XDCAM MXF video to MOV, MPG, WMV, you also can batch convert MXF clips to ProRes 422 for FCP (X), AIC for iMovie/FCE, etc. with included Profiles. I believe it is helpful for you. Below is a very easy guide on Sony F65 MXF to Adobe Premiere Pro’s native formats conversion.

Good News! Pavtube Release a New Site - multipelife.com with Product Migration and Name Change.

To thanks for your continued support, we are holding a 'New Site Special' in which you can get 20% off Video Converter Ultimate on Windows/Mac platform now:

Read more: http://1080p-video-tool.blogspot.com/2014/05/pavtube-new-site-release.html

PS: If you are a Windows user, please choose the Video Converter Ultimate, the workflow is the same.

Click here to download the free trial version, get it installed and let's start!
How to convert Sony F65 MXF footage for Premiere Pro CS 6/5/4/3

Step 1. Add MXF files to Pavtube iMedia Converter for Mac.

Connect you camcorder to Mac and keep it on until it show as a hard drive on desktop.

Install and run Pavtube iMedia Converter for Mac.

Click top left icon to load you footages. You can choose "Add videos" or "Add from folder" directly.


Step 2. Choose compatible format for Adobe Premiere Pro CS 6/5/4/3

Click "Format", you can choose "Final Cut Pro > Apple ProRes 422 (*.mov)". Or find Adobe Premiere Pro at left, choose "MPEG-2 (*.mov)" or "MOV(AVC)(*mov)" etc. All of them are the preferred codec for Premiere Pro (CS6/CS5/CS4/CS3)

Apple ProRes 422:


MOV, MPEG, WMV:


Step 3. Set up output videos settings for Premiere (Optional)

Click "Settings" which is marked as 3, you can fix the bitrate, frame rate, sample rate and video size, it's all up to you. Usually the higher bitrate you choose, higher video quality will be, and larger video size correspondingly.

Step 4. Start converting Sony F65 MXF for Premiere Pro (CS6/CS5/CS4/CS3)

Now click the big red circle at right bottom, wait for moments till the conversion complete. You can click "Open" to locate the converted video directly.

For beginners, here is a guide on how to import video files to Premiere Pro.

Here, Pavtube iMixMXF can exactly do this for you. It is a great MXF Mixer and Converter that enables you to convert multi-track MXF from Sony F65 to Prores for Premiere Pro preserving all the audio channels without quality loss, but also can make it easy for merging multiple video clips. The Windows users can Pavtube MXF MultiMixer.

Read More:

Tuesday, December 10, 2013

Play DRM protected Digital Copy movies on Sony Xperia Z1

Description: With the help of the best Digital Copy movies to Sony Xperia Z1 converter to remove DRM protection of your Digital Copy movies and rip to the best format for your Sony Xperia Z1.

Yesterday was my birthday, and I went to the cinema with my best friends. We chose to watch the latest movie “The Hunger Games: Catching Fire” which I have read the novel before. I kept my excitement in close watch with Catching Fire and went expecting a good movie and nothing more. I was welcomed with an excellent surprise: the movie followed the events of the novel whenever possible and brilliantly so, while managing to keep me on the edge of my seat.

What I really liked about the movie was that they didn’t shy away from the novel and conveyed the despair and oppression imposed by the Capitol over the rest of Panem. It makes you think that all of this is happening around the world, in one way or another, maybe masquerade, but it is.

If you like beautifully told dystopian stories (CHILDREN OF MEN) or are a fans of Suzanne Collins, seeing The Hunger Games: Catching Fire should be obvious. It is easily one of the best films of 2013.
 

For such exciting film, after seeing it in the cinema, I can’t wait to buy the form of Digital Copy for playback on my Sony Xperia Z1. With the help of Pavtube ChewTune (Read Review), I can remove the DRM protection and put my Digital Copy movies on Sony Xperia Z1.

Hot Search: Digial Copy to Android | iTunes to Chromecast | iTunes to NAS | Amazon Video to Galaxy Tab S | iTunes to Surface 


  (Click here for Mac OS X 10.5) 
 
How to convert Digital Copy movies to Sony Xperia Z1

Before the conversion, you must make sure two important things:

First, your computer is authorized for Digital Copy Movies, that is to say, you can play the Digital Copy Movies in your Windows Media Player.

Then, when you are installing Pavtube ChewTune, do not close the Audio Drive window.


Let’s start the process!

Step 1: Run Digital Copy to Sony Xperia Z1 Converter, import Digital Copy movies to this program from your computer.


Step 2:Choose the output format for Sony Xperia. You could choose the “Common video for Android and Apple Devices (*.mp4)” profile, as well as the “H.264 Video (*.mp4)”.


Step 3: Hit the “Convert” button on the bottom right corner to start the conversion and export DRM-free digital copy movies.

Tips:

The conversion process may be a litter longer. It would take as long as the source movie length because Pavtube ChewTune records source Digital Copy movies in 1:1 video and audio quality. During the conversion, you can do something else to spend the waiting time.

Once get the converted videos, just copy and dump them to Sony Xperia Z1 via USB.

How to transfer the converted Digital Copy contents to Sony Xperia Z1 in detail?

Windows transfer

1. Connect your device to the USB port on your computer. Its USB storage is mounted as a drive and appears on your computer screen.
2. Copy files back and forth as you would using any other external device.
3. When you finish, eject the device from within Windows before unplugging the USB cable.

Mac OS transfer

1. Install Android File Transfer from www.android.com/filetransfer, and follow the instructions there. (If you are using Android File Transfer for the first time, double-click it to open it. After the first connection, it opens automatically whenever you connect.)
2. Connect your device to your computer with a USB cable. Android File Transfer starts, if it's not already running, and opens a window that displays the contents of your device, along with storage space details at the bottom of the window.
3. Work with this window much as you do in the Finder window: open and close folders, create new folders, and drag files to or from it and other Finder windows.
4. Disconnect the USB cable when you finish.

Related settings: To change your device's USB connection options, touch Settings > Device > Storage > Menu > USB computer connection.

Are you ready to re-enjoy these wonderful movies on your Sony Xperia Z1? Let's go!

Additional Tip: 

Get Pavtube ChewTune in bundle package: Video Converter Ultimate + ChewTune with Only $74.9 which can save you $19.1, then you can enjoy any DRM or common movies freely on Sony Xperia Z1

Related articles:

Friday, November 29, 2013

Guide on Importing Sony FS700 MTS files into Final Cut Pro 7 and FCP X

Summary: Here are tips and tricks for Sony NEX-FS700 and Final Cut Pro: In order to import and edit Sony NEX-FS700 MTS into FCP 7/X smoothly, you need transcode Sony AVCHD to FCP compatible format on Mac. 

As a high-end camcorder, Sony NEX-FS700 is definitely worth buying: professional design, large-sensor, and high quality recording. FS700 can shoot at up to 960 frames per second and now there are already quite a few cameras out there that can do this.


As FS700 records full HD 1080 50/60p MTS/M2TS files in AVCHD format. However, FCP has less compatiblity with AVCHD .mts/.m2ts files, and many users find that the AVCHD format cannot be recognized by FCP 7, for example:

Hello, I own HD video converter for MAC. I'm attempting to batch transfer 1080i HD footage from a Sony FS700 (AVCHD/MTS) to Prores. I want the footage to stay interlaced and not convert to 25P (progressive). Is there a way to do this? Can only find a 25p option. Thank you!

Why this happens just because the codec of AVCHD is not supported by Final Cut Pro. So is there any easy solution to avoid the headache "incompatibility importing problem"? Here is a simple tip for you to make Sony FS700 50/60p AVCHD editable in FCP. Some 1080/50 fps AVCHD clips grayed out in L&T or import window and we were not able to ingest them to FCP until we used third-party encoder to change these 50/60 fps MTS clips to ProRes 422.

What we use: Pavtube MTS/M2TS Converter for Mac to help you get it done.

Good news! At Thanksgiving Big Deal 2013, if you get MTS/M2TS Converter for Mac, you can get Video Converter for Mac free which can help you to edit and play flash video (flv, f4v) on Mac with ease. Take a look now and grasp this opportunity before Dec.10, 2013! Never miss!

It will not only transcode Sony FS700 mts to Prores 422 for native editing in FCP on Mac, but also keeping audio and video synchronization on Windows and Mac (including Mountain Lion/Mavericks).

Sony FS700 workflow-Load FS700 recorded 1080p AVCHD to Final Cut Pro

1.Download Pavtube Sony MTS to FCP Encoder, follow the prompts to install the program. Click "Add" to load Sony FS700 MTS video files or directly drag the files into file list.


2.And then click "Format" bar to choose Final Cut Pro -> Apple Prores 422 (*.mov), this format is best presetted for FCP editing.


3. "Settings" button in the main interface is very useful for you to customize the Video Codec, aspect ratio, bit rate, frame rate, Audio codec, sampling rate, bit rate, channels.

4. After these, you can click "Convert" to start to transcode Sony FS700 MTS to Apple Prores codec for native editing.

Now you can follow the steps and have a try, happy every day!

Read Related Articles:

Sunday, November 10, 2013

Make Sony NEX-VG10/VG20/VG30 MTS files editable in iMovie

Description: If you want to edit AVCHD .mts files shot by Sony NEX-VG10/VG20/VG30 smoothly in iMovie, here is right for you. Go to following article to get the instruction.

Sony NEX-VG10/VG20/VG30, which offer excellent image and video quality with interchangeable-lens systems, capture footages in both AVCHD format high definition video and MPEG-2 format standard definition video. Most users prefer to choose AVCHD format in order to get high quality videos. However, many users will face the similar issue about editing in iMovie on Mac OS X as below:

"I'm strictly an amateur hobbyist hoping to make some good videos for a hugely popular blog. I wanted to covert the AVCHD 60p clips from my recently purchased Sony NEX-VG10 to a mac friendly format for editing in imovie."


That is probably because the AVCHD .mts files cannot be recognized by iMovie. In this case, we can count on third-party software to transcode them to a compatible format for iMovie. Here comes Pavtube MTS/M2TS Converter for Mac, a professional MTS to iMovie Converter tool for converting MTS/M2TS/M2T/TS files to a variety of video formats. It will help to transcode Sony NEX-VG10/VG20/VG30 AVCHD .mts files to iMovie friendly AIC codec MOV format, which is intermediate format that features high performance and quality, being less processor-intensive to work with on Mac OS X. With it you are able to edit AVCHD .mts files in iMovie smoothly and then share a better video with friends or post the edited videos to blog. Now follow me to learn how to convert AVCHD .mts files to iMovie on Mac OS X Mavericks.


You are free to download the MTS to iMovie Converter and install on your Mac. Then go to the guide here:

1. Load AVCHD .mts files to the MTS to iMovie Converter.


Tips: You can joint multiple AVCHD files on to one output file by checking Merge into one file on the interface.

2. Select AIC MOV format for iMovie.

Many output format here and you are recommended to select "AIC .mov" files under "iMovie and Final Cut Express" because it best compatible format for iMovie.


3. Adjust output settings and edit the video. (Optional)

Settings: You are allowed to change the parameters of video and audio, such as Size, Bitrate, Frame Rate, etc.


Edit: Here you are able to edit the video before conversion. You can cut off the unnecessary part of the video in Trim, crop the video, add watermark or 3D effect, attach subtitle and so on.


4. Convert AVCHD MTS to iMovie.

Click "Convert" button to start conversion and then click "Open" button to locate the generated files for iMovie.

If you want to convert more videos in different formats, you could try HD Video Converter for Mac, which is capable of converting both various HD videos and latest DVD/Blu-ray. You are also allowed to 1:1 backup the whole discs for further playback or editing. 20% discount will be provided if you get it during the time of Thanksgiving Promotion 2013.

Good news! In this promotion page, if you get MTS/M2TS Converter for Mac, you can get FLV/F4V Converter for Macfree which can help you to edit and play flash video (flv, f4v) on Mac with ease. Take a look now and grasp this opportunity! Never miss!

More related:

Tuesday, October 1, 2013

Best solution for importing Sony DSC-RX100 mts video in iMovie


Summary: Have got a Sony Cybershot DSC-RX100 and have issues with importing movies from RX100 into iMovie. Is there any solution? Just convert MTS video to AIC .mov for iMovie for editing on Mac.


If you are planning to buy a mid-range HD camera, RX100 could be a smart choice. It is an enthusiast compact camera features with 1080 60p or 1080i video capture in AVCHD format. However, AVCHD is not friendly with iMovie, many users encounter the problem when transferring RX100 AVCHD MTS files to iMovie.

Q1: 
iMovie cannot import movies from the RX100. Anyone has a work around?

Q2: I'm using iMovie, and I'm trying to import the video from my camcorder (Sony RX100). But when I clicked the camera button, iMovie crashes. Why I can not import the clips to iMovie directly? Am I missing something? Pls help me!

Q3: I have a Macbook with Mac OS X installed. I have installed iLife 09. I have just bought a sony rx100. I can download the photos but I am unable to open mts in iMovie. They are in MTS format (AVCHD). Is there any software which I can import mts files to imovie? 

What's the problem? And then how to realize this goal for native editing RX100 1080/60p mts in iMovie? Since Apple hasn't added full supported to the 1080/60p mts recordings within iMovie, and you have to change MTS videos to iMovie acceptable AIC .mov format. This is the best Sony RX100 1080/60p AVCHD to iMovie Solution.

Hot Search: Canon MTS to iMovie | VOB to iMovie | H.264 to iMovie

For this case, a professional Sony MTS to iMovie application - Pavtube MTS/M2TS Converter for Mac comes to help you which is your first choice to transcode Sony RX100 1080/60p AVCHD footages to AIC MOV for iMovie. Here is a step-by-step tutorial for your to figure out your Sony RX100 MTS/M2TS iMovie problem:

Notes: Free MTS/M2TS Converter for Mac you can also have a try!

Preparations

1. Copy your MTS videos from Sony RX100 to Apple hard drive.

2. Free Download the best MTS to iMovie Converter on Mac, install and launch it.

Brief Steps

Step 1. Drag and Drop source MTS videos to Sony MTS to iMovie Converter. Or click "Add Video" to import the mts footage from RX100.


Step 2. Set up output format for AVCHD to iMovie Conversion.

From "Format" list, choose "iMovie and Final Cut Express > Apple InterMediate Codec (*.mov)" for editing in iMovie smoothly.


Step 3. Press the big "Convert" button to start transcoding Sony RX100 AVCHD MTS to AIC MOV for using in iMovie. The program adopted advanced audio and video sync technology; never let you troubled by the audio and video issues.

Once finished, click "Open" to get converted MOV videos. Then you could open up iMovie, and go to "File > Import > Movies…" to import converted video files to iMovie.


More Tips:
1. If you want to merge multiple MTS files into one for easy editing, please tick the box "Merge into one file" to merge all the imported clips.

2. In case the MTS footage is taken under interlacing mode, just click "Edit" to go to Video Editor, and hit Effect to select the Deinterlacing and interlacing lines will be eliminated. (Checked by default)

Read More:

Sunday, September 29, 2013

Sony's FDR-AX1 Handycam puts 4K recording in the grasp of prosumers (eyes-on)

We assure you, the camera above is not Sony's HDR-AX200.

Model Highlights: 4K/60p video Ultra HD, 1/2.3" 8.3MP Exmor R® CMOS image sensor, real-time 4K/60 fps recording, 3 ND filters and 6 paint functions, Sony G Lens with 20x (31.5-630mm) zoom, built-in mic with 2x additional Pro XLR jacks.


While it shares a similar body, this is the new FDR-AX1 that leaked this morning -- a fixed lens 4K videocamera for prosumers, priced at a cool $4,500. Although JVC beat Sony to the market with its $5,000 kit, Sony's vying to have the upper hand with the tech inside its take, namely by using its XAVC S format. It works by capturing video in MPEG-4 AVC/H.264 Long GOP and audio in linear PCM, which all gets saved in an "MP4 wrapper." To handle the massive amount of data throughput from its 4k/60p stream, the camcorder records to QXD cards (two slots are onboard) which, until now, haven't had much use outside of Nikon's D4. A 64GB card will net you two hours of 4K video, while downscaling to 1080/60p adds an extra hour on top of that.

Video gets captured by a 1/2.3-type Exmor R CMOS sensor and a 20x optical zoom (31.5-630mm) G lens, which comes equipped with a trio of ND filters and Optical SteadyShot. As you'd expect, there are a plethora of manual controls, powered stereo XLR inputs, a 3.2-inch display and a viewfinder on back. It's worth noting that while the AX1 won't be HDMI 2.0 compliant at first, Sony's planning a firmware update down the line to enable it. Until that occurs, it'll only be able to transfer HDMI video over to Sony's existing 4K TVs. We're also told that the camcorder will work with SD cards for shooting in HD.

If you don't care for the flexibility of interchangeable lenses or need something more affordable than the likes of a RED Scarlet, the FDR-AX1 can be yours this October. Sweetening the deal just a little more, Sony will also throw in a 32GB XQD card and a full copy of Vegas Pro 12 to ensure you can get started out of the box. Check out our eyes-on gallery with the prototype seen above in the meantime.

Related topics:

Sony Announces New PXW-Z100 4K Camcorder
Make Blackmagic Camera 4K footage editable in FCP
Convert 4K Video for editing with Mac in FCP, Avid, iMovie, Premiere, FCE

Saturday, September 28, 2013

Fast Way for importing Sony FS700 50/60p mts footage in Avid Media Composer

In this article, you will learn how to transcode Sony FS700 50/60p MTS to DNxHD MOV for Avid Media Composer editing without any importing problems on Mac.


The file I'm trying to import is AVCHD from my Sony NEX-FS700 at 1080p50 into Avid MC 6.5 via AMA. AVCHD-MTS AMA-plugin is installed but result in an error message. So I'm was asking here to figure out how to get the mts files from FS700 into Avid without any issue?

In fact, Avid can't import Sony FS700 recorded 1080 50/60p AVCHD video, the frame rate is so high and the codec is not friendly to AMC for editing. On Avid official website, Avid only works with standard film and broadcast formats. Although, Avid MC has added some plug-ins, actually background converters for the high-definition video format AVCHD, the importing process are unbelievably slow.

As DNxHD codec is the first choice for editing in Avid Media Composer, so in order to import the Sony FS700 50/60p AVCHD to Avid for editing, the easy workaround is to transcode MTS to Avid MC compatible DNxHD .mov format.

Here, Pavtube HD Video Converter for Mac does a good job in converting Sony FS700 50/60p AVCHD to Avid Media Composer preferred DNxHD format with best video quality. Following we will offer you a tutorial on importing and editing Sony NEX-FS700 50/60p AVCHD to Avid Media Composer on Mac.

1.Download the best Sony mts to Avid Converter, follow the prompts to install the program. Click "Add Video" to load Sony FS700 60p MTS video files or directly drag the files into file list.


2. Click "Format" bar to choose Avid Media Composer -> Avid DNXHD (*.mov), this format is best presetted for Avid Media Composer editing.


Tips:

Pavtube Sony AVCHD Converter for Mac can also convert Sony FS700 60p mts files to FCP, iMovie and FCE, QuickTime, Adobe Premiere Pro, Adobe After Effects, DaVinci Resolve or Apple Aperture 3 compatible video format for editing.

a. For FCP and Aperture 3: Click and choose "Final Cut Pro -> Apple ProRes 422(*.mov)" as the output format. FCP 6 only can support ProRes 422 and ProRes 422(HQ) codec.
b. For iMovie and Final Cut Express: Click and choose "iMovie and Final Cut Express -> Apple InterMediate Codec (AIC) (*.mov)" as the best output codec.
c. For Adobe Premiere Pro and After Effects: Click "Adobe Premiere/Sony Vegas", choose "MPEG-2 (*.mov)" or "MOV(AVC)(*mov)" or "WMV (VC-1)(*.wmv)" as the best video format.
d. For playing Sony AVCHD video on QuickTime: Choose "Common Video -> MOV-QuickTime(*.mov)" as the best video format.
3. "Settings" button in the main interface is very useful for you to customize the Video Codec aspect ratio, bit rate, frame rate,Audio codec, sampling rate, bit rate, channels.

4. After these, you can click "Convert" to start to transcode Sony FS700 50/60p MTS to Avid DNXHD codec for native editing in Avid Media Composer.

Hope this guide: "How to import/edit Sony FS700 50p/60p MTS to Avid Media Composer"can do great help to you. Happy every day!

Read More:

Tuesday, September 17, 2013

Why Premiere Pro and After Effects doesn't like Sony EX3 XDCAM files

Got Problems importing Sony PMW-EX3 xdcam mp4 footage into Premiere Pro/After Effects for further editing? Look no further, follow the easy workaround to achieve your goal smoothly.


Question:

I recently purchased two PMW-EX3 cameras for use here at my work, and I thought that I had them up and running perfectly but recently ran into a problem importing footage. When I shoot anything over around 13:40:00 long, PP CS4 will not import the entire length of the clip, only the first 13:40:00 (give or take a minute or two). When I play back the clips on the camera or in Sony's clip browser software I can play the entire duration of the clip. When I'm in PP using the Media Browser window to get to my footage, it even shows me the correct duration of the clip in the Duration column, but when I copy it over into my project bin, only that first 13 and a half minutes makes it. And a similar problem importing the files from EX3 into After Effects. AE only imports the first MP4 file of your clip and not the rest.

I've searched lots of other forums, and while I've seen various issues with importing XD EX footage into PPro and AE, I haven't seen this best solution yet

Sony PMW-EX3 can shoot XDCAM EX MP4 recording with true 1920x1080 resolution on dual SxS cards. As the XDCAM mp4 footage still cannot fully supported by some video editors like Adobe Premiere Pro and After Effects on Mac. So if you are using Premiere and AE for editing just like the above user, the best workaround for us is to convert Sony PMW-EX3 mp4 to Adobe Premiere Pro/After Effects most compatible MPEG-2 format, and it will make the editing work much smooth and easier. 

At first, you need to find a third party program to do EX3 files to MPEG-2 transcoding. As far as I konow, the best hd video converting program is Pavtube HD Video Converter for Mac, a powerful XDCAM Converter for Premiere/AE, which is use-to-use, capable of converting XDCAM video to various formats for editing with Premiere Pro, Avid Media Composer, Final Cut Pro, iMovie or FCE on Mac, and supports batch renaming painlessly. Download it here and get to konw the detailed steps as below.

Guide on transcoding Sony EX3 XDCAM to MPEG-2 for Premiere Pro and After Effects editing on Mac

Step 1: Install and run the best Sony XDCAM Converter for Mac. Click the “Add Video” or "Add from folder" button to import .mp4 files from the Sony EX3 camcorder. Join mp4 clips via checking the “Merge into one” box.


Step 2: Hit the Format box and select Adobe Premiere/Sony Vegas --> MPEG-2(*.mpg) as output format for editing EX3 XDCAM video in Premiere Pro and After Effects natively.


Step 3: Click the “Settings” icon to do some audio, video parameter settings like video bitrate, frame rate, audio sample rate, audio channel, etc. (Optional)

Step 4: Click the "Convert" button under the preview window, the Mac XDCAM Converter will start the conversion from EX3 to Adobe Premiere Pro/Adobe After Effects immediately.

After the conversion, you will be able to get the output files via clicking on “Open” button effortlessly. Afterwards, you can import Sony EX3 MP4 footages to Premiere Pro CS and After Effects for further editing easily.

XDCAM Related:

Wednesday, September 11, 2013

Easy way to edit Sony F55/F5 XAVC files in Sony Vegas, After Effects, Pinnacle,Cyberlink, Windows Movie Maker


Summary: Do you've got or have you ever heard about Sony PMW-F55/PMW-F5 CineAlta 4K digital cinema camera? Now just follow the article to convert Sony F55/F5 XAVC on Windows for editing in Sony Vegas, After Effects, Pinnacle,Cyberlink, Windows Movie Maker, etc.


After the successful sale of PMW-F55 and PMW-F5 all over the world, Sony keeps on developing more new models so as to gain more market share and to solidify its position in the already-full HD cameras market. XAVC is a video format introduced by Sony on October 30, 2012 and records by F55 & F5 camcorder. It supports resolution (4096 * 2160 and 3840 * 2160) at up to 60 fps. To record videos, XAVC is among the most advanced formats.

With every new camera, come many new questions about workflow. The term "workflow" can be fairly broad, but today I am looking at the helpful tips for importing Sony F55/F5 XAVC footage into various non-linear editing systems (NLEs) on Windows plantform like Sony Vegas, After Effects, Pinnacle,Cyberlink, Windows Movie Maker, etc.

If you're working with XAVC on Windows, you will find the Sony F55/F5 XAVC files are not supported well by Windows PC.  In order to import Sony XAVC footage into Sony Vegas, After Effects, Pinnacle,Cyberlink, and windows Movie Maker for smoothly editing, we can render to the third-party software to help convert XAVC to AVI/MOV/WMV/MPG–Windows native format. This is the best way to assist XAVC users with Sony F55/F5 XAVC Windows editing workflow.

To achieve our goal, the quickest and easiest way is to use the easy-to-use yet professional software called Pavtube HD Video Converter (currently on sale with 20% off), with which, we can effortlessly and flawlessly transcode Sony F55/F5 XAVC footage to AVI/MOV/WMV/MPG for Sony Vegas, After Effects, Pinnacle,Cyberlink, and windows Movie Maker editing. It is safe to install and easy to use. And you can enjoy the powerful edit function, like trim, crop, watermark for text, image and video, 3D effect, subtitles and so on. Now free download and follow below step to convert Sony XAVC files on Windows for editing in Sony Vegas, After Effects, Pinnacle,Cyberlink, Windows Movie Maker.

Step 1. Load Sony F55/F5 XAVC files.

You can choose "add video" directly or "load files" to add the whole folder.


Step 2. Select output format for video editing software.

Click "Format" menu and choose "Adobe Premiere/Sony Vegas -> MPEG-2 HD Video (*.mpg)",or select WMV/MOV/MPEG-2, you can also choose "HD Video -> AVI HD Video (*.avi)". Finally, click the file icon beside output bar, and choose a destination folder for saving output files.


Step 3. Edit loaded Sony XAVC files.

Click "Edit" button and you are allowed to trim, crop, add text/image/video watermark or some effect to your output video for making it perfect. Here the function of adding subtitles to output files will contribute to make your own videos. You can use free software Subtitle Edit to edit your subtitle content then add it to output videos.


Tips: Click "Settings" on the interface and you can adjust the parameters including size, bitrate, frame rate, etc. to get a high quality of output files. And keep the settings the same as original video recordings will provide you the least loss of video quality.

Step 4. Start conversion.

Click the "Convert" button to start transcoding Sony F55/F5 XAVC footage for editing in Sony Vegas, After Effects, Pinnacle,Cyberlink, and windows Movie Maker. When it completed, click the "Open" button to get the generated videos for your editing software.

More features about this Sony Ultimate XAVC Video Converter:

1. Rip and convert Blu-ray and DVD including 1:1 backup Blu-ray/DVD movies to PC hard device for future needs.

2. Directly Copy feature will save 100% intact .M2TS main movie from original BD disc.

Now you can easily import and edit Sony F55/F5 XAVC Footage to Sony Vegas, After Effects, Pinnacle,Cyberlink, and windows Movie Maker. Just have a try! If you are a Mac user, you can go to the 20% off Pavtube HD Video Converter for Mac.

XAVC related articles:

Sunday, September 1, 2013

Convert .mts files from Sony NEX-7 to work with iMovie on Mac

Summary: Follow this article you will know how to convert and import Sony NEX-7 AVCHD MTS to iMovie compatible format with the best MTS to iMovie Converter on Mac.


In the middle ground between DSLRs and point-and-shoot lies a vast plain filled with all manner of tweener cameras, in all variants of shape, size, price, and quality. Until now, no one has nailed the whole package, but so far the smartest middle ground — smaller body and price, but without losing too much quality or manual control — has been Sony's NEX line.

The NEX-5N and NEX-C3 are excellent cameras, with big sensors in small bodies, but the NEX-7 is the flagship member of the line. The $1,349 shooter has a DSLR-sized, 24.3-megapixel APS-C sensor, a built-in electronic viewfinder, a tilting LCD, 1080p video recording, and a solid set of manual controls. It's built to run with the big dogs, and priced like it too — can it keep up? And could you actually buy the NEX-7 instead of a DSLR?

For many experienced Mac users, what they are concerned most is how does the Sony NEX-7 mts files work with Mac. As for NEX-7, you will get all kinds of options when shooting video: it can record in 1080p and 1080i at 60 frames per second, or 1080p at 24fps. You can shoot in AVCHD or MP4, though MP4 video is an odd 1440 x 1080 resolution. You can also shoot video in a variety of different manual modes, meaning you can change shutter speed, aperture, and the like both before and during video recording.


But AVCHD format is not well supported by iMovie, Final Cut and other software on Mac, you may encounter many problems when you try to import and edit them in FCE, iMovie and FCP. If you want to import and edit Sony NEX-7 MTS in iMovie, you need to convert Sony MTS to iMovie best supported video format, like Apple InterMediate Codec(AIC) MOV format, you can follow the steps below and learn how to convert Sony NEX-7 MTS videos to AIC codec for iMovie editing smoothly.

1. Free Download Pavtube MTS/M2TS Converter for Mac. This software can convert Sony AVCHD MTS video to iMovie compatible formats or other common formats.


2. Install and run this MTS to iMovie Converter. Click "Add Video" to load the .mts files from Sony NEX-7 to the Mac Converter.


3. Click format column to choose the output format for iMovie. Click and choose "iMovie and Final Cut Express -> Apple InterMediate Codec (AIC) (*.mov)", it's the best format for iMovie - to import Sony NEX-7 MTS to iMovie.


4. You can click "settings" button to adjust output parameters, such as resolution and bitrate. 

Tips: To get 1080p full hd video qualtiy, you can click to set video resolution to1920×1080.


5. Click convert button to start.

The Mac MTS to AIC Converter will convert Sony MTS footage for iMovie quickly. It can also help you to convert Sony Alpha NEX-7 mts for importing into FCP. After conversion, you can successfully work with Sony NEX-7 MTS video in iMovie as you want.

Learn More: