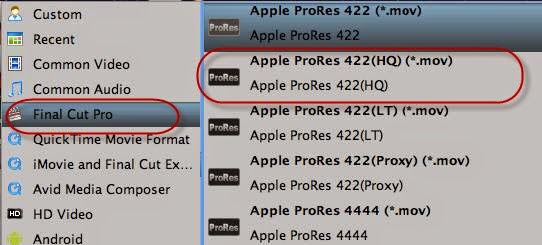
Summary: Here are top two ways to import Canon C500 MXF to Final Cut Pro X, you can follow it to solving the problem "FCP X doesm't support C500 MXF files well".
Canon C500 is an impressive 4K Cinema Camera, which has the ability of capturing 2K footage (2,048 x 1,080 pixels) at 12-bit, full 4K RAW output of up to 4096 x 2160 pixels. As the Canon C500 owners, you can enjoy vivid video recordings. With every camcorder, comes many new questions about workflow. The term ‘workflow’ can be fairly broad, but today I am looking at importing Canon C500 MXF footage into Final Cut Pro X.
Fortunately, there are some ways to fix the issues. Let's find them out here. If you're editing Canon C500 MXF footage in FCP X, keep reading to find your best way.
Read More: Two Ways to Import Canon XF100 MXF footage to Premiere Pro
Method 1: Using Canon XF Plugin
Prepararion:
latest Canon XF Plugin for Final Cut Pro, Canon XF Utility
Pros:
- Free
- Supports native MXF importing
Cons:
- Doesn't work well wtih 50Mbps (CBR) 4:2:2, 1920×1080, (60i/30p/24p)
- With a lot of steps
- May cause errors due to incompatible codecs
- Spends a lot of time
- Occupies a large amount of RAM
- Only available for Canon MXF files
Requires: Mac OS X 10.5.x or Mac OS X 10.6.x
I have to tell you the importing way is a tedious process, which needs your patience. If you haven't installed the above plugins, please download and install them. Click here to free download the latest Canon XF Plugin for Final Cut Pro.
 For Canon XF Utility, you have to go to website to download by following the step: Open the
 Canon C500 product page
and click "Drivers & Software", choose your operating System and OS Version, then you will find the "Canon XF Utility 1.3.1 for Mac OS X" in the "Software" category. Here, you also can free download the "Canon XF Plugin for Final Cut Pro 1.3″. Once plugins are all installed, you can follow the below parts to import MXF to FCP X.
Tip: Before downloading, please enter your product serial number with no hyphens "-".
Part 1. Back up Canon C500 MXF footages with XF Utility:
 1. Connect your C500 camera to your Mac OS, you also can insert your CF card into your computer.
2. Launching the XF Utility, you will see your CF card showed up as the Canon drive and "Backup" in the upper left corner as the below picture.
3. Click Backup on the upper left corner, Canon C500 MXF footages on the CF card will be backed up with the XF Utility.
PS: Before backing up videos, please make sure you have set the location to store your footage in the Preferences menu.
Part 2. Import the footages to Log and Transfer window:
 1. Once your footage is saved with XF Utility, please run Loag and Transfer plugin in Final Cut Pro for rendering.
2. Click on the folder icon in the top left corner of the Log & Transfer window to load C500 recorded HD MXF files you've soved.
3. Choose the editing format: Click on the small flower-shaped icon in the top middle of the Log & Transfer window, which will open the Import Preferences panel. You can choose ProRes or natvie format as the editing format.
Tips:
1) In general, you can smoothly edit native MPEG-2 MXF, but FCP is designed to work best in ProRes.
2) By default, Log & Transfer will either convert the footage to ProRes or just re-wrap clips into MOV format.
 4. Click OK when you are done, and continue to import your footage by clicking Add Selection to Queue. Now your C500 MXF recording file is in FCP X, you can freely editing.
Method 2: With MXF Converter
Preparation: Pavtube iMixMXF ($45)
System: Mac OS X (Mavericks, 10.8 Mountain Lion, 10.7 Lion, Snow Leopard10.6)
Pros:
- Fastly convert MXF to ProRes
- Five types of ProRes for FCP
- It is also available for Sony and Panasonic MXF footages.
- Supports to transcode MXF to any other video format for all NLE’s
- For all FCP 5/6/7/x users
- You can get 5.1 Channels
- Freely change video/audio settings
- Can keep original quality
- Save rendering time
- Convert MXF to MKV/MP4/MOV formats preserving multi-track audio - Output multi-track Apple Prores MOV for further editing in Final Cut Pro (X)- Mix the multi tracks in to one track for broadcasting
- Merge/split/trim/crop MXF footages- Add *.srt/*.ass/*.ssa subtitle files to MXF footage
Cons:
- Not free
- You can't edit native MXF files
As is known to us, ProRes MOV is the best format supported by FCP X, so, to make Canon C500 MXF editable in FCP X, you need to convert MXF to ProRes codec, which is also editable in FCP X.
Did a lot search and tried some but not very satisfied for the transcode speed, quality or audio tracks saving. Recently found a program on mac named
Pavtube iMixMXF and it work well till now; it really helps in converting muti-track mxf to FCP X. Come and meet this multi-audio track MXF Converter for Mac and follow these steps to easily convert XF100 multiple video/audio track MXF to ProRes for Final Cut Pro X.
Step 1. Get this Mac multi-track MXF Converter installed, click 'Add video'
to load individual C500 mxf videos; or click'Add from folder' to load the entire folder. It will recognize all the audio channels.
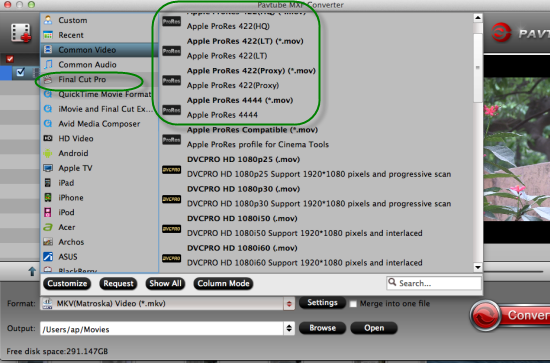
Step 2. Click "Format" and choose Multi-track Video>Multi-track Apple ProRes 422(*.mov) as the most compatible codec for FCP X editing.
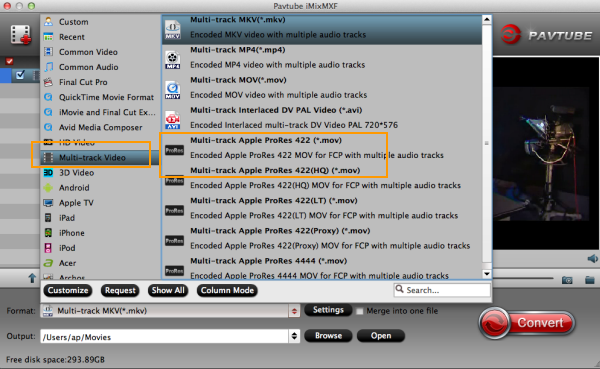 Step 3. Click "Settings" to customize your video size, bitrate, frame rate and other specs; and check video channels that you want to keep.
Follow the bottom left icon to "mix into one channel"; or that it will keep all the audio tracks apart.
 Step 4. Click "Convert" to start converting multi audio channels C500 MXF to multi-track Apple Prores 422 mov saving multi audio channels for editing in FCP X on Mac.
Tips:
1. Read this step-by-step guide to learn how to load the converted video to FCP X.
2. For users don't need to deal with multi-track thing, just simple want to convert MXF to other formats, the MXF Converter for Mac (only $29) is highly recommended. And at Pavtube Christmas Giveaway, get it you can free get one of the products like MKV Converter for Mac, FLV/F4V Converter for Mac or MOD Converter for Mac.
3. If you want to transcode Canon C500 MXF for Premiere Pro, please choose the "Adobe Premiere/Sony Vegas --> MPEG-2(*.mpg)" as output; For iMovie or FCE 4, choose the "iMovie and Final Cut Express -> Apple InterMediate Codec (AIC) (*.mov)". For Avid MC, choose "Avid Media Composer > Avid DNxHD(*.mov)"
In Coclusion:
The first Method is a free work for all Canon users and it can make FCP edit the native MXF videos. If you think this too complex and find your computer doesn't support pulgins well, I believe the second way can easily solve the incompatible troubles with C500 MXF to FCP X importing. In a word, hope you to enjoy your Canon C500 MXF footage with Final Cut Pro.
Read More:
