Summary: Any suggestions as to how I can import BPAV files to Premiere Pro for editing? This tutorial is a step-by-step guide, keep reading and find something useful.
“I have camera original stuff on a disk in a BPAV-folder. When I import video and audio of the raw BPAV clips to Adobe Premiere Pro, I found the MP4 within the BPAV file is unreadable to Premiere. I’m eager to work out the solution.”
Sony XDCAM EX camcorders write MP4 files into a folder named BPAV. Generally, in Adobe Premiere Pro, importing BPAV sources with Media Browser is usually workable. If you want to transfer BPAV folder to a hard disk, you need to copy the entire BPAV folder and its contents, not just one MP4 file at a time. Or the file would be corrupted.
If you are stuck in the trouble like the situation we mentioned at the very beginning, when importing video and audio of the raw BPAV to Premiere Pro, always found that the MP4 within the BPAV file is unreadable to Premiere, you’d better seek for an alternative way. A common practical way we recommended is to convert BPAV files to Premiere Pro best accepted one, and MPEG-2 is the optimal format.
Which software can we apply? Here the top option is Pavtube Video Converter. If you are running on Mac operating system, you can refer to Pavtube Video Converter for Mac (review). With it, you can effortlessly convert BPAV MP4 files to Premiere Pro supported MPEG-2, and it works well and converts flawlessly. Meanwhile, this video converter can create files compatible with NLEs like FCP, Avid Media Composer, iMovie, After Effects, DaVinci Resolve and etc.


Other Download:
- Pavtube old official address: http://www.pavtube.com/video_converter/
- Amazon Download: http://download.cnet.com/Pavtube-Video-Converter/3000-2194_4-75734821.html
- Cnet Download: http://download.cnet.com/Pavtube-Video-Converter/3000-2194_4-75734821.html
How to import BPAV files to Premiere Pro?
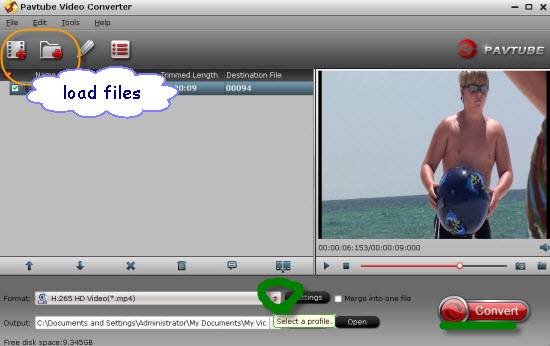
Step 1: Download, install and launch the corresponding program. Drag and drop BPAV MP4 files to the software. You can import multiple files at once thanks to batch conversion.

Step 2: Click the drop-down list in the format line to get the format box. Then choose “Adobe Premiere/Sony Vegas>>MPEG-2 (*.mpg)” as output format.

Step 3: Click “Settings” button to customize the output video and audio settings by yourself. But if you are not good at it, you’d better use the default parameters, they will ensure you a good balance between file size and image quality basically. You can change the resolution, bit rate, frame rate as you need.
Step 4: You can preview to check the final result. Once you are satisfied with it, click the “Convert” button to start converting BPAV MP4 to MPEG-2 .mpg format. It will take you a little while.
Conclusion: After conversion, you can get the generated files by clicking “Open” button. Now, you’ll get no troubles in editing BPAV files in Premiere Pro. Follow the steps and have a try!
Further Reading:
- Best way to import 1080p /720p MKV into Final Cut Pro (X) on Mac
- Galaxy Note 5 vs Note 4: Best Galaxy Note 5 Video Converter
- Transcode Sony Alpha a7II XAVC S to MOV with ProRes HQ/DNxHD/AIC codec for Editing on NLEs
- Convert DJI Inspire 1 4K Files to 1080p for Editing on Mac/PC
- Convert Sony TD20 3D MTS to 3D SBS MKV/MP4 for Playing
- Convert Canon C100 Mark II AVCHD to DNxHD MOV for Avid MC
- Downsize Sony 4K XAVC to 1080p for Playing Smoothly