Sony’s new flagship full-frame monstrosity called Sony A9 can assist you to capture up to 100Mbps 4K (UHD) XAVC S video at 24/25/30p. For Mac users, before sharing your camera footage with friends on Mac computer, iPhone, iPad, Apple TV or video sharing sites, you can do some professional effects rendering or color correction work with the professional NLE editing software Premiere Pro CC. So how about the workflow of Sony A9 4K XAVC S with Premiere Pro CC?
Work Sony A9 4K XAVC S with Premiere Pro
The good news is that if you are Adobe Premiere Pro CC 8.2.0 (2014.2) or later version users, you can directly load 4K XVAC S into Premiere Pro CC without rewrapping or transcoding. Following are the simple steps to ingest 4K XAVC S into Adobe Premiere Pro CC:
- Ensure that the Premier Pro version is compatible with the chosen XAVC mode.
- Choose Media Browser. Locate the footage from the media card (SxS, XQD or SD).
- Either right-click on the clip and select Import, or select the clip or clips and go to File Menu and select Import.
However, if you are using previous version of Adobe Premiere Pro CC 8.2.0 such as Adobe Premiere Pro CC, Premiere Pro CS6, Premiere Pro CS5, etc, you will then fail to load the Sony A9 4K XAVC S into Premiere Pro CC/CS6/CS5, etc.
Transcode Sony A9 4K XAVC S for Premiere Pro CC/CS6/CS5 editing
To fix the format incompatible issue, you can download Pavtube Video Converter for Mac. For those people who own a old Mac computer and just want to have a smooth 1080p video editing workflow, you can use our program to directly output Sony A9 4K XAVC S to Premiere Pro CC/CS6/CS5 native optimized MPEG-2 editing codec. However, if you happen to own a powerful Mac computer and wish to have a high performance and high quality 4K editing workflow, it would be much ideal for you to choose the Apple Prores 422 or 422 HQ format, an intermediate codec that is encoded with variable bitrate to be economical with video storage, without damaging the visuals. In addition, as a 10 bit codec, Apple Prores can process a lot of more color data and make the color correction process easier.
Edit 4K XAVC S with built-in editing tools
Don't want to move the whole video clip into Premiere Pro CC/CS6/CS5 for post editing. Never mind, you can use the program's built-in trim function to cut off unwanted clips or segments. If there are black edges around the video frame, you can use the crop function to remove them off. In addition, you can also add external subtitle to the video.
For your convenience, Pavtube Video Converter for Mac is available on both Windows (get Windows version) and Mac platform. In addition, the program has perfect compatibility with the new Windows and Mac OS. This program is very easy to use, no matter experienced user or fresh could handle it very well. What's more, the quality of the converted video is pretty high quality, you can't tell the difference between the result file and the original source video.


Get Pavtube Video Converter for Mac with 20% off discount, coupon codec: 45K2D47GJH |
How to Convert and Import Sony A9 4K XAVC S to Premiere Pro CC?
Step 1: Transfer camera video to the Mac computer.
You can edit the Sony A9 4K XAVC S footage directly from the SxS card via the camcorder, or a card reader, or use the Media Browser to transfer the content to hard disk for better performance.
Step 2: Load Sony A9 4K XAVC S files.
Launch the best XAVC Converter on your Mac computer and then load source 4K XAVC files that you've transferred to your Mac Hard Drive to the program by click Add Video button. You can also drag and drop your XAVC files into it.

Step 3: Define the output format.
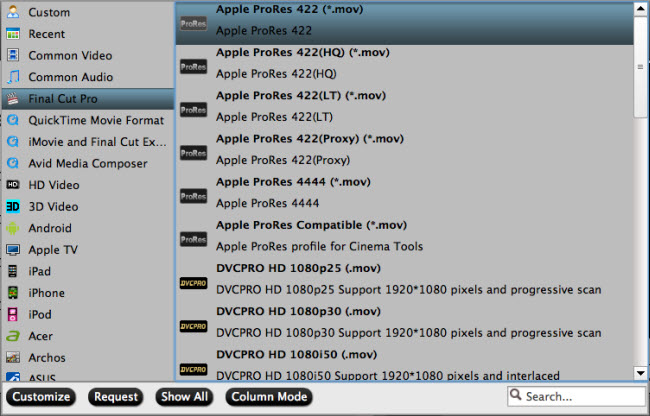
Clicking "Format" bar drop-down list, to have a smooth 1080p editing workflow on Premiere Pro, just choose "MPEG-2(*.mpg)" under "Adobe Premiere/Sony V..." main category.

For high quality and high performance 4K editing workflow with Premiere Pro, just choose "Apple Prores 422(*.mov)" or "Apple Prores 422 HQ(*.mov)" under "Final Cut Pro" main category.
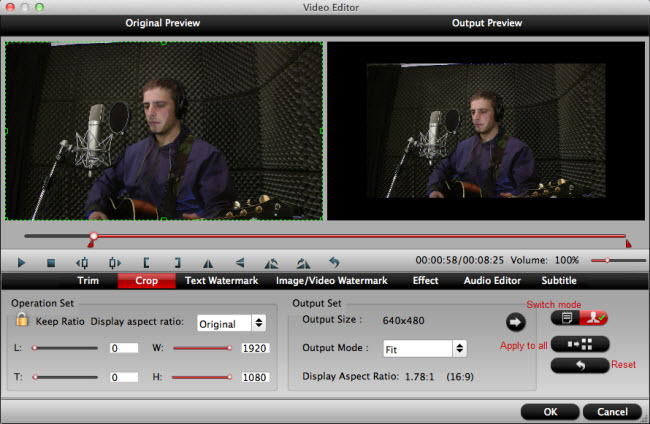
Step 4: Trim/Crop/Add subtitle to Sony A9 4K XAVC S files.
Trim video length
In the video editor window, choose the "Trim" tab and this tab is selected by default when the editing window appears. You can use the trim function to cut off unwanted parts from start and end. You can either drag pointers on the process bar or set exact time point in Start and End boxes to set.

Crop video black bars
The "Crop" facility enables users to get rid of the black edges and unwanted area of the image. In the video editor window, navigate to the "Crop" tab. Follow the below methods to crop selected video:
A: Crop video by dragging and dropping the crop frame. Simply move your mouse cursor to drag and adjust the green frame to desired position.
B: Crop video by setting values. There are "Simple Mode" and "Advanced Mode" under Crop feature.
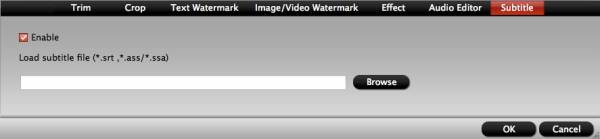
Add subtitle to video
Open "Video Editor" window, switch to the "Subtitle" tab, check enable, then you will be able to load external SRT/ASS/SSA subtitles to your movies.
Step 5: Begin the conversion process.
After all setting is completed, hit the "Convert" button at the right bottom of the main interface to begin the conversion process from Sony A9 4K XAVC S to Premiere Pro CC/CS6/CS5 compatible 1080p or 4K editing codec.
When the conversion is finished, click "Open Output Folder" icon on the main interface to open the folder with generated files. Then feel free to import video to Premiere Pro CC for professional effects rendering or color correction workflow.
Related Articles
Any Product-related questions?support@pavtube.com