Monday, April 14, 2014

BD Main Movie Backup: Backup rental Blu-ray disc in M2TS format on Mac OS X

Description: The article mainly introduce the easy way to make copies of your rental Blu-ray disc in M2TS format without any quality loss for wathing on computer instead of tv on Mac OS X.

I have a Blu-ray disc, and I wanna rip this disc into m2ts format so that I can watch it on computer, or convert to .ifo to burn to BD. Then is there an easy way to make "time-shifting" copies to watch later after returning a rental disc, or to be able to watch on computer instead of tv?

Searching onlike and seeing many video forum to help me ripping Blu-ray dis on Mac and then I find Pavtube Blu-ray Ripper for Mac, which can help me to backup blu-ray main movie to M2TS file with original quality and no conversion.
I like that this top Mac BD Ripper which can copy ‘movie only’, without previews, warnings, etc. The interface is so straightforward, and easy to understand. Though I am not a video expert, I can perform it well. Not like Aurora which only makes complete disc copy, and makeMKV which I don't know how to find a way to burn my files, Pavtube seems very useable and complete as it is now. It really provides a professional way to backup the intact Blu-ray main movie with amazing speed as well as the best method to rip my Blu-ray onto my iPhone with keepping  the quality of original blu-ray. The windows version is Pavtube Blu-ray Ripper.


Free download the best Blu-ray to M2TS backup program for Mac to backup the intact Blu-ray main movie in M2TS file and install it. Follow the guide below:

Make a copy of Blu-ray main movie to M2TS file without conversion on Mac


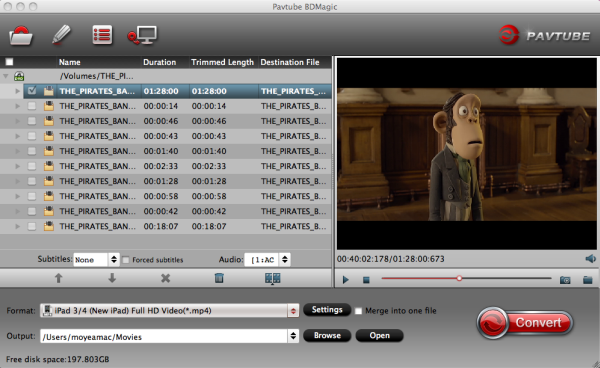
Step 1: Select Blu-ray source.

When launch the best Blu-ray to M2TS backup software, click “Load files” button on the top left, you will get three options:

Load the disc: Inserted discs are usually recognized and listed automatically, just select the one you desired.

Load from the folder: When you have copy the content of disc to computer or hard device, use this option to select the folder to import.

Load ISO/IFO: If your blu-ray source is ISO file, use this option to load.


Once imported, you will get a list of titles on the source. The main title with longest duration usually has been selected automatically.

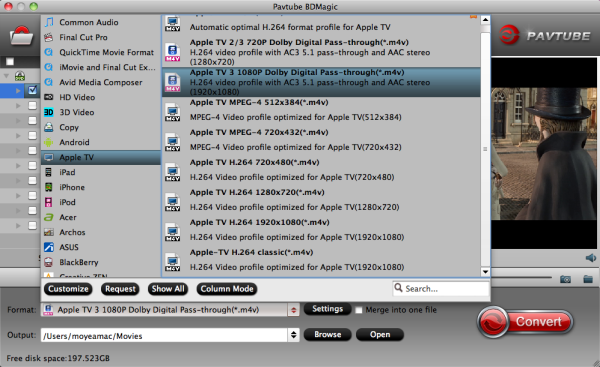
Step 2: Choose Directly Copy for output.

Firstly, go to select the location of output files. Simply click “Browse” button and choose the destination folder.

Secondly, click “Format” menu you will find lots of format options in the dropdown list. Here “Directly Copy” is the best choice for you because it will copy the intact main movie without any recoding. In this way, you will get a lossless m2ts file at amazing conversion speed.


Note: Many other video formats are listed there. You can select different output video formats according to your different requirements. If you want to convert blu-ray to various formats for smartphones or edit software, you are free to choose the one you need.

Step 3: Lossless Backup Blu-ray main movie to M2TS on Mac.

Now it is time to start backing up Blu-ray to M2TS without encoding on Mac by clicking big “Convert” button. Then click “Open” button you will find a quick way to locate the generated files. Once completed, you can get one lossless m2ts file with multiple streams from original Blu-ray.

As the generated M2TS file is intact Backup of Blu-ray main movie, so it will retain all the multiple audio and subtitle tracks and it cannot be selected during conversion.It works easily and at high efficiency. With it Backup intact Blu-ray main movie is no long the complicated thing. Now take time to enjoy it.

Related Articles:

Friday, April 11, 2014

Best video export settings for Blu-Ray using Premiere Pro CS6

In order to make a Blu-ray directly playable and editable in Premiere Pro CS6 program, this guide will show you how to rip convert Blu-ray movies to Premiere fully compatible format.

It's a great fun if you have a pretty large Blu-ray collection for sharing with your friends or familiars. When you have the digital copies of these movies saved on your hard drive or personal server, you may also like to edit Blu-rays in Premiere Pro CS6 on Mac.


Commercial Blu-rays bring extraordinary video quality to us for family watching and sharing for the large amount of content that can be stored. It's a great fun if you have a pretty large Blu-ray collection, or movie collection. However,it comes with the problems that Premiere Pro CS6 can’t directly ingest Blu-ray files. So, how can we rip Blu-ray movies for Premiere CS6 editing? As far as I know, Premiere Pro CS6 is not so that picky on the formats, but it prefers MOV/MPEG-2 format in editing. Is there any quick and easy way to do this? this?
OK, after lots of searching in google, finally a powerful conversion program is founded to be able to ingest Blu-ray to Premiere on Mac, an all-in-one Pavtube BDMagic for Mac program on Mac. This software does a good job in decrypting and transcoding Blu-rays so that you can easily get the files you want, no matter audio/video only, or both. And the lastest version has added 3D profiles in Format menu. (Side-by-Side, Top-Bottom, or Anaglyph 3D in MKV/MP4/MOV/WMV/AVI). So it now support converting 3D to 3D, and you can get your desired 2D/3D Blu-ray video in 3D effect.

Get this Best Mac Blu-ray Ripper for Premiere Pro installed; you can order a license directly or download a trial version for free before purchase.

How to Rip Blu-ray to Premiere Pro CS6 with Best Blu-ray Ripper for Mac?

Step 1. Load your disc.

There is a disc icon on the top left which let you load from disc, folder or ISO/IFO respectively.


Step 2. Choose your Output directory down which is marked as 2.

For editing Blu-ray movies in Premiere CS6, the AIC is preferred. Click "Format" and choose "MOV (AVC)(*.mov)" or "MPEG-2 (*.mpg)" from "Adobe Premiere/Sony Vegas" option.


PS: It has various profiles and formats so that you can rip blu-ray to various formats according to your needs.

Step 3. Set up frame rate, bitrate and other output settings.

Click Settings, you can find file details including codec, size, bitrate and frame rate. You are able to fix them according to your needs. FYI: the higher bitrate you choose, the better video quality it outputs.

Step 4. Now just press the big circular "Start Conversion" button to convert Blu-ray to MOV/MPEG-2 for Premiere CS6 and let it do its magic. Wait for moments and you will get the fresh hot converted videos for Premiere CS6.

Tips:

1. Refer to here to learn how to import video files into Premiere Pro.

2. Here are some step-by-step guides of how to import Blu-ray to FCPedit DVD in FCP, rip Blu-ray to iMovie/FCE and convert DVD to multi-track Prores for FCP X on Mac.

Thursday, April 10, 2014

Import Blu-ray Movie to Avid Media Composer for Editing

Summary: Want to edit Blu-ray movies in Avid Media Composer (Avid MC)? Simply follow this article to convert and import Blu-ray to your Avid MC on PC and Mac OS X (Mavericks) with DNxHD codec.

"I am busy preparing for the filmfestival recently, and I encounter a problem about ripping a short blu-ray movie to Avid Media Composer(6) for editing, the movie is used to playing at the beginning of the filmfestival, who can giving me some suggestion?"


Although the latest Avid Media Composer added many new features, it still can't support Blu-ray video files. When transferring Blu-ray to Avid MC, you will encounter importing and editing problems from time to time. To add Blu-ray films into Avid MC, the easy workaround is to convert Blu-ray to Avide natively supported DNxHD codec. Let’s find out how to do it here.

To achieve your goal smoothly, you need to download this professional Blu-ray to Avid MC Converter. It is the best program I can recommend for converting Blu-ray to Avid DNxHD codec. With it, you can effortlessly rip Blu-ray movie to Avid Media Composer for further editing on PC and Mac without quality loss. The Mac version is Pavtube Blu-ray Ripper for Mac. Now download this program and follow this guide below to complete your task.

How to rip and convert Blu-ray to DNxHD .mov for Avid Media Composer?

Step 1. First of all, get this Blu-ray to Avid MC Converter installed and insert DVD to PC/Mac. Btw, Mac cannot read Blu-rays directy, if you want to rip Blu-ray, plug-in your external Blu-ray drive to your computer and read Blu-ray there.

Now click the first disc-like icon on the top, click your disc name to load. Pavtube Blu-ray Ripper for Win/Mac will detect the main title automatically, unless you wan to rip the extras, do not touch it.


Step 2. The next step, click "Format" drop-down list and choose "Avid Media Composer>Avid DNxHD 1080p(*.mov)".


Step 3. Now the most important step to get DNxHD file in best quality.

Click the "Settings" icon (next to "Format"), you can free change other settings like frame rate, audio sample rate, channels, etc. The higher bitrate you choose, the larger file size and better video quality will be.

Step 4. Well it's all set now. Back to main UI, hit the big red "Convert" to start ripping Blu-ray to DNxHD MOV in best quality for Avid Media Composer on Mac. Wait for moments, hit "Open output folder" or "Open" to quick find the converted files.

Related Articles:

Tuesday, April 8, 2014

How to rip some of my Blu-ray musicals for watching on Apple TV/iPad

iPad and Apple TV can not play Blu-ray movies directly. To solve this issue, you need to convert a Blu-ray into an ATV/iPad-compatible file first and then airplay the files for playback. Luckily, we are here to provide you the way to fix it. Let's learn it now!

I have a large Blu-ray collection, and I like to rip some of my bluray musicals so I can watch in Apple TV/iPad . After doing some research the web for top blu-ray ripper, I find Pavtube BDMagic which is recommend by many online reviews. So I tried it and I have successfully ripped to mpeg-4 mp4 format to watch on my iPad and Apple TV. With it, I can rip most blu ray disc without additional software and it can also convert my blu-ray to iPhone iPad Dell tablet playable format with high quality and fast speed.

The equivalent Mac version is Pavtube BDMagic for Mac. Just download it now and follow the step-by-step guide below to copy Blu-ray movies to iPad and Apple TV for smoothly playing.

(Note: Please read Top 5 Blu-ray Ripper Reviews.)

The Steps:

The quick start guide below uses the Blu-ray Ripper screenshots. The way to ripping Blu-rays to iPad/ATV on Mavericks (10.9 included) is almost the same. Just make sure you get the right version according to your computer operating system.

Step 1: Click "Load file" button to import your Blu-ray movies to the nice Blu-ray to Apple Converter.

P.S. Pavtube Blu-ray Ripper can do with all kindes of Blu-ray sources: protected and unprotected Blu-ray Disc, Blu-ray folder, Blu-ray ISO and IFO file.


Step 2: Press the "Format" button, and go to "Apple TV" options to find "Apple TV H.264 (*.m4v)". This format is best for playing on Apple TV.


Or you can select iPad > iPad HD Video(*.mp4) as the export format. The output videos could fit all iPad models with excellent quality. As you see, you can also select the optimized preset for your iPad model.

Tips 1: You can freely select the subtitles for your movies as you like from the Subtitles option.

Tips 2: You may also click "Settings" to set the Video/Audio Parameters like Size (resolution), bitrate, frame rate, etc to for iPad Mini according your own will. Remember the file size and video quality is based more on bitrate than resolution which means bitrate higher results in big file size, and lower visible quality loss.

Step 3: After everything is OK, click the big "Convert" button to start ripping Blu-rays to iPad/Apple TV MP4 videos.

Once the conversion completes, you can click "Open" to find the .m4v or mp4 videos which can be directly imported to your iPad and Apple TV. You can also airplay the video from Apple TV to other IOS devices via airplay.

Related Articles:

Sunday, April 6, 2014

Rip DVD to Samsung Galaxy Tablet: Enjoy DVD Movies with Samsung Galaxy Note 10.1 2014 Edition on the Go

This DVD to Galaxy converter helps you transfer DVD movies to MPEG-4/H.264 MP4 format with best quality, so that you can watch DVD on Galaxy Note 10.1 2014 Edition without DVD drive.

The new Samsung 10.1 2014 tablet was released, and its specs caught my attention. The 32 Gigabyte WiFi edition Android 4.3 Jelly Bean tablet not only had a 2,560 x 1,600 pixel display resolution at a 298 PPI density (compared to iPad Air's Retina at the smaller 2,048 x 1536 and lesser 264 PPI density), but also it had handwriting recognition, expandable storage, video was 1080p (vs the iPad’s 720p), a slightly larger screen, the ability to run multiple apps at the same time in split-screen, and a host of other features.


The Samsung Galaxy 10.1 2014 Edition is The Best Tablet I've Ever Owned, but as we know, it is still not come with DVD-ROM for watching my favourite DVD movie. So I think it's necessary to share the article below to walk through the quick way to transfer DVD to Galaxy Note 10.1 2014 Edition for playback.

If you want to play DVD movies on Samsung Galaxy Note 10.1 2014 Edition, you need to convert DVD to Galaxy Tablet accepted videos on computer as your first move. After many trials, we select this Pavtube DVDAid for that it's capable of removing DVD protection quickly (a few minutes during the importing) and smoothly converting DVD to MP4 which is preferred by Galaxy Note 10.1 2014 Edition without any quality and sync issues. The Mac version is Pavtube DVDAid for Mac.

The following is a step-by-step way for you to know how to convert DVD to Galaxy Note 10.1 2014 Edition with DVD to Galaxy Converter. Download the software in your computer. And then install and run it. Everything is ready..

Step by step Instruction on How to rip DVD to Samsung Galaxy Note 10.1 2014 Edition

Note: The ways to convert DVD to Galaxy Note 10.1 2014 Edition on Mac and Windows are the same. This below guide uses the Windows version screenshots. Just make sure you downloaded the right version.

Step 1: Import DVD Movies

Run Pavtube DVDAid, import the DVD disk you want to convert, you can also load DVD folder or DVD ISO image in the main interface.


Step 2: Choose output format

Click “Format” bar, you can easily find the optimized videos for the Galaxy Note 10.1 2014 Edition under ” Samsung > Samsung Galaxy Note 10.1 N8000(*.mp4) “. The preset is specially designed for Galaxy Note 10.1 2014 Edition perfectly. If you like, you can also click the “Settings” button to change the video resolution, encoder, frame rate, etc.


Step 3: Profile Settings

For watching videos on Galaxy Note 10.1 2014 Edition, 720p with 2000~2500kbps is just all right. I found bitrate higher results in big file size, and lower visible quality loss, and vice versa.

Tips:

1.If you want to make 1:1 copy of original DVD disc without quality loss with all audio streams, subtitle tracks, extras, etc, you can click the "Copy the entire disc" icon to meet your needs.


2. If you have Nvidia CUDA/ATI AMD ready graphics card, you can have GPU encoding. Check the status of the CUDA/AMD button on the main interface and you'll learn if CUDA/AMD encoding is in use.

Step 4: Start Conversion

After all those steps, click the "Convert" button to manage the conversion process from DVD to Galaxy Note 10.1 2014 Edition.

After the ripping process finished, you can find the output video in the destination folder. Move it to your Samsung Galaxy Note 10.1 2014 Edition.

Transfer media (music, video, photo) files to Samsung Galaxy Note 3
Copy Media Files (Video, Music, Photo, iBook) from PC to Galaxy Tab 3

Related Articles:

Tuesday, April 1, 2014

How to backup your DVD disc collections to home server for playback

Description: A simplest DVD to MP4 ripping tutorial; you can easily backup DVD collections and convert them to best MP4 file for sharing to home media server with this Pavtube DVD Ripper.

"I own a large DVD collection. The movies are watched almost every day by a member of the family. Will it be possible to digitize these DVD discs and play on a laptop hooked to a TV or out side in the home theater? Really worry about disc scratch and damage…"

Many people prefer to build a home media server to store all your photos, movies and more in a central location. Usually it integrates with all your family's home computer; everyone in your family can access shared folders of photo albums, music and movies from any device in your home network.


How to backup your DVD disc collections to home server for playback? Well, first of all you need to roll off the disc protection, and then convert them to more common video formats like MP4 which is compatible with most devices, like computer, smartphone, tablet, TV, console, etc.

Hereby you need a DVD ripping software.

Among many tools in various brands, Pavtube DVD Ripper is definitely hands down better in ease of use, ripping speed and quality of video output. It simply break your disc protection in background which you don't need to operate manually; just set the target format and you get the best videos.


Tips: Got the Mac version for you – Pavtube DVD Ripper for Mac

Download a free trial of this user-friendly Pavtube DVD Ripper and let's start this super-easy workflow.

Tutorial: How to backup DVD to home media server

Step 1. Insert your DVD and launch Pavtube DVD Ripper.

Insert your disc to computer, launch Pavtube DVD Ripper and click the disc-like icon on the top, click disc name to load your movie.


Notice the "Subtitles" and "Audio" options above format list? You can choose one subtitle or language and build them into target video. Anyway, if you want to obtain multiple audio tracks or subtitles, try this Pavtube ByteCopy.

Step 2. Choose "H.264 MP4" format.

Click "Format" drop-down list, choose "HD Video>H.264 HD Video(*.mp4)" as below:


H.264 MP4 is well compatible with main stream devices like PC/Mac, IOS/Android/Windows smartphone&tablet, etc.

(Optional): adjust target file specs.

If you are not satisfied with the default file specs, hit the "Settings" icon (besides "Format") and free change video size, bitrate, frame rate, and audio sample rate, etc.

Step 3. Conversion.

Hit the big red "Convert" in right bottom corner to start ripping DVD to MP4 format directly. Wait for a while when it's ripping; after it completed, hit "Open" or "Open output folder" to quick locate generate MP4 files.

Now just stream them to your home media server and share with family members!

Related articles:

Mac solution: Get Blu-ray movies to Apple TV 3 for wathing

This article shows you the complete guide and easy solution to convert and import Blu-ray movies to Apple TV 3 or future Apple TV 4 on your Mac (including  Mavericks 10.9 and  Yosemite 10.10). 

Hello. I am in the process of purchasing a Blu Ray drive to use with my desktop Mac and will be purchasing a software program for converting my Blu Rays . I wish to play them on my Apple TV3 and the future AppleTV4. Will these blu rays be stored in the Home Video of ITunes ? Also when do I need to have external hard drive storage for my collections.? I have a 10.10 Yosemite 27" IMac. Thanks and looking forward to getting started.


Then how to get these blu-ray collection onto Apple TV 3 for watching as the above user asked?

As you know, Blu-ray disc or even the decrypted Blu-ray rips can’t be supported by Apple TV 3. The best solution is to rip and convert Blu-ray to iTunes compatible format then sync to ATV 3 for playback without any limit. Follow the guide below rip Blu-rays to Full HD 1080p MP4 files for viewing on Apple TV 3 on Mac.

System Requirements for ripping Blu-ray to iTunes and streaming to Apple TV on Mac


* Mac OS X 10.5/10.6/10.7/10.8/10.9/10.10

* Compatible Blu-ray Disc Drive

* Pavtube BDMagic for Mac

* 2.4 Ghz Intel Core 2 Duo or faster processor

* At least 2 GB of RAM

* iTunes 10.6 or later

* A video driver that supports HDCP for Windows PC

* A display that supports HDCP with a screen resolution of 1280 x 800 or higher

* Apple TV 3rd generation


Step-by-step guide for ripping Blu-ray movies for Apple TV 3 on Mac

1. Make sure your Blu-ray Disc drive is well connected with computer, and put a source Blu-ray Disc to the BD drive. Mac is lacking of Blu-ray support and you need to add an external BD drive that is compatible with Mac.

2. Have Blu-ray Ripper installed on your computer. And free download Pavtube Blu-ray Ripper for Mac.

If you are windows users, read my old post how to rip Blu-ray to Apple TV.

3. Run the Mac Blu-ray to Apple TV 3 Converter. Press "Load Disc" icon to import Blu-ray movie. The software requires network connection to decrypt Blu-ray so keep your network wired.

blu ray to apple tv Rip Blu ray to Apple TV 3 with AC3 5.1 audio on Mac

4. Select main movie from file list, and set subtitles and audio language for export.

5. Set iTunes/Apple TV 3 compatible format from the drop-down list of "Format".  To export a Apple TV 3 1080p video with ac3 5.1 pass-through for AV receiver decoding, "Apple TV 3 Dolby Digital Pass-through (*.m4v)" preset is highly recommended.

apple tv format1 Rip Blu ray to Apple TV 3 with AC3 5.1 audio on Mac

6. Press "Convert" to get Blu-ray Ripper start compressing Blu-ray to Apple TV 3 friendly videos.

7. When conversion completes, press "Open" to find compressed .m4v movie and add it to iTunes movie store. Open up iTunes and follow "File>> Add file to Library…" to sync ripped Blu-ray movie to iTunes for video streaming to ATV. Now you can enjoy the Blu-ray movie with iTunes freely and stream the Blu-ray movie to Apple TV 3.

Apple TV 3 Related Articles: