Thursday, December 25, 2014

Tips on Streaming HD MKV Movies to Xbox 360/One

Be interested in watching videos on Xbox 360/One? But as you know some formats there are not supported, such as the MKV, right? Let’s learn more here.


Frankly speaking, I don’t know if you guys have found that during the years, people find more and more HD video content downloaded from Internet torrent streaming sites. Then they are quickly getting familiar with MKV video format, a video container theoretically packs everything. How much do you know about this container format? Up to 1080p Full-HD quality, MKV movies surely are also perfect source for your Xbox console. Unfortunately, so far Xbox series (Xbox 360, Xbox 360 elite, Xbox 360 Pro or Slim, and Xbox One) cannot read MKV file. What’s more, 4K and AVI videos etc, are not available.

What do you know about the Xbox or Xbox 360?
The Xbox is a video gaming brand powered by Microsoft, which includes a series of video game consoles like Xbox, Xbox 360 and Xbox One and Xbox 360 is the most popular and widely used one of these game consoles. Xbox 360 competes with Sony's PlayStation 3 and Nintendo's Wii as part of the seventh generation of video game consoles, with which, you'll have a wonderful experience in games and entertainment, and just as Xbox 360 Official Website said Xbox 360 is the center of your games and entertainment universe.

Reasons here why Xbox cannot cannot accept the MKV movies for a playback
Xbox 360 has strict requirement for the input formats and only WMV, AVI, H.264 and MPEG-4 are compatible with Xbox 360. In other words, it's impossible to directly play MKV on Xbox 360. It is pity since MKV is an open standard free container format and very popular so far.

Pavtube MKV to Xbox Converter for Windows/Mac
 can work everything well in Xbox 360/One.
In order to convert our MKV files to the best format HD WMV for Xbox, we here highly recommend you this Xbox video converter which can easily stream our MKV files to Xbox with the easy operation. Let’s see what happen below:

Guide on converting HD MKV to HD WMV for smoothly playback on Xbox 360/One:
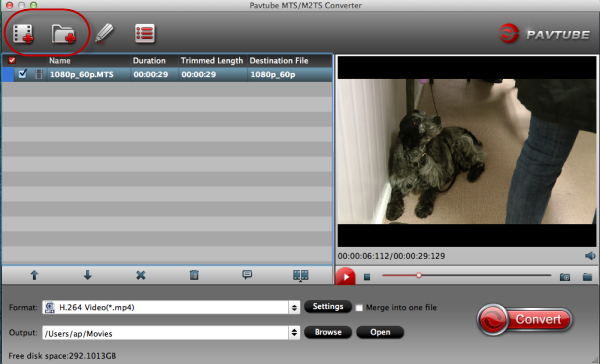
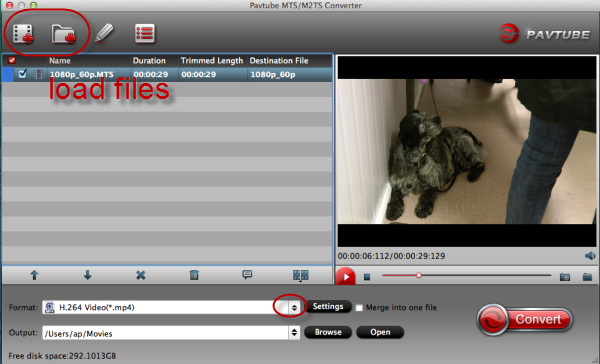
When you install this MKV to Xbox Converter and open the main interface, with the ‘Add video’ we can load the individual MKV video clips or with the ‘Add form folder’ we can import the source files in a complete folder. Batch conversion is also supported well here.


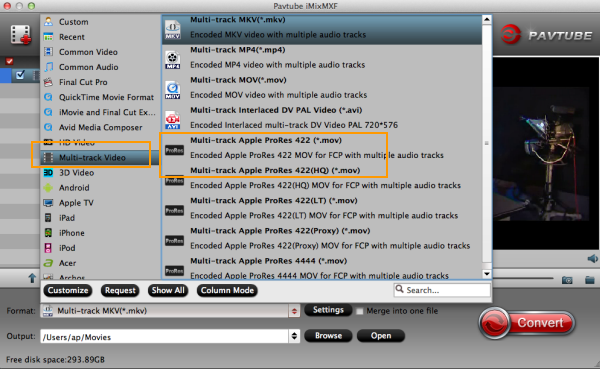
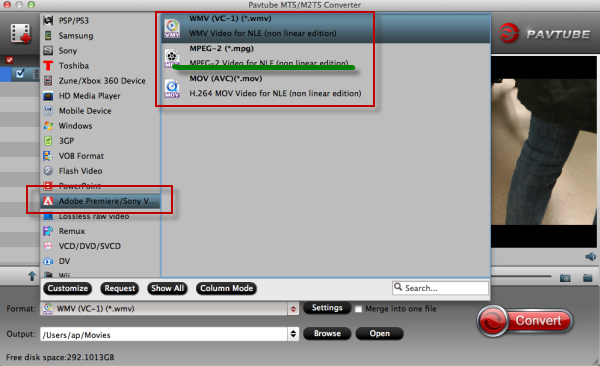
Then we should come to the top important point, choose the right one for Xbox here. Tap the ‘Format’ bar on the left of the preview window, drop down the output list, we can find the ‘Zune/Xbox 360 device’ there. As we mentioned above, in order to preserve the original quality, we suggest to select the ‘Xbox 360 HD Video(*.wmv)’ as the best one.


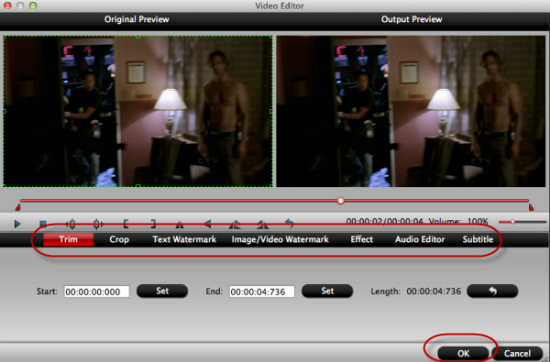
Optional function for those advanced users: Do you wanna have a nice enjoyment on Xbox? Well. Let me introduce the ‘Edit’ item here for you. Cut the unwanted clips? ‘Trim’ can decide the movie length. Add some subtitles as explanations? ‘Subtitles’ could do you a big favor. You can become a good editor in this interface.


Just several main simple steps we can work the MKV files well in Xbox, right? Finally, tap the ‘Convert’ button on the main interface, we can get the suitable HD WMV movies for playing in Xbox 360/One.

Other guides you may like:

Saturday, December 20, 2014

Can JVC HD Everio GZ-RX110BE AVCHD be Friendly with Song Vegas Pro 13/12/11?

A good question on how to make JVC HD Everio GZ-RX110BE AVCHD MTS files friendly with Sony Vegas Pro 13/12/11? Any good solutions do you have?


General speaking, which is known to professional video editors, with the incompatible limitation, more and more camera footage has become unavailable for editing in popular editors, AVCHD MTS footage is the main character in the following article. Have you ever found that they cannot be directly imported into such like FCPAdobe Premiere,Avid or even Sony Vegas Pro 13/12/11?

Popularity of this JVC HD Everio GZ-RX110BE camera: 1/5.8-inch CMOS with 2.5Mpixels; AVCHD video format at up to 1080/50p; Waterproof to 5m; shockproof when dropped from up to 1.5m; 40x optical zoom; 60x dynamic zoom; Wi-Fi control via Android or iOS app, etc. So which piece of feature that attracts you so much?

What do you want to edit your AVCHD MTS files with Sony Vegas Pro? For a nice playback? For a enjoyable sharing with your friends? Whatever the usage you want make to get it possible, we should take another measure of the original JVC AVCHD MTS files before we importing to our Sony Vegas Pro. Pavtube MTS/M2TS Converter for Windows is such a professional AVCHD to Sony Vegas Converter that converting all MTS or M2TS files to compatible ones for NELs. Do you believe that?

Now, I would like to share the main conversion steps for you. So easily to convert your AVCHD MTS to Sony Vegas Pro best supported MPEG-2 MPG. Just read carefully:

Step 1. Import our original AVCHD footage
When you successfully download and open this AVCHD MTS Converter, on the main interface, just click the ‘Add video’ to get all your video clips individually into this program. Or drag your files directly in is also not a bad idea.


Step 2: Seek the output for Sony Vegas Pro
Open the ‘Format’ bar and drop down the list, nearly on the bottom of the list, we can choose the ‘Adobe Premiere Pre/Sony Vegas’>>’MPEG-2 (*,mpg)’ as the best one. In other ways, we can also tap the item in the searching box to find it out too.


Step 3:Optional function here, if you wanna some simple editing with your original files. Maybe the ‘Edit’ on the top of the main interface could make your dream come true. Decide your video length with ‘Trim’? Cut your video edges with ‘Crop’? Or something else we can find more details here. That’s why we also call this AVCHD converter as another name, ‘Tiny Editor’.


Step 4: Finally, back to the main interface, just tap the ‘Convert’ to make your conversion work started. No needs for waiting for a long time, with a 6X faster speed, we can easily get the result for editing in Sony Vegas Pro 13/12/11. Is that cool?

Q: If I have another formats that also cannot be imported in Sony Vegas Pro? Except for this AVCHD MTS converter, any other solutions I can take to get rid of this trouble?
A: Surely, another Pavtube Video Converter for Windows/Mac is allowed here for you as a good reference. Any interests there to have a try?

You may like:

Tuesday, December 16, 2014

Could I Load Sony PXW-X200 XAVC into FCP/Premiere/Avid on Mac?

"It's a common situation that people can't import Sony PXW-X200 XAVC to Final Cut Pro X successfully. For instance, FCP X only recognizes the image in the loaded XAVC video; it will grey out the import window or even crashes suddenly. 

Here're two ways to import Sony XAVC to FCP X: 1. You need to install the Sony XAVC/XDCAM Plug-in for FCP X on your system; 2. You can transcode Sony XAVC to FCP X Supported Apple ProRes format for edtitin without rendering on Mac." 


Introduction: 

Why we love Sony PXW-X200 camcorder so much? 

Offering the ultimate flexibility, the new Sony PXW-X200 offers pristine Full HD (1920*1080) recordings in the latest generation XAVC codec for broadcast quality 10-bit 4:2:2 sampling utilizing the MPEG-4 XAVC/H.264 compression for maximum quality. In other words, this kind of camera has the strong ability for shooting flexible videos with a high quality. 

What a pity! The latest high definition XAVC video format introduced by Sony PXW-X200 is not well supported by Final Cut Pro X so far. 

According to Apple official and XAVC users feedback, we offer two ways to import Sony PXW-X200 XAVC video to Final Cut Por X on Mac OS X, including the latest Yosemite or Mavericks. 

Method one. Sony XAVC Plug-in for Apple Final Cut Pro X 

1. If you use Final Cut Pro X version 10.2: Final Cut Pro X 10.2 supports Sony XAVC, XAVC S, XDCAM, XDCAM HD, and XDCAM EX media. 

Before importing Sony XAVC, verify that Pro Video Formats is installed on your system. Check for software updates and, if necessary, install the latest Pro Video Formats. (You can also manually download Pro Video Formats from the Apple Support website.) No additional software is required. 

2. If you use Final Cut Pro X version 10.1.4 or earlier: Final Cut Pro X 10.1.4 and earlier support Sony XAVC, XDCAM, XDCAM HD, and XDCAM EX media. 

Note: If you want to import Sony XAVC S media, update to Final Cut Pro X 10.2. 

Before importing Sony XAVC and XDCAM media, verify that Pro Video Formats and the Sony XAVC/XDCAM Plug-in for Apple are installed on your system. Check for software updates and, if necessary, install the latest Pro Video Formats. (You can also manually download Pro Video Formats from the Apple Support website.) 

If you need to install the Sony plug-in, manually download it from the Sony Creative Software Download page. Review the included release notes, and then install the Sony plug-in. 

Method two. Transcode Sony PXW-X200 XAVC files to FCP X supported Apple ProRes 

This is a simple and effective method: convert PXW-X200 XAVC to FCP X format with professional software at one go. By converting the video beforehand, you can import XAVC to FCP X for editing immediately. 

Pavtube HD Video Converter for Mac is a yet fast and effective XAVC to FCP X converter for Mac OS X, Yosemite, Mavericks, Montain Lion included. Preconfigured with FCP X profile and high quality engine, this full-featured Mac XAVC to FCP X converter will enable both novice users and advanced users to convert Sony XAVC to FCP X supported format and import XAVC to FCP X with only a few mouse clicks, while retaining excellent video and audio quality for editing in FCP X. After the fast video conversion ends, you can import the converted XAVC video to FCP X directly without rendering and edit Sony XAVC in FCP X to create your own video clip. More, Pavtube HD Video Converter for Mac can also convert XAVC to MPEG-2 for Premiere or convert XAVC to DNxHD mov for Avid. Would you like to have a try? 

Note: If you're running Windows system, pls try the Video Converter, and you can also read the guide on converting XAVC files on Windows


1. Install this program and launch it according to its instructions. With two buttons we can easily transfer our original files in, "Add video" and "Add from folder" can do this job well. The how could we get the suitable ones for FCP, Premiere and Avid? Now, follow the screen shots below, we have individual output choices for each one. 


2. For Final Cut Pro, may be the "Final Cut Pro -> Apple ProRes Codec 422 (*.mov)" on the output list could be your best, right? 


The XAVC to FCP X Converter for Mac have different selection there so if you cannot find them out. Just tap the answer in the searching box, you won't miss it there. 

3. Then we can go to other optional items to take around, such as the "Settings" there. Many users are fond of this button because we can adjust our own output videos here. For example, the video size, bitrates, or even the audio channels. Anything we can make a selections here for output devices or apps. 


4. Finally, just tap the "Convert" button, the software can easily get the output Apple ProRes mov files. 

At the end of this paper, if you are the first time to work with FCP XPremiere Pro and Avid, Pavtube also can offer you some related transferring guides individually for FCP, Premiere and Avid, you can take as references. 

That's all! Thanks for your reading, have a nice day.

Read Related Articles:

Friday, December 12, 2014

Best Converter to Transcode Decoded Movies with High Quality

Have you ever got troubled in some Blu-ray movies? This guides here can teach you how to nicely convert your decoded Blu-ray movies with high quality.


In a word, in order to watch the Blu-ray movies for a nice enjoyment after decoded? If you still have no ideas on how to rip Blu-ray movies for a nice backup, a best converter for backup especially here designed for you guys. Would you like to take a close look?

Hello, guys, if you are Blu-ray fans, how do you usually archive your Blu-ray movies? As the high definition of Blu-ray movies, they are so popular in our daily life, especially the 3D movies, right? However, with the busy work, we don’t have so much time to enjoy them well so some simple media players or handle tablets become our good friends. Thus, we should decode the Blu-ray movies for a first step. Pavtube BDMagic for Mac could do this job in a nice way.

While for those who want to backup these decoded movies, we should ask Pavtube MTS/M2TS Converter for Mac(Windows version) to do us a big favor. It seems to be a video converter for those MTS/M2TS files, besides, it also has the strong ability of backup our Blu-ray movies or DVD movies well. Is that cool? Now do you have any interests in learning more details on how it works?

Download this best backup video converter and install it in a nice way, with the ‘Add From folder’ button we can so easily to import our original decoded Blu-ray movies, they will be listed on the left blank space. Next, how to change these decoded MTS files into others for a backup on Mac. Just come to the output list, could you see the ‘Common Video’ there? Any one there you can choose as your favorite. Such as ‘H.264 Video (*,mp4), H.264 Video (*.mov), etc. As common ones, they are often used on Mac or Media Players for a playback.


Additionally, this program also has the optional items for you. Such as the ‘Settings’, here, we can adjust our personal output videos as a backup. ‘Video codec/size’, ‘bitrates’, or even the audio channels, etc. Or we just leave them as the default settings.


Don’t forget to choose the right place for you output videos on your computer. Then the big red button ‘Convert’ is waiting for you to get started. After that, just enjoy the Blu-ray movies with high quality in other ways!

You want more?

Wednesday, December 10, 2014

Make Sony PDW-850 XDCAM MXF with multi-track Accepted by FCP X

Let’s together take part in the talking on how to make Sony PDW-850 XDCAM MXF with multi-track in FCP X.


In a word, if you have the desire of converting MXF files shot by Sony PDW-850 camcorder to ProRes for FCP X with multiple audio tracks. You may pay attention to the following page to get more details on how to importing Sony MXF files to FCP X for a nice editing.

‘As a video editor, I deal with plenty of formats and their conversion with each other. The most cases I got are to handle the conversion of Canon/Panasonic/Sony multi-track MXF. Since this kind of videos have multiple channels, many of MXF converters fail to keep them during the conversion. Is there any good ones you can suggest to me?’

Frankly speaking, it is not so easy to find the MXF converters which can handle the multi-track function. As you have the MXF files specially output by Sony PDW-850 XDCAM camera, we here can introduce you the Pavtube MXF to FCP X Converter for Mac. So what the main features that can attract you so much?

  • Turn MXF videos into any formats for multiple purpose
  • Mix multiple audio tracks into one
  • Output multi-track formats as you want
  • Faster speed and easy operation

Tips: If you don’t need to convert the MXF files with multi-track, you can take this one as a try. After we tested, this program can work well with the latest version Mac OS X10.10.

Download it and install in a general way, sometimes you can directly drag your files in if you store them on your computer or ‘Add video’ can also do you a big favor. For FCP X, you can choose the ’Multi-track Video’>>’Multi-track Apple ProRes 422(*.mov)’ as the best. The following screenshot will show you how. If you have selected all the preparation work, don’t miss the ‘Settings ‘or ‘Editor’ for a try.


Click the ‘Convert’ button to start well and if you got any other advice or suggestions, welcome to offer us below. What’s more, we also provides you the main steps of transferring files to FCP X.

More: 

Monday, December 8, 2014

Log & Transfer Sony PXW-X70 XAVC (.mxf) Files to FCP 7/6

Let’s together see how to log and transfer XAVC MXF files shot by Sony PXW-X70 camera to Final Cut Pro 7/6 for a nice editing.


Summary: I don’t know if you have the experience of shooting XAVC MXF recordings from Sony PXW-X70 camera or not, this guide below mainly tells you the details on how to convert XVAC MXF to ProRes in order to make it smoothly when editing Sony PXW-X70 recordings in FCP 7/6.

Why not Sony PXW-X70 XAVC MXF files be compatible with FCP7/6?
Something you may not know here: Sony’s PMW-F5/F55, Sony PXW-X180/Z100 or PXW-X70, etc produced mutually incompatible files due to opaque subformat options obscures behind the XAVC (*.mxf) file extension. The Sony PXW-X70 camera can help you record vivid HD movies, it’s also an excellent recorder. But, Sony PXW-X70 recorded files are in XAVC (*.mxf) format, this format is often used in Sony high-end cameras or camcorders. XAVC format is not supported by many editing software, such as FCP X/7/6. 

Best solutions here you won’t miss it! Convert XAVC to Apple ProRes!
If you read the detail description of Final Cut Pro 7/6 on Apple official website, you will get the info that Apple prores codec is the native codec for FCP 7/6, once you convert Sony PXW-X70 to FCP X Apple ProRes codec, your importing and editing problem will be solved. Here we recommend you to take a free try on Pavtube MXF to FCP Converter for Mac, which has a strong ability of working this job well. It also has the Windows version here.

Steps to convert Sony PXW-X70 to FCP 7/6 supported format
Free download the program and open the main interface, click the ‘Add video’ button, just put the original files into this program. As mentioned above, if you need to convert Sony PXW-X70 files on Windows, please use its Windows version. Look for ProRes as the output? Surely you can tap it on the ‘searching box’, but you can easily find it on the output list there. ‘Final Cut Pro’>>’Apple ProRes Codec 422(*.mov)’ is waiting there for your selection.


Tips: The biggest high light of this program you should not miss is the ‘Multi-track Video’ item if you need the multiple audio tracks. This functional item could help you a lot. Do you wanna a try?

Before convert Sony PXW-X70 MXF files to FCP 7/6, it is available to press ‘Settings’ button to customize the output parameters, include the resolution, bitrates, frame rate, etc. you can also skip this step. 


Finally, if you are the first time to work with FCP 7/6, we here also have some main transfer steps for you here. Back to the main interface, don’t forget to click the ‘Convert’ button to end the conversion. Just enjoy your editing in FCP 7/6. Thanks for reading!

Read More:

Friday, December 5, 2014

Make Panasonic DMC-LX100 MTS Join in Premiere Pro CC

Need tips on how to make Panasonic DMC-LX100 MTS files accepted by Premiere Pro CC? let’s read this article below.


Summary: I don’t know if you are now puzzled with the question on how to edit your Panasonic AVCHD MTS footage in the hottest editing software Premiere Pro CC. The article below mainly tells the methods of converting MTS files to MPG, which is the most suitable one for Premiere Pro CC.

Full HD Video Shot by Panasonic DMC-LX100 4K camera.
The black Panasonic LUMIX DMC-LX100 Digital Camera is an advanced point-and-shoot with manual controls designed to enable and inspire creativity. It features a large multi-aspect 16.8MP 4/3" MOS sensor to produce 12.8MP still images (4:3) and 4K Ultra HD video at 30 and 24 fps. So for AVCHD MTS files, we can see commonly from this camera, right?

What can we do to deal with MTS files for a nice editing in Premiere pro CC?
Are you a professional editing software user? If you are, you may want to edit Panasonic LX100 4K MP4 and 60P AVCHD/MTS video in Final Cut ProAvid, etc. Also, Premiere Pro CC is included. Pavtube MTS/M2TS Converter for Mac is a best easy-to-use and intuitive tool for Panasonic camera and camcorder users. It is focus on converting Panasonic AVCHD MTS  recordings to formats compatible with your editing software like Final Cut Pro (FCP X, FCP 7, FCP 6), iMovie, Premiere Pro, FCE, Avid Media Composer, Sony Vegas, and more.

Step-by-step details of Converting Panasonic MTS to MPG on Premiere Pro CC.
Add raw files> Run the program you just set up. Drag and drop the 4K/AVCHD video files to the converter. You can also hit ‘Add video’ button to import videos to the app. If you wanna combine several videos into one file, you can click the "Merge into one" box.


How to choose a correct output format?> Could you find the icon on the left of the preview window? Yes, click on the ‘Format’ button, choose the Adobe Premiere/Sony Vegas -> MPEG-2(*.mpg) as output format for editing raw AVCHD files in Adobe with natively supported video codec. 


Need more advanced settings? Just click the ‘Settings’ button on the main interface, there we can customize advanced audio and video parameters like Video Codec, aspect ratio, bit rate, frame rate, Audio codec, sample rate, audio channels.


With all the preparation work done? Back to the main interface and hit the ’Convert’ button, with a 6X faster speed, it will not waste us a lot of time of waiting. For a further editing in Adobe Premiere Pro CC, this MTS converting assistant can do a big favor, right?

Editor's Recommendations