Wednesday, February 11, 2015

Supported Video Formats for iPad Air and iPad Mini 3 with Retina Display

Featuring the world’s most advanced A7 processor, ever faster performance, 2048-by-1536 resolution retina display and powerful apps, iPad Air and iPad Mini are destined to hold onto Apple’s dominance in the increasingly competitive tablet market. As soon as the iPad Air and iPad Mini released out, with the high definition resolution, all Apple fans are fond of watching movies on iPad Mini and iPad Air, right? However, not all video can be accepted by iPad tablets.


First of all, we should have a talk on the best supported video formats, that may be the most important point for watching various videos on iPad. Especially for those incompatible ones, such as FLV videos download from video websites. In most cases, this issue is caused because the video file format is incompatible with iPad. So here we list the supported video formats for iPad Air and iPad mini with retina display for your reference.

Part 1. Best supported video formats for iPad Air and iPad Mini
A: Video formats supported
H.264 video up to 1080p, 60 frames per second, High Profile level 4.2 with AAC-LC audio up to 160 Kbps, 48kHz, stereo audio in .m4v, .mp4, and .mov file formats; MPEG-4 video up to 2.5 Mbps, 640 by 480 pixels, 30 frames per second, Simple Profile with AAC-LC audio up to 160 Kbps per channel, 48kHz, stereo audio in .m4v, .mp4, and .mov file formats; Motion JPEG (M-JPEG) up to 35 Mbps, 1280 by 720 pixels, 30 frames per second, audio in ulaw, PCM stereo audio in .avi file format。

B: Audio formats supported:

Audio formats supported: AAC (8 to 320 Kbps), Protected AAC (from iTunes Store), HE-AAC, MP3 (8 to 320 Kbps), MP3 VBR, Audible (formats 2, 3, 4, Audible Enhanced Audio, AAX, and AAX+), Apple Lossless, AIFF, and WAV.

Part 2.Any good methods of converting incompatible ones for iPad Air and iPad Mini
Besides for the iPad supported video formats, we are going to introduce you a professional one to make them suitable for watching on Apple tablets. Pavtube Video Converter for Windows/Mac. With a good reputation, it can transcode various incompatible ones to iPad Air or iPad Mini. 

Specific steps on converting other formats for playback on iPad Air/iPad Mini:
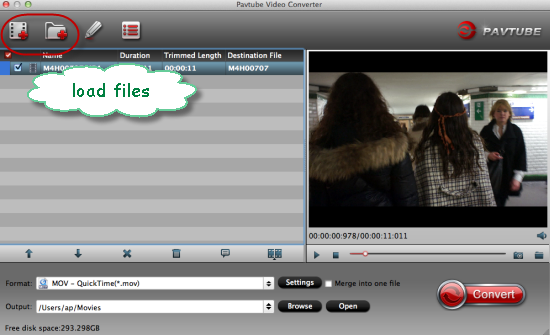
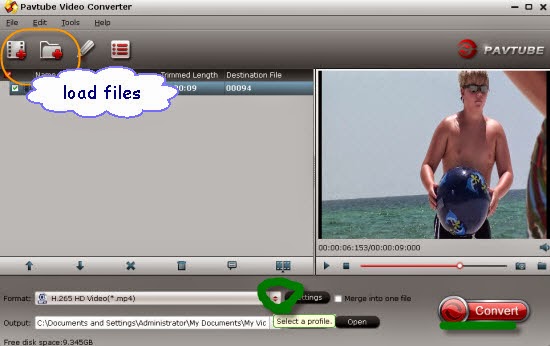
Step 1. Launch the video converter for iPad, of course you will find it is available for you to drag your files in directly. With other ways? Click the ‘Add video’ and ‘Add from folder’, we can import source files too. 


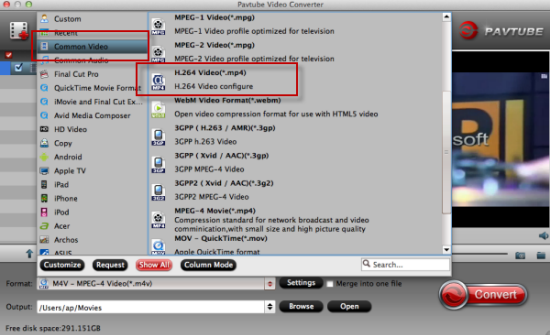
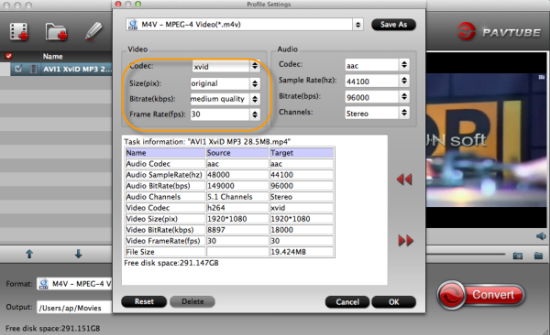
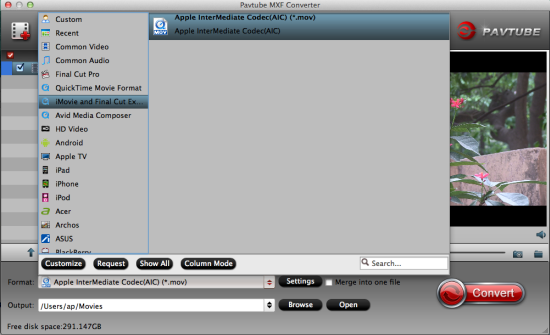
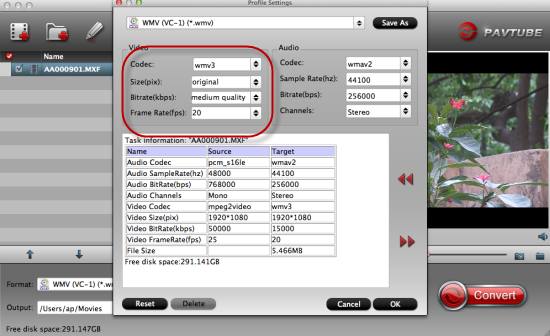
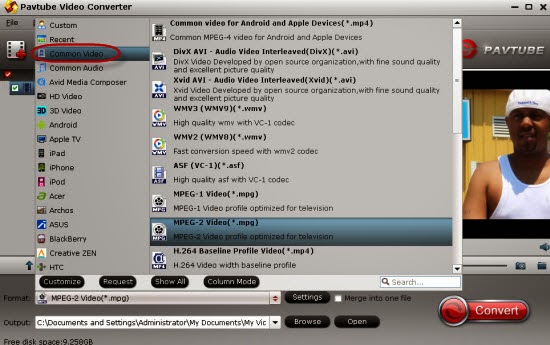
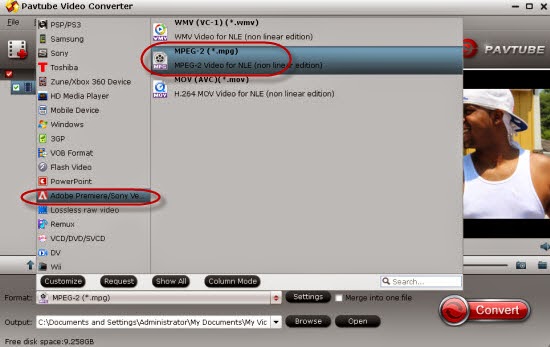
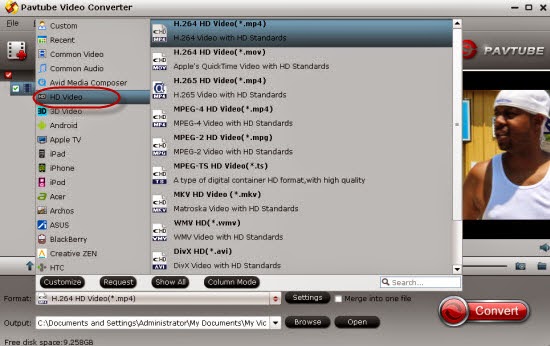
Step 2.Choose the output formats, there are professional ones for different devices and editing tools on the output list. Especially for Apple tablets, we are going to suggest you to choose the ‘HD Video’>>’H.264 HD Video (*.mp4)’ as the suitable ones for iPad as you know.


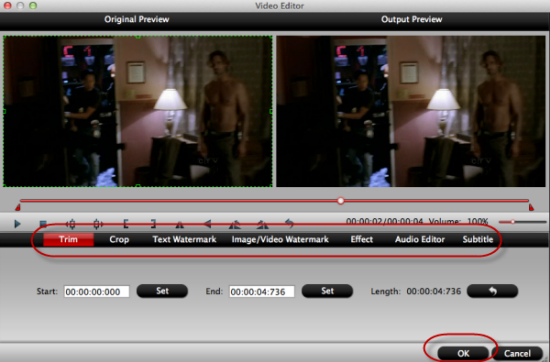
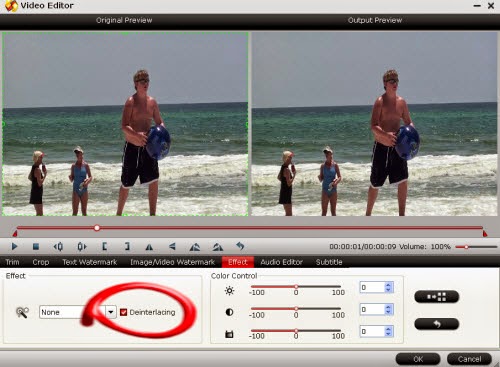
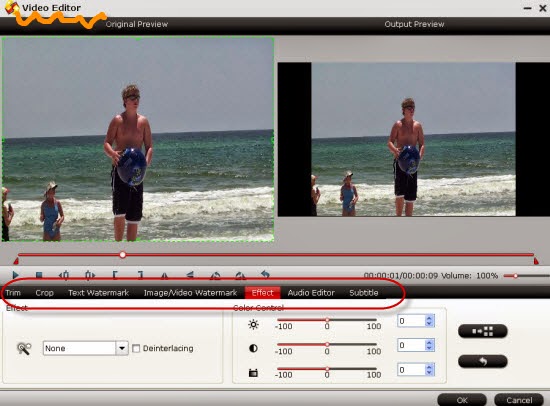
Step 3. Enjoy your best video effect on iPad? Why not get into the ‘Edit’ button to adjust the video effects? Such as the ‘Crop’ , ‘Trim’ or other functional items. You won’t be disappointed with this function.


More tips: With this professional Windows iPad video converter, I have to mention that as soon as the Pavtube claimed it can support the H.265/HEVC movies. With the higher and smaller size, you may enjoy the high definition videos there.

Conclusion: When you have finished the preparation job, why not go back to the main interface to click the ‘Convert’ button to start the conversion? With the best iPad video converter and the list of supported video formats, you won’t worry too much about this problem, right? Also, here are the tips on how to transfer files into iPad form iTunes you can take a reference.

More:

Monday, February 9, 2015

Add FLV Files to iTunes for Playing on iTunes/iPad/iPhone/iPod

iTunes only supports MP4, MOV and M4V formats? In most cases, most Apple fans consider that iTunes has the limitation on various video formats. For example, if you wanna watch your FLV video on iTunes/iPad/iPhone/iPod etc, you must give yourself a headache! That's because FLV is not an iTunes-supported video format. You can't directly import these FLV files to iTunes. Today here are talking about this topic!


Causes we may know why iTunes cannot accept the FLV videos:
The reality is that iTunes don't support FLV and no video will play under that format. The simple logic is that FLV falls under the Flash Video category thus will only play when a devoted flash player is used. AVA is another format in the category of FLV that is not supported by iTunes. For a video to play on iTunes, it has to be under any QuickTime compatible formats like .mov and .mpeg4. Therefore, you must have a suitable QuickTime extension before the video you have on FLV format plays on iTunes. For example: Stream FLV to Google ChromestWatch FLV movies on Kindle Fire?

Professional FLV to iTunes Video Converter can help us a lot:
Pavtube Video Converter for Mac is a nice Mac application with a simple design that makes it easy to convert most of popular format including FLV to iTunes compatible files. It allows you to convert public and private videos for using on different video devices like Smart phones, iPhone, Apple TV, etc. Wanna know more details on this video converter’s review?

Instructions to explain how to convert FLV videos into iTunes:
Step 1. Add your FLV files
Choose your video file by clicking on the "Add File" button and select the FLV files you want to convert to iTunes. You can also add your files by dragging and dropping them into the project area of FLV to iTunes converter.


Step 2. Select the right output format
As we mentioned above, we here should choose the suitable output to make our files accepted by iTunes.  For reference purposes, here are the video format with their extensions for Apple iTunes: .*MOV, .*MP4, .*M4V, .*MPEG, .*AVI, .*3GP. For example, you can select the ‘HD Video’>>’H.264 HD Video (*.mp4)’ as the suitable output ones.


Step 3. Edit your videos in own style?
Feature-rich editing functions are provided so that you can easily merge, cut, split, crop, flip and rotate videos, apply special effects to videos in ‘Edit’ button. To achieve a nice enjoyment, this function icon is deserved for us to have a try.


Conversion: Press the "Convert" button on the bottom-right corner of this FLV to iTunes Video Converter to start performing video conversion. Now, you can see the conversion progress. And the conversion speed is mainly affected by the size of files that you're converting and your computer's performance. Additionally, do you know how to transfer videos to iTunes

See Also:

Friday, February 6, 2015

Nicely Converting Various Videos to ProRes or H.264 on Mac

Summary: A nice guide offered here for you to make some changes for your recordings with different formats such as MTS, MXF, etc. Edit in NELs or play on media players? For example, from MTS to H.264 for iTunes? All the work you can do here with a powerful video assistant.


As a friend who works with corporate videos, it is necessary for him to change the shot footage into others for their customers frequently. Such as the needs for ProRes, H.264 or Flash videos, etc. On the other hand, we record the videos usually with different cameras, as you see below, Canon, Sony, Panasonic, etc. Due to this kind of situation, it has become a litter hard for us to handle this job well.

Now, the main character will pop us here in this guide. A professional video converting assistant can attract your eyesight. Pavtube Video Converter for Mac, which has so many main features that can convert all your videos to what you want with a nice operation on Mac. Also Windows version is allowed here.

  • Output suitable formats for different Mac editing tools
  • Faster conversion speed and easy operation
  • Edit videos through trimming, cropping, adding water marks, etc
  • Turn various HD/SD videos as watchable for media players

Main conversion steps you should know here if you need:
For a first step, according to its instructions, we should install the program successfully on our computers, with two buttons we can easily import our source files. ‘Add video’ and ‘Add from folder’. For different choices as output, we must choose suitable ones on the output list, such as for ProRes, we should select the ‘Final Cut Pro’>>’Apple ProRes Codec 422(*.mov):


For H.264 codec as you want? ‘Common Video’>>’H.264 Video (*,mp4’)/’H.264 Video (*.mov), both of them you can make a choice. For FLV?’Flash Video’ there you should pay attention to well. Any common formats here you can set as you like.


What’s more, to make it more suitable for media players, why not go to the ‘Settings’ item to adjust more? For example, video codec, video size, bitrates, or audio channels, after that, we can enjoy the nice effects there.


Now, do you feel it is easy to handle all various video to your customers? With this powerful video converter, you can just enjoy the work for a lot of fun! Finally, don’t forget to tap the big red button ‘Convert’ on the main interface to get your work started! Thanks for reading!

More guides listed here:

Wednesday, February 4, 2015

Let’s Ingest Panasonic AJ-PX800 H.264/AVC MXF to iMovie/FCE

In the following post, we would like to introduce you guys an easy and direct way to work our Panasonic AJ-PX800 h.264/AVC MXF recordings well with the popular editing tools iMovie/FCE. Just follow the article written below, with several steps, it will not annoy you too much after converting AJ-PX800 AVC/MXF files to AIC MOV for iMovie and FCE. But do you know the best supported formats for iMovie and FCE?


What kind of troubles did you get with Panasonic AJ-PX800 camcorder?
I shoot with a Panasonic AJ-HPX3700 camera, which shoots .mxf files. While my workflow with iMovie or Final Cut Express doesn’t work perfectly with these files. There are always some ‘Unsupported’ errors appeared on the screen. So here comes my question, does anyone know a good batch converter to convert the Panasonic AJ-HPX3700 P2 .mxf files?’

Transcoded editing is required in some situations, and this makes a video converter product very valuable. What a coincidence! Pavtube MXF Converter for Mac is such an suitable easy to use converting assistant especially designed for MXF recordings. With a good reputation online, it has become popular among our professional editors. For example, it can make MXF files smoothly edited in FCP or Premiere Pro etc. 

Guides below can show you the complete process of converting Panasonic AJ-PX800 MXF to AIC MOV for iMovie and FCE.

From the official website, we can download and install the program according to its instructions, with the ‘Add video’ button we can load original MXF files in. Drop down the output list, nearly on the bottom of the list we could find the right one we want there. ‘iMovie/Final Cut Express’>>’Apple Intermediate Codec (AIC)(*.mov)’ could be the best one.


Optional tips here: For those advanced users, some items on the main interface, such like the ‘Settings’ button, we can choose the suitable video codec, video size, frame rate or even the audio channel here. Surely we can set them in the original default.


Go back to the main interface, when you did all the preparation work, click the big red button ‘Convert’ we can get our work started. Additionally, if you are the first time to work with the hot editing tool iMovie, we here also have the related guide on how to transfer files into iMovie for nice editing.

Related:

Monday, February 2, 2015

Easily Deinterlace All Kinds of Interlaced Video Files on PC/Mac

Have you ever got the experience of deinterlacing different video files for playback on PC or Mac? Which way do you consider as the best to deinterlace your movies? To pursue a better effect of watching your deinterlaced video footage, in the following article, we are providing three parts of what, why and how we should deinterlace our various videos. Let’s have a look below.


Part 1. What does deinterlacing videos mean?
Deinterlacing is the process of converting interlaced video, such as common analog television signals or 1080i format HDTV signals or recorded movie footages, into a non-interlaced form that can be playable on modern non interlaced display devices like LCD or Plasma screens.

Part 2.Why we need to deinterlace our video files?
Interlacing only looks right on an old tube TV (Cathode Ray Tube, or CRT). If you have an LCD or plasma, interlaced video looks horrible. For example if you interlaced movies causes lines, color fuzzing specks, and blurriness when an object is moving when played back on a pixel discreet monitor such as the LCD screen.

Part 3. How can we deinterlace our videos with nice effects?
Here we would like to introduce you the best video deinterlacer called Pavtube Video Converter for Windows/Mac, which is not only a good video deinterlacer but also a nice video converter that can hold all the incompatible videos well. After reading this review, moreover, we can also know the editing functions in this video converter. Do you wanna a try?

More steps we can learn to deinterlace our video files.

Step 1.After you download this program, step into the main interface, we can click the ‘Add videos’ to add load our interlaced videos in. 


Step 2. Set for deinterlacing. On the top of the main interface, click the ‘Edit’ button and get into the column, and here we suggest you to tap the ‘Effect’ item to tick on the icon ‘Deinterlace’ to suit our requirements. Other editing functions you can also have a try.


Step 3. Have you ever got some needs of converting your original videos. If you indeed have the requirements, please go to the ‘Format’ bar to search the output video formats on the output list. In common situations, we suggest you to go to ‘Common Video’ to find more items you may need.


After done that, please select output format and click “Convert”, then the converted videos files could be very perfectly enjoyed on your Monitor or HDTV without interlacing artifacts. Now you have know better about this video deinterlacer, with the easy operation work and fast conversion speed, all of you can enjoy it more! What are you waiting for?

Others?

Friday, January 30, 2015

Windows Movie Maker Won't Import GoPro Hero 4 MP4 Files? Fixed!

Summary: In the following article, we will show you an example that Windows Movie Maker cannot play the MP4 footage which shot by GoPro Hero 4 cameras. Why could this situation happen? Some reasons and solutions are offered below to teach you how to convert our GoPro MP4 files to WMV, which e all think the best one for Windows Movie Maker. 

In fact, before we start our topic on GoPro Hero 4 MP4 and Windows Movie Maker, let me show more details on this GoPro Hero 4 camera, okay? This kind of action camera can capture stunning 4K footage in extreme settings(30fps). Of course 2.7K50, 1440p80, 1080p120, 960p120 and 720p120 fps for crisp, smooth footage are supported as well. If you record some 4K videos, things would be a little more complicated when you work with the 4K MP4 files in Windows Movie Maker. 

Hot search: GoPro Hero to VLC | Play GoPro Hero 4K Videos on Mac | GoPro Hero 4K Video to Vimeo | GoPro Hero to Sony Movie Studio | GoPro Hero to DropBox 


For a further knowledge of GoPro MP4, it is not only compatible with Windows Movie Maker, but also some other popular editing tools like or FCP X/7, or Premiere Pro , etc. Or Upload to YouTube? You must need some related assistants. Fortunately, we here found a related article to help you out of the trouble in editing GoPro Videos

So how could we deal with GoPro Hero 4 MP4 files on Windows Movei Maker? Don't worry, here is a professional GoPro MP4 Video Converter ( Pavtube Video Converter ) I would like to introduce to you. (For Mac version?) Which is the best Video Converter for GoPro Hero4 footage, which will create an Windows Movie Maker friendly file format- WMV keeping the original quality in Windows XP/Vista/Windows 7/Windows 8. Besides Movie Maker, this software can also export professional encoders like DNxHD for Avid, ProRes for Final Cut Pro, AIC MOV for iMovie, MPEG-2 for Premiere Pro and more. 


Other Download: 
- Pavtube old official address: http://www.pavtube.com/video_converter/ 
- Amazon Download: http://download.cnet.com/Pavtube-Video-Converter/3000-2194_4-75734821.html 
- Cnet Download: http://download.cnet.com/Pavtube-Video-Converter/3000-2194_4-75734821.html 


Step by step guide is allowed here to teach you how to edit 4K MP4 files in Windows Movie Maker with HD WMV. 

Step 1: Load your Source Videos 

When you correctly install the 4K MP4 toWMM Video Converter, launch it and the main interface will pop up there. With two buttons we can load our files in, 'Add video' can load you files with individual clips, or 'Add from folder' can load them in whole folder. They will listed on the blank there. 


Step 2: Choose the suitable output for Windows Movie Maker 

Follow the steps to come to the output list, in order to preserve the original high quality, we suggest you to come to the 'HD Video' select the 'WMV HD (*.wmv) as the best. Look the screen shot below: 


Step 3: Set your output video resolution? 

Click the 'Settings' button on the main interface, you can adjust video and audio settings, including codec, aspect ratio, bit rate, frame rate, sample rate, and audio channel. For example, from 4K to 1080p WMV, do remember adjust video size to 1920*1080. You will not miss this function. 


Step 4: Finally, back to the main interface to hit the 'Convert' button, we can start the conversion as we want. When the conversion finished, check the generated 1080p video, you will certainly be satisfied with its final video quality. It would be easier for you to playback and edit in Windows Movie Maker. 

Hot News!!! Pavtube Summer Promotion has become something of a tradition, and it's back for 2015. Giveaway and Save up to 50% OFF for new Pavtube Software owners, this sale runs until Aug 7, 2015.  

More related tips: 

Wednesday, January 28, 2015

Why Sony Vegas Pro 12 Won't Import Any Videos Such as MTS/MP4?

As someone reflect that they are often refused when importing some recordings to Sony Vegas Pro for editing. In most cases, MTS and MP4 are typical common ones that not suitable for Sony Vegas Pro according to some errors or screen conflicts appeared there just like the example below:

‘I used Sony Vegas before yesterday, everything was fine. Today, I import a MP4, M2TS, and TS and they didn't want to open. I have QuickTime; Latest version. When I tried to import m2ts, it says that could not be found. I tried converting the files to avi and still the same. Help me!’


Sony claims that Vegas Pro 10/11/12/13 supports most commonly-used video codecs, including the MP4 (MPEG-4). However, problems like "Sony Vegas won't Open MP4 files" come up from time to time. In fact, the native import of some flavors of MP4 wasn't supported in Sony Vegas Pro 12. In addition, based on our testing, some MP4 files will import into Sony Vegas Pro without QuickTime perfectly. Of course some HD video formats are not available for Vegas pro, such like MOVXAVC or even the latest codec H.265 videos, etc.

Solutions: Install the Pavtube Video Converter for Windows (For Mac version?), which is designed for converting almost all videos to various NLEs or media players, including transcoding MTS or MP4 to MPG as the best one for Sony Vegas Pro 12. It is much easier and more effective than any other third-party converting plug-ins. 

Guide on converting MTS/MP4 to compatible formats for Sony Vegas Pro 12:

Step 1. Add your source files
You can drag any video file and drop to the program or add them by clicking Load Video button. It allows you to add several video files (including but not limited to MP4, VOB, MKV, MPG, TiVo, WMV, etc.) at a time and convert them at one go.


Step 2. Seeking suitable output ones

In the Profile tray, switch to ‘Adobe Premiere Pro/Sony Vegas’ to choose the ‘MPEG-2 MPG’ as the output format. In fact, the output videos seamlessly fit Sony Vegas Pro 10/11/12/13.


Tips: By clicking the Settings button beside Profile, you can adjust the output video/audio resolution, frame rate, bit rate, etc. to customize the output files to get the best quality you want.

Step 3. Start converting MP4 to Sony Vegas Pro
Go back to the main interface and hit the ‘Convert’ button there, we can easily start the work on converting MTS/MP4 files to MPG for editing in Sony Vegas Pro 12. Once the conversion done, you can click "Open" button to get the output files effortlessly.

Additional tips: We have to mention that with latest version of this Windows Video Converter, we can encode/decode the newest H.265/HEVC videos nicely here. You have my words that you can enjoy the higher quality and smaller sizeH.265 brought to us!

Read More: