Sunday, June 7, 2015

How to compress MOV file to MP4 on PC or iMac?


There aren’t that many really popular video formats, and MOV is one of the leading contenders. The incompatibility of formats between different platforms and devices can still be a problem for many users. For example, big file size of mov recorded from camera/camcorder is hard to be played and your devices has limited storage space. And if you want to convert files to other equipment for editing, such as Avid Media Composer, Windows Movie Maker, Sony Vegas, Adobe Premiere Pro, Android/ Apple devices, or playing on computer,what to do?


The easiest way to resolve this problem is to compress MOV files to another file type that is more widely supported by devices and operating systems, such as MP4 (MPEG-4). Read this tutorial on how to compress or convert MOV to MP4, then install the program and give it a try yourself.

We highly recommend you Pavtube Video Converter, the best video movie compression software to help you compress MOV file to MP4 for editing and playing on Windows. If you are running on Mac, you can turn to the equivalent version Pavtube Video Converter for Mac
There’s also a Free MP4 Players for Windows/Mac. If you want to learn more, please read.

More details are allowed here for you to take the advice:

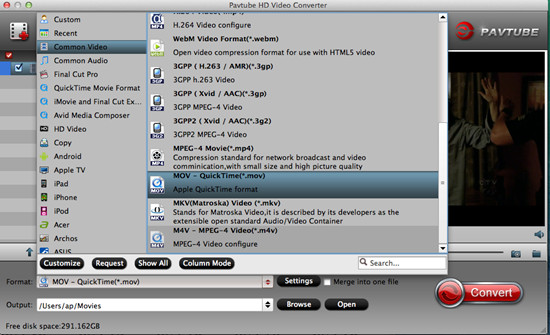
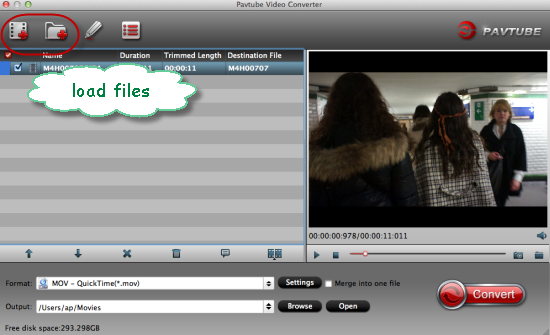
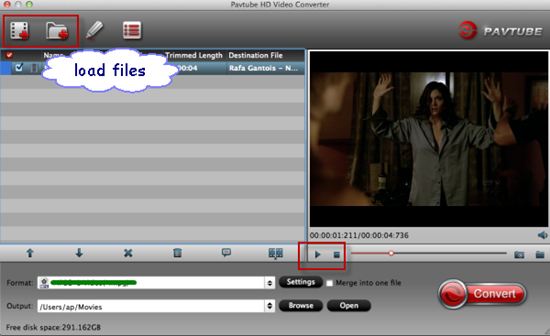
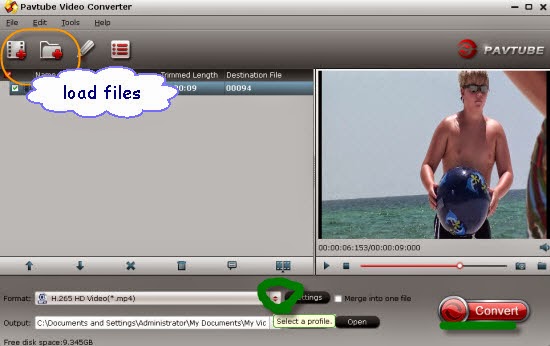
Step 1: Download and install the corresponding version. Click “Add video” on the main interface to load MOV files to the program. You can also drag the files to the program’s window list directly. This program can also support the batch video clips.


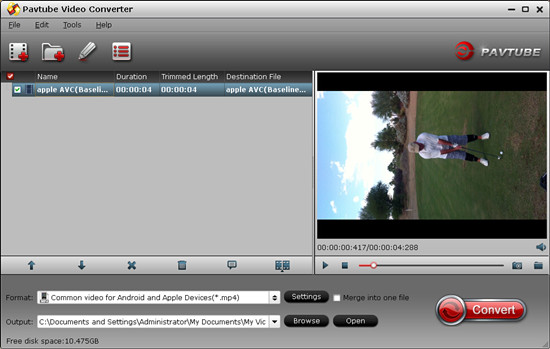
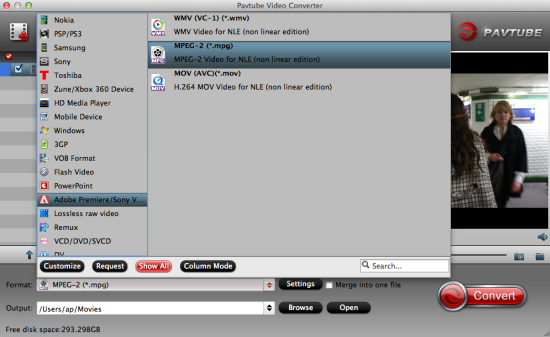
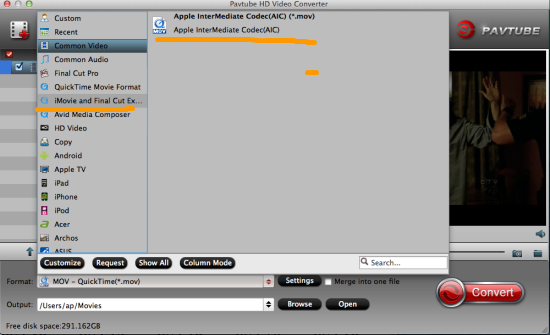
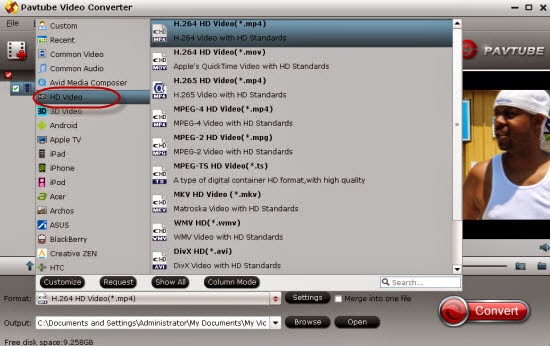
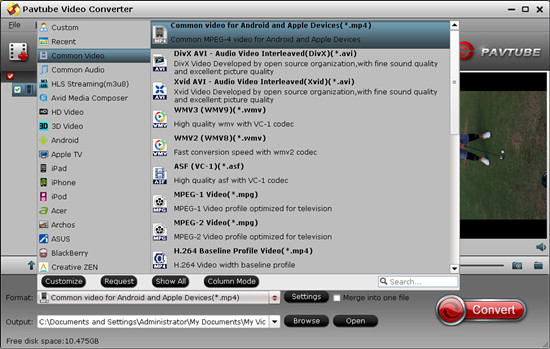
Step 2: Open the list of supported formats by clicking the convert to section. Locate the collection of MP4 presets and select the one that will work best for your target devices.


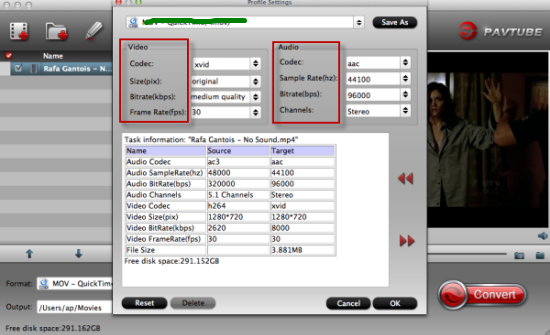
Step 3: If you want a smaller size when the free apace is not enough, you can click "Settings" to adjust Bitrates (kbps) and Size (pix). Choosing a little lower Bitrates and Size will help you to get a smaller target file, but it also leads to a lower video quality in saved file. Don't forget the balance between video quality and size.

Step 4: Click the “Convert” button to start compressing MOV files to MP4. After the conversion, click the ‘Open’ button to locate the output files and transfer the files to other equipment for editing or playing on computer.

The guide is very simple. If you want to learn more, you can see more products on our official website.

Further Reading:

Monday, June 1, 2015

Enjoy NX300 60p MP4 Footage on QuickTime Player

Summary: No methods when importing NX300 60p MP4 footage to QuickTime for playing? Why don’t you convert 60p MP4 to QuickTime MOV as we all know the suitable format for enjoying in QuickTime Player?


The Samsung NX300 captures video as an MP4 file using H.264 compression method and records Full HD 1080p at 60fps. It can also record 30fps or 24fps. Sound is captured with in-camera stereo sound. The Samsung NX300 produces just as good video results as it does still images. While as we are now talking about the MP4 footage, it is the common format that can be accepted by some NLEs and portable devices, but for playing on common media player like QuickTime, we cannot directly import them in. This is the format limitation that we may usually meet.

“Hi, guys, I’m just wondering if there’s a smooth way to work with Samsung NX300 60p MP4 in QuickTime. I’m trying to enjoy the video I shot. The thing is that the video playback is very ‘choppy’. Is there a way to go about this problem? Any clues? I would really appreciate any help. Thanks.”

While, the audio, subtitle or other media source that embed in MP4 might have different codecs. That’s the key QuickTime refuses to recognize NX300 60p MP4 footage. The limit compatible video formats, to be frank, really reduce our joy. In order to fix this, we need to convert MP4 to QuickTime MOV which is supported by QuickTime Player. Note that MOV is the default format of Mac OS X Yosemite. For a fast and fluid workflow, Pavtube HD Video Converter for Mac is highly recommended. Generally speaking, it is not a converting tool which can easily transcode the MP4 footage to QuickTime MOV, but also an editor that can adjust the output video parameters for advanced users.


How to convert NX300 60p MP4 footage to QuickTime?   

Step 1: Download and have a quick installation. The trial version will have a watermark on your converted files. Except for that, there are no time limitation, no virus, and no unnecessary bundle apps while downloading. After that, click “Add Video” button to load NX300 60p MP4 footage. You can load several files at once thanks to “Add from folder” button.


Step 2: Here, you need to choose what you want the output to be. Click “Format” drop-down list, and then select “Common Video>>MOV- QuickTime (*.mov)” as the best output format.


Step 3: Click “Settings” button to customize the output video and audio settings by yourself. But if you are not good at it, you’d better use the default parameters, they will ensure you a good balance between file size and image quality basically. You can change the resolution, bit rate, frame rate as you need.

Step 4: When everything is done, you can take a preview by hitting “Play” button. If you are satisfied with the final result, you can click “Convert” button to finish the conversion work.

Conclusion: When the conversion is done, you can click “Open” to get your generated files. Now, you can enjoy Samsung NX300 60p MP4 footage on QuickTime without any hassles.

Further Reading:

Thursday, May 28, 2015

Edit Alpha 77 Mark II AVCHD MTS in Avid MC on Yosemite

Summary: If you are searching the workflow on how to get Sony Alpha 77 Mark II AVCHD MTS to Avid Media Composer on Yosemite, the page here can show you a wonderful workaround. Are you interested in joining us to have a discussion?


The Sony Alpha 77 Mark II is the sequel to a camera series that bowled us over last year. Now it has come to us. In addition to highly detailed stills with smooth gradations, the Alpha 77 Mark II now has access to the high-bit-rate AVCHD MTS format with 60p, 30p, and 24p recording options, all at 50 Mbps. Why is Alpha 77 Mark II so popular among photographers? Though more and more HD cameras have been released by Sony, Alpha 77 Mark II has the stable shooting ability and the high definition output footage AVCHD.

With its advantages appeared, disadvantages are not hidden. While enjoying the stunning image quality, many folks may find it a painful experience to import Sony Alpha 77 Mark II AVCHD MTS to Avid Media Composer for further editing. “I just have a Sony Alpha 77 Mark II camera on hand. I’m wondering what people are using in order to get the AVCHD MTS files from Alpha 77 Mark II work with Avid Media Composer. I shot the video in 1080 60p, I found the AVCHD MTS clips cannot be recognized by Avid MC. How can I solve the import issue?”

Main Supported Video Formats for Avid Media Composer:
DNxHD: This is Avid’s baby. All kinds of DNxHD are supported natively via either of the import methods mentioned above.

H.264: H.264 is the ubiquitous codec, and it looks like it will stay for quite some time. Avid Media Composer supports H.264 natively, via AMA as mentioned above.

MPEG-4: Like H.264, Avid Media Composer supports MPEG-4 natively, via AMA as mentioned above. The Quicktime plug-ins are installed by default.

Several main Avid Media Composer are listed above, may be the DNxHD can be the best codec which is the most native one for Avid. However, someone there will be confused: How could we import those incompatible videos to Avid for editing? Such as Alpha 77 Mark II AVCHD MTS and etc. Fortunately, you won’t worry about that, for seeking the best codec for Avid, we here can strongly introduce you the Pavtube MTS/M2TS Converter for Mac, which has the strong ability of converting all different videos for editing in various NLEs.


How to edit Alpha 77 Mark II AVCHD MTS in Avid MC on Yosemite?

Step 1: Connect your Sony Alpha 77 Mark II camcorder to Mac via USB cable and find the AVCHD MTS files from the camera folder. Then copy and transfer the AVCHD MTS files from Alpha 77 Mark II to the Apple hard drive disk.

Step 2: Import Alpha 77 Mark II AVCHD MTS files to Mac MTS Converter. Run it as the best Mac MTS Converter, and click the “Add video” button to load AVCHD MTS files. You may also directly drag and drop AVCHD MTS videos to application UI for importing files.


Step 3: Click the “Format” option and navigate the mouse cursor to “Avid Media Composer>>Avid DNxHD (*.mov)” as output format.


Step 4: When everything is ready, click “Convert” to start converting Alpha 77 Mark II AVCHD MTS to DNxHD. This Mac MTS/M2TS Converter supports batch conversion so you may load multiple files and convert them at one time.

Conclusion: Now, you can edit Alpha 77 Mark II AVCHD MTS files in Avid Media Composer freely. Good news! During May 29th to June 1st, you can get our part products 40% off. Why not take a close look at our event and have a try? Happy weekend!

Further Reading:

Monday, May 25, 2015

4K to iMovie: Import DJI Inspire 1 4K Footage to iMovie for Editing

Summary: What aspects do you use for your DJI Inspire 1 4K footages? How do you usually play, edit or upload your Inspire 4K videos? Here is a tutorial on how to import DJI Inspire 1 4K footage to iMovie for editing on Mac Yosemtie.


DJI Inspire camera can shoot up to 4K footage with MOV/MP4 format capture 12 megapixel photos. With this high definition image ability showed to us, DJI Inspire has attracted a lot of users. While on the hand, it has also confused most people in playback 4K files on such like tablets or edit in NLEs like iMovie and etc.

“I am doing some DJI Inspire 1 4K video editing. I see my desktop is very powerful. However, when I playback the video in iMovie, it's very choppy, and not easy to do the editing. Does any pros have any idea on 4K in iMovie workflow? Much appreciated!”

The reason why iMovie can’t handle 4K footage is simple. Currently 4K footage is not widely supported yet, only a few video editing program like FCP X can support it. In order to edit DJI Inspire 1 4K footage in iMovie smoothly, the easy workaround is to use third-party software to rewrap and convert DJI Inspire 1 4K footage to iMovie more “editable” format Apple InterMediate Codec MOV. With the help of Pavtube Video Converter for Mac, you can finish the task easily and quickly.

In general, you can effortlessly encode DJI Inspire 1 4K footage for smoothly importing and editing in various NLEs including Adobe Premiere Pro, Avid Media Composer,Final Cut Pro, FCE and more. Besides, DJI Inspire clips, it also can deal with other video formats such as MKV, MTS, MXF, FLV and etc. If you are a PC user and willing to transfer DJI Inspire 1 4K footage on PC, Pavtube Video Converter Windows version is your first choice.


Keep reading for a brief how-to on the simple process:

Step 1: Download and have a quick installation. The trial version will have a watermark on your converted files. Except for that, there are no time limitation, no virus, and no unnecessary bundle apps while downloading. After that, click “Add Video” button to load your 4K videos from DJI Inspire 1. You can load several files at once thanks to “Add from folder” button.


Step 2: Click the “Format” bar to get the drop-down menu and you can get “iMovie and Final Cut Express”. Choose “Apple InterMediate Codec (AIC) (*.mov)” as best output format.


Step 3: Click “Settings” button to customize the output video and audio settings by yourself. But if you are not good at it, you’d better use the default parameters, they will ensure you a good balance between file size and image quality basically. You can change the resolution, bit rate, frame rate as you need.

Step 4: When everything is done, you can take a preview by hitting “Play” button. If you are satisfied with the final result, you can click “Convert” button to finish the conversion work.

Conclusion: When the conversion is done, you can click “Open” to get your generated files. Now, you can edit DJI Inspire 1 4K footage in iMovie without any hassles.

Read More:

Tuesday, May 19, 2015

Samsung NX500 H.265/HEVC to Premiere Pro CS 6/5/4/ Workflow

Are you looking for the best workflow between Samsung NX500 H.265/HEVC recordings and Premiere Pro CS 6/5/4? Just follow the post below, here we can offer you the best method to covert Samsung NX500 H.265 to Premiere Pro CS supported formats for editing. 


What Samsung NX500 4K camcorder differs from others?
As a 4K-capable camera, the NX500 Mirrorless Digital Camera from Samsung is among the most compact cameras in its class. Aside from 4K/24p, video can be recorded in Ultra-HD, at 30p, as well as in full HD up to 60p. To save space without sacrificing quality, the NX500 employs H.265 (HEVC) compression, which can capture extreme details using half the storage space typically used for HD recording. All above may be the outstanding features which can attract our eyesight.

Detailed explanation of Samsung NX500 H.265 and Premiere Pro CS 7/6/5
The Samsung NX500 camera records 4K H.265 videos in AVI/MP4 format, but the only problem is, HEVC/H.265 has not yet been accepted by most media devices, editing software like Premiere Pro, and FCP X, etc. So if you wanna edit your H.265/HEVC footage so nicely, it is necessary for us to find a professional H.265/HEVC decoder to transcode the files well. 

Best H.265/HEVC decoder for Samsung NX500 4K camcorder---Pavtube Video Converter for Mac
With it, you not only can convert Samsung NX500/NX1 HEVC (H.265) videos to MP4, AVI, WMV, MOV, FLV for easily playing, but also can convert HEVC (H.265) files to the editing tools with professional codec, like MPEG-2 for Adobe Premiere Pro/Sony Vegas, DNxHD for Avid Media Composer, .etc. Besides, the built-in video editor allows you to modify your videos by trimming, cropping, adjusting video effects and more. Let’s just see how it works so well with H.265 files.

How to ingest Samsung NX500 4K H.265 footage to Premiere Pro CS 7/6/5?
Step 1: Start up Video Converter as a professional Samsung NX500 H.265/HEVC Converter for Adobe. When its main interface pops up, click ‘Add files’ to input your source media.


Step 2. Click “Profile” bar and choose the suitable output for premiere. Here when you come to the output list, we’d like to introduce you to select the ‘Adobe Premiere Pro’>>’MPEG-2 (*.MPG)’ as the best one.


Tip: If you want to customize the output parameters, you can click “Settings” button on the main interface and adjust the resolution, bitrate or others as you want. You can also keep them as default.

After finishing adjusting all the video and audio parameters, we have to go back to the main interface to click the big button ‘Convert’ to end the job well. Then we need to transfer the files into Premiere as usual. Editing Samsung NX500 H.265/HEVC recordings in Premiere Pro CS 7/6/5, it will not confuse us anymore.

More?

Friday, May 15, 2015

Solve Sony WX500 XAVC S to iMovie/FCE Issues

Why so many Sony fans would like to import the WX500 XAVC recordings to iMovie/FCE for editing? How could we solve the problems when editing Sony WX500 XAVC files in iMovie/FCE? With the strong function of this brilliant camera, let’s find the best solutions below.


Attractive features Sony WX500 camera brought to us:
  • Uses technologies from RX and Alpha series in a small compact form 
  • 18.2MP Exmor R CMOS 
  • 30x Zeiss Vario-Sonnar T* zoom lens with 60x Clear Image zoom 
  • Optical SteadyShot with 5-axis IS 
  • Compressed in XAVC with high definition

However, what a pity that iMovie/FCE cannot recognize these XAVC recordings. You may be failed in ingesting your Sony WX500 XAVC files to iMovie/FCE for editing due to its’ supported video formats. Fortunately, here is the easiest way to import the Sony WX500 XAVC files to iMovie/FCE---Pavtube HD Video Converter for Mac, which can decode the XAVC videos to those supported ones for iMovie/FCE. 

The program is an easy-to-use yet professional Sony XAVC Converter for Mac. It’s able to convert XAVC S files from Sony DSC-WX500 to iMovie/FCE more compatible AIC MOV videos. With it, you  may also encode XAVC to Final Cut Pro, Avid Media Composer, FCE, iMovie and more NLE programs highly compatible formats for editing. If you meet the XAVC to iMovie/FCE problems, just get this program to help us a lot. 

Notes: For all Windows users, we can get the Windows version to have a try! Such as playback WX500 XAVC on VLC?

Steps on converting Sony WX500 XAVC to AIC MOV for editing in iMovie/FCE:

Step 1.Install this trail version on your Mac before purchasing to make sure everything goes right. After launching this app , click “File”>”Add Video/Audio ” to load your XAVC files, you can double click it to have a review on the preview window.


Step 2. Select the right format for iMovie as output. Let’s go to the output list to find the ‘iMovie/FCE’>>’Apple Intermediate Codec(AIC) (*.MOV)’ as the best one.


Step 3. Click this “Settings” button, it will bring you to this UI , no matter the Bit rate or Frame rate, Size (pix) all here for you to make the adjustment. You can see the whole file size if you considering about uploading them online while the file size is required for smaller one.


Finally, we can go back to the main interface to hit the ‘Convert’ button to get the work stared. Then just open the output file folder and transfer the files into iMovie/FCE for further editing. For more functional advice, welcome to tell us.

More articles:

Monday, May 11, 2015

Edit/Play/Burn OBS Recorded 1080/60p Video on PC/Mac

In the following article, it explains the reason why we are failed to edit, play or even burn our OBS recorded 1080/60p videos on PC/Mac. If you have recorded some game footage with OBS (Open Broadcaster Software), you may get some issues when importing the OBS movie files on PC/Mac, especially for some hot editing tools and media players.


Further learning of OBS (Open Broadcaster Software):
Open Broadcaster Software is a great platform to broadcast live streams. Generally OBS saves files as MP4 or FLV. The files can be uploaded straight to YouTube or other video hosting site just fine. However, when you bring OBS to FCP for editing on Mac or merge the OBS clips together. So in this way, if you wanna edit or play your OBS files smoothly on PC/Mac, just follow the tips below.

How to easily add the OBS to NLEs or Players on PC/Mac?
If you're in such a situation, there is an easy way to fix the OBS issues on PC/Mac. The quick workaround is to transcode OBS FLV files to supported formats such for FCPPremiere ProiMoive, or HDTVs etc. Just download the Pavtube Video Converter for Windows/Mac to have a try, which is an easy-to-use yet OBS video converter, player and editor. It will save you both time and trouble on PC/Mac.

Steps on converting OBS 1080p/60p recorded videos on PC and Mac:
Step 1. Just download and install this program , then click the "Add" button to load the .flv or .mp4 videos. You can also use the drag-and-drop method to load the media files to the application UI.


Step 2. Come to the output list, there are so many items for output. For NLEs, you can choose the ‘Apple PreRes 422(*.mov)’ for ‘FCP’, ‘MPEG-2(*.mpg)’ for ‘Adobe Premiere Pro’/Sony Vegas’, etc. Or more formats for media devices? ‘HD Video’ interface is a good item.


Tips: Click the ‘Settings’ icon to adjust video and audio parameters on the Profile Setting as you need to get the best quality video. This is the functional option for those advanced users.

Now click the big “Convert” to start this easy conversion. Wait for a few moments; you can click “Open” to locate the converted video directly. Freely import your OBS video files on PC/Mac, all of us can do this job well.

Notes: For those people who wanna burn OBS videos as DVDs, here we can highly recommend the DVD Creator for Windows/Mac. With this professional DVD program, we can easily burn the OBS videos so nicely.

For more?