Could you help me get rid of the trouble when I import Sony PMW-EX1R MXF files in FCP X with 4 audio channels? Luckily you may find answers below.
Similar issues you will meet when importing Sony PMW-EX1R MXF to FCP X:
‘I have footage shot on the Sony PMW-EX1R which usually is imported straight from the camera as .mxf files. Then I convert the .mxf to .mp4 and import that footage into FCPX. This time however I rushed when importing the footage, selected only the .mov codec to import, returned the camera, and now only have the videos in .mov format. The .mov footage plays fine on VLC but on QuickTime and once imported into FCPX is completely green and silent. Am I screwed?’
Changes of MXF footage when editing in NELs:
Frankly speaking, no matter what kind of camcorders you got the MXF recordings, you may be trapped in if you have some ideas of importing MXF videos to After Effects,iMovie/FCE, etc. So do you wanna some MXF transcoding Tips? Fortunately, today here, in order to get rid of the related troubles such as crashing errors or screen warnings, we are going to discuss the efficient solutions for you.
From MXF to ProRes MOV---Pavtube iMixMXF can do you a big favor.
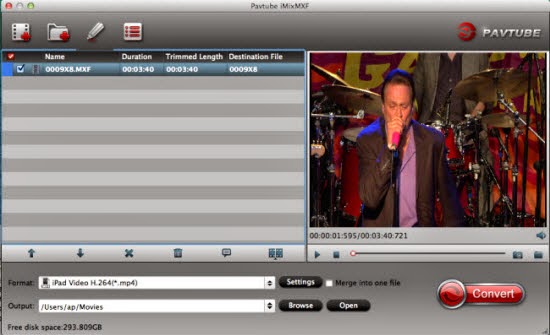
If you are the first time to hear about this MXF to FCP X converter, let me introduce you some details to you. In a word, this MXF converting program is specially designed for transcoding MXF recordings to various formats for NELs or media devices. Surely FCP X is included. Besides, this one can help you convert MXF to ProRes codec with multi-track audios. Is that cool? It can indeed preserve the multiple tracks. No needs for multiple audios? Why not have the Pavtube MXF Converter for Mac to have a try? What’s more, cause it has the additional function of editing tools we usually call it with another name ‘Tiny Editor’. Any interests?
Guide to teach you how to convert MXF to ProRes MOV for editing in FCP X:
Step 1. Load your original files:
Launch the multi-track MXF to FCP X converter. When the main interface pops up in front of our eyesight, just click the ‘Add video’ or ‘Add from folder’ to let our files in nicely.
Step 2. Choose Apple ProRes 422 as output.
Tick the clips you want to do changes and press the ‘Format’ bar to get into the output list. Obviously we can find the item we need. ‘Final Cut Pro”>>’Apple ProRes Codec 422 (*.mov)’ as the best. Additionally, if you need to preserve the multi audio tracks, just select the ‘Multi-track Video’ on the output list, then the ‘Multi-track MOV(*.mov)’ could be your best choice I think. As the follows:

Step 3.Choose the audios you need in your output videos.
Next, on the main interface, let’s click the ‘Settings’ there to get into the ‘Audio settings’ column. Just tick the audio channels you want to preserve there. So cool for those advanced users, right?

At the end of this page, we would like to offer you’re the transferring guide on how to transfer files to FCP X for editing if you are the first time to work with FCP X. Hit the ‘Convert’ icon to make your conversion work start. Now, I don’t know if you have any other problems when editing your Sony PMW-EX1R MXF recordings? Just let us know as comments below.
Related guides: