Showing posts with label panasonic. Show all posts

Sunday, February 9, 2014

Top MTS to FCP Converter- Fast convert Panasonic AG-HMC150 AVCHD to Prores HQ for FCP X

Description: Can't import Panasonic AG-HMC150 mts files to Final Cut Pro X? Follow the article below, you will get to know the easy way to transcode and deinterlace Panasonic AVCHD footage to Prores HQ for editing in FCP X editing.

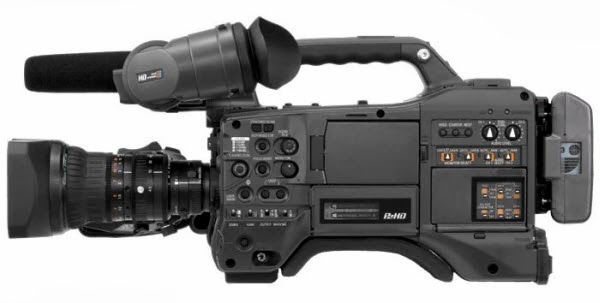
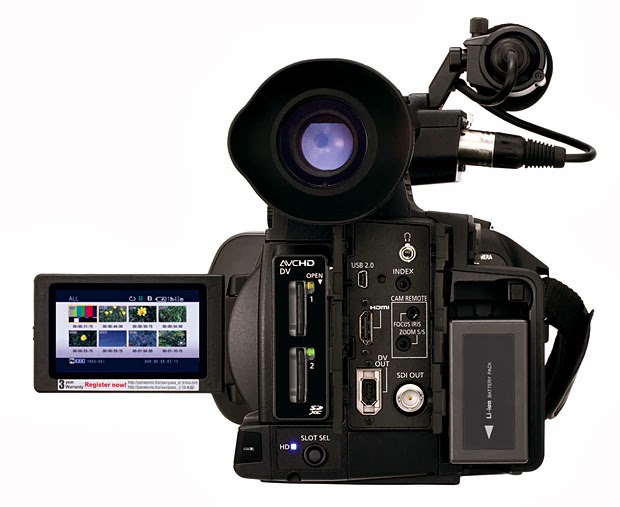
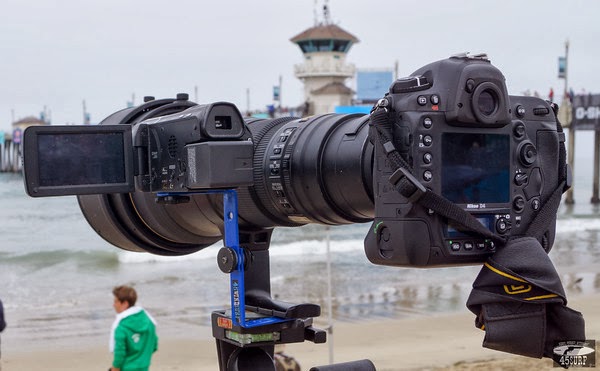
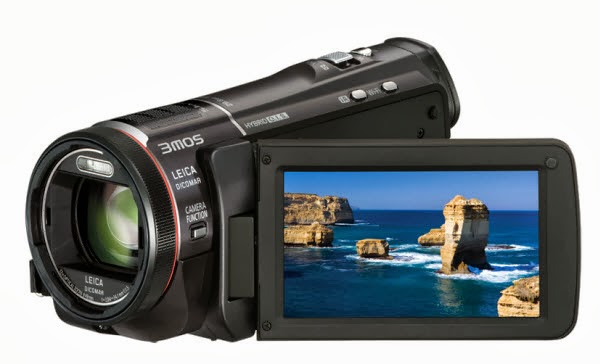
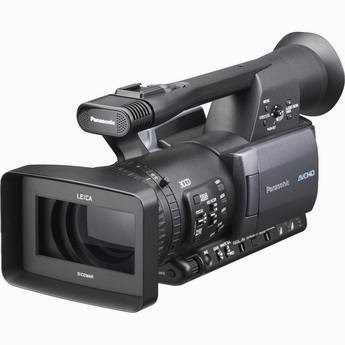
The Panasonic AG-HMC150 is a camcorder designed to record in high definition on standard SecureDigital (SD) and SHDC memory cards. While SD-based camcorders have been gaining ground in the consumer market, the AG-HMC150 has the ability to record AVCHD images at significantly higher bitrates. The ability to record up to 24Mb/s onto a single SDHC makes the camera not only incredibly versatile, but allows users to record onto inexpensive media.

AVCHD was jointly established by Sony Corporation and Panasonic Corporation in 2006 for use in their digital tapeless camcorders. But practically speaking, importing AVCHD to FCP might be tricky, due to the version of FCP, your Mac processor (PowerPC- or older Intel-based Mac don't support AVCHD editing) , and the model of camcorder. Thus, many users report that they can't import AVCHD files from AG-HMC150 into FCP X using camera import.

I just downloaded a MTS/M2TS Video converter and I'm using it to convert Panasonic AG-HMC150 MTS files into Apple HQ prores 422, yet the converted files look damaged. I attached a photo of what the results look like. I must finish this editing project by tomorrow- please advise!

As MTS recordings are not the preferred format for Final Cut Studio, if you want to edit AVCHD video with high quality on Mac with Final Cut Pro X, you can convert AVCHD to FCP compatibel Prores .MOV before editing.

Here recommend you the top HD Video Converter for Mac which can help you to convert AVCHD to Apple ProRes 422 preserving the original quality that get MTS files to edit in FCP X successfully. Plus, this Mac AVCHD converter also supports converting AVCHD MTS footage to iMovie, Adobe Premiere, Avid Media Composer, Final Cut Express and more to meet your needs. What's more, some easy-to-use editing features like trimming, cropping, adding watermark, deinterlacing, etc are combined with the convert program.

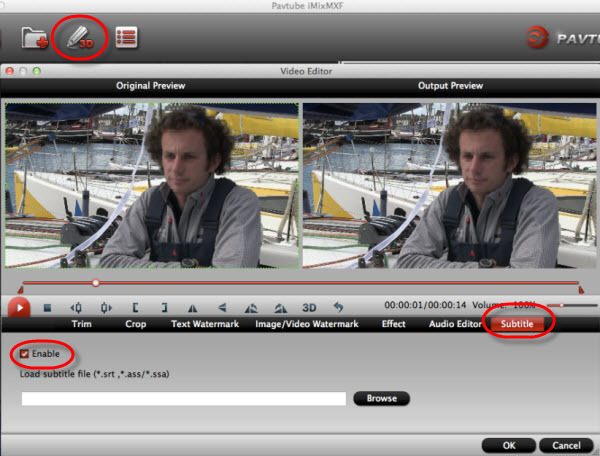
What's more, With Pavtube AVCHD MTS/M2TS Converter for Mac, you can also add *.srt, *.ass, *.ssa subtitle to a video/movie files. Here I share a guide of how to add subtitles and some free subtitle files download website: 
Now, follow the step-by-step guide transcoding and deinterlacing Panasonic AG-HMC150 MTS video to Final Cut Pro X.

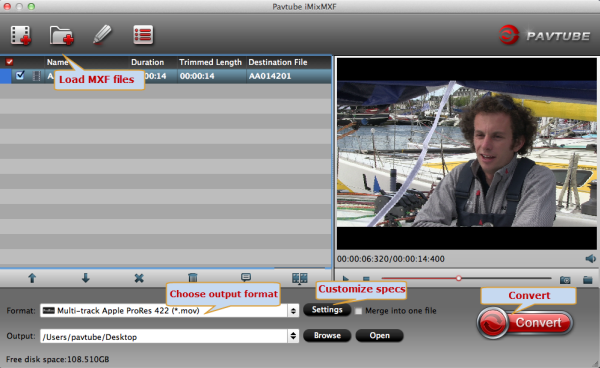
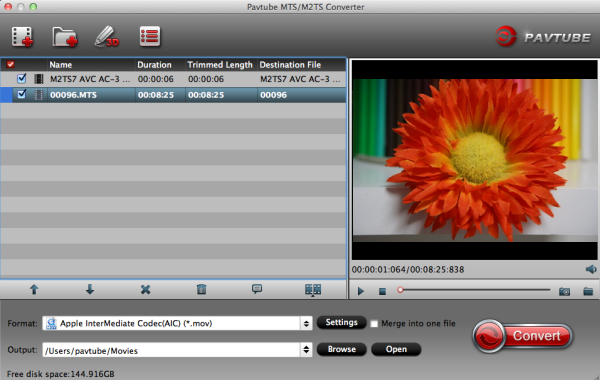
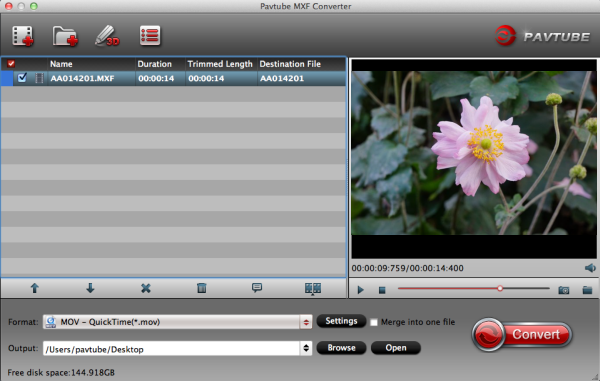
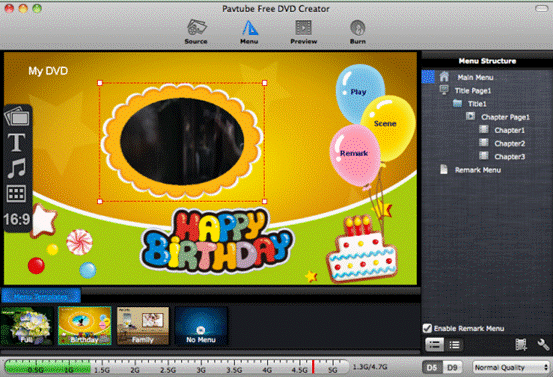
Step 1: Free Download and install MTS to FCP Converter to your Mac. It's excellent AVCHD Converter which can convert nearly all Sony/Canon/Panasonic camcorder videos to any formats you need, such as Apple Prores 422 MOV, Apple InterMediate Codec MOV, QuickTime MOV, etc. Then import your AVCHD files.

 movie-to-fcp

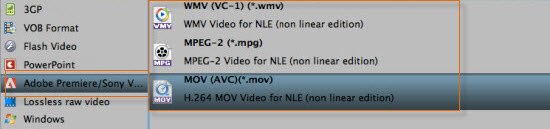
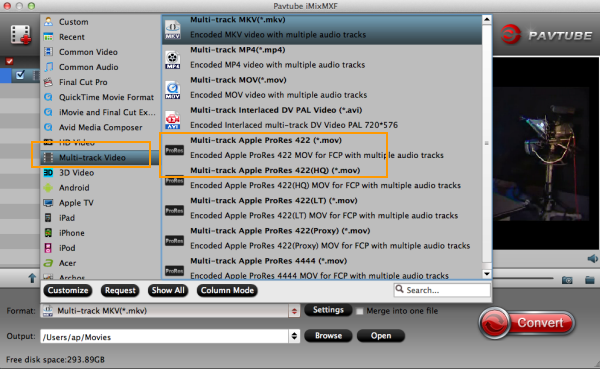
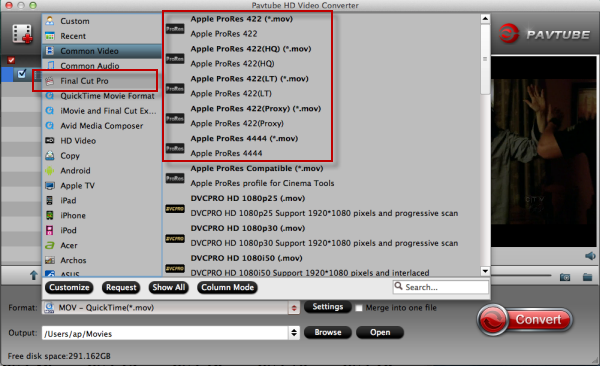
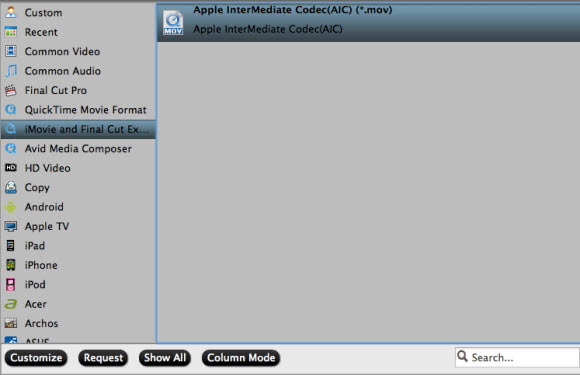
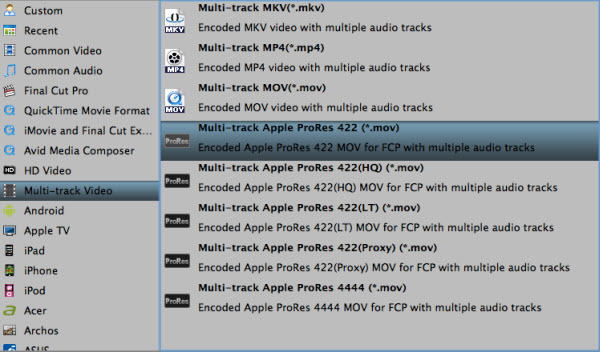
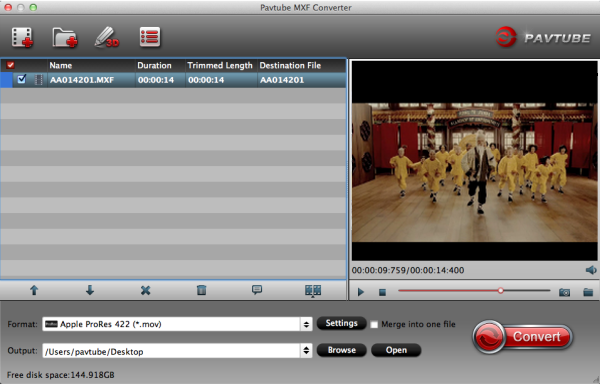
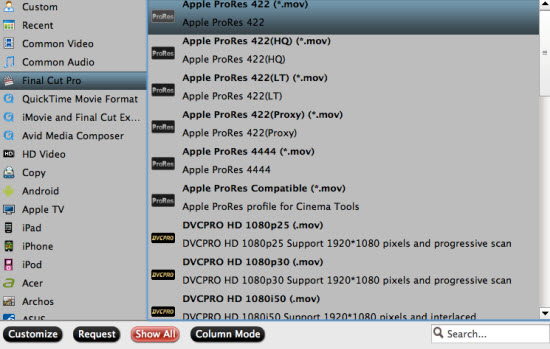
Step 2: Click the format bar, and move mouse cursor to "Final Cut Pro > Apple ProRes 422(HQ) (*.mov)" as output format for editing in Final Cut Pro X.


The Apple ProRes 422 (HQ) codec offers the utmost possible quality for 4:2:2 or 4:2:0 sources (without an alpha channel) and provides the following:

  • Target data rate of approximately 220 Mbps (1920 x 1080 at 60i) 
  • Higher quality than Apple ProRes 422 
Tips:

1. You can also select Apple ProRes 422(LT) which will give smaller file size.

Learn more Apple ProRes, please refer to Types of Apple ProRes Codecs
2. You can deinterlace and edit the 1080/60i mts videos in this program before converting to other formats on Mac OS. Trim, crop, add watermark or adjust effect as you want.

By the way, if you need to remove interlace for the media file, just click on "Edit", you will see a Video Editor panel where you are able to easily edit your 1080i HD video by using several powerful editing functions. Click on "Effect" tab, and check the deinterlace option.

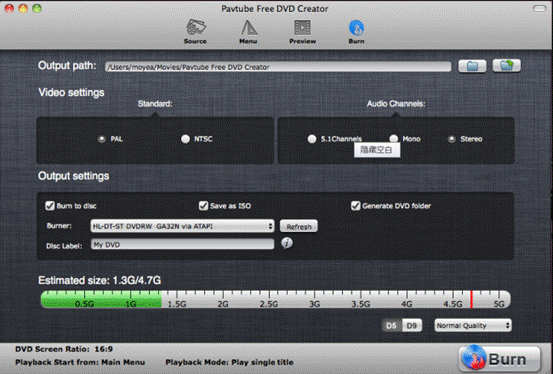
Step 3.
Click "Convert" button to start converting/deinterlacing Panasonic AG-HMC150 AVCHD videos to FCP X on Mac OS.

After a shot conversion, you will be able to import mts videos to FCP X  for editing without rendering. With it, you can also get the mts video to recognized by FCP X. Just have a try. Good luck!

Read More:

Friday, January 31, 2014

Convert Panasonic AG-HPX371 P2 MXF to multi-track Prores for FCP 6/7 and Burn to DVD on Mac

Summary: In this article, you will get to know how to transcode  Panasonic AG-HPX371 P2  MXF videos to multi-track Prores for FCP 6/7 editing and burn to DVD for sharing, storing or managing on Mac.

Panasonic's AG-HPX371 P2 HD professional camera recorder moves you up to a whole new level of production quality. With a superior 10-bit, 4:2:2, full 1920 x 1080 resolution AVC-Intra codec, the HPX371 can record more image detail more accurately. Ready for global production, the HPX371 offers international HD and SD standards, including 1080i and 720p as well as industry-standard DVCPRO HD. Data is recorded onto reliable P2 memory cards.


The AG-HPX371 is a powerful answer to today's advanced video production demands. However, the thing is, FCP does not work perfectly with the Panasonic P2 MXF codec. It need to wait for a long rending time for importing Panasonic AG-HPX371 P2 MXF in FCP 6/7 on Mac Mavericks. As far as I know, to solve the P2 MXF importing problems, the most important piece of the equation is that transcoding Panasonic P2 Card MXF files to a FCP's supported video format, like Apple ProRes (422).

If you looking for a solution for this problem likewise, come and meet this multi-audio track MXF Converter for Mac. With Pavtube iMixMXF you are allowed to quickly and easily convert/transcode AG-HPX371 P2 MXF to FCP supported Prores .mov format for FCP 6/7 editing, as well as preserving all or any audio tracks and mix the multiple audio tracks into one if you need. So follow the quick tutorial below to transcode Panasonic AG-HPX371 P2 MXF with multi-track to FCP 6/7 compatible format on Mavericks and burn to DVD on Mac.

Part 1: Transcode Panasonic AG-HPX371 P2 MXF to Multi-audio track ProRes 422 for FCP 6/7 with all audio tracks preserved on Mac Mavericks

1. Connect your AG-HPX371 P2 camera to Mac and keep it on. (Please make sure you have the entire MXF file structure as it saved on your camcorder’s P2 card)


Get Pavtube iMixMXF installed. Now follow the top left two icons to load individual mxf or in batch.


2. Click "Format" and choose Multi-track Video>Multi-track Apple ProRes 422(*.mov) as the most compatible codec for FCP 6/7 editing.

format-to-multi-track-prores-422

3. Click "Settings" to free select needed video/audio tracks.

Check the tracks you need and left others unchecked, thus you can get Multi-track MOV with your needed audio streams. Note there’s a mix into one track icon on the bottom, it will combine all your checked audio tracks into single one.

settings-for-output-format

4. Click the red "Convert" and just let it go!

When completes, locate the converted MOV files from target file path by clicking "Open" icon.

Now, open up Final Cut Pro, choose File > Import > Files…to select and load the generated ProRes 422 MOV files to FCP 6/7 for editing use.

How to import P2 footage to Final Cut Pro directly from a P2 card


Part 2: Burn FCP projects to DVD on Mac


Pavtube DVD Creator for Mac adds support for MXF files burning, it can burn single file or folder structure videos, you can burn MXF/FCP projects to DVD disc in few steps, just follow it:

1. Install DVD Creator for Mac, connect your DVD Writer and insert a blank DVD. Add your videos into the DVD Creator for Mac

2. Edit movie clip and Customize your DVD menu. You can edit your videos with trim, crop, watermark, effect settings, audio replacing settings features.


3. Preview Created DVD-Video and click burn button to start burning.


P.S.

1. Pavtube also have a Mac MXF to FCP converter program for users that do not need to deal with multi-track video/audio files; only $29 is needed atm. Refer to here to quick look this MXF Converter for Mac.

2. Good news for Blu-ray/DVD fans! Pavtube studio now provides ByteCopy for Mac plus iMixMXF bundle, saving $17 immediately! (ByteCopy for Mac is a multi-track featured blu-ray ripping program. With it, you can easily backup blu-ray to lossless multi-track MKV without any quality loss, transcode to multi-track MP4/MOV/ProRes and other mainstream video formats.)

Read More:

Saturday, January 25, 2014

Vegas Pro & MTS files: Import Panasonic AG-AC160/AG-AC130 mts to Sony Vegas Pro 12 Editing

Summary: This article will show the best way to get Sony Vegas to work with Panasonic AG-AC160/AG-AC130 mts footage by converting mts to MPEG-2/WMV for Sony Vegas Pro 12 editing. 

Panasonic AG-AC160 and AG-AC130 Memory Card Camera Recorders offer a host of advanced functions. Both are new AVCCAM Model with better zooming, greater sensivity, and higher image quality. Full-HD - Slow / Quick-Motion Recording Supported. Panasonic AG-AC130/AG-AC160 can offer high-quality HD recording utilizing MPEG-4 AVC/H.264 high-profile encoding.

The AVCCAM camcorders' Full HD resolution imager produces stunning 1920 x 1080 or 1280 x 720 AVCHD video at high sensitivity.  And you will find the mts video from Panasonic AG-AC160/AG-AC130 will not import correctly into Sony Vegas Pro 12.

Have you been having problems with this as well? As we know, AVCHD format video is not easy to use, many video editors which don't support MTS, especially the 60p mts video files. An efficient workflow is to convert Panasonic AG-AC160/AG-AC130 to Sony Vegas native editing format like WMV/MPEG-2. This article will share the way to convert Panasonic AG-AC160/AG-AC130 MTS to Sony Vegas Pro 12.

First, I found an app called Pavtube HD Video Converter , tired it and succeeded.

This software will help you to get Panasonic AG-AC160/AG-AC130 mts  files working well in Sony Vegas Pro 12. It is capable of converting a variety of hd video, blu-ray, and dvd movies to another format. And meanwhile it supports to convert to many mobile devices and editing software, like After Effects, Avid Media Composer, Adobe Premiere Pro, and more. CUDA acceleration will give you faster conversion speed. Below is a guide for you. 

Surprising news! Get it now you will have 20% discount for Pavtube Video Converter Ultimate and iMedia Converter for Mac. 
Convert Panasonic AG-AC160/AG-AC130 mts for Sony Vegas Pro 12 editing
 
1. Free download and install this mts to Sony Vegas Converter, just copy the AG-AC160/AG-AC130 mts files right to your hard drive, import the files to the program. 


2.Click format bar to choose the output format. Click and choose Adobe Premiere/Sony Vegas --> MPEG-2 (*.mpg) or WMV (VC-1) (*.wmv). This format is best for Sony Vegas Pro 12 editing. 


3.You can click "Settings" button to adjust the parameters, such as resolution, bitrate, etc. 

4.Click convert button to start converting Panasonic AG-AC160/AG-AC130 mts to Sony Vegas Pro 12. 

This 20% off Ultimate Video Converter from Pavtube can convert Panasonic AG-AC160/AG-AC130 mts files to Sony Vegas Pro 12 with best quality and fast speed. Once the conversion completes, you can click "Open" button to get the output files effortlessly.

Now you have got it right, just to import and edit 
Panasonic AG-AC160/AG-AC130 mts files within Sony Vegas Pro 12 at ease. 

Read More:

Monday, January 20, 2014

Why MXF files from Panasonic AJ-HPX2000 not reading in Premiere Pro CS6?

Summary: Don't know how to import Panasonic AJ-HPX2000 P2 MXF to Adobe Premiere Pro CS6 for further editing? Follow this guide, you will learn how to accomplish it within a few clicks. 

Panasonic AJ-HPX2000 is a multi-format HD production camera that records onto P2 cards. Using the same sensor as the popular VariCam and HDX900 cameras, the HPX2000 can shoot native 720p or switch to shoot 1080i with 24p, 25p & 30p capture. Standard definition NTSC or PAL recording is also available.


While, most of the users have found that the MXF format is not well-suited for some non-linear video edit software including Adobe Premiere Pro CS6. So here comes up the original question: how can we convert Panasonic AJ-HPX2000 P2 MXF recordings to Adobe Premiere Pro CS6 compatible format on Mavericks?

After lots of searching and testing among the top converting programs, this Pavtube MXF Converter for Mac is recommended for that it's capable to convert Panasonic AJ-HPX2000 P2 MXF to Premiere Pro CS6 on Mavericks efficiently and stably. Click here to download the free trial version, get it installed and let's start!


Convert Panasonic AJ-HPX2000 P2 MXF footage for Premiere Pro CS6 on Mavericks

Step 1. Add MXF files to Pavtube Mac P2 MXF Converter.

Connect you camcorder to Mac and keep it on until it show as a hard drive on desktop.

Install and run Pavtube P2 MXF Converter for Mac.

Click top left icon to load you footages. You can choose "Add videos" or "Add from folder" directly.

Step 2. Choose compatible format for Adobe Premiere Pro CS6.

Click "Format" and find Adobe Premiere Pro/Sony Vegas at left, choose "MPEG-2 (*.mov)" or "MOV(AVC)(*mov)" etc. as it's the preferred codec for Premiere Pro CS6. Or you can choose "Final Cut Pro > Apple ProRes 422 (*.mov)".

MOV, MPEG, WMV:


Apple ProRes 422:


Step 3. Set up output videos settings(Optional)

Click "Settings" which is marked as 3, you can fix the bitrate, frame rate, sample rate and video size, it's all up to you. Usually the higher bitrate you choose, higher video quality will be, and larger video size correspondingly.

Step 4. Start converting AG-AJ-HPX2000 P2 MXF for Premiere Pro CS6

Now click the big red circle at right bottom, wait for moments till the conversion complete. You can click "Open" to locate the converted video directly.
Tips:

If your MXF files have 2 audio tracks or more, here is a new program specially designed for multi-track preserving and mixing features, named iMixMXF. Featured formats include: MOV/MP4/MPG/WMV/FLV/MKV and more.

Learn More MXF related guide:

Thursday, January 16, 2014

Transferring Panasonic AG-HPX500 P2 MXF to FCP X with multi-track

An easy and step-by-step workflow to convert Panasonic AG-HPX500 P2 MXF to Apple ProRes with multiple audio tracks for FCP X editing.

"The camera that we are using is a Panasonic HPX500. We are shooting at 1080p 60i. But the videos are wrapped in MXF which I am not familiar with. I'm wondering whether I can edit these P2 MXF videos in FCP X? How to keep the multiple audio channels preserving? Thanks in advance!"

Panasonic AG-HPX500 is an HD P2 camcorder with high resolution. Many photography fans choose it for its outstanding video recording ability with 4:2:2 10-bit sampling, records in DVCPRO50, DVCPRO and DV, and other HD, SD formats at 1080 in 60i, 50i, 30p, 25p and 24p; as well as four independent audio channels.


The Panasonic AG-HPX500 recorded videos are really excellent among the high-end cameras; and you may want to edit them in some editing programs on mac, such as Adobe Premiere Pro, iMovie/FCE, FCP, After Effects and so on. But all of them are nonlinear editing programs which mean the MXF encoded files are not supported directly.

In addition, you may got the MXF footage taken by AG-HPX500 camera with several video streams or audio tracks and may want to edit them in FCP X always want to keep the multiple audio/video track separately as original. 
So here comes up the question: how can we convert Panasonic AG-HPX500 P2 MXF recordings to FCP X compatible format with multi-tracks?

After lots of searching and testing among the top converting programs,multi-audio track MXF Converter for Mac- Pavtube iMixMXF comes up and help you to convert MXF to Prores 422 preserving all or any audio tracks for output Prores .MOV and mix the multiple audio tracks into one if you need. Now download it and follow these steps as below.

Transcode Panasonic AG-HPX500 P2 MXF to Multi-audio track ProRes 422 for FCP Xwith all audio tracks preserved on Mac OS X 10.9 Mavericks

1. Connect your AG-HPX500 P2 camera to Mac and keep it on. (Please make sure you have the entire MXF file structure as it saved on your camcorder’s P2 card)


Get Pavtube iMixMXF installed. Now follow the top left two icons to load individual mxf or in batch.


2. Click "Format" and choose Multi-track Video>Multi-track Apple ProRes 422(*.mov) as the most compatible codec for FCP X editing.


3. Click "Settings" to free select needed video/audio tracks.

Check the tracks you need and left others unchecked, thus you can get Multi-track MOV with your needed audio streams. Note there’s a mix into one track icon on the bottom, it will combine all your checked audio tracks into single one.

4. Click the red "Convert" and just let it go!

Wait for a while to get this Panasonic AG-HPX500 multiple audio track into ProRes MOV for FCP X editing on Mac OS X 10.9 Mavericks.


P.S.


1. Pavtube also have a Mac MXF to FCP converter program for users that do not need to deal with multi-track video/audio files; only $29 is needed atm. Refer to here to quick look this MXF Converter for Mac (Mac OS X 10.9 Mavericks supported).

2. Good news for Blu-ray/DVD fans! Pavtube studio now provides ByteCopy for Mac plus iMixMXF bundle, saving $17 immediately! (ByteCopy for Mac is a multi-track featured blu-ray ripping program. With it, you can easily backup blu-ray to lossless multi-track MKV without any quality loss, transcode to multi-track MP4/MOV/ProRes and other mainstream video formats.)

More Related:

Thursday, January 9, 2014

Transfer Panasonic HDC-MDH1 AVCHD 2.7" videos to FCP 6/7

Summary: Read on this article, you can get the hints how to import and edit Panasonic HDC-MDH1 2.7" AVCHD MTS footage with Final Cut Pro 6/7 flawlessly without any issue.  

I purchased Panasonic HDC-MDH1 on 26.3.2012 in Bangalore. This is an exellent professional shoulder mount camera in lowest price, also best for Wedding, Birthday parties, Functions, outdoor shoots etc. Shoots in very lowest light clear picture. No vibration in long zoom shooting. 


I have just shot my first HD wedding video with the MDH1. I am very happy with the video quality with the 2.7" Touchscreen LCD, the camera which records in AVCHD format, I need to edit the   2.7" mts files on Mac with FCP before sharing with my friends and family.

But I find that Panasonic HDC-MDH1's recording AVCHD MTS files are not the preferred format for Final Cut Pro 6/7. Then I think the first step to do is to convert Panasonic mts video to FCP compatible Prores codec for editing with high quality on iMac/MacBook Pro with Mac OS X like Leopard, Snow Leopard, Lion, Mountain Lion and Mavericks 10.9.  Now I will share the easy steps here.

Step 1: Free Download and install Panasonic MTS to FCP Converter to your Mac. It's excellent Panasonic AVCHD Converter which can convert nearly all Panasonic camcorder videos to any formats you need, such as Apple Prores 422 MOV, Apple InterMediate Codec MOV, QuickTime MOV, etc. Then import your 2.7" AVCHD files from HDC-MDH1.

import-files-to-mts-converter

Step 2: Click the format bar, and move mouse cursor to "Final Cut Pro > Apple ProRes 422 (*.mov)" as output format .


Tips:

a.  There are other four presets for ProRes: Apple ProRes 422 HQ, Apple ProRes 422 LT, Apple ProRes 422 Proxy and Apple ProRes 4444. Usually the ProRes 422 HQ has better video quality than ProRes 422 and could meet your needs. If you need smaller size, turn to ProRes 422 LT.

Learn more Apple ProRes, please refer to Types of Apple ProRes Codecs

b. Click Settings to customize video size, bitrate, frame rate and other specs.

settings-for-output-format

Step 3. Click "Convert" button to start transcoding Panasonic HDC-MDH1 2.7" AVCHD videos to FCP 6/7 on Mac OS (Mavericks 10.9 included).

After a shot conversion, you will be able to import/load Panasonic HDC-MDH1 2.7" videos into Final Cut Pro 6/7 for editing without rendering.

Read More:

Thursday, December 26, 2013

Import Panasonic AG-HPX370 P2 MXF to FCP 6/7 with multi audio channels on Mac OS X 10.9 Mavericks

To make it easier for editing Panasonic AG-HPX370 P2 multi audio channels MXF videos with Final Cut Pro 6/7 on Mac OS X 10.9 Mavericks, you need to convert P2 MXF to multi-track ProRes codec first.

Panasonic has announced the immediate availability of the AG-HPX370 P2 HD camcorder, an affordable second-generation, interchangeable lens camcorder with 10-bit, 4:2:2 , independent-frame full 1920 x 1080 resolution AVC-Intra recording.  The AG-HPX370 is a top-level image capture device that also offers a high degree of versatility. It can accommodate both 1/3″ and 2/3″ lenses, it shoots in standard definition as well as HD.


AG-HPX370 is a professional camcorder which is able to shoot video clips in MXF format, but the HD experience also brings a problem to the users who want to ingest MXF files from HPX370 P2 card into FCP 6/7. Actually it’s not hard for you you can import Panasonic AG-HPX370 P2 MXF directly into FCP 6/7 as long as you have converted your P2 MXF footage to FCP compatible MOV with ProRes codec.

However, you may got the MXF footage taken by AG-HPX370 camera with several video streams or audio tracks. So for people who want to edit them in FCP 6/7 always want to keep the multiple audio/video track separately as original. Is it possible to solve this big puzzle?


Of course! YES! Come and meet this multi-audio track MXF Converter for Mac and follow these steps as below.

With Pavtube iMixMXF you are allowed to preserve all or any audio tracks for output Prores .MOV and mix the multiple audio tracks into one if you need.

Transcode Panasonic AG-HPX370 P2 MXF to Multi-audio track ProRes 422 for FCP 6/7 with all audio tracks preserved on Mac OS X 10.9 Mavericks

1. Connect your AG-HPX370 P2 camera to Mac and keep it on. (Please make sure you have the entire MXF file structure as it saved on your camcorder’s P2 card)


Get Pavtube iMixMXF installed. Now follow the top left two icons to load individual mxf or in batch.


2. Click "Format" and choose Multi-track Video>Multi-track Apple ProRes 422(*.mov) as the most compatible codec for FCP 6/7 editing.

import-files-to-mts-converter

3. Click "Settings" to free select needed video/audio tracks.

Check the tracks you need and left others unchecked, thus you can get Multi-track MOV with your needed audio streams. Note there’s a mix into one track icon on the bottom, it will combine all your checked audio tracks into single one.

settings-for-output-format

4. Click the red "Convert" and just let it go!

Wait for a while to get this Panasonic AG-HPX370 multiple audio track into ProRes MOV for FCP 6/7 editing on Mac OS X 10.9 Mavericks.
P.S.

1. Pavtube also have a Mac MXF to FCP converter program for users that do not need to deal with multi-track video/audio files; only $29 is needed atm. Refer to here to quick look this MXF Converter for Mac (Mac OS X 10.9 Mavericks supported).

2. Good news for Blu-ray/DVD fans! Pavtube studio now provides ByteCopy for Mac plus iMixMXF bundle, saving $17 immediately! (ByteCopy for Mac is a multi-track featured blu-ray ripping program. With it, you can easily backup blu-ray to lossless multi-track MKV without any quality loss, transcode to multi-track MP4/MOV/ProRes and other mainstream video formats.)

Read More:

Monday, December 9, 2013

Best method to import video Files from Panasonic into FCP X/Vimeo/Hightail

Summary: In this guide, you can get to know the easy method to convert Panasonic video files to Mac for editing in FCP, then upload it to Vimeo and distribute to others via Hightail.

I make video's of lectures organise by a non profit organisation. I record the video from Panasonic camera's, I need to convert the Panasonic videos to Prores 422 codec. After video editing with Final Cut Pro X, then I can convert the Prores .mov to H.264 (mov) format in two different size: 720*1280 and 540*960 and use the output to upload it to Vimeo or to distribute to others via Hightail.


I exactly looked up the file format in google, and took to me to a website that told me that my Panasonic shoot videos in MTS/MXF format, it suggest me to convert Panasonic videos to best compatible format for Mac OS. Only by converting can I avoid video playback, editing and importing problems. And under comments, I was recommend to use a decent Ultimate Panasonic Video Converter on Mac platform - Pavtube iMedia Converter for Mac, to help me get it done.

P.S. I use also Elgato H.264 Turbo HD and Compressor (Apple). The last one is not easy to use. So I choose Pavtube. It is easy to install, free upgrades, easy to use and lots of supporting formats. 

Surprising, we find the program is 20% off at Pavtube Thanksgiving Best Seller.

Convert Panasonic MXF/MTS videos on Mac for editing in FCP X and shareing on Vimeo or Hightail

1. Install Panasonic Ultimate Converter for Mac. Run it  and transfer Panasonic video to hard drive, and then click "Import" to add the handycam files you need into the program.


2. Click format column and choose the output format.

You can choose Final Cut Pro -> Apple ProRes 422 (*.mov), this codec is optimized for FCP X editing;


For sharing on website like Vimeo or Hightail, you can choose MP4 format for output.

3: Click settings button to adjust the output video’s parameters, such as bitrate, resolution, etc.

4. You can edit the Panasonic MXF/MTS videos in this program before converting to other formats on Mac OS. You can trim, crop, editaudio/subtitles or adjust aspect ratio the output videos by clicking the pencil-like icon.

For example, you can switch to “Crop” tab. Choose Advanced mode, lock the “Keep Ratio” and you can free change aspect ratio.

5. Start converting Panasonic video to FCP X/Vimeo/ Higtail.

This iMedia Converter for Mac is an all-in-all converting program that will convert Blu-ray, DVD, and recorded videos on Mac at top speed, you can choose rich formats for output on Mac, and now I can easily and successfully use Panasonic recorded MTS/MXF footages to edit in FCP X, and then sharing on Vimeo and distribute to others via Hightail. It really do a great favor for me, if you have the same problems, you can take a try now! Good luck!

Find more related guides in Pavtube Panasonic Column:

Sunday, September 22, 2013

Does iMovie 9 recognise 1080p MTS video from Panasonic HC-X920?


Summary: How to get iMovie 9 to work with 1080p mts footage from Panasonic HC-X920 perfectly? The is easy workaround to convert Panasonic MTS to AIC Codec for natively using AVCHD file in iMovie.


The 2013 collection is no different, and what better place to start than the new Panasonic consumer flagship, the HC-X920.  With the WiFi-enabled X920, you can enjoy professional grade HD video you can share from anywhere. X920 records video with [AVCHD] AVCHD 3D / Progressive / [iFrame] MP4 format. If you use Panasonic HC-X920 for the 1080p 60fps mts recording and want to edit the 1080p mts files in iMovie 09. You will got problems as below: 

I also purchased X920 for the better clock rate and the newer AVCHD codec. My editing software iMovie 09 doesn't yet support the top recording standard 1080/60p. It is a easy to use camcorder, you won't go wrong with this model. So is it possible make it into reality to edit them in iMovie 09?

X920 is what I expected, have taken it to the beach, snow and have not had any issues, my children love the menu, easy for anybody to operated, no need of the viewfinder, best investment for your money. What's more, HC-X920 also supports the optional 3D lens, will recommend it to friends and family. Any suggestions for the X920 3D mts and iMovie 09 workflow?

I have a MacBook Pro Vs.10.6.8, which came with iMovie '09. I just bought a new X920 HD Camcorder 1080 it puts files in .MTS format. My iMovie does not support the files. It can't even pick them up. Do I need to upgrade to IMovie '11 to be able to edit my HD camcorder files (.MTS)? If so, that's a problem, becuase I got an error that said I can't upgrade because my Mac is too old (which it's only two years old). Or, should I just get another camera? 
iMovie 09 won't import the 1080p AVCHD (2D/3D) Videos. So, how to deal with Panasonic HC-X920 1080p AVCHD in iMovie 9? Well, as we know, iMovie native format is AIC .mov, so the best method to import 2D/3D AVCHD from Panasonic HC-920 to iMovie 9 smoothly is to convert the Panasonic AVCHD to AIC for editing along with some help from a 3rd-party Mac Pansonic AVCHD Converter. 

Fortunately, Pavtube MTS to iMovie Converter for Mac can exactly do favor for you. With it, you can convert Panasonic HC-X920 AVCHD to iMovie compatible AIC codec MOV format. There will be no problem to import AVCHD footage into iMovie 9 keeping audio and video synchronization on Mac.

With the Mac program, you can transcode AVCHD MTS/M2TS/M2T/TS files at 1080i, 1080p, and 720p to proper format for:

  • Editing on FCP, iMovie, FCE, Avid, Premiere, iPhoto and more;
  • Playing on portable devices(iPad, iPhone, iPod, Nexus 4, Nexus 7, Galaxy S4, S3, Tab 3, Tab 2, HTC One and so on);
  • Burning on Mac OS X
     
  • Uploading to YouTube, Vimeo, Facebook and more uses. 

What's more, the MTS/M2TS Converter for Mac supports adding .srt, .ass, .ssa subtitle to your videos or movies.  Aslo, it has added 3D profiles in Format menu. (Side-by-Side, Top-Bottom, or Anaglyph 3D in MKV/MP4/MOV/WMV/AVI)

In summary, it works very well in converting Panasonic HC-X920 1080p MTS files to AIC for editing in iMovie 9. You can download a free trail version: Pavtube MTS/M2TS Converter for Mac and follow the guide below:

Step 1. Add .mts files to the Mac MTS to iMovie Converter.

Launch the Mac MTS/M2TS to iMovie Converter. Click "Add Video" or "Add from folder" button to load your source .mts or .m2ts files from Panaonic HC-X920.


Tip: If you want lossless merge multiple MTS, M2TS files, pleas check the "Merge into one file" box.

Step 2. Choose iMovie native foramt as output.

To convert X920 MTS files to iMovie native foramt, please click "Format > iMovie and Final Cut Express", choose "Apple Intermediate Codec(AIC) .mov" as the best output format.


Tip: If you wanna edit the video/audio parameters, you need to go to "Settings" window.

Step 3. Start MTS to iMovie native foramt conversion.

Click the "Convert" button under the preview window, and the best Mac MTS to iMovie Converter will start converting Panasonic HC-X920 MTS clips to iMovie friendly AIC mov format on Mac OS X.

When the conversion is done, you will be directed to open the folder where you saved the converted files, and then you can import output video files to iMovie to edit.

Tips: 
1. If you want to import Panasonic MTS footage in FCP, only need to change step 2, choose "Format > Final Cut Pro > Apple ProRes 422 (*.mov)" as output format, or you can also refer to the guide.

2. If you want to edit Panasonic HC-X920 MTS footage in Avid Media Composer, only need to change step 2, choose "Format > Avid Media Composer > Avid DNxHD (*.mov)" as output format, or you can also refer to the guide

3. If you want to share Panasonic HC-X920 60p AVCHD video on Youtube, you can refer to this guide.

Editor's Recommendations

Sunday, September 15, 2013

Get FCP X work with Panasonic AG-HPX300 preserving multi-tracks

Summary: Anyone figured out how to import Panasonic AG-HPX300 MXF footage to FCP X? FCP X support P2 mxf files or not? The easy workaround aims to tell you how to get HPX300 MXF P2 mxf recognised by FCP X with preserving multi audio tracks.


I have some files recorded with a Panasonic AG-HPX300. They are MXF recordings in AVC-Intra and DVCPRO HD codec. How can import them to FCPX 10.4? The key point is I don't want to loss any of the audio channels that I recorded with two microphones. Is that any work flow for this?

Panasonic AG-HPX300 recording files in MXF format. Although FCP X says they have native support for MXF files, in fact, is doesn't support P2 MXF files well from AG-HPX300. And many users will fail to import Panasonic AG-HPX300 P2 MXF footage in FCP X directly as above.
 
To 
my knowledge, the simplest way to solve the incompatibility problem is just to convert Panasonic AG-HPX300 P2 MXF file to FCP X compatible format like Prores. mov. And in order to accomplish the goal without losing any tracks during conversion, come and meet this multi-audio track MXF Converter for Mac which can easily convert Panasonic AG-HPX300 MXF to Prores will all audio tracks preserved. And follow the step-to-step guide as below.

1. Connect your AG-HPX300 P2 camera to Mac and keep it on; get this multi-track MXF to FCP Converter installed. Now follow the top left two icons to load individual mxf or in batch. 


Tips:

Please make sure you have the entire MXF file structure as it saved on your camcorder’s P2 card. See MXF file structure on Panasonic’s P2 card as below. Pavtube iMixMXF is able to recognize audio tracks from ‘AUDIO’ folder automatically, which ensures the generated Prores .MOV files have both image and sound correctly.


2. Click "Format" and choose Multi-track Video>Multi-track Apple ProRes 422(*.mov) as the most compatible codec for FCP X editing.


3. Click "Settings" to free select needed video/audio tracks.

Check the tracks you need and left others unchecked, thus you can get Multi-track MOV with your needed audio streams. Note there’s a mix into one track icon on the bottom, it will combine all your checked audio tracks into single one.


With this Pavtube iMixMXF program, you can also add some personal subtitles in it like this which makes the play backing much easier:


4. Click the red "Convert" to easily convert Panasonic AG-HPX300 multiple video/audio track MXF to ProRes for FCP X. 

Just let it go and wait for a while to get this fresh hot multiple audio track ProRes MOV for FCP  X editing on Mac. 

P.S.

Pavtube also have a Mac MXF to FCP converter program for users that do not need to deal with multi-track video/audio files; only $29 is needed atm. Refer to here to quick look this MXF Converter for Mac.

Read more:
Import Panasonic AJ-HPX3100 P2 MXF into iMovie
Edit Panasonic AG-HVX200 P2 MXF in Avid MC
Premiere Pro and Panasonic P2 MXF Workflow 

Tuesday, September 10, 2013

Panasonic HPX250: Rewrapping MXF to Quicktime MOV on Mac

Description: It mainly introduces how to play Panasonic AG-HPX250 P2 MXF files with QuickTime player. If you are facing the problem to play P2 MXF on Mac smoothly, this article will show you a way out. 

I'm on the verge of purchasing a HPX250 camcorder in the coming days. I'll use AVC-Intra for production work, but I can't see the raw P2 mxf footage from the camera when loading into QuickTime Player on Mac. My problem is going to be getting the HPX250 MXF files translated to a format which QT will support. What is the best workflow?


From above, you can see the MXF file from Panasonic AG-HPX250 is not a friendly format for QuickTime player on Mac. In fact, without advanced tools, it was impossible to for QuickTime to distinguish Panasonic AG-HPX250 incompatible MXF footage.

To watch
Panasonic AG-HPX250 P2 MXF video on Apple QuickTime on Mac, you need to rewrap the MXF files to QuickTime compatible MOV video firstly. Here Pavtube MXF Converter for Mac is know as the best and fast MXF rewrapping tool that can help you convert any P2 MXF file to QuickTime video on Mac with super fast speed and excellent quality.  

Becides, it is capable of converting MXF files to a variety of other formats like Apple ProRes, Avid DNxHD, Apple InterMediate Codec, DVCPRO, MOV, MPG, M4V etc. You can also choose to convert to some built-in mobile devices and editing software, such as iPhone 5, iPad 4/Mini, Final Cut Pro, iMovie, FCE, Avid Media Composer, Adobe Premiere Pro, etc. Let’s go to try efficient workflow with an easy-to-use interface.

At first, download and install the MXF to MOV Converter, and then follow the guide for how to rewrap Panasonic HPX250 MXF to QuickTime MOV for playback on Mac.

1. Load MXF files

There are two ways for you to load MXF files: Load MXF video or Load the whole MXF folder .


2. Select MOV for QuickTime player

Click "Format" menu to find "QuickTime Movie Format", and then choose the format you want.


Tips: You can click "Settings" on the interface, some video and audio parameters for output can be changed like bitrate, frame rate, channels, etc. Definitely keep default settings is able to bring you a wonderful video if you are not good at settings.

3. Convert Panasonic HPX250 MXF to QuickTime MOV

Click "Convert" button to start P2 MXF to QuickTime Conversion. It will not take much for conversion. Once completed, click the "Open" button to locate the output MOV files for QuickTime player to playback smoothly on Mac.

Tips: If you want to convert to MOV file with all multiple audio tracks preservation, Pavtube iMixMXF can help you to get it done. With it you are allowed to preserve all or any audio tracks for output MOV and mix the multiple audio tracks into one if you need. 

Read More:

Tuesday, August 20, 2013

Import Panasonic AG-HPX170/HPX171 P2 MXF files to FCP and Burn FCP projects to DVD on Mac

Summary: Follow this post to know how to import Panasonic AG-HPX170/HPX171 P2 MXF to FCP for editing and burn FCP projects to DVD on Mac, hope it can solve you P2 mxf to FCP problem and dvd burning solution.

Every time that there is a need to hire a better camera it seems that everyone is hiring the Panasonic HVX200 and not the Sony EX1. So I have not had a chance to see how the HVX200's 4:2:2 with 720p helps with my Blue or Green Screen filming. I know that the EX1 produces a cleaner and better picture than the the Panasonic – or so I am told – but the colour decimation is 4:2:0, hmmm. But here is the Panasonic HPX170/171 that also has a much better picture but with 4:2:2 colour decimation. So this will be my best choice.


However, there cames another problem- How to import Panasonic AG-HPX170/HPX171 P2 MXF footages into FCP for editing smoothly on Mac?

The thing is, FCP does not work perfectly with the Panasonic P2 MXF codec. As far as I know, to solve the P2 MXF importing problems, the most important piece of the equation is that transcoding Panasonic P2 Card MXF files to a FCP's supported video format, like Apple ProRes (422).

If you looking for a solution for this problem likewise, check out Pavtube MXF Converter for Mac which is entitled as a top P2 MXF Converter. It supports encoding Panasonic P2 and Canon MXF files and Sony XDCAM MXF to FCP native format so that you can easily import the Panasonic AG-HPX170/HPX171 P2 MXF recordings to FCP for editing on Mac.


So follow the quick tutorial below to transcode Panasonic AG-HPX170/HPX171 P2 MXF to FCP compatible format and then edit in FCP or burn to DVD on Mac.

Part 1: How to import Panasonic AG-HPX170/HPX171 P2 MXF files to FCP? 

  • For FCP X users, pls make sure you have installed ProApps QuickTime Codecs, or you may get files only without video. You can download it from here:

    http://support.apple.com/kb/DL1396

1. Free download Pavtube MXF Converter for Mac trial version, install and launch it.


2. Click "Add video" or "Add from folder" icon to load Panasonic AG-HPX170/HPX171 MXF files into Pavtube application.


3. Select Final Cut Pro friendly output format.

Apple ProRes 422 is considered as the best format for FCP, so you are recommended to choose "Apple ProRes 422 (*.mov) as target format from "Format" > "Final Cut Pro".


4. Start Panasonic AG-HPX170/HPX171 P2 MXF to Apple ProRes 422 conversion.

Click the big "Convert" button to start encoding Panasonic AG-HPX170/HPX171 P2 MXF to Apple ProRes 422 MOV for Final Cut Pro.

When completes, locate the converted MOV files from target file path by clicking "Open" icon.

Now, open up Final Cut Pro, choose File > Import > Files…to select and load the generated ProRes 422 MOV files to FCP for editing use.


Part 2: Burn FCP projects to DVD on Mac

Pavtube DVD Creator for Mac adds support for MXF files burning, it can burn single file or folder structure videos, you can burn MXF/FCP projects to DVD disc in few steps, just follow it:

1. Install DVD Creator for Mac, connect your DVD Writer and insert a blank DVD. Add your videos into the DVD Creator for Mac

2. Edit movie clip and Customize your DVD menu. You can edit your videos with trim, crop, watermark, effect settings, audio replacing settings features.


3. Preview Created DVD-Video and click burn button to start burning.


Read More: